In this tutorial we shall show users how to write unit test cases in Java with JUnit. This tutorials will show the JUnit test examples
Table Of Contents
1. Introduction
JUnit is an open-source testing framework used by Java programmers. It contains various methods to include in class to make your test cases run smoothly. This is the testing framework where users can unit test their methods for working. Almost all Java programmers used this framework for basic testing. Basic example of the JUnit can be seen in JUnit Hello World example.
JUnit is very popular library among Java developers for testing the programs at unit level. JUnit provides many resources to test each and every type of method. You can test simple methods, in the order of the test cases, through keyboard input or multithreaded applications.
As a regular reader, you already know that JUnit is a powerful way of unit testing our programs. It provides various techniques through which we can test our methods. It is a major tool in the arsenal of Java developers. We can test all type of methods irrespective of the method returning any value or not. JUnit contains many annotations that are used while creating test cases.
Currently latest stable version is 4.x and 5.x is coming most probably in Q1 of 2017. We will try to cover most of the cases in our this example.
First of all lets see most important annotations that we will be using throughout of our tutorial.
- @BeforeClass – It is used to write code that we want to run before all test cases. You can write about some initialization to be done so that all test cases should access that.
- @Before – It will run before every test case. Some changes that you want to do before every test.
- @Test – This is actual test case. We will write our actual test cases here. If there are multiple test cases then running order can be sequential or may be random. By default it depends on the JVM. But we can schedule them to run in a particular order. We will see such example here in this tutorial.
- @After – It will run after every test case. Same as @Before, this will run after each test cases.
- @AfterClass – It is used to write code that we want to run after all test cases. Here we can close all our database connections or some type of objects like closing the file that we opened for reading and testing.
2. Technologies Used
In this tutorial we will be using many technologies. Let’s see the technologies that we are going to use.
- Java 8 – Java is the default language as we using JUnit. We are using Java 8, as it is latest stable version of Java. In our example we won’t use any major feature of Java 8.
- JUnit 4.12 – This is again the default as we making this example. We will be using JUnit 4.12, as it is the latest stable version of the JUnit so far on the market.
- Maven – Maven is the build and dependency tool. We are using it to make our example a bit forward, as we do not need to gather all jars files and then put under the library. Instead we will simply write the name of the files and it will automatically pull all dependent files itself. It is a widely recognized tool that is used in Java.
- Eclipse – Eclipse will be used as the default IDE for this example. You can use any IDE of your choice as far as you are comfortable with it. We are using the Eclipse as it is widely used by larger number of developers world wide.
3. Project Setup
You may skip project creation and jump directly to the beginning of the example below.
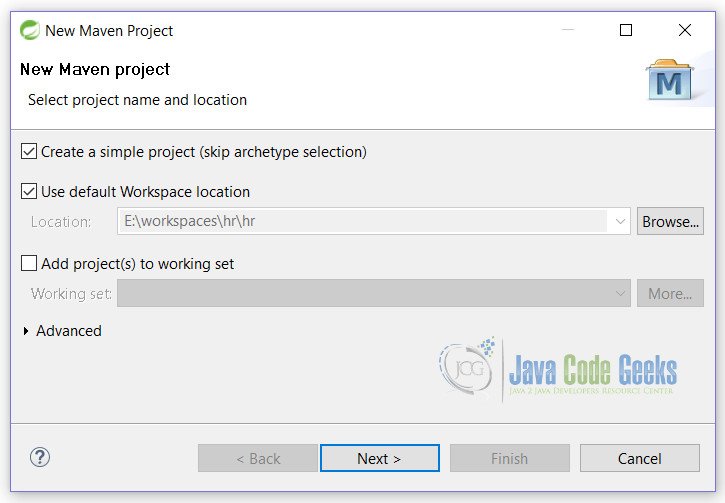
Let’s start by creating a sample project. We will be creating a maven project. To start, open Eclipse.
File -> New -> Maven Project. You will be provided with the following screen. Simple check the first checkbox and click on the Next button.
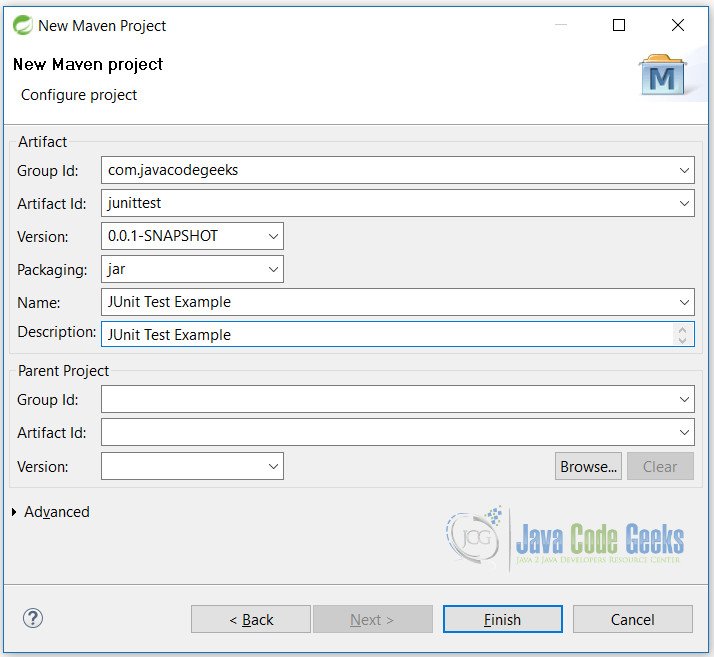
This is the screen where you will name your project and add any extra step. Simply fill in the details provided below. Once you are done click on the Finish button.
We are ready with the skeleton of the example. But before we start coding it we simply need to add the dependency of JUnit in maven. That can be easily achieved by adding the below lines in the pom.xml file.
pom.xml
<dependencies>
     <dependency>
          <groupId>junit</groupId>
          <artifactId>junit</artifactId>
          <version>4.12</version>
     </dependency>
</dependencies>
<properties>
    <maven.compiler.source>1.8</maven.compiler.source>
    <maven.compiler.target>1.8</maven.compiler.target>
</properties>
It is a very simple example of pulling the JUnit jars from maven repository.
Line 3 will pull the JUnit dependency from maven with all its dependencies that needed to run the JUnit.
Lines 9, 10 tell maven to use the Java 8 for compilation of our example.
Now we have configured our example we need to update the project so that it will fetch all dependencies and use Java as our compilation. To do that, simply right click on the project -> Maven -> Update dependencies. After this our project is ready to write any test cases.
4. JUnit API
JUnit has a vast API and to cover it in a single post is not possible. But we will cover most important parts of it in this tutorial. We will see how JUnit helps in testing various scenarios of the application.
Let’s start by exploring the ways in which we can test our unit test cases. We will start by a simple example.
4.1 Simple
This is a very example of testing the test cases.
	@Test
	public void isTrueTest() {
		assertTrue("Statement is true", true);
	}
In this example we are simple testing the statement for true. Let’s examine each line as we will use them all over example.
Line 1: We are using @Test annotation of JUnit here. This is where JUnit starts to executes the test case. As soon as JUnit sees this annotation it will know that this is the test case that need to be executed.
Line 2: A simple method to be executed.
Line 3: We are using the assertTrue method of JUnit to test our condition. We can use assertThat method also here
4.2 @FixOrderMethod Example
This example is useful in cases where user wants to run their test cases in particular order. Users are required to have basic knowledge of Java for this example. We will follow with an short example to show the process of using JUnit FixMethodOrder annotation.
By default there is no specific order of execution and the test cases run without any predictability. @FixMethodOrder is useful in instances, where users need to run their test cases in order of the names of the test cases. @FixMethodOrder annotation helps to achieve this goal.
@FixMethodOrder(MethodSorters.NAME_ASCENDING)
public class JUnitFixMethodOrderTest {

	@Test
	public void firstTest() {
		System.out.println("First Test");
	}

	@Test
	public void thirdTest() {
		System.out.println("Third Test");
	}

	@Test
	public void secondTest() {
		System.out.println("Second Test");
	}
}
We have implemented the @FixOrderMethod at line 1. There are other 2 method sorters we can use. THere are total of 3.
DEFAULT: Default implementation and the order is not predictable.
JVM: This constant leaves the execution of order on JVM.
NAME_ASCENDING: This is mostly used constant that sorts the method name in ascending order.
When you run this example you will see the following output.
First Test
Second Test
Third Test
Complete example of this can be downloaded from here.
4.3 Group Test Example
In JUnit we can group and run test cases. In this example, we will try to resolve issue of running multiple group tests all together. There are 2 approaches in JUnit to group test the methods. We will start with basic and then go with the more complicated one.
- @RunWith(Suite.class)
- @RunWith(Categories.class)
4.3.1 @RunWith(Suite.class)
This annotation is helpful whenever we want to test multiple classes at once. In this case we do not need to run each individual class for testing. Simply run the class with @RunWith(Suite.class) annotation and it will take care of running all your test cases one by one.
Let’s have 3 classes with different test cases. Now we want to run all test classes all together. Simply make a test class and add @RunWith(Suite.class) annotation. See example below.
@RunWith(Suite.class)
@SuiteClasses({ ClassATest.class, ClassBTest.class, ClassCTest.class })
public class ClassTestSuite {

}
Here at line 1, we are using @RunWith annotation to tell the JUnit to run test class with Suite class. At line 2, we are specifying the classes to run with the test suite i.e. you have to include all classes whose test cases you want to run.
4.3.2 @RunWith(Categories.class)
Another way of running test suite is with @RunWith(Categories.class) annotation. This is more organized way of running your test cases. By this way, users have more control over test cases. @Category interface is used for this purpose. It works more like a marker interface, where we mark the test cases with it.
Let’s have classes where we have defined test cases with priority.
@Test
@Category(PerformanceTests.class)
public void classB_Test1() {
     System.out.println("classB_Test1");
}

@Test
@Category(SlowTests.class)
public void classB_Test2() {
     System.out.println("classB_Test2");
}
Here at line 2 and line 8 we have defined the category of the test cases.

@RunWith(Categories.class)
@Categories.IncludeCategory(PerformanceTests.class)
@Suite.SuiteClasses({ClassATest.class, ClassBTest.class, ClassCTest.class})
public class PerformanceTestsSuite {

}
Here at line 1, we are specifying to run our class with Categories class. At line 2, we are specifying which categories to include for tests. At line 3, we are specifying the classes to include while testing .
Complete example of this can be downloaded from here.
4.4 RunListener Example
There are cases when we want to respond to the events during a test case run. Here we can extend the RunListener class and override the methods according to our implementation. The JUnit RunListener can listen to the events of the JUnit lifecycle.
You simply need to extend the RunListener class. We are including the methods that we can override in our class.
testRunStarted(Description description) – Called before any tests have been run.
testRunFinished(Result result) – Called when all tests have finished
testStarted(Description description) – Called when an atomic test is about to be started
testFinished(Description description) – Called when an atomic test has finished, whether the test succeeds or fails
testFailure(Failure failure) – Called when an atomic test fails
testIgnored(Description description) – Called when a test will not be run, generally because a test method is annotated with Ignore
testAssumptionFailure(Failure failure) – Called when an atomic test flags that it assumes a condition that is false
package junitrunlistener;

import org.junit.runner.JUnitCore;

public class TestClassRun {

	public static void main(String[] args) {
		JUnitCore runner = new JUnitCore();
		runner.addListener(new OurListener());
		runner.run(TestClassA.class, TestClassB.class);
	}
}
Notice the highlighted lines. This is how we run our Run Listener example. Here we are adding our custom listener to the JUnitCore.
In line 10, we are defining our classes to run for test i.e. whose test cases to be tested.
Complete example of this can be downloaded from here.
4.5 Timeout Example
JUnit provides a very good way of testing your methods against the timeout. There are times when we want our methods to execute in a specific time. For example, we want a method to be completed in 1 second. This can be achieved easily by using different types in JUnit.
JUnit provides 3 different ways of testing methods against the time.
4.5.1 Using Timeout
	@Test(timeout = 2000)
	public void totalCashTest() throws InterruptedException {
		assertThat(10.0, is(bank.getTotalCash()));
	}
At line 1, we are specifying the timeout for this test case. If test does not executes within time, it will fail.
4.5.2 Using @Rule annotation
We can use @Rule annotation. This is helpful when we want all our test cases to be passed within a specific time. For example, we want our each test case to be executed in 2 seconds
    @Rule
    public Timeout globalTimeout = Timeout.seconds(2);
Here we are specifying at line 1, @Rule at starting of the class. It applies to each and every test case in a class including @BeforeClass and @Before annotations.
4.5.3 Using @ClassRule annotation
We can use the @ClassRule annotation on class. It will see that all methods in a class execute in a specific time. So, here we want all the test cases collectively to be passed within a specific time of 10 seconds.
	@ClassRule
	public static Timeout globalTimeout = Timeout.seconds(10);
Difference between
@Rule and @ClassRule is that, former is used for testing each method for a specific time, whereas latter is used to test all methods to be executed in a specific time.Complete example of this can be downloaded from here.
5. Conclusion
In this tutorial we have learned how we can write test cases with JUnit. We have learned the ways to test the cases with different scenarios. We have analyzed the different ways to test. You can download individual projects from the below links that provide more details about the methods.
- JUnit Hello World Example
- JUnit FixMethodOrder Example
- JUnit Group Tests Example
- JUnit RunListener Example
- JUnit Test Timeout Example
In addition to above you can also visit the below tutorials.
- JUnit Keyboard Input Example
- JUnit MultiThreaded Test Example
- JUnit Quickcheck Example
- JUnit Mockito When thenReturn Example
- JUnit Hamcrest Example
- JUnit Cucumber Example
- JUnit Report Generation Example
- JUnit HSQLDB Example
- JUnit Testcase Example
- JUnit Test Constructor Example
- JUnit Test Void Method Example
- JUnit Test Case Example for Web Application
Hope you enjoyed these tutorials.
