JSF 2.0 Tree Selection Example
Hi there! Today we ‘re gonna see how we could let the user select multiple tree elements, according to JSF 2.0.
We all know that JSF is here to ease the server-side user interfaces development, but when it comes to trees, things are getting somehow complicated: JSF does not have a default tree component, so we have to “extend” the framework’s functionality / implementation, by combining it with a framework that supports tree visualization.
Relative frameworks that support tree visualization are PrimeFaces, RichFaces and IceFaces.
We ‘ll go for PrimeFaces, due to the following pros:
- Easy to use.
- Practical documentation.
- Developers’ trend.
- The fastest library.
Assume the following concept for today’s example: we want to know our users’ preferences, according to cars, actors and personal documents that we are able to distribute across the web. Thus, multiselection checkbox group could be created, where some relative options -according to each category- are provided.
1. Project Environment
This example was implemented using the following tools:
- JSF 2.2
- Maven 3.1
- Eclipse 4.4 (Luna)
- JDK 1.8
- Apache Tomcat 8.0.15
Just like any other of my previous JSF examples, you need to create a Dynamic Web Project with Maven and JSF should be included in it. At any case, if you don’t remember some configurations, consult my very first example according to JSF.
However, there is a specific configuration that needs to be done, in order to setup and JSF+PrimeFaces. For those of you, that are not aware of what’s going on, please consult this post or grab directly this gist.
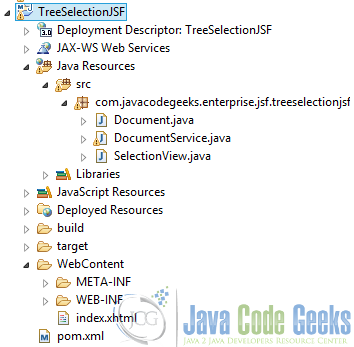
This is the project’s final structure, just to ensure that you won’t get lost anytime:
2. Managed Beans
Let’s first create our tree’s structure programmatically. Suppose our tree looks like below:
This, is translated to the following code:
SelectionView.java
package com.javacodegeeks.enterprise.jsf.treeselectionjsf;

import java.io.Serializable;

import javax.annotation.PostConstruct;
import javax.faces.application.FacesMessage;
import javax.faces.bean.ManagedBean;
import javax.faces.bean.ManagedProperty;
import javax.faces.bean.ViewScoped;
import javax.faces.context.FacesContext;

import org.primefaces.model.TreeNode;

@ManagedBean(name="treeSelectionView")
@ViewScoped
public class SelectionView implements Serializable {

    /**
	 *
	 */
	private static final long serialVersionUID = 1L;
	private TreeNode root;
    private TreeNode[] selectedNodes;

    @ManagedProperty("#{documentService}")
    private DocumentService service;

    @PostConstruct
    public void init() {
        root = service.createCheckboxDocuments();
    }

    public TreeNode getRoot() {
        return root;
    }

    public TreeNode[] getSelectedNodes() {
        return selectedNodes;
    }

    public void setSelectedNodes(TreeNode[] selectedNodes) {
        this.selectedNodes = selectedNodes;
    }

    public void setService(DocumentService service) {
        this.service = service;
    }

    public void displaySelectedNodes(TreeNode[] nodes) {
        if(nodes != null && nodes.length > 0) {
            StringBuilder builder = new StringBuilder();

            for(TreeNode node : nodes) {
                if (node.isLeaf()) {
	            	builder.append(node.getData());
	                builder.append("
");
                }
            }

            FacesMessage message = new FacesMessage(FacesMessage.SEVERITY_INFO, "Your choices:", builder.toString());
            FacesContext.getCurrentInstance().addMessage(null, message);
        }
    }
}
First of all, in line 14, we give a name to our bean, in order to easily inject its functionality from the front-end (the corresponding JSF page). Lines 22-23 define two important instance variables, root and selectedNodes, which are both TreeNode elements: the first one will be used to define our tree’s root, whereas the second one, to manipulate the user’s preferences.
Before continuing with the analysis of this class, as you might made clear, this is not about another of my usual JSF examples, where any related to the server-side functionality is implemented by simply using a ManagedBean. This is a bit more complex, as we here want to provide a button, which on the clicked state, “feeds” the back-end with the user’s selected nodes. In addition, imagine the SelectionView.java class, as a handler one, as it ‘ll be used to create the desired tree instance and provide the functionality for the growl message, with the user’s selected nodes.
In line 26, we inject a value of the DocumentService class into this property. This generally can be feasible, by using the @ManagedProperty annotation, as in line 25. According to our case, JSF and JavaEE rules, our DocumentService class, should be a ManagedBean, under the name of documentService.
Lines 29-31 define an initiliazer method, which will be executed after the fore-mentioned dependency injection is done (in order to perform any initialization); this stands for the @PostContruct annotation. That is, after the the dependency injection of DocumentService, what is called is its createCheckboxDocuments(), which obviously contains our tree’s structure. In any case, we ‘ll examine its structure on time.
What else is important to be discussed here is the displaySelectedNodes() method (lines 49-62), where we create a FacesMessage to be passed to our View, if only the processed node is a leaf (if statement in line 54); that is, without having implemented this check, the growl message that would be displayed to the user, would also include the parent node, if all of its children were selected (obviously, this isn’t actually wrong, but I here wanted to demonstrate it in way, that you ‘re also curious about other possible implementations of the method’s functionality).
Strings are immutable, which means that a String’s value cannot be modified, unless we create a new String object. Thus, we here used the
StringBuilder object, which is mutable (and its value can be modified without the need to create a new StringBuilder object) and very efficient when a user needs to often modify a sequence of characters.Now, as expected, let’s see the injected to the fore-mentioned class:
DocumentService.java
package com.javacodegeeks.enterprise.jsf.treeselectionjsf;


import javax.faces.bean.ApplicationScoped;
import javax.faces.bean.ManagedBean;
import org.primefaces.model.CheckboxTreeNode;
import org.primefaces.model.TreeNode;

@ManagedBean(name = "documentService")
@ApplicationScoped
public class DocumentService {

    public TreeNode createCheckboxDocuments() {
        TreeNode root = new CheckboxTreeNode(new Document("Files"), null);

        TreeNode cars = new CheckboxTreeNode(new Document("Cars"), root);
        TreeNode documents = new CheckboxTreeNode(new Document("Documents"), root);
        TreeNode actors = new CheckboxTreeNode(new Document("Actors"), root);

        TreeNode sedan = new CheckboxTreeNode(new Document("Sedan"), cars);
        TreeNode coupe = new CheckboxTreeNode(new Document("Coupe"), cars);

        // Cars' children definition.
        TreeNode bmw525 = new CheckboxTreeNode("picture", new Document("BMW 525i.jpg"), sedan);
        TreeNode bmw116 = new CheckboxTreeNode("picture", new Document("BMW 116i.jpg"), coupe);
        TreeNode bmw316 = new CheckboxTreeNode("picture", new Document("BMW 316i.png"), coupe);

        // Documents' children definition.
        TreeNode cv = new CheckboxTreeNode("document", new Document("Thodoris_Bais_CV.doc"), documents);
        TreeNode shortBio = new CheckboxTreeNode("document", new Document("Thodoris_Bais_bio.doc"), documents);

        // Actors' children definition.
        TreeNode men = new CheckboxTreeNode(new Document("Men"), actors);
        TreeNode women = new CheckboxTreeNode(new Document("Women"), actors);

        TreeNode robertDeNiro = new CheckboxTreeNode("mp3", new Document("Robert De Niro"), men);
        TreeNode seanPenn = new CheckboxTreeNode("mp3", new Document("Sean Penn"), men);

        TreeNode evaMendez = new CheckboxTreeNode("mp3", new Document("Eva Mendez"), women);

        return root;
    }
}
First of all, according to this class, it’s important to clarify that we here use the @ApplicationScoped annotation, in order to specify that this class’ context is shared between all servlet requests.
In order to implement programmatically the displayed in Figure 1 tree, we need to implement PrimeFaces’ TreeNode interface. But we here want to cooperate with checkbox values, so CheckboxTreeNode makes the best fit. As you can see in the official documentation, we here use the last two contructors:
CheckboxTreeNode(Object data, TreeNode parent)to define a parent node.CheckboxTreeNode(String type, Object data, TreeNode parent)to define a leaf.
3. DTO
According to section 2 and DocumentService.java, whenever a TreeNode instantiation came to the data argument, a new Document object was created. So, here it is:
Document.java
package com.javacodegeeks.enterprise.jsf.treeselectionjsf;

import java.io.Serializable;

public class Document implements Serializable {

    /**
	 *
	 */
	private static final long serialVersionUID = 1L;

	private String name;

    public Document(String name) {
    	this.name = name;
    }

    public String getName() {
        return name;
    }

    public void setName(String name) {
        this.name = name;
    }

    @Override
    public String toString() {
        return name;
    }
}
“Ok, hold on, why do I have to override the toString() method?!”
As the data argument of CheckboxTreeNode‘s constructor defines, this is about an Object (and an Object’s transfer, respectively), so, without overriding toString(), our StringBuilder object (DocumentService.java class) will possibly contain representations like com.javacodegeeks.enterprise.jsf.treeselectionjsf.Document@16fb619.
4. View page
Let’s quickly demonstrate our View’s structure:
index.xhtml
<?xml version="1.0" encoding="UTF-8"?>
<!DOCTYPE html PUBLIC "-//W3C//DTD XHTML 1.0 Transitional//EN"
"http://www.w3.org/TR/xhtml1/DTD/xhtml1-transitional.dtd">
<html xmlns="http://www.w3.org/1999/xhtml"
      xmlns:h="http://java.sun.com/jsf/html"
      xmlns:f="http://java.sun.com/jsf/core"
      xmlns:p="http://primefaces.org/ui">
 	<h:head>
        <title>JSF Tree Selection Example</title>
    </h:head>
    <h:body>
    	<h:form>
		    <p:growl id="msgs" showDetail="true" escape="false"/>

		    <h3>JSF 2.0 Tree Selection Example</h3>
		    <p:tree value="#{treeSelectionView.root}" var="doc"
		                selectionMode="checkbox"
		                selection="#{treeSelectionView.selectedNodes}">
		        <p:treeNode icon="ui-icon-note">
		            <h:outputText value="#{doc.name}"/>
		        </p:treeNode>
		        <p:treeNode type="document" icon="ui-icon-document">
		            <h:outputText value="#{doc.name}" />
		        </p:treeNode>
		        <p:treeNode type="picture" icon="ui-icon-image">
		            <h:outputText value="#{doc.name}" />
		        </p:treeNode>
		        <p:treeNode type="mp3" icon="ui-icon-video">
		            <h:outputText value="#{doc.name}" />
		        </p:treeNode>
		    </p:tree>
		 	<br/>
		    <p:commandButton value="Display" update="msgs" icon="ui-icon-newwin"
		                actionListener="#{treeSelectionView.displaySelectedNodes(treeSelectionView.selectedNodes)}"/>
		</h:form>
    </h:body>
</html>
We here define a PrimeFaces tree (line 16) and assign the root value to our ManagedBean. Actually, this means that we have assigned a TreeNode instance as a backing model.
What the var attribute does, is defining the name of the requested scope variable that will be used to refer each TreeNode data.
Finally, the PrimeFaces’ commandButton, in line 33, updates the growl message (definition in line 13), when clicked, according to the user’s selected nodes. The action listener calls the displaySelectedNodes method by passing the selectedNodes array as a method argument to it.
To get a better understanding of the PrimeFaces commandButton, compared to the JSF one, please refer to the fore-mentioned link.
5. Demo
Time to see all the above, in action.
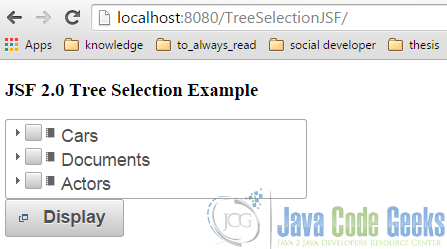
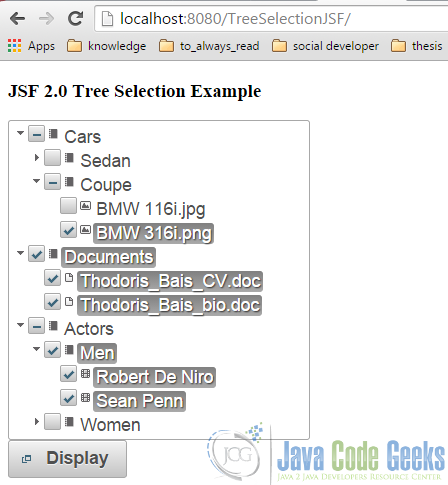
This is how it looks like, after having selected some nodes:
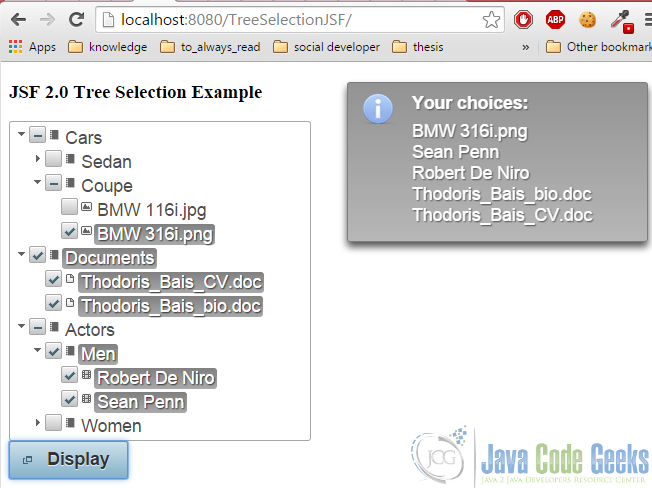
Let’s now click the button:
6. Download the Eclipse Project
This was an example of JSF Tree Selection.
You can download the full source code of this example here : TreeSelectionJSF.zip

