1. Introduction
In this example we will demonstrate how to create a JSF Application in NetBeans. Our application will display a simple form to the user asking to enter their name. When they submit the form we will display a welcome message. The name field is mandatory so leaving it blank will display an error message. First Let’s find out more about JSF and NetBeans.
1.1 NetBeans
NetBeans is an Integrated Development Environment (IDE). It’s free, open source and similar to Eclipse. It provides all necessary features and tools to develop Java applications easily and quickly. Besides Java it provides tools to develop HTML, PHP and C/C++ applications out of the box. Its code editor supports multiple languages such as Java, C/C++, XML, HTML, PHP, JavaScript, etc. The language support is extensible through plug-ins. It’s based on a plug-ins mechanism thus allows these features to be activated when needed.
Currently NetBeans is going through the process of becoming an Apache Software Foundation project. It’s in incubating stage as of this writing. Apache NetBeans 9 RC1 was released on 28th May. Feel free to visit http://netbeans.apache.org/ if you are interested to learn more.
For this example, we will use NetBeans version 8.2. You can download the Java EE bundle from https://netbeans.org/downloads/.
1.2 Java Server Faces (JSF)
Java Server Faces (JSF) is a server-side component-oriented framework that helps in creating rich Java-based web applications. It provides a standard platform for resolving common problems of web application development such as navigation, templating, validation, conversion and page flows. It provides an easier way to separate the presentation (i.e. application user interface) from the behavior (i.e. application logic). This clean separation allows the team members to focus on their respective areas. For example, a UI designer can use the JSF UI components to build the application interface or create a mockup without writing any scripts. The application developer can expand the mockup by binding the UI components to the server-side logic and application code.
JSF is based on Model-View-Controller (MVC) 2 pattern. MVC is all about separation of concerns. The model represents the data. The view is the representation of data. The controller is the one that ties these two together. The diagram below depicts how MVC works:

Controller receives, interprets, validates the user request, updates the model, determines the next view and present it to the user.
In a JSF application, Faces Servlet represents the Controller. Models are represented by Managed Beans and Views are represented by Facelets. We will go through each of these parts once we have our base application created by NetBeans.
1.3 Technologies used
For this example, we will use the following tools in a Windows 64-bit platform:
- NetBeans – 8.2
- Java – 1.8.0_161
- JSF Framework – 2.2
- Apache Tomcat – 9.0.10
1.4 Create a JSF Application in NetBeans
We will use the new project wizard to create a Java web application. To do so, click on New Project button on the main toolbar or press Control + Shift + N on windows (Cmd + Shift + N on Mac).
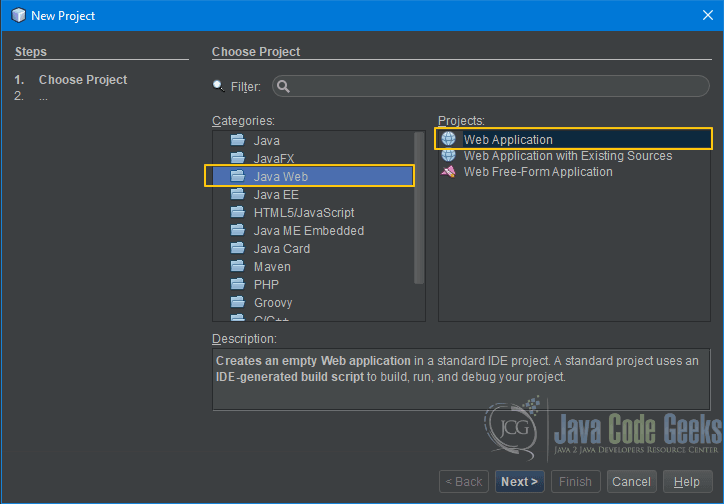
Select Java Web from Categories list and Web Application from Projects list. Press Next.
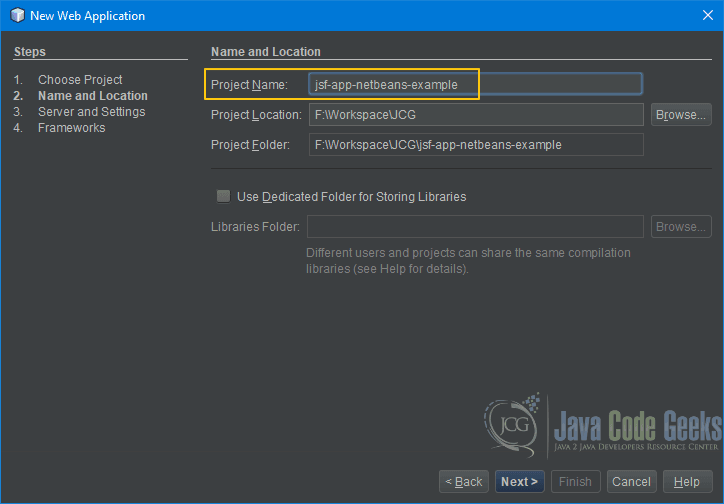
Enter a Project Name, Location on your hard disk. Project Folder will be filled automatically based on name and location. Press Next.
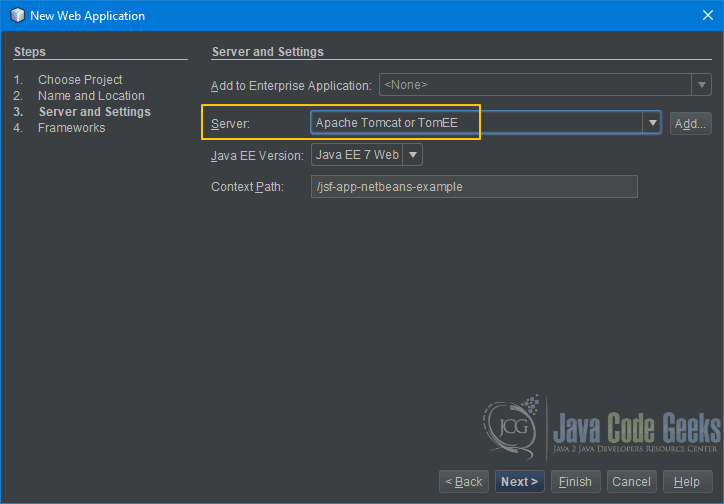
Select a server from the Server dropdown list. In this example we will use Apache Tomcat 9.0.2. Java EE Version and Context Path should be filled already. Press Next.
This is the step where we tell NetBeans that we want a Java Server Faces application, so select JavaServer Faces from the frameworks list. Registered Libraries should be JSF 2.2.
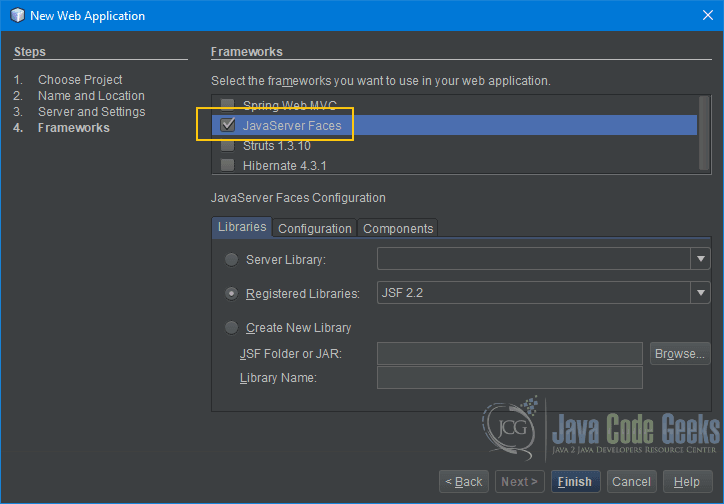
Configuration tab is where one defines the URL pattern and Preferred page language. We are fine with the defaults for this example. Press Finish.

If everything goes well, you will have a project created with the following structure:
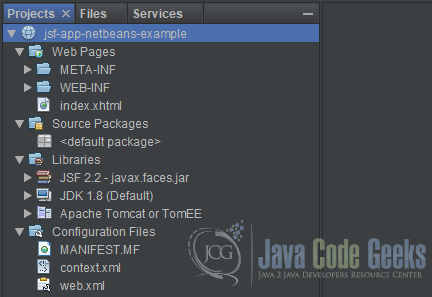
- Web Pages – Contains all UI files such as
XHTMLFacelets,Stylesheets,JavaScripts, etc. At this point, we have our first page called index.xhtml. - WEB-INF contains the web deployment descriptor
web.xml. - All
Javafiles resides in Source Packages. We don’t have any right now but soon you will see once we create our firstmanaged bean. - Libraries contains all
framework,JDKand Server related files. Do note thejavax.faces.jar, which is theJSF 2.2 framework. - Configuration Files folder contains – Can you guess? Yes, you are right, it shows all configuration files. Do note these configuration files reside in their own folders.
NetBeansis just showing all in one place to make it easier for us.
Project is created successfully but does it work? Let’s find out. Press the Run Project button on the toolbar or press F6. It may ask you to enter the username and password for your server. Take a look at the output panel. The important line we are looking for is highlighted below.

If NetBeans didn’t open the browser itself then open your favorite browser and visit http://localhost:8080/jsf-app-netbeans-example (assuming your server is running on port 8080). The link is also shown in the output panel (highlighted). You should a simple message “Hello from Facelets” on your browser:
There you go, we have our first basic JSF application. Magic… right? Well, having a good IDE really saves time but we are not done yet. Let’s take a quick look at the files that was created by the wizard.
1.4.1 Faces Servlet – The Controller
Faces Servlet is the controller of our JSF application. There is no Java file created cause it’s part of the framework. All you need to do is configure it properly in the web deployment descriptor i.e. web.xml file.
Here is the listing of our web.xml file:
web.xml
<?xml version="1.0" encoding="UTF-8"?>
<web-app version="3.1" xmlns="http://xmlns.jcp.org/xml/ns/javaee" xmlns:xsi="http://www.w3.org/2001/XMLSchema-instance" xsi:schemaLocation="http://xmlns.jcp.org/xml/ns/javaee http://xmlns.jcp.org/xml/ns/javaee/web-app_3_1.xsd">
    <context-param>
        <param-name>javax.faces.PROJECT_STAGE</param-name>
        <param-value>Development</param-value>
    </context-param>
    <servlet>
        <servlet-name>Faces Servlet</servlet-name>
        <servlet-class>javax.faces.webapp.FacesServlet</servlet-class>
        <load-on-startup>1</load-on-startup>
    </servlet>
    <servlet-mapping>
        <servlet-name>Faces Servlet</servlet-name>
        <url-pattern>/faces/*</url-pattern>
    </servlet-mapping>
    <session-config>
        <session-timeout>
            30
        </session-timeout>
    </session-config>
    <welcome-file-list>
        <welcome-file>faces/index.xhtml</welcome-file>
    </welcome-file-list>
</web-app>- Line 03 – 06:
Context-paramelement is used to define the init parameters that is going to be available to anyservletin the web application. By setting thePROJECT-STAGEto development we get extradebuggingsupport - Line 07 – 11: First we need to tell the server a little bit about the
servlet. We do that by using the element. Here we give the servlet a name and the actual class name. load-on-startup element tells the server to load thisservletwhen the server starts - Line 12 – 15: The
servletneeds to be mapped to aURLor URL pattern. To do so, we use element. In our case, allURLthat has faces in it will be sent to this servlet. You can define multiple mapping for aservlet. Other possible mappings are /*.jsf, /*.faces, etc. - Line 21 – 23: Welcome file list element defines a list of welcome files. The welcome file is invoked by the server automatically if no file name is specified in the
URL. Take a look at ourURL, we haven’t specified any file name but the server is smart enough to show us “Hello Faces Servlet” message. How did it happen? Cause we have defined index.xhtml file as our welcome file so the server is picking it up.
1.4.2 Managed Bean – The Model
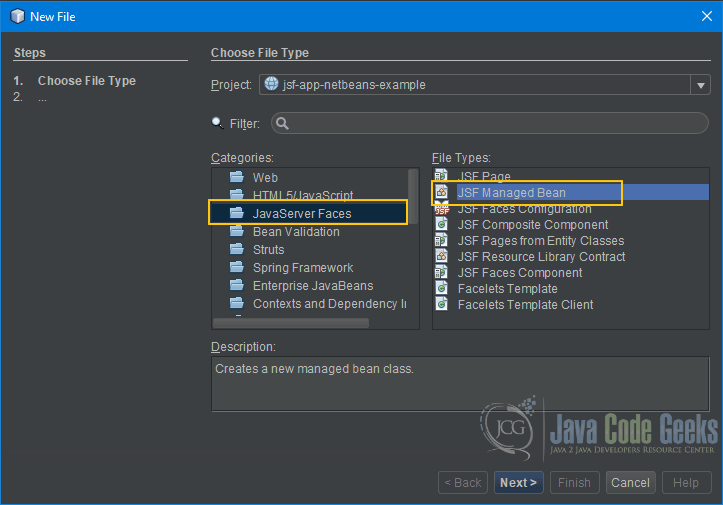
We don’t have any so let’s create one. Press the New File button on the toolbar or press Control + N on Windows (Cmd + N on Mac). Select Java Server Faces under Categories and JSF Managed Bean under File Types. Press Next.
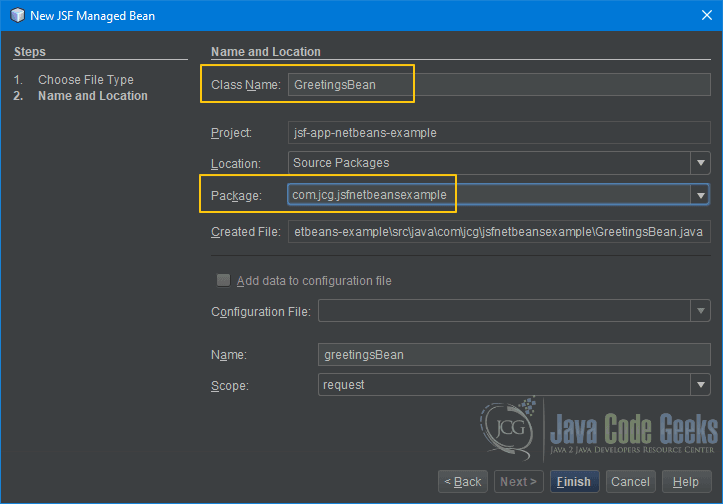
Fill in the Class Name and Java package name. This bean will have default scope i.e. request so no change is required. Press Finish.
We have to add our own code to GreetingsBean so double click on the file to open it in the editor. We need a field to hold the user name and a new method to bind to the submit button. When user presses the Submit button this method will get executed and returns the string that corresponds to the next page to be displayed.

Here is the listing of our GreetingsBean code:
GreetingsBean.java
package com.jcg.jsfnetbeansexample;

import javax.faces.bean.ManagedBean;
import javax.faces.bean.RequestScoped;

/**
 *
 * @author Satya Choudhury
 */
@ManagedBean
@RequestScoped
public class GreetingsBean {

    private String userName = "";

    /**
     * Creates a new instance of GreetingsBean
     */
    public GreetingsBean() {
        System.out.println("Created GreetingsBean instance...");
    }

    public String getUserName() {
        return this.userName.trim();
    }

    public void setUserName(String userName) {
        this.userName = userName.trim();
    }

    public String greetUser() {
        return "greeting";
    }
}
- Line 14: We added a new string field called
userName. This will hold the name entered by the user - Line 19-21: The
constructorwas already created for us by the wizard. We just added a SOP for some logging - Line 23-29: The getter and setter method for
userNamefield - Line 31-33: The
greetUsermethod will be bound to the “submit” button. Notice the string being returned by the method. This string represents the next view i.e.greeting.xhtmlwithout the file name extension
1.4.3 View – The User Interface
Facelets is the official template system for JSF 2. You can use JSF components directly within the Facelets without any additional development. To do so, you will have to define the namespace in the html element. Notice the two namespace we have specified in the index.xhtml file. Besides templating, Facelets allows re-use by including the content resides in a separate file. We have one Facelet already created by NetBeans called index.xhtml. We don’t have the greeting.xhtml file. Let’s create it.
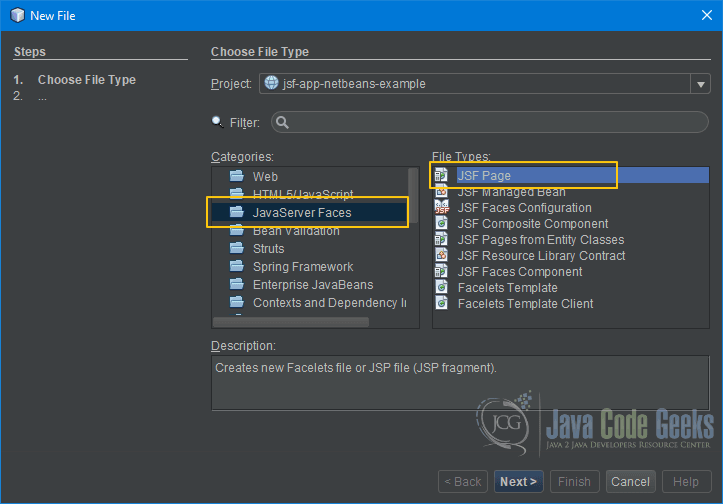
Press the New File button on the tool bar or press Control + N on Windows (Cmd + N on Mac). Select JavaServer Faces under Categories and JSF Page under File Types. Press Next:
Enter greeting in File Name. Leave other values as it is. Press Finish.

NetBeans will create the file and open it in the editor for further editing. Let’s add our own code.
greeting.xhtml
<?xml version='1.0' encoding='UTF-8' ?>
<!DOCTYPE html PUBLIC "-//W3C//DTD XHTML 1.0 Transitional//EN" "http://www.w3.org/TR/xhtml1/DTD/xhtml1-transitional.dtd">
<html xmlns="http://www.w3.org/1999/xhtml"
      xmlns:h="http://xmlns.jcp.org/jsf/html">
    <h:head>
        <title>Greeting</title>
    </h:head>
    <h:body>
        <h:outputLabel><h2>Hi, #{greetingsBean.userName}. Nice to meet you.</h2></h:outputLabel>
    </h:body>
</html>
- Line 6: Change the page title
- Line 9: Add a JSF UI component to show our greeting message. Notice that the
userNameis bound to the field ingreetingsBean. When we retrieve value to display then thegetUserName()method is called automatically
Finally let’s take a look at the index.xhtml.
index.xhtml
<?xml version='1.0' encoding='UTF-8' ?>
<!DOCTYPE html PUBLIC "-//W3C//DTD XHTML 1.0 Transitional//EN" "http://www.w3.org/TR/xhtml1/DTD/xhtml1-transitional.dtd">
<html xmlns="http://www.w3.org/1999/xhtml"
      xmlns:h="http://xmlns.jcp.org/jsf/html">
    <h:head>
        <title>JSF Application NetBeans Example</title>
    </h:head>
    <h:body>
        <h:form>
            <h:outputLabel><h2>Hi, what's your name?</h2></h:outputLabel>
            <h:inputText maxlength="10" required="true" value="#{greetingsBean.userName}" requiredMessage="Please enter your name."/>
            <br/><br/>
            <h:commandButton value="Submit" action="#{greetingsBean.greetUser}" />
        </h:form>
    </h:body>
</html>
- Line 6: We changed the page title
- Line 9-14: We added a form to allow the user enter name and press the submit button
- Line 10: Shows a label for the input field
- Line 11: The name input field. It allows a maximum 10 characters. Required attribute makes it a mandatory field. We have specified an error message in
requiredMessageattribute. It will be displayed if user submits the form without entering a name. Do notice that value attribute looks exactly same as in our greeting.xhtml file, however the context is different. Here we are receiving the input thussetUserName()method is called automatically - Line 13: The submit button is bound to the
greetUsermethod. The method is called when user presses the button.
It’s time to see the application in action. Click the Run Project button on toolbar or press F6. It should display the following page:

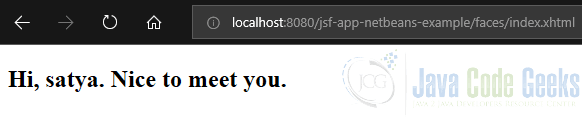
If you enter your name and press Submit button then you should see the page below. The screen shot shows that I entered satya which is my name.
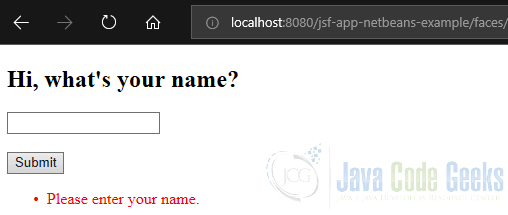
If you press the submit button without entering a name then you should see the error message like below.
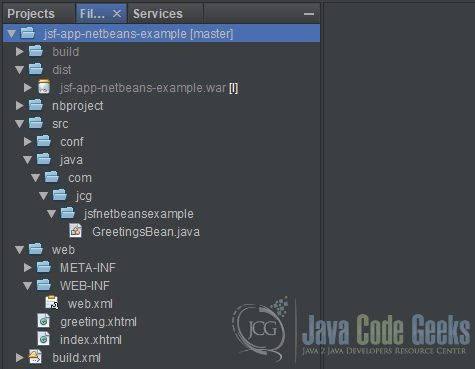
This is the final project structure in NetBeans. You must be wondering about all the extra folders that was not there in the beginning:
- build – This folder contains all files used by
NetBeansduring build process - dist – The final application that can be distributed or deployed on the servers
- nbproject – Project settings related internal files used by
NetBeans
2. Summary
In this example, we used NetBeans new project wizard to create a simple JSF application quickly. It created all necessary files and configurations for us that we used as the base of our application. We extended the base application by creating our own files and codes. We went through the basic structure of a JSF application and what role is played by Faces Servlet, Facelets and Managed Beans. How it’s mapped to MVC 2 pattern.
3. Download the NetBeans Project
This was an example of JSF Application in NetBeans
You can download the full source code of this example here : jsf-app-netbeans-example.zip
