Spring Boot JAX-RS with Jersey Example
In this post, we feature a comprehensive article on Spring Boot JAX-RS with Jersey. We will show how to create a JAX-RS web service with Spring Boot and Jersey.
1. Introduction
REST (Representational State Transfer) is an architectural pattern for developing web services. REST is a popular choice for web services development projects since it is lightweight, stateless, and therefore easily scalable. REST uses HTTP verbs (POST, GET, PUT, DELETE) for performing CRUD operations (Create/Read/Update/Delete) on web resources.
Java API for RESTful Web Services (or JAX-RS) is a Java EE
API specification for developing REST-style web services. The API includes
the annotations defined in JSR-311 and fall into the following categories:
- URI Mapping for locating resources.
- HTTP Methods for manipulating resources.
- Data Formats for producing and consuming the textual representations of resources.
- Request Parameters for binding parameters to Java types.
- Exceptions Mappers for catching application exceptions and returning custom HTTP responses.
There are a few implementations from which to choose when
developing JAX-RS web services. These
include:
- RESTEasy
- Apache CXF
- Jersey
Jersey serves as the JAX-RS reference implementation. It is
an open-source production-quality framework that expands on the JAX-RS toolkit.
It is part of the Glassfish JEE server stack but can be deployed on other
application servers.
Creating a RESTful web service using Jersey is simple when
using Spring Boot as the platform. The amount of configuration required is
small when you use the Spring Boot Jersey starter dependency in your project,
as will be demonstrated in this example.
1.1 Tools Used in this Example
- Eclipse IDE for Java Developers Version: 4.10.0
- Spring Tools 4 – for Spring Boot
- Postman 7.0.7
Spring Tools 4 for Spring Boot is a set of plugins for Eclipse that support building and running Spring Boot applications. You can add Spring Tools 4 to your existing Eclipse installation by going to the Eclipse Marketplace and searching for “Spring Tools 4”.
To download Postman, visit https://www.getpostman.com/downloads/.
2. Spring Boot JAX-RS with Jersey Example
In this example, we will create a simple JAX-RS CRUD application with Jersey, JPA, and H2.
2.1 Create the Spring Boot Project
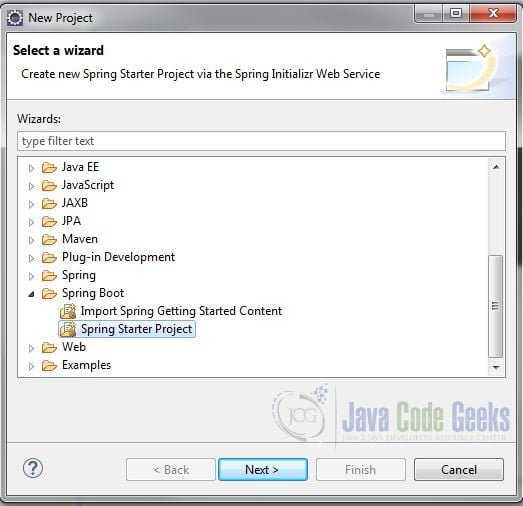
In the New Project – Select a Wizard dialog box, expand Spring Boot and select Spring Starter Project. Click “Next”.
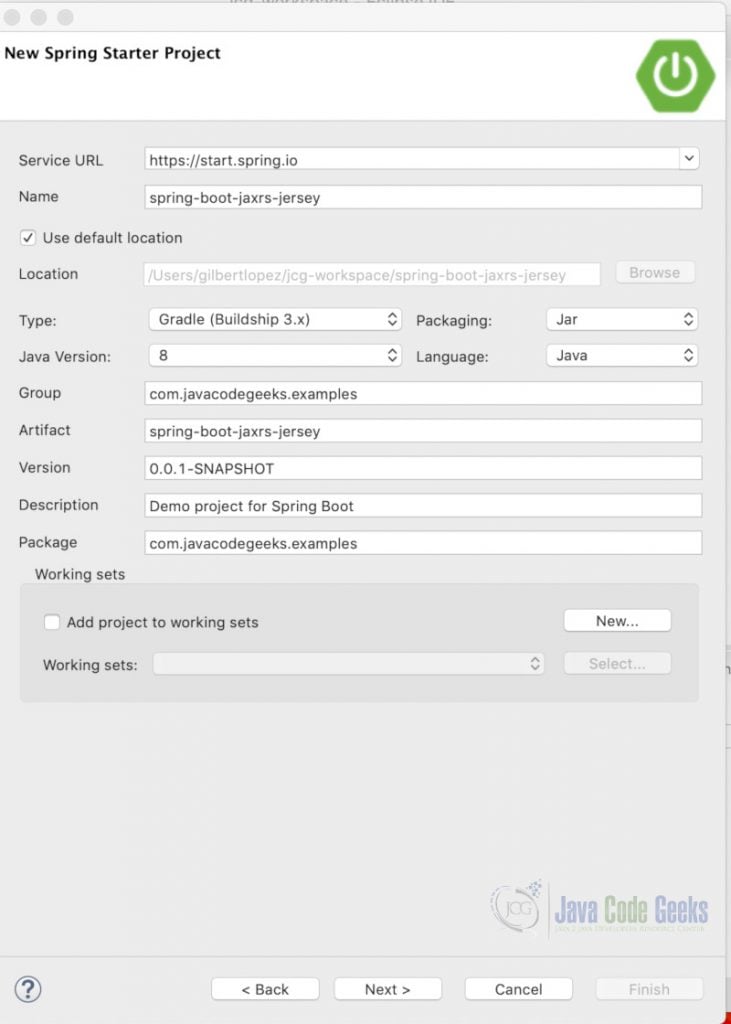
In the New Spring Starter Project dialog window, enter a name for the project. Also, enter the group, artifact and package information. For Type, select Maven or Gradle. Accept all the other default values. (This project uses Java Version 8.) Click “Next”.
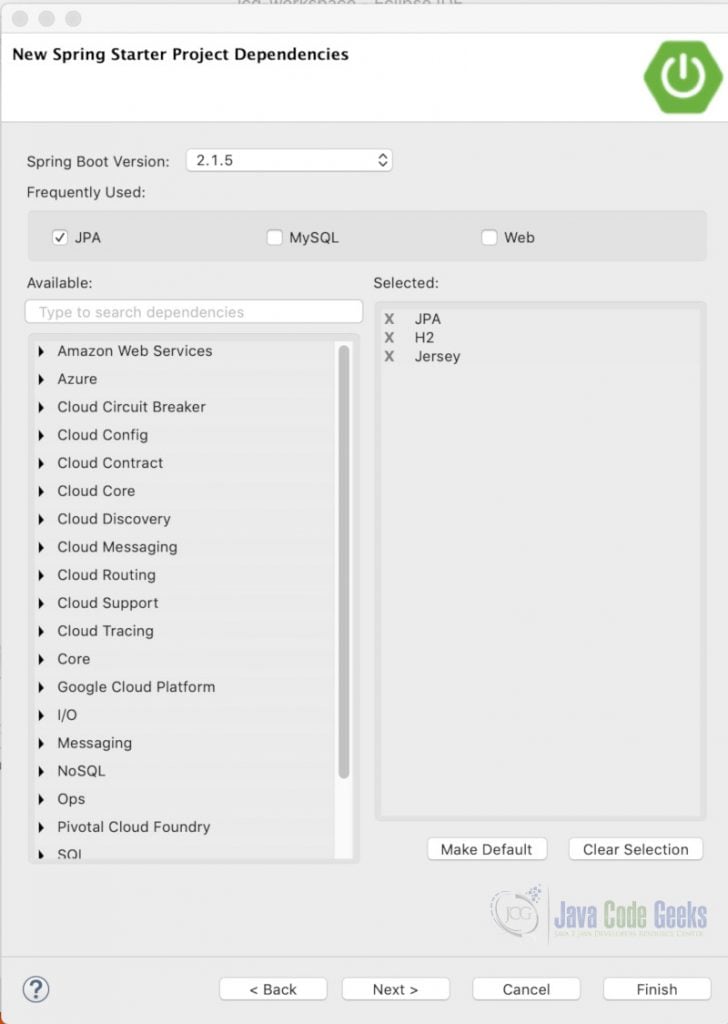
Select Spring Boot Version 2.1.5 in the New Spring Starter Project Dependencies dialog window. Also, select the “Jersey”, “JPA”, and “H2” dependencies. Click “Finish”.
2.2 Create the JPA Entity Model
Let’s create the Student model and use annotations to expose it as a JPA entity. Create a package com.javacodegeeks.examples.model and a class Student with the following code:
Student.java
import javax.persistence.Entity;
import javax.persistence.GeneratedValue;
import javax.persistence.GenerationType;
import javax.persistence.Id;

@Entity
public class Student {

    @Id
    @GeneratedValue(strategy=GenerationType.AUTO)
    private Long id;

    private String firstName;

    private String lastName;

    private String year;

    public Long getId() {
        return id;
    }

    public void setId(Long id) {
        this.id = id;
    }

    public String getFirstName() {
        return firstName;
    }

    public void setFirstName(String firstName) {
        this.firstName = firstName;
    }

    public String getLastName() {
        return lastName;
    }

    public void setLastName(String lastName) {
        this.lastName = lastName;
    }

    public String getYear() {
        return year;
    }

    public void setYear(String year) {
        this.year = year;
    }

}
This is the entity class that Hibernate will map to a table.
The annotations are part of the JPA specification. They define the mapping between the domain model object and the database table. The annotations are described below. (Note that these annotations are from the javax.persistence package.)
- @Entity – This class-level annotation specifies that this Java class should be persisted to a database table.
- @Id – This field-level annotation specifies the primary key of the entity and maps it to the primary key of the table.
- @GeneratedValue – This annotation specifies how the primary key ID will be generated. In our example, we chose GenerationType.AUTO meaning that the JPA provider (Hibernate) will decide which strategy to employ based on the database dialect used.
2.3 Create the Repository
Since we are using Spring Data JPA, we will write a lot less code in our CRUD application. In fact, all we need to do is define an interface that extends CrudRepository to access the data. When you extend the CrudRepository interface, Spring Data JPA will automatically generate the implementation of generic CRUD operations for your domain model object. These include but are not limited to:
- save(S entity) – creates or updates a given entity
- deleteById(ID id) – deletes the entity with the given id
- findById(ID id)– retrieves an entity by its id
- findAll() – returns all entities in the table
Create a package com.javacodegeeks.examples.repository and interface StudentRepositorywith the following code:
StudentRepository.java
import org.springframework.data.repository.CrudRepository;

import com.javacodegeeks.examples.model.Student;

public interface StudentRepository extends CrudRepository<Student, Long> {

}
The CrudRepository interface requires the entity class and its ID type as generic type arguments (e.g. Student and Long).
2.4 Create the Root Resource Class
We will build a simple student service for our example. Create a new package com.javacodegeeks.examples.service and class SudentService and add the @Service and @Path annotations.
StudentService.java
import javax.ws.rs.Path;

import org.springframework.stereotype.Service;

@Service
@Path("students")
public class StudentService {

}
The @Path annotation identifies this class as a root resource. The Path’s value specifies the relative URI where the resource will accept requests. We are indicating that this root resource will respond to requests starting at “students”. If a URI path template is used, (e.g. @Path("students/{id}")) the embedded variable, indicated by braces, is substituted at runtime with the value in the actual request. (For example, students/1.) Path annotations can be applied at the class or method level. If both are used, the method’s value is appended to that of the class, as is the case for the getById() method discussed below.
2.5 Inject the Repository into the Resource Class
We will use constructor-based injection to initialize the repository. Add the following code to the StudentService class:
StudentService.java
	private final StudentRepository repository;

	public StudentService(StudentRepository repository) {
		this.repository = repository;
	}
In the next sections, we will add the CRUD methods to our resource class.
Note: The JAX-RS annotations discussed below belong to the javax.ws.rs and javax.ws.rs.core packages.
2.6 Add the Read Methods
First, add the getStudents() method to the class.
	@GET
	@Produces(MediaType.APPLICATION_JSON)
	public Iterable<Student> getStudents() {
		return repository.findAll();
	}
The @GET annotation indicates that the method will respond to HTTP GET requests sent to /students. The @Produces annotation declares the media type or types that can be returned in the response. This method will return JSON representations of the Student objects. getStudents() calls the repository’s findAll() method and returns all the students in the table.
Next add the getStudent(Long id) method.
	@GET
	@Path("{id}")
	@Produces(MediaType.APPLICATION_JSON)
	public Response getStudent(@PathParam("id") Long id) {
		Student student = repository.findById(id).orElseThrow(NotFoundException::new);
		return Response.ok(student).build();
	}
The @GET annotation indicates that the method will respond to HTTP GET requests sent to /students/{id}. The @Produces annotation declares that this method will return JSON in the response.
As discussed above, @Path can use a URI path template. The @PathParamannotation is used to retrieve and bind the embedded variable in the path template to a class variable or method parameter. Here we are binding the {id} in the path to the Long id parameter of the getByIdmethod .
The getById method returns a javax.ws.rs.core.Response object. The Response object is an abstraction of an HTTP response and allows you to include metadata, such as status codes, using the builder pattern.
The method calls the repository’s findById method to retrieve a student. If no student is returned it will throw a NotFoundException. Otherwise, it will return a Response which contains the student entity and an OK status.
So, what is this orElseThrow method at the end of the findById call and what does it do? It is part of the java.util.Optional API. It returns the wrapped Student object if found, otherwise it throws the exception provided by the exception supplier. We can substitute the supplier with a method reference to the NotFoundExceptionclass’ constructor. When this exception is thrown, a “404 Not Found” status code is returned.
2.7 Add the Create Method
Add theaddStudent(Student student, UriInfo uriInfo)method to the resource class.
	@POST
	@Consumes(MediaType.APPLICATION_JSON)
	public Response addStudent(Student student, @Context UriInfo uriInfo) throws URISyntaxException {
		Student result = repository.save(student);
		return Response.created(new URI(
				String.format("%s/%s",uriInfo.getAbsolutePath().toString(),
	            result.getId())))
				.build();
	}
The @POST annotation indicates that this method will respond to HTTP POST requests. The @Consumes annotation declares that JSON will be accepted as a media type by this resource. The method calls the repository’s save method to save the student in the database and returns a javax.ws.rs.core.Response object.
The response is generated using the builder pattern. The Response.created() method will set the status code of the response to “Created 201”. We pass in the location of the newly created student (as a URI instance) to the created() method. It will appear in the response header.
We can hard-code the path to the new resource in the source code but it is better to use the UriInfo object
to retrieve the context path. UriInfo is injected into the method using the javax.ws.rs.core.Context annotation in the parameter list. After that, all we need to do is append the id of the new student to create the location.
2.8 Add the Update Method
Add the updateStudent(Long id, Student student) method.
	@PUT
	@Path("{id}")
	@Consumes(MediaType.APPLICATION_JSON)
	@Produces(MediaType.APPLICATION_JSON)
	public Response updateStudent(@PathParam("id") Long id, Student student) {
		Student studentInDB = repository.findById(id).orElseThrow(NotFoundException::new);

		studentInDB.setFirstName(student.getFirstName());
		studentInDB.setLastName(student.getLastName());
		studentInDB.setYear(student.getYear());
		repository.save(studentInDB);

		return Response.ok(studentInDB).build();
	}
The @PUT annotation indicates that the method will respond to HTTP PUT requests sent to /students/{id}. The @Produces and @Consumes annotations specify that this resource accepts and returns JSON. The @PathParamannotation is used to bind the {id} in the path to the Long id method parameter.
The method first attempts to find the Student by the ID specified by the path parameter. It will throw a NotFoundExceptionif it fails. Otherwise, it will call setter methods to update the student object and then save it in the repository. Finally, it will return a Response which contains the student entity and an OK status.
2.9 Add the Delete Method
Add the deleteStudent(Long Id) method.
	@DELETE
	@Path("{id}")
	public Response deleteStudent(@PathParam("id") Long id) {
		 repository.findById(id).orElseThrow(NotFoundException::new);
		 repository.deleteById(id);
		 return Response.ok().build();
	}
The @DELETE annotation indicates that the method will respond to HTTP DELETE requests sent to /students/{id}. The @PathParamannotation is used to bind the {id} in the path to the Long id method parameter.
The method first attempts to find the Student by the ID specified by the path parameter. It will throw a NotFoundExceptionif it fails. Otherwise, it will call the repository’s deleteById method to remove the student from the database. Finally, it will return a Response with an OK status.
2.10 Configure the Application
Configuring JAX-RS endpoints in Jersey is quite simple. Create a package com.javacodegeeks.examples.config and class JerseyConfig that extendsResourceConfig and add the following code:
JerseyConfig.java
import org.glassfish.jersey.server.ResourceConfig;
import org.springframework.context.annotation.Configuration;

import com.javacodegeeks.examples.service.StudentService;

@Configuration
public class JerseyConfig extends ResourceConfig{

	public JerseyConfig() {
		register(StudentService. class);
	}
}
The@Configuration annotation is used to mark JerseyConfig as a component managed by Spring Boot.
We can register our resource class as a JAX-RS component by extending ResouceConfig and calling its register method. This is done in the constructor. You can register resources and providers as required for your application. If you have several classes in a Java package that you want to register, you can use the packages("your.package.name") method of ResouceConfig and Jersey will scan the package and register all eligible classes in your application.
2.11 Create the Data Loader
We can use our student repository to create some sample data at startup. Create a package com.javacodegeeks.examples.bootstrap and class DataLoader that implements ApplicationListener<ContextRefreshedEvent> :
DataLoader.java
import org.springframework.context.ApplicationListener;
import org.springframework.context.event.ContextRefreshedEvent;
import org.springframework.stereotype.Component;

import com.javacodegeeks.examples.model.Student;
import com.javacodegeeks.examples.repository.StudentRepository;

@Component
public class DataLoader implements ApplicationListener<ContextRefreshedEvent> {

    private final StudentRepository repository;


    public DataLoader(StudentRepository repository) {
        this.repository = repository;
    }

    @Override
    public void onApplicationEvent(ContextRefreshedEvent event) {
        Student student_a = new Student();
        student_a.setFirstName("Marissa");
        student_a.setLastName("Mayer");
        student_a.setYear("Freshman");
        repository.save(student_a);

        Student student_b = new Student();
        student_b.setFirstName("Martin");
        student_b.setLastName("Fowler");
        student_b.setYear("Senior");
        repository.save(student_b);

        Student student_c = new Student();
        student_c.setFirstName("Roy");
        student_c.setLastName("Fielding");
        student_c.setYear("Freshman");
        repository.save(student_c);
    }
}
The DataLoader class listens for the ContextRefreshedEvent that gets raised when the ApplicationContext is initialized or refreshed. It implements the onApplicationEvent method and adds some Student entities to the table. Note that we need to decorate this class with @Component so that Spring loads it in the application context.
2.12 Start the Spring Boot Application
Right-click your project in Project Explorer and select Run As > Spring Boot App.
2.13 Test the CRUD Application
There are many tools available for testing REST API endpoints. You can even use cURL. We will use Postman in this example as it will make it easier to POST and PUT data. Also, Postman is a good tool to have in your arsenal if you plan to develop REST APIs.
Start Postman and close the “Create New” dialog window. The top portion of the window is where you select the HTTP method and enter the request URL. The bottom portion of the window is where the response will be displayed.
2.13.1 Retrieve All Students
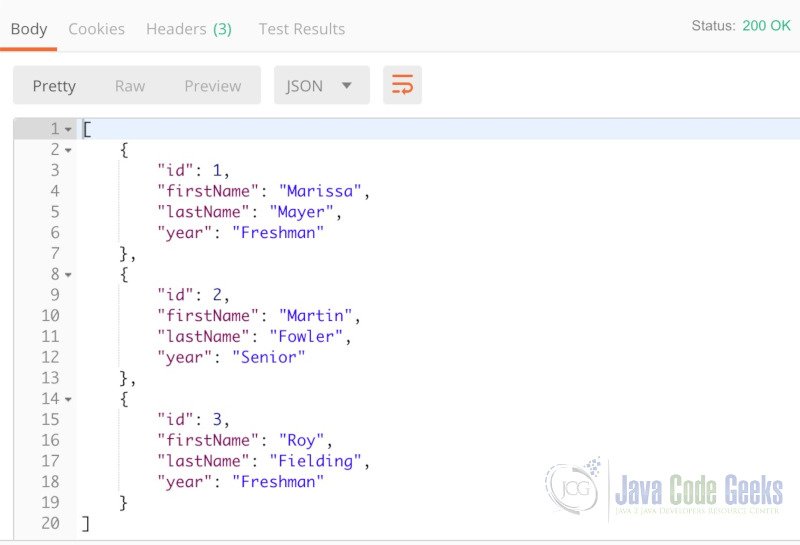
Enter the request URL http://localhost:8080/students and click Send.

You will see the list of students in the response portion of the window. You will also see the response status code of 200 OK.
2.13.2 Retrieve a Single Student
Open a New Tab. Enter the request URL http://localhost:8080/students/1 and click Send.

In the Response portion of the window, you will see the details for student 1. You will also see the response status code of 200 OK.

2.15.3 Add a Student
Open a New Tab. Select POST from the drop-down menu to the left of the request URL bar. Select Body and “raw” located underneath the request URL bar. Change “Text” to ‘JSON application/json” from the drop-down menu. Paste the following JSON data structure in the Body area.
{
    "firstName": "Bill",
    "lastName": "Gates",
    "year": "Freshman"
}
Note: The JSON files can be located in the src/main/resources folder of the downloadable project.
Enter the request URL http://localhost:8080/students and click Send.

In the Response portion of the window, you see the response status code of 201 Created.

If you select Headers in the response pane, you will see the location of the newly added student. Copy the location and open a new request window. Paste the location in the address bar and send a GET request. You will see the data for the new student.

2.13.4 Update a Student
Open a New Tab. Select PUT from the drop-down menu to the left of the request URL bar. Select Body and “raw” located underneath the request URL bar. Change “Text” to ‘JSON application/json” from the drop-down menu. Paste the following JSON data structure in the Body area.
{
    "firstName": "Jane",
    "lastName": "Eyre",
    "year": "Junior"
}
Enter the request URL http://localhost:8080/students/1 and click Send.

In the response section, you will see the details of the updated student and a response status code of 200 OK.

2.13.5 Delete a Students
Open a New Tab. Select DELETE from the drop-down menu. Enter the request URL http://localhost:8080/students/2 and click Send. In the response section, you will see a response status code of 200 OK.

Go back to the first tab, enter the request URL http://localhost:8080/students and click Send.
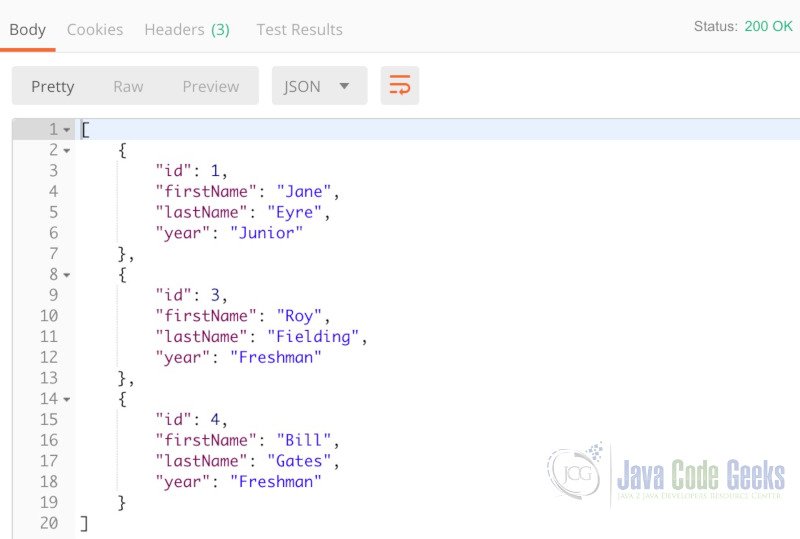
Notice that student 2 has been deleted from the table.
2.13.6 Student Does Not Exist
Open a New Tab. Enter the request URL http://localhost:8080/students/5 and click Send.
In the Response portion of the window, you will see a “HTTP Status 404 – Not Found” error page.

3. Spring Boot JAX-RS with Jersey – Summary
In this example, we demonstrated how to develop a simple JAX-RS CRUD application with Jersey, JPA, and H2.
4. Download the Source Code
This was a Spring Boot JAX-RS with Jersey Example.
You can download the full source code of this example here: Spring Boot JAX-RS Jersey Example


