Welcome readers, in this tutorial, we will show how to use JasperReports with spring boot framework.
1. Introduction
- Spring boot is a module that provides rapid application development feature to the spring framework including auto-configuration, standalone-code, and production-ready code
- It creates applications that are packaged as jar and are directly started using embedded servlet container (such as Tomcat, Jetty or Undertow). Thus, no need to deploy the war files
- It simplifies the maven configuration by providing the starter template and helps to resolve the dependency conflicts. It automatically identifies the required dependencies and imports them in the application
- It helps in removing the boilerplate code, extra annotations, and xml configurations
- It provides a powerful batch processing and manages the rest endpoints
- It provides an efficient jpa-starter library to effectively connect the application with the relational databases
- It offers a Microservice architecture and cloud configuration that manages all the application related configuration properties in a centralized manner.
1.1 JasperReports
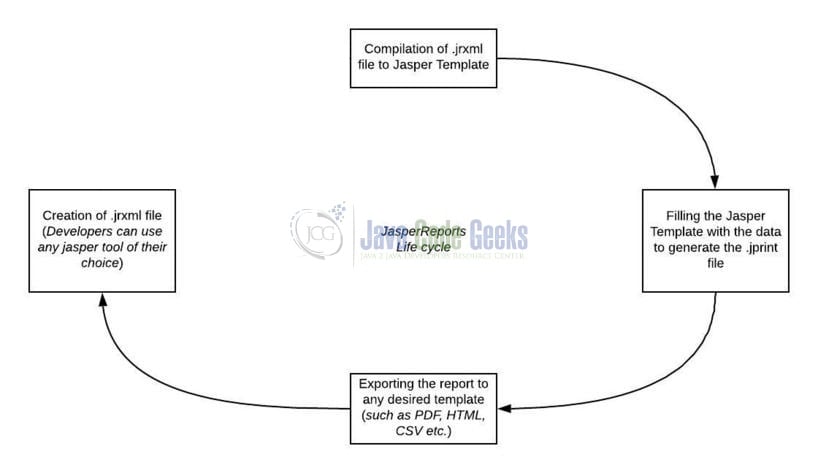
JasperReports is an open-source reporting library. It is used to prepare reports in various formats such as PDF, HTML, XLS or CSV’s. This library creates page-oriented ready-to-print documents in a simple manner. The following flow chart illustrates the creation of reports.
In this tutorial, we will create a spring boot application that loads the sample employee data and creates a pdf report using the jasper-report library. To follow this concept, let us open the eclipse ide and implement this tutorial. But before going any further I’m assuming that readers are aware of the concepts of creating and running a basic spring boot application.
2. JasperReports with Spring Boot
Here is a systematic guide for implementing this tutorial.
2.1 Tools Used
We are using Eclipse Kepler SR2, JDK 8, and Maven.
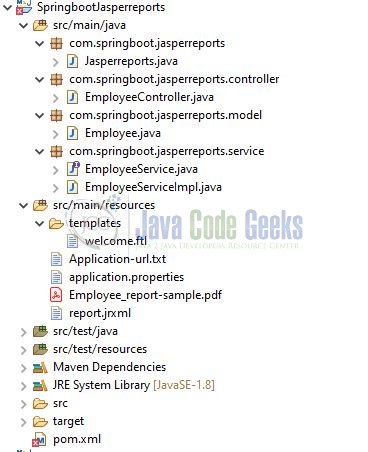
2.2 Project Structure
In case you’re confused about where you should create the corresponding files or folder, let us review the project structure of the spring boot application.
Let us start building the application!
3. Creating a Springboot application
Below are the steps involved in developing the application.
3.1 Maven Dependency
Here, we specify the dependency for the spring boot, free marker, and jasper-reports. Maven will automatically resolve the other dependencies. The updated file will have the following code.
pom.xml
01 02 03 04 05 06 07 08 09 10 11 12 13 14 15 16 17 18 19 20 21 22 23 24 25 26 27 28 29 30 31 32 33 34 35 36 37 38 39 40 41 42 43 44 45 46 47 48 49 50 | <modelVersion>4.0.0</modelVersion> <groupId>com.springboot.jasperreports</groupId> <artifactId>SpringbootJasperreports</artifactId> <version>0.0.1-SNAPSHOT</version> <name>Springboot Jasper Reports example</name> <parent> <groupId>org.springframework.boot</groupId> <artifactId>spring-boot-starter-parent</artifactId> <version>2.2.2.RELEASE</version> </parent> <properties> <java.version>1.8</java.version> </properties> <dependencies> <!-- Spring boot web mvc dependency. --> <dependency> <groupId>org.springframework.boot</groupId> <artifactId>spring-boot-starter-web</artifactId> </dependency> <!-- Spring boot freemarker jar. --> <dependency> <groupId>org.springframework.boot</groupId> <artifactId>spring-boot-starter-freemarker</artifactId> </dependency> <!-- Jasper reports dependency. --> <dependency> <groupId>net.sf.jasperreports</groupId> <artifactId>jasperreports</artifactId> <version>6.11.0</version> </dependency> <!-- Faker dependency to generate dynamic data. --> <dependency> <groupId>com.github.javafaker</groupId> <artifactId>javafaker</artifactId> <version>1.0.1</version> </dependency> </dependencies> <build> <finalName>SpringbootJasperreports</finalName> </build></project> |
3.2 Application Properties
Create a new properties file at the location: SpringbootJasperreports/src/main/resources/ and add the following code to it.
application.properties
1 2 3 4 5 6 7 | ### Server port ###server.port=10091### Springboot application name ###spring.application.name=SpringbootJasperreports### Freemarker configuration ###spring.freemarker.template-loader-path= classpath:/templatesspring.freemarker.suffix= .ftl |
3.3 Report Template File
Create a report template file at the location SpringbootJasperreports/src/main/resources/ and add the following code to it. A .jrxml file contains the template definition in an XML format i.e. this JasperReport template file includes design elements such as text-fields, charts, parameters, variables and the report layout. In this template, we have four fields that are mapped to the elements of the data source bean. It also has the text-field element that is filled with dynamic data from the application.
report.jrxml
01 02 03 04 05 06 07 08 09 10 11 12 13 14 15 16 17 18 19 20 21 22 23 24 25 26 27 28 29 30 31 32 33 34 35 36 37 38 39 40 41 42 43 44 45 46 47 48 49 50 51 52 53 54 55 56 57 58 59 60 61 62 63 64 65 66 67 68 69 70 71 72 73 74 75 76 77 78 79 80 81 82 83 84 85 86 87 88 89 90 91 92 93 94 95 96 97 | <?xml version = "1.0" encoding = "UTF-8"?><!DOCTYPE jasperReport PUBLIC "//JasperReports//DTD Report Design//EN"<jasperReport xsi:schemaLocation="http://jasperreports.sourceforge.net/jasperreports name="report2" pageWidth="595" pageHeight="842" columnWidth="555" leftMargin="20" rightMargin="20" topMargin="20" bottomMargin="20"> <parameter name="createdBy" class="java.lang.String"/> <field name="Id" class="java.lang.Integer"> <fieldDescription> <![CDATA[id]]> </fieldDescription> </field> <field name="Name" class="java.lang.String"> <fieldDescription> <![CDATA[name]]> </fieldDescription> </field> <field name="Designation" class="java.lang.String"> <fieldDescription> <![CDATA[designation]]> </fieldDescription> </field> <field name="Department" class="java.lang.String"> <fieldDescription> <![CDATA[department]]> </fieldDescription> </field> <background> <band splitType="Stretch"/> </background> <title> <band height="42" splitType="Stretch"> <staticText> <reportElement x="64" y="0" width="481" height="42"/> <textElement textAlignment="Center"> <font size="20" isBold="true"/> </textElement> <text> <![CDATA[Employee Report]]> </text> </staticText> </band> </title> <columnHeader> <band height="61" splitType="Stretch"> <textField> <reportElement x="456" y="21" width="99" height="20"/> <textElement/> <textFieldExpression> <![CDATA[$P{createdBy}]]> </textFieldExpression> </textField> <staticText> <reportElement x="398" y="21" width="58" height="20"/> <textElement/> <text><![CDATA[Created By:]]></text> </staticText> </band> </columnHeader> <detail> <band height="20" splitType="Stretch"> <textField> <reportElement x="0" y="0" width="50" height="15" /> <textElement textAlignment="Right" verticalAlignment="Middle"/> <textFieldExpression class="java.lang.Integer"> <![CDATA[$F{Id}]]> </textFieldExpression> </textField> <textField> <reportElement x="200" y="0" width="100" height="15" /> <textElement textAlignment="Left" verticalAlignment="Middle"/> <textFieldExpression class="java.lang.String"> <![CDATA[$F{Name}]]> </textFieldExpression> </textField> <textField> <reportElement x="300" y="0" width="100" height="15"/> <textElement textAlignment="Right" verticalAlignment="Middle"/> <textFieldExpression class="java.lang.String"> <![CDATA[$F{Designation}]]> </textFieldExpression> </textField> <textField> <reportElement x="500" y="0" width="100" height="15"/> <textElement textAlignment="Left" verticalAlignment="Middle"/> <textFieldExpression class="java.lang.String"> <![CDATA[$F{Department}]]> </textFieldExpression> </textField> </band> </detail></jasperReport> |
3.4 Freemarker Template File
Create a freemarker template file at the location SpringbootJasperreports/src/main/resources/templates/ and add the following code to it. This file will be shown to the users on the application startup.
welcome.ftl
01 02 03 04 05 06 07 08 09 10 11 12 13 14 | <!DOCTYPE html><html lang="en"><head> <meta charset="UTF-8"> <title>Index</title> <link rel="stylesheet" href="https://stackpath.bootstrapcdn.com/bootstrap/4.3.1/css/bootstrap.min.css"></head><body> <div class="container"> <h2 class="text-center text-info">Spring Boot Jasper Reports Tutorial</h2><hr/> <a href="/api/view" class="btn btn-info" role="button">Generate Pdf</a> </div></body></html> |
3.5 Java Classes
Let us write all the java classes involved in this application.

3.5.1 Implementation/Main class
Add the following code to the main class to bootstrap the application from the main method. Always remember, the entry point of the spring boot application is the class containing @SpringBootApplication annotation and the static main method.
Jasperreports.java
01 02 03 04 05 06 07 08 09 10 11 12 13 14 15 16 | package com.springboot.jasperreports;import org.springframework.boot.SpringApplication;import org.springframework.boot.autoconfigure.SpringBootApplication;/** * Main implementation class which serves two purposes in a spring boot application: Configuration and bootstrapping. * @author yatin-batra */@SpringBootApplicationpublic class Jasperreports { public static void main(String[] args) { SpringApplication.run(Jasperreports.class, args); }} |
3.5.2 Model class
Add the following code to the Employee model class.
Employee.java
01 02 03 04 05 06 07 08 09 10 11 12 13 14 15 16 17 18 19 20 21 22 23 24 25 26 27 28 29 30 | package com.springboot.jasperreports.model;// Employee pojo class.public class Employee { private final Integer id; private final String name; private final String designation; private final String department; public Employee(final Integer id, final String name, final String designation, final String department) { this.id = id; this.name = name; this.designation = designation; this.department = department; } public Integer getId() { return id; } public String getName() { return name; } public String getDesignation() { return designation; } public String getDepartment() { return department; }} |
3.5.3 Service class
Add the following code to the service class where we will prepare the dummy data for an employee.
EmployeeServiceImpl.java
01 02 03 04 05 06 07 08 09 10 11 12 13 14 15 16 17 18 19 20 21 22 23 24 25 26 27 28 29 30 | package com.springboot.jasperreports.service;import java.util.ArrayList;import java.util.List;import java.util.Random;import org.springframework.stereotype.Service;import com.github.javafaker.Faker;import com.springboot.jasperreports.model.Employee;@Servicepublic class EmployeeServiceImpl implements EmployeeService { final Faker faker = new Faker(); final Random random = new Random(); // For ease we are not making the database interaction here. // Readers can inject the dao layer here to make the real-time database interactions. @Override public List<Employee> findAll() { final List<Employee> employees = new ArrayList<>(); // Creating a list of employees using the "faker" object. for(int count=0; count<21; count++) { employees.add(new Employee(random.nextInt(30 + 1), faker.name().fullName(), faker.job().title(), faker.job().field())); } return employees; }} |
3.5.4 Controller class
Add the following code to the controller class designed to handle the incoming requests. The class exposes two methods to display the welcome page of the application and generates the employee report.
EmployeeController.java
01 02 03 04 05 06 07 08 09 10 11 12 13 14 15 16 17 18 19 20 21 22 23 24 25 26 27 28 29 30 31 32 33 34 35 36 37 38 39 40 41 42 43 44 45 46 47 48 49 50 51 52 53 54 55 56 57 58 59 60 61 62 63 64 65 66 67 68 69 70 71 72 73 74 75 76 77 78 79 80 81 82 83 84 85 86 87 | package com.springboot.jasperreports.controller;import java.io.InputStream;import java.util.HashMap;import java.util.List;import java.util.Map;import org.slf4j.Logger;import org.slf4j.LoggerFactory;import org.springframework.beans.factory.annotation.Autowired;import org.springframework.stereotype.Controller;import org.springframework.web.bind.annotation.GetMapping;import org.springframework.web.bind.annotation.RequestMapping;import org.springframework.web.servlet.ModelAndView;import com.springboot.jasperreports.model.Employee;import com.springboot.jasperreports.service.EmployeeService;import net.sf.jasperreports.engine.JRException;import net.sf.jasperreports.engine.JasperCompileManager;import net.sf.jasperreports.engine.JasperExportManager;import net.sf.jasperreports.engine.JasperFillManager;import net.sf.jasperreports.engine.JasperPrint;import net.sf.jasperreports.engine.JasperReport;import net.sf.jasperreports.engine.data.JRBeanCollectionDataSource;@Controller@RequestMapping(value = "/api")public class EmployeeController { final Logger log = LoggerFactory.getLogger(this.getClass()); final ModelAndView model = new ModelAndView(); // @Autowired annotation provides the automatic dependency injection. @Autowired EmployeeService eservice; // Method to display the index page of the application. @GetMapping(value= "/welcome") public ModelAndView index() { log.info("Showing the welcome page."); model.setViewName("welcome"); return model; } // Method to create the pdf report via jasper framework. @GetMapping(value = "/view") public ModelAndView viewReport() { log.info("Preparing the pdf report via jasper."); try { createPdfReport(eservice.findAll()); log.info("File successfully saved at the given path."); } catch (final Exception e) { log.error("Some error has occurred while preparing the employee pdf report."); e.printStackTrace(); } // Returning the view name as the index page for ease. model.setViewName("welcome"); return model; } // Method to create the pdf file using the employee list datasource. private void createPdfReport(final List<Employee> employees) throws JRException { // Fetching the .jrxml file from the resources folder. final InputStream stream = this.getClass().getResourceAsStream("/report.jrxml"); // Compile the Jasper report from .jrxml to .japser final JasperReport report = JasperCompileManager.compileReport(stream); // Fetching the employees from the data source. final JRBeanCollectionDataSource source = new JRBeanCollectionDataSource(employees); // Adding the additional parameters to the pdf. final Map<String, Object> parameters = new HashMap<>(); parameters.put("createdBy", "javacodegeek.com"); // Filling the report with the employee data and additional parameters information. final JasperPrint print = JasperFillManager.fillReport(report, parameters, source); // Users can change as per their project requrirements or can take it as request input requirement. // For simplicity, this tutorial will automatically place the file under the "c:" drive. // If users want to download the pdf file on the browser, then they need to use the "Content-Disposition" technique. final String filePath = "\\"; // Export the report to a PDF file. JasperExportManager.exportReportToPdfFile(print, filePath + "Employee_report.pdf"); }} |
4. Run the Application
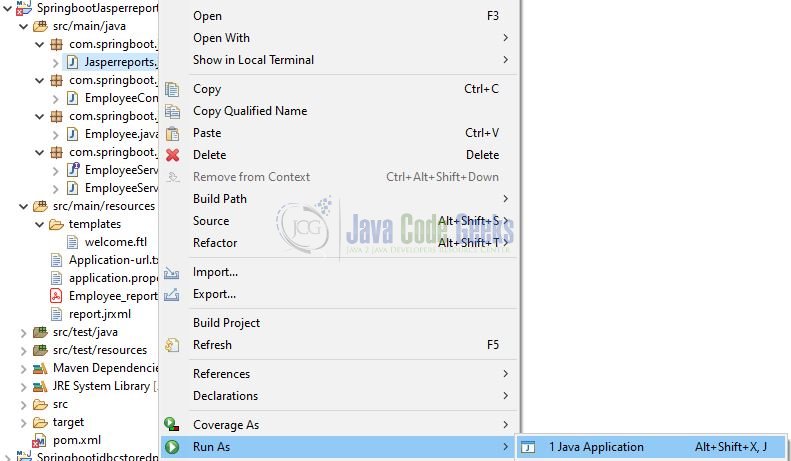
To execute the application, right-click on the Application.java class, Run As -> Java Application.
5. Project Demo
Developers can hit the below URL that will open the index of the application. On the index page, the application has the ‘Generated Pdf’ button that will generate the employee report as shown in the below figure.
http://localhost:10091/api/welcome

That is all for this tutorial and I hope the article served you whatever you were looking for. Happy Learning and do not forget to share!
6. Conclusion
In this section, developers learned how to use JasperReports with a spring boot application. Developers can download the sample application as an Eclipse project in the Downloads section.
7. Download the Eclipse Project
This was an example of using JasperReports with a Spring boot application.
You can download the full source code of this example here: JasperReports with Spring Boot

when a type http://localhost:10091/api/welcome on the browser
I’m having “Can’t access this site” ERR_CONNECTION_REFUSED.
i’m using xampp.
There was an unexpected error (type=Internal Server Error, status=500).
Circular view path [welcome]: would dispatch back to the current handler URL [/api/welcome] again. Check your ViewResolver setup! (Hint: This may be the result of an unspecified view, due to default view name generation.)
So the jrxml/jasper report template is integrated/bundled inside spring boot application and not deployed/published in the jasper repository server, right? i.e. more of a monolith approach, right? Any change in the report will require the application to be rebuild and redeployed, isn’t it?
how to use JRLoader to retrieve prepared .jasper file instead of compile it everytime ?