Hello. In this tutorial, we will create a simple restful spring boot application and understand the implementation of the patch endpoint request.
1. Introduction
PATCH is used when we want to apply the partial update to the resource and does not want to update the entire resource. @PatchMapping annotation is used in spring for mapping the HTTP PATCH requests onto the controller methods.
2. Spring boot Patch request example
Let us dive into some practice stuff and I am hoping that you are aware of the spring boot basics.
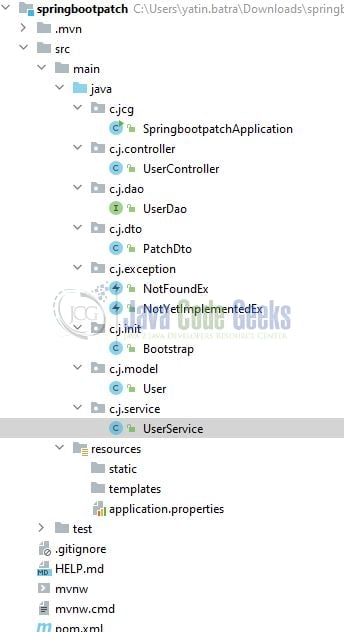
2.1 Tools Used for Spring boot application and Project Structure
We are using IntelliJ, JDK 8, and Maven. In case you’re confused about where you should create the corresponding files or folder, let us review the project structure of the spring boot application.
Let us start building the application!
3. Creating a Spring Boot application
To create the base for this application I will be skipping the traditional approach of creating the project and will move toward the Spring Initializr that offers the quickest way to set up the project. To create this tutorial I will be exploring Maven as the project and Java as the programming language.
3.1 Importing the project
Once the project setup is done via the Spring Initializr import it into the IntelliJ. The imported project will automatically download the jars specified in the pom.xml. For this tutorial, I will use the spring-boot-starter-web, spring-boot-starter-data-jpa, and dependencies for creating the application.
3.2 Creating the implementation files
I will focus this tutorial on the important classes and skip the general classes (such as repository, service, and bootstrap classes) required to set up this practical implementation for brevity. You can download the complete application from the Downloads section.
3.2.1 Setting the properties
Create a properties file in the resources folder and add the following content to it. The file will contain information about the port number on which the application should run and h2 database settings. You’re free to change this information as per your needs.
application.properties
server.port=9100
#h2 db settings
spring.datasource.username=sa
spring.datasource.password=
spring.datasource.url=jdbc:h2:mem:testdb
spring.datasource.driverClassName=org.h2.Driver
spring.jpa.database-platform=org.hibernate.dialect.H2Dialect
spring.jpa.hibernate.ddl-auto=create-drop
spring.jpa.properties.hibernate.show_sql=true
spring.h2.console.enabled=true
spring.h2.console.path=/h2-console
3.2.2 Creating the User model class
Create the model class responsible to create the table structure in the h2 database.
User.java
package com.jcg.model;

import javax.persistence.Column;
import javax.persistence.Entity;
import javax.persistence.GeneratedValue;
import javax.persistence.GenerationType;
import javax.persistence.Id;
import javax.persistence.Table;
import lombok.AllArgsConstructor;
import lombok.Builder;
import lombok.Data;
import lombok.NoArgsConstructor;
import org.springframework.stereotype.Component;

@Entity
@Table(name = "my_user")
@Data
@NoArgsConstructor
@AllArgsConstructor
@Builder
@Component
public class User {

  @Id
  @GeneratedValue(strategy = GenerationType.AUTO)
  int id;

  @Column(name = "full_name", nullable = false)
  String fullName;

  @Column(name = "age")
  int age;
}
3.2.3 Creating the Patch Dto class
Create a data transfer class responsible to handle the HTTP PATCH operation and its request body for the partial update of the resource.
PatchDto.java
package com.jcg.dto;

import lombok.AllArgsConstructor;
import lombok.Getter;

@AllArgsConstructor
@Getter
public class PatchDto {

  String op;

  String key;

  String value;
}
3.2.4 Create the Controller class
The controller will be responsible to handle the client interactions. The application exposes three endpoints i.e.
- Get all users
- Get user by id
- Patch user details via the
@PatchMappingannotation
UserController.java
package com.jcg.controller;

import com.jcg.dto.PatchDto;
import com.jcg.exception.NotFoundEx;
import com.jcg.exception.NotYetImplementedEx;
import com.jcg.model.User;
import com.jcg.service.UserService;
import java.util.List;
import org.springframework.beans.factory.annotation.Autowired;
import org.springframework.http.HttpStatus;
import org.springframework.http.ResponseEntity;
import org.springframework.web.bind.annotation.GetMapping;
import org.springframework.web.bind.annotation.PatchMapping;
import org.springframework.web.bind.annotation.PathVariable;
import org.springframework.web.bind.annotation.RequestBody;
import org.springframework.web.bind.annotation.RequestMapping;
import org.springframework.web.bind.annotation.RestController;

@RestController
@RequestMapping("/api")
public class UserController {

  @Autowired
  UserService service;

  @GetMapping("/all")
  public ResponseEntity<List<User>> findAll() {
    return ResponseEntity.ok(service.getAll());
  }

  @GetMapping("/{id}")
  public ResponseEntity<User> findById(@PathVariable(name = "id") int id)
      throws NotFoundEx {
    return new ResponseEntity<>(service.getById(id), HttpStatus.OK);
  }

  @PatchMapping("/{id}")
  public ResponseEntity<Boolean> updatePartially(@PathVariable(name = "id") int id,
      @RequestBody PatchDto dto) throws NotYetImplementedEx, NotFoundEx {
    // skipping validations for brevity
    if (dto.getOp().equalsIgnoreCase("update")) {
      boolean result = service.partialUpdate(id, dto.getKey(), dto.getValue());
      return new ResponseEntity<>(result, HttpStatus.ACCEPTED);
    } else {
      throw new NotYetImplementedEx("NOT_YET_IMPLEMENTED");
    }
  }
}
3.2.5 Creating an implementation class
Creating an implementation class responsible to start the Spring application.
SpringbootpatchApplication.class
package com.jcg;

import org.springframework.boot.SpringApplication;
import org.springframework.boot.autoconfigure.SpringBootApplication;

@SpringBootApplication
public class SpringbootpatchApplication {

  public static void main(String[] args) {
    SpringApplication.run(SpringbootpatchApplication.class, args);
  }
}
4. Run the main class and Demo
To run the application, right-click on the SpringbootqualiferApplication.class class, Run As -> Spring Boot App. If everything goes well the application will be started successfully and dummy data will be added to the my_user table with the help of CommandLineRunner implementation class. To test the application endpoints we will use the postman tool. However, you’re free to use any tool of your choice for interacting with the application endpoints.
Application endpoints
// Get all users
// http://localhost:9100/api/all

// Get user by id
// http://localhost:9100/api/1

// Partial update user by id
// http://localhost:9100/api/1
/*
{
  "op": "update",
  "key": "fullName",
  "value": "Adam",
}
 */
That is all for this tutorial and I hope the article served you whatever you were looking for. Happy Learning and do not forget to share!
5. Summary
In this tutorial, we see an implementation of using the HTTP PATCH request method via the PatchMapping annotation to perform the partial update of a resource. You can download the sample application as an Eclipse project in the Downloads section.
6. Download the Project
This was an example of understanding the patch endpoint request in a spring boot application.
You can download the full source code of this example here: Spring boot Patch request example

How is this a partial update, what if I want to just update the key and not the value, I will have to send the entire object as it is. That would symbolise a PUT request and not a PATCH request