Param and Attribute Example with JSF 2.0
Today we ‘re gonna talk about parameter manipulation in JSF, using param and attribute tags.
1. Param Tag
What about parameters in JSF? In JSF, we can use the <f:param> tag, in order to pass a parameter to a component (or pass request parameters), but things here, are not so clear, as it’s behavior depends on the component that it is attached.
The current example’s goal is, to pass two parameters from a JSF page, to another. Let’s see some introductory examples, before diving into the full example.
Passing parameters to UI components
<h:outputFormat value="Hello {0}. It seems like you support {1} in this World Cup.">
	<f:param value="Thodoris" />
	<f:param value="Greece" />
</h:outputFormat>
Passing request parameters (attached to commandButton)
<h:commandButton id="submit"
	value="Submit" action="#{user.outcome}">
	<f:param name="country" value="Greece" />
</h:commandButton>
But how could we get these values in the back-end? How could we conform our usual bean to read them from the JSF page?
Map<String,String> params = FacesContext.getExternalContext().getRequestParameterMap();
	String countrry = params.get("country");
The Full Example
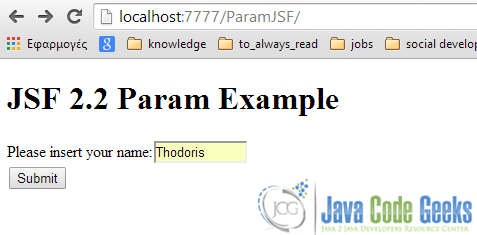
Suppose that our super-clever web application has a page that prompts the user to insert his name (see Param Tag – Prompt Page); the application then, transfers his name to a welcome page, where a guess is made, also. In our case, it’s about the user’s favourite team in the World Cup 2014. Both parameters will be manipulated through the param tag.
So, regarding the technical part of our example:
- The fore-mentioned parameter manipulation will take place in the java bean
- The “index” page will contain one submit button, which will also send a parameter to the “welcome” page
- The “welcome” page will welcome the user in personal level, using the name that he provided in the “index” page; it will also display the parameter transferred from the button’s click.
Here is the full example, demonstrating the usage for both of the two fore-mentioned mini-examples.
We ‘ll first take a look at our usual UserBean class:
package com.javacodegeeks.jsf.param;

import java.io.Serializable;
import java.util.Map;

import javax.faces.bean.ManagedBean;
import javax.faces.bean.SessionScoped;
import javax.faces.context.FacesContext;

@ManagedBean(name="user")
@SessionScoped
public class UserBean implements Serializable {

	/**
	 *
	 */
	private static final long serialVersionUID = 1L;

	private String name;
	private String country;

	private String getCountryFromJSF(FacesContext context) {
		Map<String, String> parameters = context.getExternalContext().getRequestParameterMap();

		return parameters.get("country");
	}

	public String outcome() {
		FacesContext context = FacesContext.getCurrentInstance();
		this.country = getCountryFromJSF(context);

		return "result";
	}

	public String getName() {
		return name;
	}

	public void setName(String name) {
		this.name = name;
	}

	public String getCountry() {
		return country;
	}

	public void setCountry(String country) {
		this.country = country;
	}
}
Now, let’s see the code structure of our JSF pages that interact with the “backing-bean” class:
index.xhtml
<?xml version="1.0" encoding="UTF-8"?>
<!DOCTYPE html PUBLIC "-//W3C//DTD XHTML 1.0 Transitional//EN"
"http://www.w3.org/TR/xhtml1/DTD/xhtml1-transitional.dtd">
<html xmlns="http://www.w3.org/1999/xhtml"
	xmlns:h="http://java.sun.com/jsf/html"
	xmlns:f="http://java.sun.com/jsf/core"
	xmlns:c="http://java.sun.com/jsp/jstl/core">

<h:head>
	<title>JSF Param Example</title>
</h:head>
<h:body>
	<h1>JSF 2.2 Param Example</h1>
	<h:form id="simpleform">
    		Please insert your name:<h:inputText size="10"
			value="#{user.name}" />
		<br />
		<h:commandButton id="submit" value="Submit" action="#{user.outcome}">
			<f:param name="country" value="Greece" />
		</h:commandButton>
	</h:form>
</h:body>
</html>
result.xhtml
<?xml version="1.0" encoding="UTF-8"?>
<!DOCTYPE html PUBLIC "-//W3C//DTD XHTML 1.0 Transitional//EN"
"http://www.w3.org/TR/xhtml1/DTD/xhtml1-transitional.dtd">
<html xmlns="http://www.w3.org/1999/xhtml"
	xmlns:h="http://java.sun.com/jsf/html"
	xmlns:f="http://java.sun.com/jsf/core"
	xmlns:c="http://java.sun.com/jsp/jstl/core">

<h:head>
	<title>JSF Param Example</title>
</h:head>
<h:body>
	<h1>JSF 2.2 Param Example - Result</h1>
	<h:outputFormat
		value="Hello {0}.
    		It seems like you support {1} in this
    		World Cup.">
		<f:param value="#{user.name}" />
		<f:param value="#{user.country}" />
	</h:outputFormat>
</h:body>
</html>
2. Attribute Tag
The purpose and usage of this tag are somehow similar to the param tag, but hear, we have to deal with an actionListener. According to the tag’s definition, it provides an option to pass an attribute’s value to a component, or a parameter to a component via action listener.
What a better example to be experimented with the newly introduced tag, rather than a simple button? Yes, that is, let’s keep it simple by investigating the tag’s behavior through a button (a simple button is enough to fire the actionListener).
So, assuming that we have a web page with a button, we want this button to “carry” some parameters, when it is clicked (especially, a password, in our case).
In order to get familiar with the attribute, keep in mind that we can also use it to assign a value to our button:
<h:commandButton>
    <f:attribute name="value" value="Submit" />
</h:commandButton>

// Similar to:
<h:commandButton value="Submit" />
Now, let’s see how we can assign and retrieve a parameter from a component:
(The concept is exactly the sme with the above example.
<h:commandButton actionListener="#{user.actionListenerSampleMethod}" >
    <f:attribute name="password" value="test" />
</h:commandButton>
Yes, that was our button, “carrying” a password value. As described above (and -I’m sure- made clear by yourself), except from our results page (where we just want to display the password’s value, so there isn’t anything more complicated than #{user.password}), we have to implement the “interaction” method. That is, this method is written in the class that connects the two pages, in the back-end, as we already know from all the previous examples. Here it is:
package com.javacodegeeks.jsf.attribute;

import java.io.Serializable;

import javax.faces.bean.ManagedBean;
import javax.faces.bean.SessionScoped;
import javax.faces.event.ActionEvent;

@ManagedBean(name="user")
@SessionScoped
public class UserBean implements Serializable {

	/**
	 *
	 */
	private static final long serialVersionUID = 1L;

        private String password;

	// The action listener method.
	public void actionListenerSampleMethod(ActionEvent event) {
 		password = (String)event.getComponent().getAttributes().get("password");
	}

	public String getPassword() {
		return password;
	}

	public void setPassword(String password) {
		this.password = password;
	}
}
This was an example of Param and Attribute in JSF 2.0.


