Docker Kubernetes Integration Tutorial
This tutorial talks about Docker and Kubernetes integration. This tutorial gives a quick introduction to the Kubernetes and the Docker, and the key concepts behind Kubernetes and its integration with Docker containers.
1. Introduction
Kubernetes, in its most simple definition, is a container orchestration engine. Here orchestration means managing the containers in terms of creation, deletion, monitoring for availability, failure detection, and recovery. Check our article What is Kubernetes to know more about Kubernetes.
Docker technology is a containerization mechanism to run images as containers. It also allows us to build images, upload into a secure registry, and run the images available at the docker registry. Refer to our article to get a quick start on docker containers.
2. How Kubernetes uses docker
Further to the definition, this section shows how Kubernetes executes workloads (or applications) through docker containers.
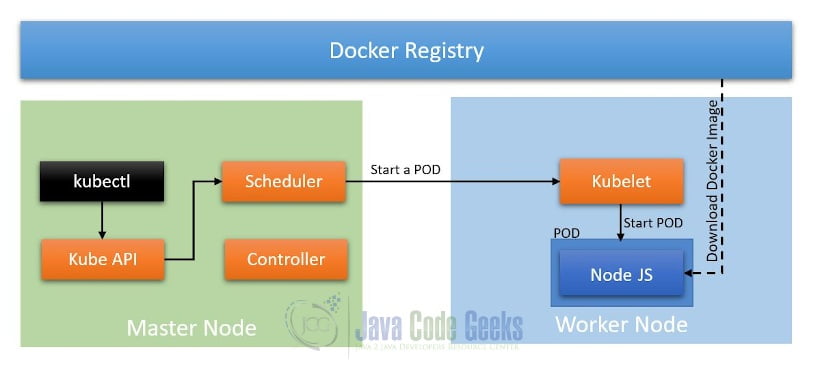
A typical Kubernetes cluster, as shown in the figure below, consists of a master node and one more worker nodes. The master node is also called as control-plane and hosts a Kube API server that receives requests to run applications that are divided into small units called POD. The POD is a minimal running unit that is managed by the master node. Into the POD, there goes in one or more containers running from the images built from the application which is to be executed.

Let us take an example of running a simple node JS application enabled by Express.
Here kubectl deploys an application through a deployment. When a deployment is created the K8s create a POD based on a given Docker image. When the Kubernetes master issues a command to the worker nodes to create a POD, the worker node downloads the said docker image and runs the same as a container.
3. The Application
The application consists of a simple Express-based nodeJS application. The node JS has a start point app.js which the endpoint “/” which returns a text – Welcome to the JCG tutorial for Kubernetes Docker Integration. You can start the application by simply executing node app.js provided you have Node version 12 is installed.
It comes with a Dockerfile using which you can generate a Docker image. The application code also comes with deployment-jcg.yaml which can be used to deploy the image, generated using the above Dockerfile, on to the Kubernetes cluster.

4. K8s Deployment
Let us consider the image generated using the example application is jcg-nodejs:1.0.0. The below listing is the YAML to create the deployment:
apiVersion: apps/v1
kind: Deployment
metadata:
  name: deployment-jcg
  labels:
    app: nodejs
spec:
  replicas: 1
  selector:
    matchLabels:
      app: nodejs
  template:
    metadata:
      labels:
        app: nodejs
    spec:
      containers:
        - name: jcg-nodejs
          image: jcg-nodejs:1.0.0
          ports:
            - containerPort: 3000
Here the above YAML, shows that the deployment name is deployment-jcg and it has a POD specification for a single container (name: jcg-nodejs) based on the image jcg-nodejs:1.0.0 and the image itself exposes a port 3000,
When you create a deployment with the above YAML, the Kubernetes downloads the images jcg-nodejs:1.0.0 and runs it as a container. Once the POD is in running state, the node JS Application would be running at 3000. However, to access the application you need to create a service and access the POD through the service. Check Section 5. Execution to see a detailed way to deploy and see it in action.
5. Execution
This section illustrates the running of the sample application on a minikube version of Kubernetes (K8s). This section covers the installation of minikube, local registry, building the image, and finally running the container on the local minikube. These instructions assume Ubuntu Linux OS. Refer to the Kubernetes site to know the instructions for other operating systems.
5.1 Installation of Minikube
Step 1: Install Docker
sudo apt install docker.io
sudo groupadd docker && sudo usermod -aG docker $USER
Step 2: Download minikube
curl -Lo minikube https://storage.googleapis.com/minikube/releases/latest/minikube-linux-amd64 \
  && chmod +x minikube
Step 3: add the Minikube executable to your path
sudo mkdir -p /usr/local/bin/
sudo install minikube /usr/local/bin/
Step 4: Install kubectl. Reference: Kubernetes
curl -LO "https://storage.googleapis.com/kubernetes-release/release/$(curl -s https://storage.googleapis.com/kubernetes-release/release/stable.txt)/bin/linux/amd64/kubectl"
chmod +x ./kubectl
sudo mv ./kubectl /usr/local/bin/kubectl
Step 5: Start the minikube using Docker as the driver
minikube start --driver=docker

5.2 Upload source code and build the image
Step 1: Upload the example code to the minikube host to a place say, /home/shiva/jcg-nodejs
Step 2: Build the image.
cd NodeJSExample
eval $(minikube docker-env)
docker build . --file Dockerfile --tag jcg-nodejs:1.0.0
5.3. Deploy the application to the Kubernetes
Deploy to Kubernetes is using the YAML which comes along with the application. For more information about deployments refer to the Kubernetes documentation.
kubectl apply -f deployment-jcg.yaml
Output:
deployment.apps/nginx-deployment created
Check if pods are running.
kubectl get pods
Output:
NAME                              READY   STATUS    RESTARTS   AGE
deployment-jcg-6bdfc58f5f-2sbbb   1/1     Running   0          48s
To access the hello-minikube Deployment, expose it as a Service
kubectl expose deployment deployment-jcg --type=NodePort --port=3000
Get the URL to access the application.
minikube service deployment-jcg --url
Output:
http://172.17.0.4:31819
Access the application using a browser at the URL shown in the above step.

Delete the service.
kubectl delete services deployment-jcg
Output:
service "deployment-jcg" deleted
Delete the deployment.
kubectl delete deployment deployment-jcg
Output:
deployment.apps "deployment-jcg" deleted
Stop the minikube.
minikube stop
Output:
✋  Stopping node "minikube"  ...
🛑  Powering off "minikube" via SSH ...
🛑  1 nodes stopped.
6. Download the source code
You can download the full source code of this example here: Docker Kubernetes Integration Tutorial


