1. Introduction
Docker Compose is a tool for defining and running multi-container Docker applications. With Compose, you define in a configuration file the set of docker containers that the application requires a specific machine. Then, using a single command, you create and start all the services in a single host.
Docker Compose is especially useful for the following use case scenarios:
- Create a development environment with all the required services started only using your own machine. In other words, stop to prepare your development environment manually over and over again in your own or different machines.
- Automate test environments with the same characteristics than the production environments and run integration tests.
- Single hosts deployments– that is use a machine with different services as docker containers. The most recommended way to do so is using the Docker machine or Docker swarm because you can launch docker compose remotely from your laptop in a safe way without requiring SSH.
To use Docker Compose, you just need to create a configuration file called docker-compose.yml, which contains the specification to create and run a set of docker containers. Let’s try to create an example with a web application that uses a Redis database server.
2. Docker Toolbox setup
Docker-compose is one of the included tools in the Docker toolbox. To install the Docker toolbox, you just need to download the appropriate installer from here for your operative system and execute it.
Docker Toolbox contains the following tools:
- Docker Compose : to create runtime environments with multiple docker containers in one machine.
- Docker Machine : to dynamically run docker commands to remote machines or in the local/default one.
- Docker Kitematic : to Build and run containers through a graphical user interface (GUI).
- VirtualBox : to run Docker.
- Docker client: to create and run docker containers.
Once you have finished the installation procedure, you should be able to run docker-compose --help, which prints the accepted subcommands.
3. Docker compose example: An HTTP server connected to Redis
This example is about a web application for creating a TODO list using Redis with basically three steps:
- Define how to run the web and database docker images in docker-compose.yml so they can be run together in an isolated environment.
- Create the web application and its Dockerfile to create the runtime environment anywhere.
- Lastly, run
docker-compose upand Compose will start and run your entire app.
3.1 Creating the docker-compose.yml file
Create an empty project called todos and copy the following docker-compose.yml inside the project directory.
docker-compose.yml
web:
  build: .
  ports:
   - "8000:8000"
  links:
   - redis
redis:
  image: redis
This file specifies two containers: web, which contains our Java code to launch a web server, and Redis server. Notice that in the first case, appears the build property, whereas in the second case, the image property. It means that in order web container needs to build a Docker image that appears in our local file system. However, for the Redis server, the image is downloaded from the DockerHub repository.
With this docker-compose.yml file, Compose simulates two machines with different IP addresses in the same local network because they are linked (i.e link property). However, only the web is externally through the 8000 of our docker-machine and Docker creates a binding between this port and the container 8000 port.
3.2 YAML Configuration
YAML stands for Yet Another Markup Language. It is related to data serialization. YAML is used for compose configuration. It is saved in .yml or .yaml extension. YAML file consists of the following:
- Compose file version
- Application services
- Volumes consumed by the services
- Networks to be created
Sample YAML configuration
version: '3'

services:

  javacodegeeks_database:
    container_name: javacodegeeks_database
    hostname: javacodegeeks_database
    image: postgres
    volumes:
      - ./volume:/var/lib/postgresql
    environment:
      - POSTGRES_DB=javacodegeeksdb, javacodegeeksdb_dev
      - POSTGRES_USER=mhuls
      - POSTGRES_PASSWORD=aStrongPassword
    ports:
      - 54321:5432
    restart: unless-stopped


  javacodegeeks_api:
    container_name: javacodegeeks_api
    hostname: javacodegeeks_api
    build:
      context: ./javacodegeeks_api
      dockerfile: Dockerfile
    ports:
     - 54322:5000
    volumes:
      - ./javacodegeeks_api/src/:/usr/src/app/
      - /usr/src/app/node_modules
    restart: unless-stopped
    environment:
      NODE_ENV: ${JAVACODEGEEKS_ENVIRONMENT}
    depends_on:
      - javacodegeeks_database


  javacodegeeks_webserver:
      container_name: javacodegeeks_webserver
      hostname: javacodegeeks_webserver
      build:
          context: ./javacodegeeks_webserver
          dockerfile: Dockerfile
      ports:
        - 80:80
        - 443:443
      volumes:
        - ./javacodegeeks_webserver/src/test:/usr/share/nginx/html
      restart: always
      depends_on:
        - javacodegeeks_database
Let us look at the data types supported in YAML configuration
3.2.1 Data Types
The following are the basic data types supported in YAML:
- Integers
- Strings
- Null Types
- Booleans
Now, let us look at collection types supported in YAML configuration
3.2.2 Collections
Collections are related to a set of elements with data type values.The following are different types of YAML collections:
- Mappings
- Sequences
- Combination of Sequence and Mapping
3.2.2.1 Mappings
Mappings consists of values. They can be nested. Different types of mappings supported in YAML compose file are:
- Version
- Services
3.2.2.2 Sequences
Sequences are a list or array of values. They can be nested. Dashes are used to specify the items in a sequence. Indentation shows the level of the item in the sequence.
3.2.2.3 Combinations
Combination of sequence and mapping collections is possible in a yaml configuration. – symbol is used for indentation. Mappings also can be combined with sequence. Line with a – is used with indented mapping in a sequence. You can also use the mapping on the same line as -.
Now, let us look at volumes, compose files, version, services, variables, extension fields, and yaml alternatives in YAML configuration.
3.2.3 Volumes
Volumes are used in compose file mapping to represent next root key. This key is optional. Docker Volume create is same as volume mapping. Volumes can be referenced by the services in the service’s configuration key for volumes.
3.2.4 Compose Files
Compose files are used in Docker Engine. Version 3 is used for Docker version 1.13 and higher. Some of the Compose configuration options are applicable to Docker swarm mode. Some of them are applicable to when not running in swarm mode.
3.2.5 Version
Version of yaml configuration file is a string. It represents the major version number. The version helps in identifying the format of the file to be parsed.
3.2.6 Services
Services are configured in the yaml configuration. Every service has nested mapping for a services key. Every service has a name. Container is configured with multiple services in the yaml configuration.
3.2.7 Variable Substitution
Variables can be substituted for handling different environments like developer, qa, testing, and production. The environmental variables can be substituted by the variable placeholders in a compose file.
3.2.8 Extension Fields
Extension fields have a root key starting with x- and configuration is added below it. YAML anchors help in adding the configuration any where in the yaml configuration. Anchor is like an alias for a specified configuration.
3.2.9 Alternative to YAML
JSON can be alternative format for Docker Compose configuration. JSON files are more readable because of whitespace and YAML are very compact. Features wise YAML has superset of features which JSON has.
3.3 Creating the web server
Now, let’s create the Dockerfile that Compose requires in the same directory as the docker-compose.yml file with the following contents.
Dockerfile
FROM ubuntu:14.04
MAINTAINER javacodegeeks

RUN apt-get update && apt-get install -y python-software-properties software-properties-common
RUN add-apt-repository ppa:webupd8team/java

RUN echo "oracle-java8-installer shared/accepted-oracle-license-v1-1 boolean true" | debconf-set-selections

RUN apt-get update && apt-get install -y oracle-java8-installer maven

ADD . /usr/local/todolist
RUN cd /usr/local/todolist && mvn assembly:assembly
CMD ["java", "-cp", "/usr/local/todolist/target/todolist-1.0-jar-with-dependencies.jar", "com.javacodegeeks.todolist.TodoServer"]
This Dockerfile builds our to-do list project with Maven and starts a specific Java class. Thus, it is necessary to convert our to-do list project into a Maven project. To do so, copy the following pom.xml in the project directory (the same place as Dockerfile and docker-compose.yml.
pom.xml
<project xmlns="http://maven.apache.org/POM/4.0.0" xmlns:xsi="http://www.w3.org/2001/XMLSchema-instance"
	xsi:schemaLocation="http://maven.apache.org/POM/4.0.0 http://maven.apache.org/xsd/maven-4.0.0.xsd">
	<modelVersion>4.0.0</modelVersion>
	<groupId>com.javacodegeeks</groupId>
	<artifactId>todolist</artifactId>
	<version>1.0</version>
	<dependencies>
		<dependency>
			<groupId>biz.paluch.redis</groupId>
			<artifactId>lettuce</artifactId>
			<version>3.3.2.Final</version>
		</dependency>
		<dependency>
			<groupId>commons-io</groupId>
			<artifactId>commons-io</artifactId>
			<version>2.4</version>
		</dependency>
		<dependency>
			<groupId>com.fasterxml.jackson.core</groupId>
			<artifactId>jackson-databind</artifactId>
			<version>2.6.3</version>
		</dependency>
	</dependencies>
	<build>
		<plugins>
			<plugin>
				<artifactId>maven-assembly-plugin</artifactId>
				<version>2.6</version>
				<configuration>
					<descriptorRefs>
						<descriptorRef>jar-with-dependencies</descriptorRef>
					/descriptorRefs>
				</configuration>
			</plugin>
		</plugins>
	</build>
</project>
This POM file uses lettuce( a Java Redis client) and Jackson and commons-io as utility libraries for coding basic HTTP servers in only one Java class. Create this class with the following code:
src/main/java/com/javacodegeeks/todolist/TodoServer.java
package com.javacodegeeks.todolist;

import java.io.IOException;
import java.io.OutputStream;
import java.net.InetSocketAddress;
import java.net.MalformedURLException;
import java.net.URL;
import java.util.List;

import org.apache.commons.io.IOUtils;

import com.fasterxml.jackson.databind.ObjectMapper;
import com.lambdaworks.redis.RedisClient;
import com.lambdaworks.redis.RedisConnection;
import com.lambdaworks.redis.ValueScanCursor;
import com.sun.net.httpserver.HttpExchange;
import com.sun.net.httpserver.HttpHandler;
import com.sun.net.httpserver.HttpServer;

public class TodoServer {

	public static void main(String[] args) throws Exception {
		HttpServer server = HttpServer.create(new InetSocketAddress(8000), 0);
		server.createContext("/", new MyHandler(System.getenv("REDIS_PORT")));
		server.setExecutor(null); // creates a default executor
		server.start();
	}

	static class MyHandler implements HttpHandler {

		private RedisClient redisClient;
		private RedisConnection connection;
		private ObjectMapper mapper;

		public MyHandler(String redisURL) throws MalformedURLException {

			String hostPortURL = redisURL.substring("tcp://".length());
			int separator = hostPortURL.indexOf(':');
			redisClient = new RedisClient(hostPortURL.substring(0, separator),
					Integer.parseInt(hostPortURL.substring(separator + 1)));
			connection = redisClient.connect();
			mapper = new ObjectMapper();
		}

		public void handle(HttpExchange t) throws IOException {
			String method = t.getRequestMethod();
			OutputStream os = t.getResponseBody();
			String response = "";

			if (t.getRequestURI().getPath().equals("/todos")) {
				if (method.equals("GET")) {
					ValueScanCursor cursor = connection.sscan("todos");
					List tasks = cursor.getValues();
					response = mapper.writeValueAsString(tasks);

				} else if (method.equals("PUT")) {

					connection.sadd("todos", IOUtils.toString(t.getRequestBody()));
				}
			}

			t.sendResponseHeaders(200, response.length());
			os.write(response.getBytes());
			os.close();
		}

		@Override
		public void finalize() {
			connection.close();
			redisClient.shutdown();
		}
	}
}
Notice that the TodoServer is assuming that the Redis connection URL appears in an environment variable called REDIS_PORT. However, how to know the names of the available environment variables? Docker defines a standard way to do so here.
3.4 Lauching Docker Compose
All the elements for the example are ready now. So, open your prompt, go to the project directory and run:
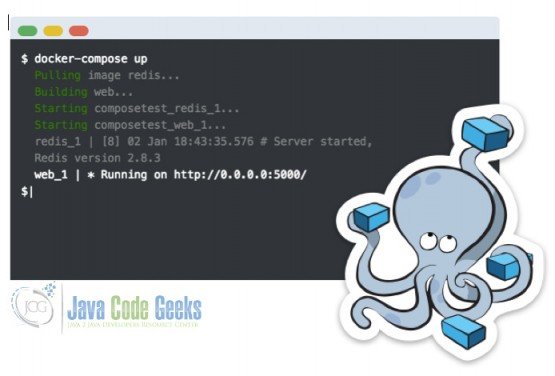
Docker-Compose up command
docker-compose up
Voila! At this moment, we have an HTTP server connected with Redis in our default docker machine. In order to discover the IP of the default docker machine, run the following command.
Docker-Machine ip command
$docker-machine ip default
192.168.99.100
3.5 Testing the web server
Using the output of the previous command, we can test the webserver using the curl command. The available options are:
- Create new tasks:
CURL command to create new taskscurl -X PUT --data "new task" http://192.168.99.100:8000/todos
- List all tasks:
CURL command to List all taskscurl -X GET http://192.168.99.100:8000/todos
4. Download the complete source code
This is an example of how running a Java program with Docker Compose.
You can download the full source code of this example here: Docker Compose Example
Last updated on Dec. 16th, 2021

Dear Ms. Pau, I read this article and did the same things explained here. After executing the ‘docker-compose up’ command, I supposed that every thing was ok and got the message that ‘Redis_1 is ready to accept connection’. For testing the web server I ran the following two commands: curl -X PUT –data “new task” http://192.168.99.100:8000/todos curl -X GET http://192.168.99.100:8000/todos and got this message: curl:(28)operation timed out after 0 milliseconds with 0 out of 0 bytes received. I could not resolve the problem and get the correct reply from curl command. Could you please help to find what was wrong… Read more »