1. Introduction
Kubernetes(k8s) is an open-source container-orchestration management tool that ensures that containers run in the “desired state” all the time. It was developed by Google and released as an open-source project in 2015. The word Kubernetes means “helmsman” in ancient Greek.
Kubernetes is a tool that manages containers with easy deployment, monitoring, scalability, and auto-recovery. According to Kubernetes architecture, the master node has API Server which stores the requests into a database and interacts with a group of worker nodes via controllers. The worker node installs Kubelet and container runtime (e.g. Docker) and monitors the “desired state” in the database and acts upon that.
In this example, I will demonstrate how to:
- Install Kubernetes in a Windows 10 PC.
- Deploy a docker image in a Kubernetes cluster via kubectl CLI command.
- Scale up and down for a container.
- Delete container resources.
2. Install Kubernetes
In this step, I will show how to install Kubernetes in a Windows 10 PC via Docker Desktop. First, click here to install Docker Desktop. Second, enable Kubernetes in Docker Desktop for Windows 10. Please reference https://kubernetes.io/docs/home/ to install the Kubernetes cluster and worker node for the multi-node cluster.
2.1 Enable Kubernetes
In this step, I will enable Kubernetes in the Docker for Desktop. First, click the Docker icon and launch its Settings window and check the “Enable Kubernetes” as the following screenshot.
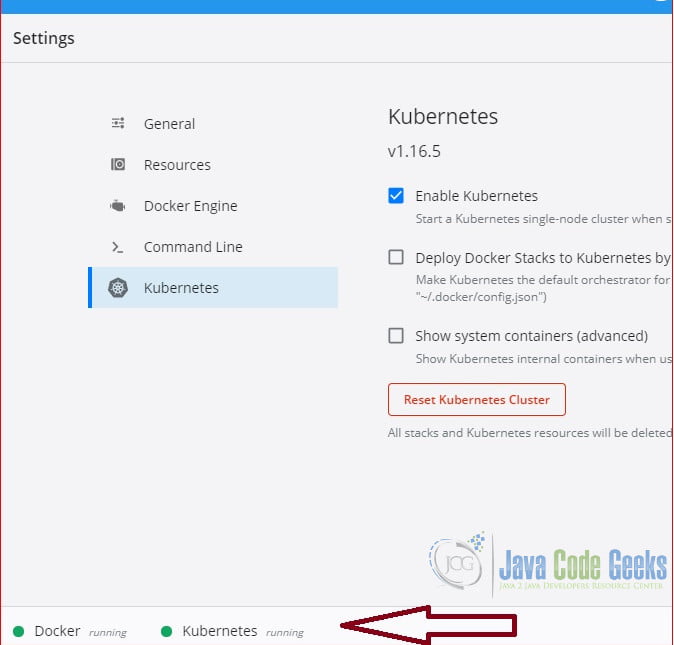
Click the “Apply & Restart” button, it will show a green circle with “Kubernetes running” as Figure 1 after restart.
2.2 Verify Kubernetes Status
You can also verify that Kubernetes is running with kubectl version command.
kubectl version
PS C:\MaryZheng\DockerImages\springbootwebdemo> kubectl version
Client Version: version.Info{Major:"1", Minor:"16+", GitVersion:"v1.16.6-beta.0", GitCommit:"e7f962ba86f4ce7033828210ca3556393c377bcc", GitTreeState:"clean", BuildDate:"2020-01-15T08:26:26Z", GoVersion:"go1.13.5", Compiler:"gc", Platform:"windows/amd64"}
Server Version: version.Info{Major:"1", Minor:"16+", GitVersion:"v1.16.6-beta.0", GitCommit:"e7f962ba86f4ce7033828210ca3556393c377bcc", GitTreeState:"clean", BuildDate:"2020-01-15T08:18:29Z", GoVersion:"go1.13.5", Compiler:"gc", Platform:"linux/amd64"}
PS C:\MaryZheng\DockerImages\springbootwebdemo>
3. Kubectl Commands
Kubernetes provides CLI command tool to interact with Kubernetes cluster and directly manipulate resources via JSON or YAML file. Here is the CLI command syntax:
kubectl [command] [TYPE] [NAME] [flags]
- [command] – Specifies the operation to perform on resources. e.g. version, create, get, apply, run, or delete.
- [TYPE] – case-insensitive resource type. e.g. nodes, pods, images, services.
- [NAME] – case-sensitive resource name. if name is not specified, then all resources for given Type are displayed.
- [flags] – Specifies optional flags to override the default value. -o yaml to change the output format from default plain-text to yaml
In this step, I will demonstrate the usage of several common commands.
3.1 Run the Docker Image
In this step, I will use the kubectl command to run a docker image in a single node Kubernetes cluster. The image: sb-hello-world is built in this article.
kubectl run
PS C:\MaryZheng\DockerImages\kubedemo> kubectl run maryserver --generator=run-pod/v1 --image=sb-hello-world --image-pull-policy=IfNotPresent
pod/maryserver created
PS C:\MaryZheng\DockerImages\kubedemo> kubectl get all
NAME             READY   STATUS    RESTARTS   AGE
pod/maryserver   1/1     Running   0          5s

NAME                 TYPE        CLUSTER-IP   EXTERNAL-IP   PORT(S)   AGE
service/kubernetes   ClusterIP   10.96.0.1    <none>        443/TCP   49s
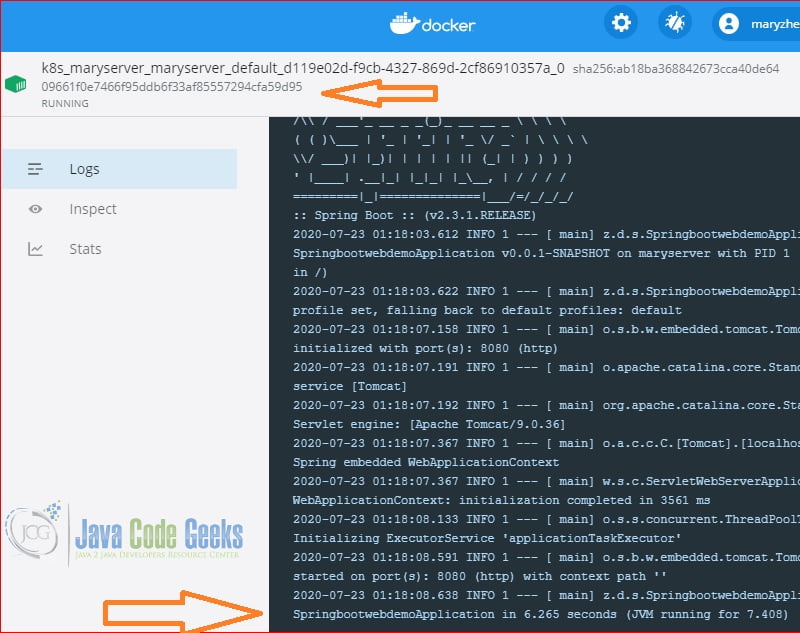
We will verify the container is running by viewing the log.
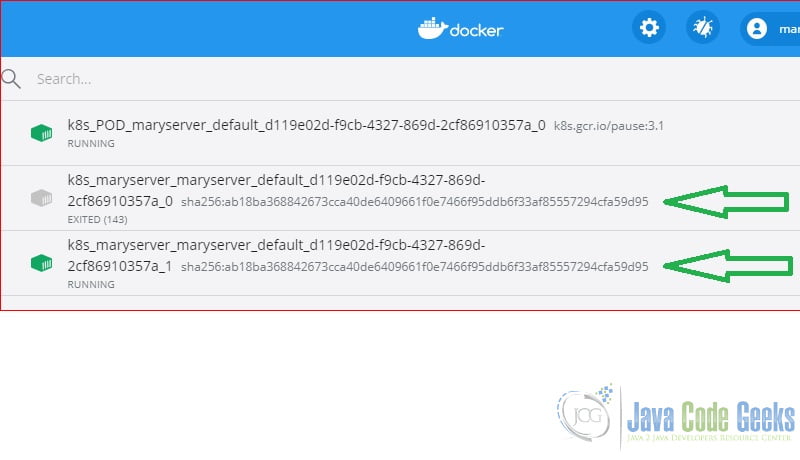
We will confirm that container is auto-recovered when the POD is stopped. As soon as you stopped the POD, a new container is created.
3.2 Port Forward
In this step, I will use the port-forward command to make the application accessible from outside of the container.
kubectl port-forward
PS C:\MaryZheng\DockerImages\kubedemo> kubectl port-forward maryserver 8080:8080
Forwarding from 127.0.0.1:8080 -> 8080
Forwarding from [::1]:8080 -> 8080
Handling connection for 8080
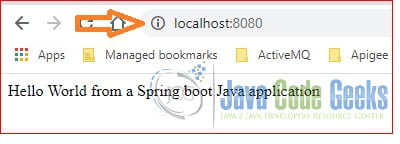
We will verify it by opening a browser and navigating to http://localhost:8080/ and it should display as the following screenshot.
3.3 Clean Up
In this step, I will use delete all command to delete all the resources.
kubectl delete
PS C:\MaryZheng\DockerImages\kubedemo> kubectl delete all --all
pod "maryserver" deleted
service "kubernetes" deleted
PS C:\MaryZheng\DockerImages\kubedemo>
4. Configuration File
Kubernetes makes deployment, scaling, monitoring, and auto-recovery for a containerized application so much easy. All these tasks can be done by Kubernetes based on a configuration file.
In this step, I will create YAML files to manage the following resources:
- POD – runs container and exists on a node. It is the smallest unit of deployment and defines replica sets.
- Deployment – can have several PODs in one deployment.
- Service – define how to expose application as a DNS entry and query based on selector to chose which PODs to apply.
4.1 Deployment YMAL File
The deployment.yaml defines the “desired state” of containers in a YAML.
deployment.xml
apiVersion: apps/v1
kind: Deployment
metadata:
  name: sb-hello-world-deployment
  labels:
    app: sb-hello-world
spec:
  replicas: 1
  selector:
    matchLabels:
      app: sb-hello-world
  template:
    metadata:
      labels:
        app: sb-hello-world
        author: MaryZheng
        created_by: MaryZheng
    spec:
      containers:
      - name: sb-hello-world
        image: sb-hello-world
        imagePullPolicy: IfNotPresent
        ports:
        - containerPort: 8080
          protocol: TCP
- metadata – defines the name and label.
- spec – defines the replica set and image detail.
4.2 Create Deployment
In this step, I will use the apply command to create a POD based on a deployment.yaml file
kubectl apply
PS C:\MaryZheng\DockerImages\kubedemo> kubectl apply -f .\deployment.yaml
deployment.apps/sb-hello-world-deployment created
PS C:\MaryZheng\DockerImages\kubedemo> kubectl get all
NAME                                             READY   STATUS    RESTARTS   AGE
pod/sb-hello-world-deployment-7cd45754c6-hd4hh   1/1     Running   0          29s

NAME                 TYPE        CLUSTER-IP   EXTERNAL-IP   PORT(S)   AGE
service/kubernetes   ClusterIP   10.96.0.1    <none>        443/TCP   78s

NAME                                        READY   UP-TO-DATE   AVAILABLE   AGE
deployment.apps/sb-hello-world-deployment   1/1     1            1           29s

NAME                                                   DESIRED   CURRENT   READY   AGE
replicaset.apps/sb-hello-world-deployment-7cd45754c6   1         1         1       29s
PS C:\MaryZheng\DockerImages\kubedemo>
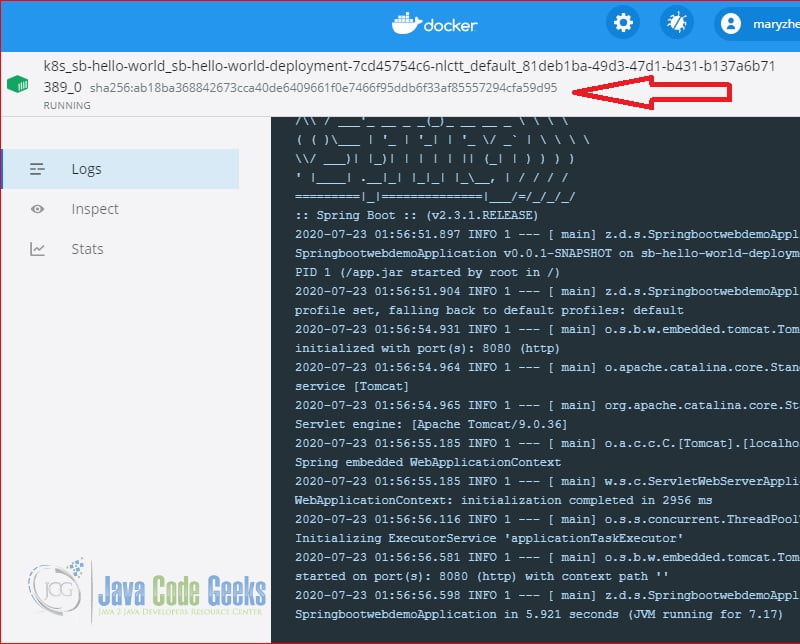
I will verify it by viewing the application log inside container.
4.3 Port Forward
In this step, I will use port-forward command to enable accessing the application.
kubectl port-forward
PS C:\MaryZheng\DockerImages\kubedemo> kubectl port-forward pod/sb-hello-world-deployment-7cd45754c6-hd4hh 8080:8080
Forwarding from 127.0.0.1:8080 -> 8080
Forwarding from [::1]:8080 -> 8080
Handling connection for 8080
I will verify it by opening a browser and access to http://localhost:8080/.
4.4 Expose Service
In this step, I will use expose command for the deployment.
kubectl expose
PS C:\MaryZheng\DockerImages\kubedemo> kubectl expose deploy sb-hello-world-deployment --type=NodePort
service/sb-hello-world-deployment exposed
PS C:\MaryZheng\DockerImages\kubedemo>
It will assign a container port automatically. I will use get command to display the port.
kubectl get service
PS C:\MaryZheng\DockerImages\kubedemo> kubectl get service
NAME                        TYPE        CLUSTER-IP     EXTERNAL-IP   PORT(S)          AGE
kubernetes                  ClusterIP   10.96.0.1      <none>        443/TCP          24m
sb-hello-world-deployment   NodePort    10.107.29.95   <none>        8080:32626/TCP   84s
PS C:\MaryZheng\DockerImages\kubedemo>
Finally, I will verify it by opening a browser and navigating to the port. http://localhost:32626/
4.5 Scale Application
Scale up and down for the container is easy by updating the replica value in the yaml file. All we need to do is changed to replicas: 2. Then apply it again.
kubectl apply
PS C:\MaryZheng\DockerImages\kubedemo> kubectl apply -f .\deployment.yaml
deployment.apps/sb-hello-world-deployment configured
PS C:\MaryZheng\DockerImages\kubedemo> kubectl get all
NAME                                             READY   STATUS    RESTARTS   AGE
pod/sb-hello-world-deployment-7cd45754c6-gjjfc   1/1     Running   0          19s
pod/sb-hello-world-deployment-7cd45754c6-hd4hh   1/1     Running   0          29m

NAME                                TYPE        CLUSTER-IP     EXTERNAL-IP   PORT(S)          AGE
service/kubernetes                  ClusterIP   10.96.0.1      <none>        443/TCP          30m
service/sb-hello-world-deployment   NodePort    10.107.29.95   <none>        8080:32626/TCP   6m59s

NAME                                        READY   UP-TO-DATE   AVAILABLE   AGE
deployment.apps/sb-hello-world-deployment   2/2     2            2           29m

NAME                                                   DESIRED   CURRENT   READY   AGE
replicaset.apps/sb-hello-world-deployment-7cd45754c6   2         2         2       29m
PS C:\MaryZheng\DockerImages\kubedemo>
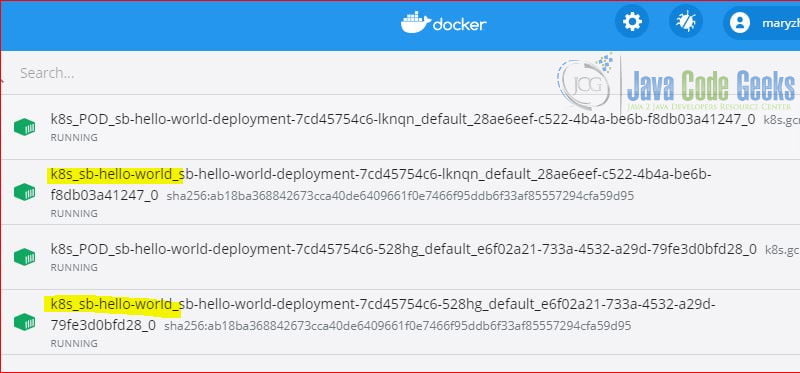
After that, you should see there are two PODs running for the sb-hello-world images as the following screenshot.
5. Summary
In this example, I demonstrated how to use kubectl commands to deploy, scale up, and scale down a container in a kubernetes cluster. Kubernetes makes container management, cluster management, and scheduling much easier than other tools. You can click here to see how many companies use kubernetes.
