1. Introduction
When it comes to a scalable environment you have to think about a software that will help you automatically to scale it up when it’s needed. The Kubernetes is also known as K8 and is an open-source system for automating deployments, scaling application and management of the containerized application. This project is an open-source container orchestration system for automate deployments scaling and management. Initially it was developed by Google and now Cloud Native Computing Foundation maintains this project.
2. What is Kubernetes?
The Kubernetes framework helps you to automate your deployment process and other steps, such as scaling and managing containerized applications. This is portable, extensible for managing workloads, services and facilitates both declarative configuration and automation.
Kubernetes can be available across multiple hosts on-premise, public, private or hybrid clouds. This makes Kubernetes an ideal platform for hosting cloud native applications because it can be scaled easily.
For more information about Kubernetes you can find here. The official documentation you can find here.
2.1. Concept of virtualization
Before going deep into more details about Kubernetes architecture, we will take a look at the virtualization concept going back in time.
In the past the traditional deployment was to run the application on physical servers. The downside for this concept is because we are not able to define boundaries for application in physical servers, and it might cause resource allocation issues. In case you have multiple applications that run on a physical server some of the applications might take most of the resources and the other applications that run on the machine would underperform. The solution in this case will be to run each application on a different physical server.
Virtualization deployment. This comes in complements of the traditional deployments. You will be able to run multiple Virtual Machines(VMs) on a single physical server’s CPU. Using VMs will allow applications to be isolated and introduce a level of security between VMs. Virtualization offers the possibility of better utilization of resources. A VM can have its own operating system and run all the components on top of the virtualization hardware.
Containers deployment. Containers are similar to VMs offering different isolation properties to share with the Operating System among other applications. Compared with the VMs, containers have their own operating system, filesystem, share of CPU, memory and many more. These containers can be portable across clouds and OS distribution.
Containers have the following extra benefits:
- easy to create and run an image compare with the VMs
- continuous development, integration and delivery with quick and efficient rollback
- cloud and OS distribution portability
- environment consistency across development, testing and production
- efficiently resource utilization and resource isolation
3. Where to use it?
Kubernetes can be run on multiple platforms like on-premises, OpenStack, AWS or Azure cloud.
If you want to have a highly scalable application you will need to have a platform that manages the entire servers to offer low latency, high uptime, and scalable instances (for organizations that operate at a massive scale). This orchestration tool is suitable for a containerized application that wants to move it to the next level of resilience infrastructure.
The top big tech companies that are using Kubernetes are:
- Spotify
- Capital One
- The New York Times
- Adidas
- Tinder
- Airbnb
4. How it works?
A container orchestrator, basically, is an administrator that is responsible for managing the fleet of containerized applications. The orchestrator will be in charge in case some of the containers need more resources or need a restart. Kubernetes works like an operating system, it is considered a well-architecture distributed system. All the machines that belong to the cluster are considered as a pool of resources. This tool has the role of a distributed operating system by managing the scheduler, allocating the resources, monitoring the health of the infrastructure and maintaining the workloads and desired state.
As we mentioned before Kubernetes is an operating system capable of running modern applications across multiple clusters and infrastructure in Cloud or private data centers. This consists of two layer head nodes and worker nodes. The head node is responsible for scheduling and managing the life cycle of workloads. On the other hand the worker nodes act as a workhorse that runs the application. The collection of these two layers compose a cluster node. To manage the cluster the communication with the control panel will be through API via command-line interface or other third-party tool. The application can be composed by one or more container images that are stored in an accessible image registry.
5. Pros and Cons
Kubernetes has many advantages of using it, basically coming up with the deployment pattern that manages failovers and backups. The primary focus is to ease deployment and manage the complex distributed system with zero downtime. This system is responsible for one or multiple clusters and detects the availability of each image that is running. The size of the cluster can be from 2 to thousands of machines and containers distributed among different cloud providers, if needed. In case of a failure on a node the tool will be able to start-up another node while keeping the entire cluster operational.
5.1. Advantages of using Kubernetes
- approach the concept of self-healing only for PODs with the default configuration, but Kubernetes may provide further integration of self-healing layers to ensure application reliability.
- developers can deploy workloads on the entire cluster and not just on a particular server leveraging the computing resources.
- monitor several simultaneously running containers.
- Kubernetes enables workload portability without limiting the types of applications it supports.
- offers load-balancing service and provides individual IP addresses for every pod and a single DNS name for a set of pods.
- portable and cost-effective platform. It demands especially lesser computing resources to operate. For your containers you can set up max and and minimum for the CPU and memory resources.
5.2. Disadvantages of using Kubernetes
- using in an un proper type of application, local developments or simple application.
- Kubernetes might come with complexity for local development that can diminish productivity.
- transition to Kubernetes can be confusing for new users, slow, complicated and challenging to manage.
- Kubernetes is complex and the learning curve is a bit steep and it needs an expert with more in-depth knowledge on K8.
- There are a lot of advantages in Kubernetes but leveraging all of the benefits it might consume a lot of time, effort and resources. The team should gain knowledge to familiarize with this new concept and workflow.
- virtualization isn’t perfect, for high performance applications it strictly depends where your application is running. Pods with high network utilization will impact co-located pods. Pods with high disk IO will impact pods using the same volume.
6. Architecture
In this section we will discuss each component from the Kubernetes architecture.

Web-UI (Dashboard) is an add-on web based UI for Kubernetes cluster. Through this UI a user can manage and troubleshoot running applications in the cluster, as well as the cluster itself.
Kubectl is a command line tool that allows you to run commands against the Kubernetes cluster. With Kubectl you can deploy applications, inspect and manage cluster resources as well as viewing the logs.
6.1. Components of control panel
Control panel components make global decisions about the cluster as well as detecting and responding to cluster events. This control panel can run on any machine in the cluster.
Kube-apiserver is a component of the Kubernetes control panel that exposes the Kubernetes API. This server is in the front-end of the Kubernetes control panel. The main role of kube-apiserver is to scale horizontally by deploying more instances.
etcd is basically a database to store key-value data for all clusters. If you use etcd as its backing store make sure you have a back up plan for that data.
kube-scheduler watches the newly created pods with no assigned node and selects a node for them to run on. Some things to take into consideration for scheduling decisions include: individual and collective resource requirements, hardware/software/policy constraints, affinity and anti-affinity specification, data locality, inter-workload interference and deadlines.
kube-controller-manager manages the controller processes. Besides that, each controller is a separate process, but to reduce complexity they are compiled into a single binary and run in a single process.
Types of controllers are:
- Node controller. Monitor and notify when a node goes down.
- Job controller. Looking for job objects that represent one-off tasks, then creates Pods to run those tasks to completion.
- Endpoints controller. Populates the endpoints objects (Services and Pods).
- Service Account and Token Controllers. Ensure the creation of default accounts and API access tokens for new namespaces.
Above all there is another component called cloud-controller-manager. This contains cloud specific logic.
6.2. Node components
Node components are responsible to maintain running pods and provide the Kubernetes runtime environment. These components are running on every node.
kublet is an agent that runs on each node in the cluster. The responsibility is to make sure that containers are running in a Pod. This takes a set of PodSpecs that are provided through various mechanisms and ensures that the containers described are running and are healthy. Kublet doesn’t take care of containers which are not created by Kubernetes.
kube-proxy is a network proxy that runs on each node in the cluster. This is responsible for maintaining network rules on nodes. With this network rules allows you to communicate to your Pods from network sessions inside or outside of your cluster. The kube-proxy uses the concept of an operating system packet filtering layer if it’s available otherwise will forward the traffic itself.
Container running. Software that is responsible for running containers. Kubernetes supports container runtime such as container, CRI-O, or any other implementation of Kubernetes CRI (Container Runtime Interface).
Above all mentioned you can add some add-ons. The add-on uses Kubernetes resources to implement cluster features. These are cluster level features, namespace resources that belong to the kube-system namespace.
Some of the example of addons are:
- DNS
- Container Resource Monitoring
- Cluster-Level Logging
7. Setup (Linux-based system)
Installing Kubernetes on your local machine (single instance) isn’t really recommended. In case you want to install, it needs to have multiple instances. It is recommended at least two nodes(one master node and a worker node). Proceeding further you have to make sure that you have sudo/root access and a package manager. Before you start, run an update package list: sudo apt-get update.
7.1. Install container
First of all you have to install docker. To install docker run this command: sudo apt-get install docker.io. To check your docker version run: docker --version
Enabling docker at the boot run you have to run this command: sudo systemctl enable docker
Install the docker service on the other machine that you want to run Kubernetes.

7.2. Install Kubernetes
To install Kubernetes you have to firstly add the signing key. Execute this command to add that: curl -s https://packages.cloud.google.com/apt/doc/apt-key.gpg | sudo apt-key add. In case you don’t have installed curl run this command: sudo apt-get install curl. Repeat the previous command on the other node to add the signing key.
Since the Kubernetes is not included in the default repository to add them running this command: sudo apt-add-repository "deb http://apt.kubernetes.io/ kubernetes-xenial main"
7.3. Install Kubernetes tools
Kubeadm(Kubernetes Admin) this tool will help you to initialize the cluster.
Kubelet is the work package. This service runs on every node and starts containers.
Kubectl gives you command-line access to the cluster.
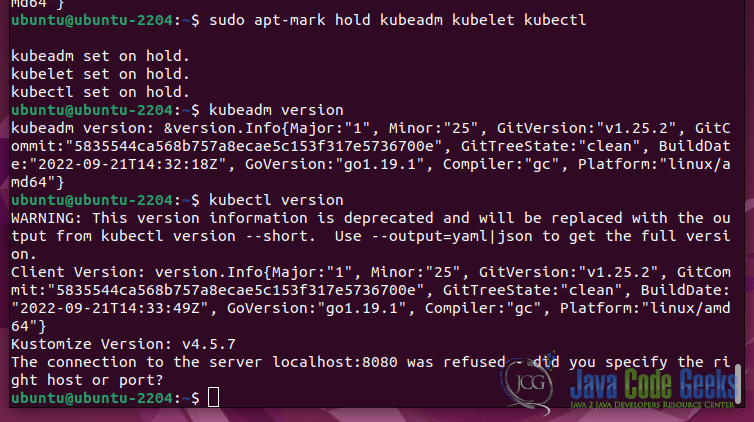
To install these tools execute this command: sudo apt-get install kubeadm kubelet kubectl.
To check the version of the kubeadm run: kubeadm version.
Repeat tool installation on each node.
After you will install all the tools you will be able to see the versions for each tool.
7.4. Deploying with Kubernetes
To start deploying with Kubernetes, disable memory swap on each server with this command: sudo swapoff –a
For each node define a host name.
Defining the master node with this command: sudo hostnamectl set-hostname master-node.
Defining the worker nodes with this command: sudo hostnamectl set-hostname worker-node.


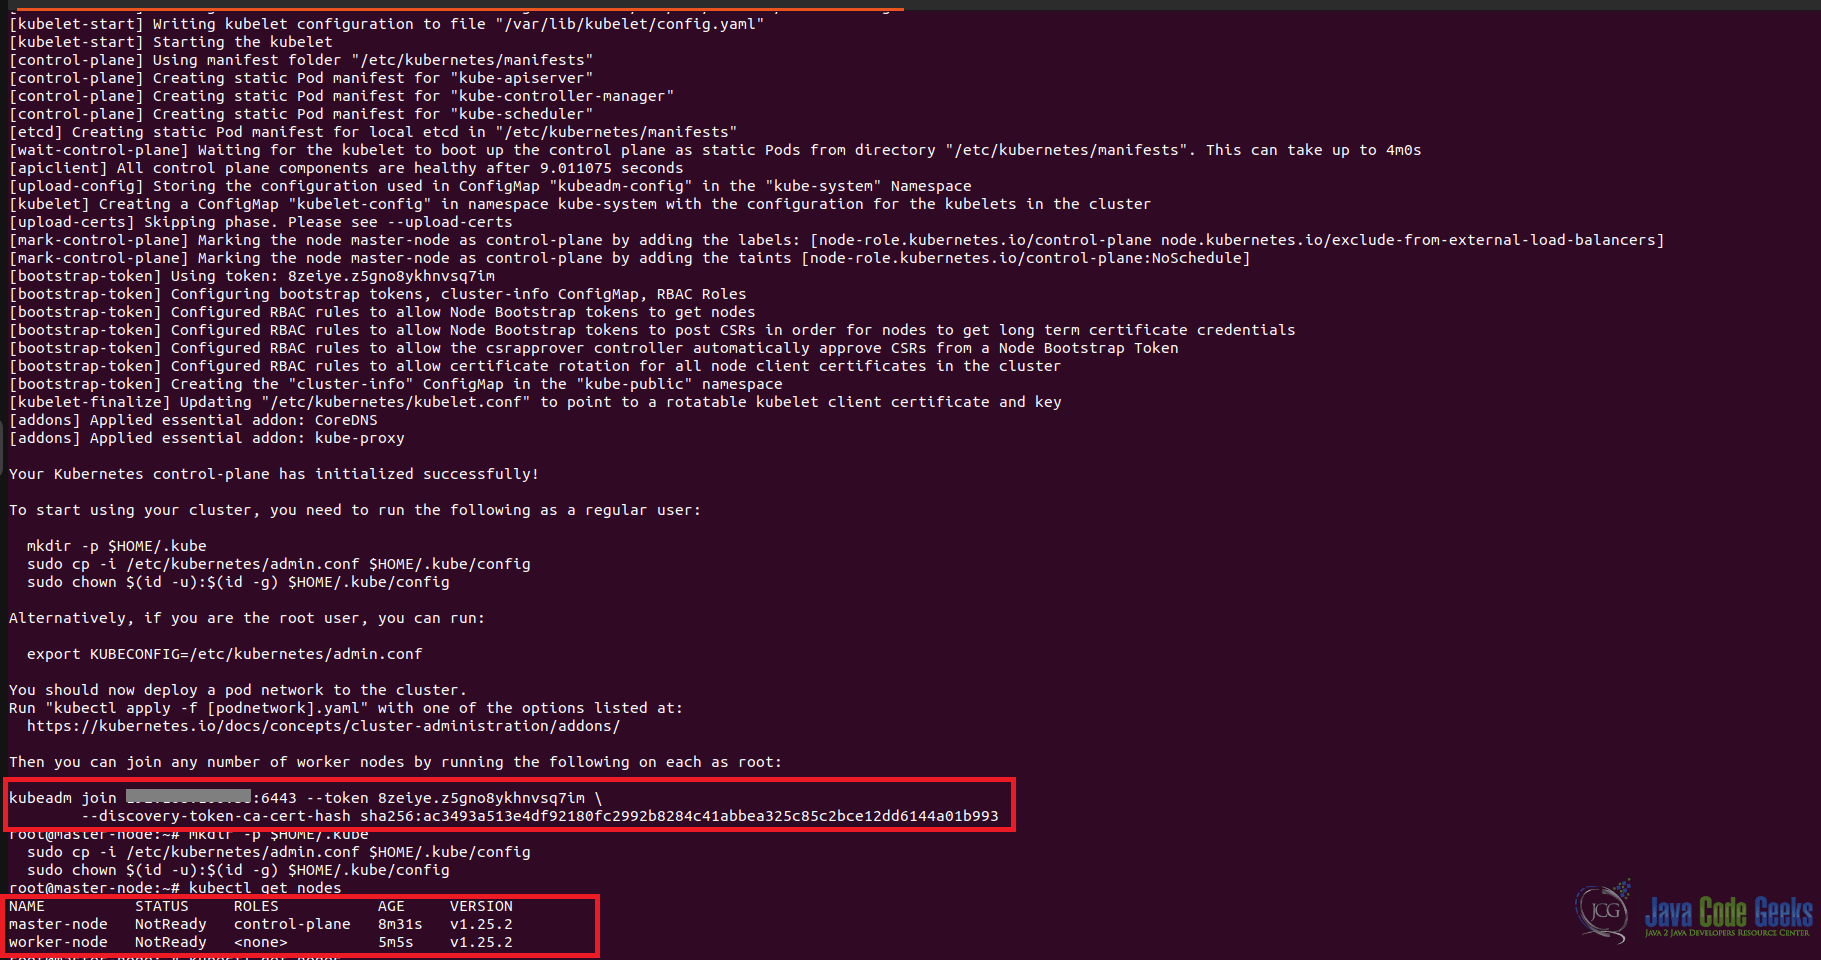
Setup master node network with this command: sudo kubeadm init --pod-network-cidr=192.168.0.0/16 (put your IP address and a network mask). After this command ends it will display a kubeadm join. Next create a directory for the cluster:
mkdir -p $HOME/.kube
sudo cp -i /etc/kubernetes/admin.conf $HOME/.kube/config
sudo chown $(id -u):$(id -g) $HOME/.kube/config
OPTIONAL: Configure a POD network to cluster. POD network is a way to allow communication between different nodes in the cluster. For the purpose of this article we will use flannel virtual networks. To configure run this command on worker nodes: sudo kubectl apply -f https://raw.githubusercontent.com/coreos/flannel/master/Documentation/kube-flannel.yml
To join the worker nodes to cluster run this command: kubeadm join --discovery-token <codes_from_master_server> --discovery-token-ca-cert-hash <codes_from_master_server>
Check the status node with this command: kubectl get nodes
8. Useful commands in Kubernetes
kubectl get pods -> returns all the pods that are present

kubectl run redis --image=redis123 --generator=run-pod/v1 -> create a new redis pod.(it's also possible with file definition)

kubectl describe pod -> information about the pod

kubectl edit pod redis123 -> edit an existing pod.

kubectl get pods -o wide -> returns detailed information about PODs.

kubectl delete pod nginx -> delete a pod

kubectl create -f redis-pod.yaml -> creates a new pod with the pod definition file.

kubectl get replicationcontroller -> how many replication controllers are.

kubectl scale --replicas=6 -f replicaset-definition.yaml -> update the replica parameters.

kubectl scale --replicas=6 replicaset myapp=replicaset -> the same as previous, but this will not update the file of pod definition.

kubectl delete replicaset myapp-replicaset -> also deletes all underlying PODs

kubectl get replicaset or kubectl get rs -> get all replica set

kubectl edit replicaset redis123 -> edit a replica set

kubectl scale rs new-replica-set --replicas=5

kubectl get all -> we can see all the information that exist in kubernetes like:
deployment replica set and pods.

kubectl run --generator=run-pod/v1 nginx --image=nginx --dry-run -o yaml -> generate a POD manifest yaml file.

kubectl create deployment --image=nginx nginx	-> create a deployment.

kubectl create deployment --image=nginx nginx --dry-run -o yaml -> generate deployment yaml file.

kubectl create deployment --image=nginx nginx --dry-run -o yaml > nginx-deployment.yaml-> generate deployment yaml file

kubectl get pods -> get all pods from a default namespace

kubectl get pods --namespace=kube-system -> get all PODs from kube-system.

kubectl get pods --all-namespaces -> return all pods from all namespaces.

kubectl get namespaces -> get all namespaces.

kubectl create -f pod-definition.yml --namespace=dev -> create a pod in a namespace.

kubectl create namespace dev -> create new namespace

kubectl run redis --image=redis --generator=run-pod/v1 --namespace=finance -> create a new pod in a desired namesapce.

kubectl get services -> see all the services.
9. Conclusion
In this article you will understand the concept of the Kubernetes, what this tool is, where to use it and how to use it. Besides the basic concept about Kubernetes you will gain knowledge about architecture concepts and how these components are working together to build such a powerful tool for automatic deployment and scaling application.
