Hello. In this tutorial, we will explain what microservices are and how to use them.
1. Introduction
Microservices in their real meaning is to develop a single application as a suite of independent small applications where each small application (known as microservice) runs its process and communicates with each other in the lightest way possible (such as with the help of synchronous or asynchronous communication).
- Microservices are exposed as RESTful services
- Microservices are small services that can act as deployable units
- Microservices can be cloud-enabled
- Microservices is an SOA based architecture (i.e. Service Oriented architecture) meaning dividing the single application into smaller parts which each part implements business logic and is loosely coupled with other parts
- Follows the Microservices principle –
- Single responsibility principle where each microservice has only one responsibility
- Each microservice is modeled around a particular business domain
- Each microservice has its own failure mechanism so that the larger application remains unaffected and the failure can be detected quickly. If possible restore them
- Each microservice offers the independent deployment
1.1 Microservices benefits
Microservices offers many advantages such as:
- Big style monolithic applications are broken down into smaller parts making it easy for developers to code and maintain
- With the microservices architecture in place, it has become easier for the developer to adapt different technology for each smaller application
- Each smaller application (known as microservices) can independently scale based upon the application needs
- Cost-effective and smaller size
1.2 Microservices disadvantages
Like every new architecture which has its advantages it also offers some of the restrictions like –
- Each microservice configuration becomes a headache for configuration management as the developer becomes responsible for maintaining the configuration of different microservices in different environments
- Tracking down each microservice calling is a painful job
- Automation of continuous integration and continuous deployment for each microservice is a headache when the count of microservices increases with the new features coming up for the product
- Testing also becomes a tough job
1.3 Microservices technology and tools
Some different techniques and tools are involved in microservices implementation. Some of these techniques and tools are –
- Spring boot – One of the best frameworks to write business code as per the service-oriented architecture. Offers flexibility like Inversion of Control, Aspect-Oriented programming, JPA, Removing boilerplate code, etc
- Dropwizard – Offers a simple lightweight of writing the microservices
- Restlet – It is a framework famous among the Java developers to write endpoints following the RESTful architecture
- Spark – Microservices basis the Java 8 and Kotlin style
- Docker – Open source code to create, deploy, and run the application with the help of containers where developers can use these containers to run the application as a single package
- Hystrix – Popularly known as a fault-tolerance java library
2. What Microservices are through examples
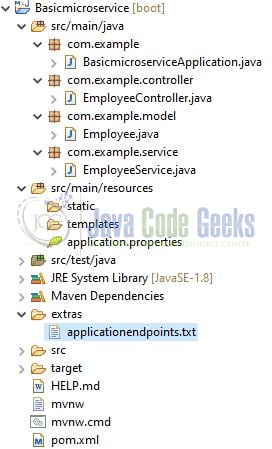
Let us dive into Spring boot programming stuff where we will create a simple microservice consisting of a controller and a mock service returning the employees’ data. We are using Eclipse Kepler SR2, JDK 8, and Maven. In case you’re confused about where you should create the corresponding files or folder, let us review the project structure of the spring boot application.
Let us start building the application!
3. Creating a Spring Boot application
Below are the steps involved in developing the application.
3.1 Maven Dependency
Here, we specify the dependency for the Spring boot application and Lombok. The updated file will have the following code.
pom.xml
<?xml version="1.0" encoding="UTF-8"?>
<project xmlns="http://maven.apache.org/POM/4.0.0" xmlns:xsi="http://www.w3.org/2001/XMLSchema-instance"
	xsi:schemaLocation="http://maven.apache.org/POM/4.0.0 https://maven.apache.org/xsd/maven-4.0.0.xsd">
	<modelVersion>4.0.0</modelVersion>
	<parent>
		<groupId>org.springframework.boot</groupId>
		<artifactId>spring-boot-starter-parent</artifactId>
		<version>2.5.1</version>
		<relativePath/> <!-- lookup parent from repository -->
	</parent>
	<groupId>com.springboot</groupId>
	<artifactId>Basicmicroservice</artifactId>
	<version>0.0.1-SNAPSHOT</version>
	<name>Basicmicroservice</name>
	<description>Demo project for Spring Boot</description>
	<properties>
		<java.version>1.8</java.version>
	</properties>
	<dependencies>
		<dependency>
			<groupId>org.springframework.boot</groupId>
			<artifactId>spring-boot-starter-web</artifactId>
		</dependency>

		<dependency>
			<groupId>org.projectlombok</groupId>
			<artifactId>lombok</artifactId>
			<optional>true</optional>
		</dependency>
		<dependency>
			<groupId>org.springframework.boot</groupId>
			<artifactId>spring-boot-starter-test</artifactId>
			<scope>test</scope>
		</dependency>
	</dependencies>

	<build>
		<plugins>
			<plugin>
				<groupId>org.springframework.boot</groupId>
				<artifactId>spring-boot-maven-plugin</artifactId>
				<configuration>
					<excludes>
						<exclude>
							<groupId>org.projectlombok</groupId>
							<artifactId>lombok</artifactId>
						</exclude>
					</excludes>
				</configuration>
			</plugin>
		</plugins>
	</build>

</project>
3.2 Application properties file
Create a new properties file at the location: Basicmicroservice/src/main/resources/ and add the following code. You’re free to change the application details as per your wish.
application.properties
server.port=8181
spring.application.name=basicmicroservice
3.3 Java Classes
Let us write the important java class(es) involved in this application.
3.3.1 Implementation/Main class
Add the following code to the main class to bootstrap the application from the main method. Always remember, the entry point of the spring boot application is the class containing @SpringBootApplication annotation and the static main method.
BasicmicroserviceApplication.java
package com.example;

import org.springframework.boot.SpringApplication;
import org.springframework.boot.autoconfigure.SpringBootApplication;

import lombok.extern.slf4j.Slf4j;

@SpringBootApplication
@Slf4j
public class BasicmicroserviceApplication {

	public static void main(String[] args) {
		SpringApplication.run(BasicmicroserviceApplication.class, args);
		log.info("Application started successfully");
	}
}
3.3.2 Model class
Add the following code to the model class. This model class will be responsible for the database entity model as well. However, for simplicity, we are skipping it in this tutorial.
Employee.java
package com.example.model;

import org.springframework.stereotype.Component;

import lombok.AllArgsConstructor;
import lombok.Data;
import lombok.NoArgsConstructor;

@Component
@Data
@NoArgsConstructor
@AllArgsConstructor
public class Employee {

	int id;
	String name;
}
3.3.3 Service class
Add the following code to the service class which interacts with the database interface to fetch the data from the database. However, for simplicity, I am omitting the database part and focusing on the basic microservice implementation.
EmployeeService.java
package com.example.service;

import java.util.ArrayList;
import java.util.List;

import org.springframework.stereotype.Service;

import com.example.model.Employee;

@Service
public class EmployeeService {

	private static final List<Employee> employees = new ArrayList<>();

	{
		employees.add(new Employee(1, "John"));
		employees.add(new Employee(2, "Jane"));
		employees.add(new Employee(3, "Joseph"));
		employees.add(new Employee(4, "Jack"));
		employees.add(new Employee(5, "Jade"));
	}

	public List<Employee> getAllEmployees() {
		return employees;
	}

	public Employee getEmployee(final int id) throws Exception {
		return employees
				.stream()
				.filter(employee -> employee.getId() == id)
				.findFirst()
				.orElseThrow(() -> new Exception("Entity not found"));	// can be custom based exception also such as EntityNotFoundException
																		// can also return null
	}

	// Note - The database part is skipped for brevity.
}
3.3.4 Controller class
Add the following code to the controller class to create the application endpoints.
EmployeeController.java
package com.example.controller;

import java.util.List;

import org.springframework.beans.factory.annotation.Autowired;
import org.springframework.http.HttpStatus;
import org.springframework.web.bind.annotation.GetMapping;
import org.springframework.web.bind.annotation.PathVariable;
import org.springframework.web.bind.annotation.RequestMapping;
import org.springframework.web.bind.annotation.ResponseStatus;
import org.springframework.web.bind.annotation.RestController;

import com.example.model.Employee;
import com.example.service.EmployeeService;

import lombok.extern.slf4j.Slf4j;

@RestController
@RequestMapping("/api")
@Slf4j
public class EmployeeController {

	@Autowired
	EmployeeService service;

	// get all employees
	// http://localhost:8181/api/employees
	@GetMapping("/employees")
	@ResponseStatus(HttpStatus.OK)
	public List<Employee> getEmployees() {
		log.info("Fetching all employees");
		return service.getAllEmployees();
	}

	// get employee by id
	// http://localhost:8181/api/employee/1
	@GetMapping("/employee/{id}")
	@ResponseStatus(HttpStatus.OK)
	public Employee getEmployee(@PathVariable(value= "id") final int id) throws Exception {
		log.info("Fetching employee with id = {}", id);
		return service.getEmployee(id);
	}
}
4. Run the Application
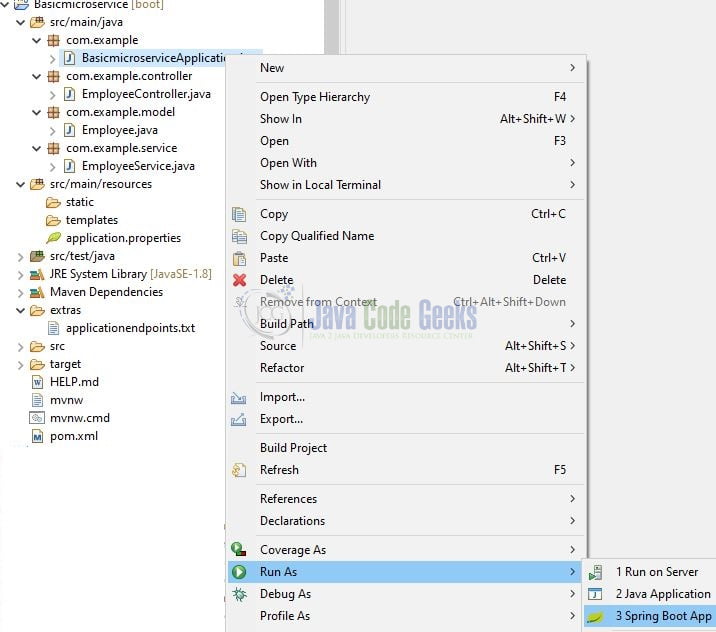
To execute the application, right-click on the BasicmicroserviceApplication.java class, Run As -> Java Application.
5. Project Demo
When the application is started successfully on the port number – 8181 we will test the application endpoints. The following endpoints will be generated successfully post-application startup.
// get all employees
http://localhost:8181/api/employees

// get employee by id
http://localhost:8181/api/employee/1
That is all for this tutorial and I hope the article served you whatever you were looking for. Happy Learning and do not forget to share!
6. Summary
This was a tutorial to learn about microservices and how to use them using the spring boot example. You are free to create any other microservice application in different programming languages, such as Dropwizard, Spark, Docker, etc. Specifically:
- we made an introduction to microservices
- we created simple example programs
You can download the sample application as an Eclipse project in the Downloads section.
7. Download the Project
You can download the full source code of this example here: What are Microservices?
