This article provides a comprehensive guide on using Liquibase, a popular database version control tool, in Kubernetes environments.
1. Introduction to Liquibase and Kubernetes
1.1 What is Liquibase
Liquibase is an open-source database schema change management solution that enables developers to manage database changes. It allows developers to release and revise database changes faster from development to production.
1.2 What is Kubernetes
Kubernetes is an open-source container orchestration tool that automates the deployment, scaling, and management of containerized applications.
1.3 Benefits of Using Liquibase in Kubernetes
Using Liquibase in Kubernetes brings version control, rollback capabilities, and automation to your database schema management process for containerized applications running on Kubernetes. The list below outlines and explains some benefits of using Liquibase in Kubernetes.
- Version Control for Database Changes: Liquibase allows developers to version control their database schema changes, just like with code changes.
- Automated Database Schema Management: Liquibase allows developers to define database schema changes in a declarative manner using XML, YAML, or JSON formats. By integrating Liquibase with Kubernetes, developers can automate the application of these changes to their database, reducing the manual effort required to manage database schemas.
- Rollback Support: Kubernetes enable easy rollback to previous versions. If a database schema change causes issues, developers can easily roll back to a previous version of the schema.
- Continuous Deployment and CI/CD Integration: Integrating Liquibase with Kubernetes allows developers to include database schema changes as part of their continuous deployment process, ensuring that both application and database changes are deployed in sync.
2. Setting up a Kubernetes Cluster
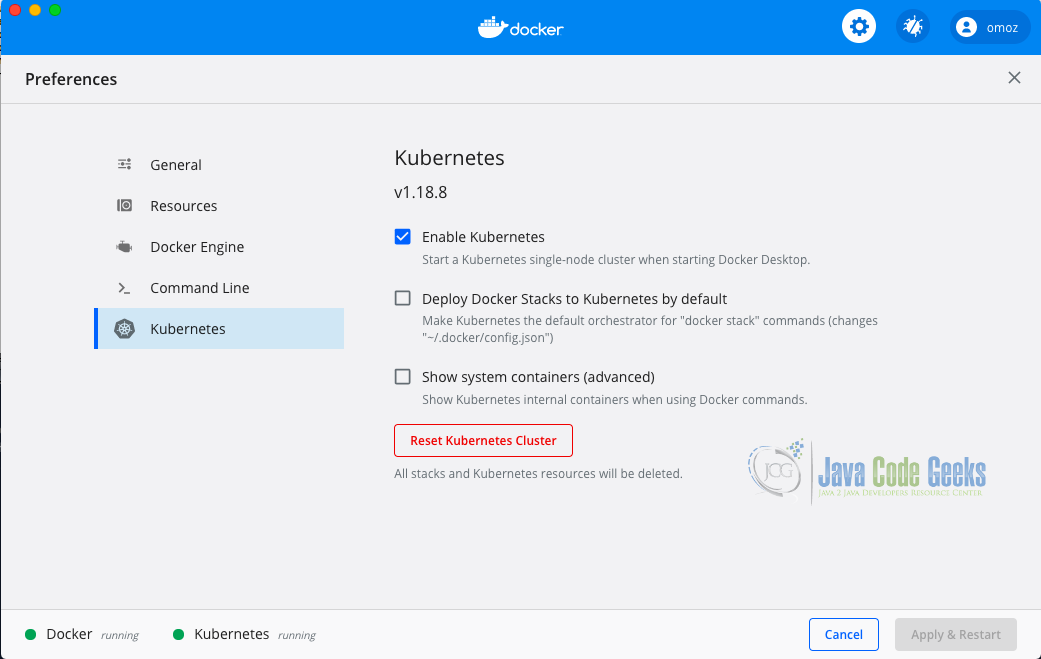
Kubernetes runs in containers. To set up a Kubernetes cluster, firstly, we will need to install Docker Desktop and have it running. To get a Kubernetes cluster running on a Mac, Click on the whale Docker logo in the menu bar and select Preferences. A screen opens with the Docker Desktop configuration options. Next, Click on Kubernetes and check the Enable Kubernetes checkbox and click on the Apply and Restart button. Docker Desktop will download all the Kubernetes images and get everything started up. After everything is started up and ready, there would be a green light at the bottom of the screen settings indicating that Kubernetes is running as shown in the image below
2.1 Verify Kubernetes Cluster
Kubernetes uses kubectl to manage apps and containers. Docker Desktop installs kubectl and to check the state of the Docker Desktop Kubernetes cluster, run the following command below on a terminal
kubectl get nodes
The result of running the command outputs a single node called docker-destop which is a full Kubernetes cluster that runs the Kubernetes API server as shown below

3. Deploying a Database in Kubernetes
In this section, we will deploy a MySQL database to the Kubernetes cluster we set up in our local host machine. We will create a MySQL deployment, add persistent storage, and expose the deployment with a service. We will be using YAML/YML files to define our Kubernetes resources. The list below provides detailed explanations of some Kubernetes terminologies that would be used to accomplish this.
PersistentVolume: A Kubernetes object that is a piece of storage in the cluster.PersistentVolumeClaim: A request for storage by a user.Pod: Small deployable units that encapsulate applications that you can create and manage in Kubernetes.Service: A Kubernetes Object that provides a way to access a pod or container.Deployment: A Kubernetes Object that monitors a set of pods and ensures that these pods are running and also makes sure to restart them if they are down.Kubernetes Config File: A file that is written inYAML or YMLthat tells Kubernetes about the different objects to be created.
3.1 Create a PersistentVolume
First, create a folder named javacodegeeks or any name of your choice and navigate into the folder. Next, create a YAML/YML file named mysql-persistentvolume.yml to create a PersistentVolume with the following content
## YAML Template.
---
apiVersion: v1
kind: PersistentVolume
metadata:
  name: mysql-persistentvolume
  labels:
    type: local
spec:
  storageClassName: manual
  capacity:
    storage: 1Gi
  accessModes:
    - ReadWriteOnce
  hostPath:
    path: "/mnt/data"
3.2 Create a PersistentVolumeClaim
Create a file name mysql-persistentvolumeclaim.yml that would be used to create the PersistentVolumeClaim. This will add persistent storage to the MySQL pod which will request for 1GB of storage with ReadWriteOnce access mode. Below is the content of the mysql-persistentvolumeclaim.yml file
## YAML Template.
---
apiVersion: v1
kind: PersistentVolumeClaim
metadata:
  name: mysql-persistentvolumeclaim
spec:
  storageClassName: manual
  accessModes:
    - ReadWriteOnce
  resources:
    requests:
      storage: 1Gi
3.3 Create MySQL Deployment Pod
Next, we will create a deployment object to manage the pod running a MySQL container with the necessary configuration and also with a reference to the PersistentVolumeClaim. Create a YAML/YML file called mysql-deployment.yml in the same folder with the following content
## YAML Template.
---
apiVersion: apps/v1
kind: Deployment
metadata:
  name: mysql
spec:
  selector:
    matchLabels:
      app: mysql
  strategy:
    type: Recreate
  template:
    metadata:
      labels:
        app: mysql
    spec:
      containers:
        - image: mysql:8.0.23
          name: mysql
          env:
            - name: MYSQL_ROOT_PASSWORD
              value: password
          ports:
            - containerPort: 3306
              name: mysql
          volumeMounts:
            - name: mysql-persistent-storage
              mountPath: /var/lib/mysql
      volumes:
        - name: mysql-persistent-storage
          persistentVolumeClaim:
            claimName: mysql-persistentvolumeclaim
3.4 Create a Service to Expose MySQL
Next is to create a service object that will permit other pods to access the MySQL database pod. We will create a service object that will expose port 3306 for the MySQL database. Create a YML/YAML file named mysql-service.yml with the following contents
## YAML Template.
---
apiVersion: v1
kind: Service
metadata:
  name: mysql-service
spec:
  ports:
    - port: 3306
  selector:
    app: mysql
  clusterIP: None
3.5 Apply Config Files
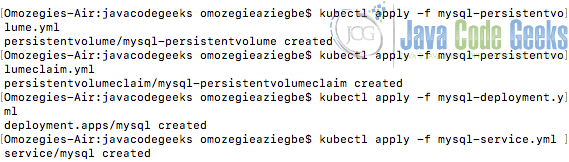
Now we will use the kubectl apply command to tell Kubernetes to use the config files to create a Persistent Volume, a Persistent Volume Claim, a Deployment that manages a Pod containing MySQL and a Service that allows access to the Pod. Note that this command should be applied in sequential order.
3.5.1 STEP 1: Apply the PersistentVolume
Create the PersistentVolume with the following command
kubectl apply -f mysql-persistentvolume.yml
3.5.2 STEP 2: Apply the PersistentVolumeClaim
Create the PersistentVolumeClaim with the following command
kubectl apply -f mysql-persistentvolumeclaim.yml
3.5.3 STEP 3: Create the Deployment
Create the deployment with the following command
kubectl apply -f mysql-deployment.yml
3.5.4 STEP 4: Create the Service
Create the service with the following command
kubectl apply -f mysql-service.yml
The output on a terminal from applying the above commands is shown below
3.5.5 Confirm Kubernetes Objects
To check if the Kubernetes objects were created successfully, use the commands from the table below
| Kubernetes Get Commands | Description |
|---|---|
kubectl get deployments | Checks if the Deployment was created |
kubectl get pods | List all pods in the namespace |
kubectl get service | List all services in the namespace |
4. Installing Liquibase in Kubernetes
From the research done, the best method to use Liquibase in Kubernetes is to make use of init containers. There is an official Liquibase base image to use in Kubernetes. An initContainer runs before the main container which means that the init container will run Liquibase to update the database schema before our main application container starts.
4.1 Liquibase Set up
Liquibase needs Java to run. First, create an independent Dockerfile for the initContainer. This file would contain the Liquibase tool and the dependencies needed such as the JDBC driver for MySQL mysql-connector-java-8.0.23.jar .
In the project folder, create a file named Dockerfile. The code below shows the content of the Dockerfile.
FROM openjdk:8-jdk-alpine

RUN apk add --update bash curl

ENV LIQUIBASE_VERSION=4.22.0

RUN curl -L https://github.com/liquibase/liquibase/releases/download/v${LIQUIBASE_VERSION}/liquibase-${LIQUIBASE_VERSION}.tar.gz \
    | tar -xz -C /opt \
    && ln -s /opt/liquibase-${LIQUIBASE_VERSION}/liquibase /usr/local/bin/liquibase

RUN curl -L https://repo1.maven.org/maven2/mysql/mysql-connector-java/8.0.23/mysql-connector-java-8.0.23.jar \
    -o /opt/mysql-connector-java-8.0.23.jar
4.2 Create a Kubernetes Deployment for the Application
Next, create a new Kubernetes deployment for the application.
4.2.1 Use Init Containers to run Migration
Let’s configure Kubernetes to use the Dockerfile as an initContainer. Create the deployment definition YAML/YML file named new-app-deployment.yml in the same folder and add the following content
## YAML Template.
---
apiVersion: apps/v1
kind: Deployment
metadata:
  name: mysql
spec:
  selector:
    matchLabels:
      app: mysql
  template:
    metadata:
      labels:
        app: mysql
    spec:
      initContainers:
      - name: liquibase
        image: liquibase/liquibase:latest
        env:
        - name: LIQUIBASE_URL
          value: jdbc:mysql://mysql-database:3306/database-name
        - name: LIQUIBASE_USERNAME
          value: user
        - name: LIQUIBASE_PASSWORD
          value: password
        command: ["liquibase", "update"]
        volumeMounts:
        - name: liquibase-config
          mountPath: /liquibase/
      - name: mysql
        image: mysql:latest
        ports:
        - containerPort: 8080
        env:
        - name: DATABASE_URL
          value: jdbc:mysql://mysql-database:3306/database-name
        - name: DATABASE_USERNAME
          value: user
        - name: DATABASE_PASSWORD
          value: password
      volumes:
      - name: liquibase-config
        configMap:
          name: liquibase-config
4.3 Create a ConfigMap to Store Liquibase ChangeLogs
ConfigMaps are components of Kubernetes that are used to maintain container images by separating the configuration settings. It is recommended to store the Liquibase ChangeLog file in Kubernetes using ConfigMaps. Now, let’s create a ConfigMap to store our Liquibase configuration settings. Create a YAML/YML file named config-map.yml and add the following content
## YAML Template.
---
apiVersion: v1
kind: ConfigMap
metadata:
  name: liquibase-config
data:
  liquibase.properties: |
    changeLogFile: /liquibase/changelog/changelog.xml
    driver: com.mysql.cj.jdbc.Driver
    classpath: /liquibase/mysql-connector-java-8.0.23.jar
To create the ConfigMap , run the following command from a terminal
kubectl create configmap liquibase-config --from-file=conf=config-map.yml
4.4 Run the Deployment
To run the deployment in the Kubernetes cluster, run the following command
kubectl apply -f new-app-deployment.yml
5. Conclusion
In this article, we learned how to use Liquibase in Kubernetes to perform database migrations. We have seen how to enable a Kubernetes cluster using Docker Desktop and also learned about how to deploy a Database in Kubernetes. In conclusion, Using initContainers in Kubernetes to run database migrations with Liquibase is an efficient way to manage database changes.
6. Download the Project
This was a blog post on Using Liquibase in Kubernetes.
You can download the full source code of this example here: Explore Using Liquibase in Kubernetes
