Utilize Spring @Cacheable on Self-Invocation
Spring Framework provides a caching mechanism to improve the performance of applications by reducing the need to recompute or retrieve data that has already been processed. The @Cacheable annotation is a key component of this caching mechanism, allowing developers to cache the results of methods, making subsequent invocations faster. While it is common to use @Cacheable directly on a method, there are scenarios where we might want to invoke caching from another method within the same bean. By design, Spring Boot @Cacheable annotation is ignored on self-invocation. The reason behind this design choice is to avoid potential pitfalls and undesired side effects that may arise from caching within the same instance. This article explores how to utilize Spring @Cacheable on self-invocation.
1. Understanding @Cacheable
Before diving into invoking @Cacheable from another method, let’s briefly understand how @Cacheable works. When you annotate a method with @Cacheable, Spring checks whether the method has been called with the same arguments before. If it has, Spring returns the cached result instead of executing the method again.
If not, the method is executed, and the result is stored in the cache for future use. To address the issue of @Cacheable annotation being ignored on self-invocation in Spring Boot, consider the following solutions:
- Use Self-Injection: Using the
@Cacheableannotation on self-invocation can be achieved by creating an instance of the class within itself also known as self-instantiation. The self-injection approach involves injecting an instance of the same class (self-reference) into itself, typically through dependency injection mechanisms. - Use AspectJ instead of Proxy-based AOP: By default, Spring AOP uses proxy-based AOP, which causes the
@Cacheableannotation to be bypassed on self-invocation. However, you can switch to AspectJ-based AOP, which can intercept self-invocations. You can enable AspectJ by configuring your Spring Boot application to use AspectJ instead of the default proxy-based AOP. AspectJ provides two ways for weaving aspects into your source code, Load-Time and Compile-Time weaving. In this example we will demonstrate how to use either one.- Configure AspectJ Load-Time Weaver: Configure AspectJ weaving in your Spring Boot application. We can do this programmatically using Spring’s
@EnableLoadTimeWeavingannotation. - Compile-Time Weaving: If you prefer compile-time weaving, you can configure your build tool (e.g., Maven or Gradle) to perform AspectJ weaving during the compilation phase.
- Configure AspectJ Load-Time Weaver: Configure AspectJ weaving in your Spring Boot application. We can do this programmatically using Spring’s
2. Setting Up Caching in Spring Project
In a Spring Boot project, add the spring-boot-starter-cache starter package. This package includes all the caching dependencies we need to integrate caching into our project.
 <dependency>
            <groupId>org.springframework.boot</groupId>
            <artifactId>spring-boot-starter-cache</artifactId>
 </dependency>
3. Invoking @Cacheable Using Self-Injection
In Spring Boot, when a method within a Spring bean is invoked, and that method is annotated with @Cacheable, the caching behavior may be ignored if the method is invoked within the same instance (self-invocation).
To address this issue of the @Cacheable annotation being ignored on self-invocation in our Spring Boot project, we have to create an instance of the class within itself known as self-injection using the @Autowired annotation.
Below is an example demonstrating how to invoke @Cacheable from another method within the same bean:
3.1 Service Class
Create a service class and add the following code:
@Service
@CacheConfig(cacheNames = "squarenumbers")
@Scope(proxyMode = ScopedProxyMode.TARGET_CLASS)
public class CachingService {

    private static final Logger logger = LoggerFactory.getLogger(CachingService.class);

    @Autowired
    private CachingService self;

    @Cacheable("myCache")
    public int calculateSquare(int number) {
        logger.info("Calculating square for number: {}", number);
        // Simulate time-consuming operation
        try {
            Thread.sleep(2000); // Simulate delay
        } catch (InterruptedException e) {
            Thread.currentThread().interrupt();
        }
        return number * number;
    }

    public int getCachedSquare(int number) {
        logger.info("Invoking getCachedSquare method for number: {}", number);
        return self.calculateSquare(number); // This will invoke @Cacheable method
    }

    public int getSquare(int number) {
        return this.calculateSquare(number);
    }
}
In the above code, the @Scope(proxyMode = ScopedProxyMode.TARGET_CLASS) annotation configures the scope of the bean. ScopedProxyMode.TARGET_CLASS indicates that a class-based proxy should be created to manage the scoped bean.
@Autowired annotation on self field autowires an instance of the CachingService class into itself. This allows the class to call its own methods, including the cached method.
@Cacheable("myCache") annotation on calculateSquare method indicates that the result of this method should be cached. The cache name is specified as myCache.
The calculateSquare method calculates the square of a given number. If the result for a specific number is not found in the cache, the method performs the calculation and stores the result in the cache.
The getCachedSquare method invokes the calculateSquare method through the self reference, ensuring that the caching aspect of the method is triggered while the getSquare method directly invokes the calculateSquare method of the current instance.
3.2 Controller Class
@RestController
public class CachingController {

private static final Logger logger = LoggerFactory.getLogger(CachingController.class);
private final CachingService cachingService;

    @Autowired
    public CachingController(CachingService cachingService) {
        this.cachingService = cachingService;
    }

    @GetMapping("/calculateSquare/{number}")
    public int calculateSquare(@PathVariable int number) {
        logger.debug("Invoking calculateSquare method for number: {}", number);
        return cachingService.getSquare(number);
    }

    @GetMapping("/getCachedSquare/{number}")
    public int getCachedSquare(@PathVariable int number) {
        logger.debug("Invoking getCachedSquare method for number: {}", number);
        return cachingService.getCachedSquare(number);
    }
}
The CachingController class exposes endpoints to test both the cached and non-cached results.
3.3 Main Class
Next, update the Main class of the application to enable Caching. The @EnableCaching annotation enables caching functionality in our application, allowing caching to be used within the application.
@SpringBootApplication
@EnableCaching
public class CachingdemoApplication {

	public static void main(String[] args) {
		SpringApplication.run(CachingdemoApplication.class, args);
	}

}
3.4 Endpoint Invocation
Let’s explore the behavior when invoking the exposed endpoints:
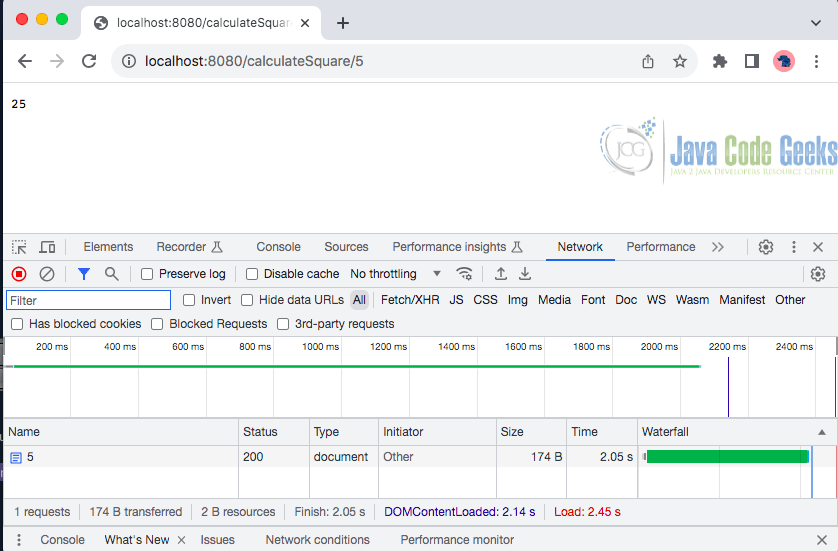
Suppose we invoke the /calculateSquare/{number} and /getCachedSquare/{number} endpoints with different integer values.
- For
/calculateSquare/{number}Endpoint:- The
calculateSquaremethod will be executed for each unique number, and the square will be computed. - Each invocation will take approximately 2 seconds due to the simulated delay.
- The calculated square will be stored in the cache (If the result is not already cached, it will be stored in the cache for future requests).
- The
- For
/getCachedSquare/{number}Endpoint:- The
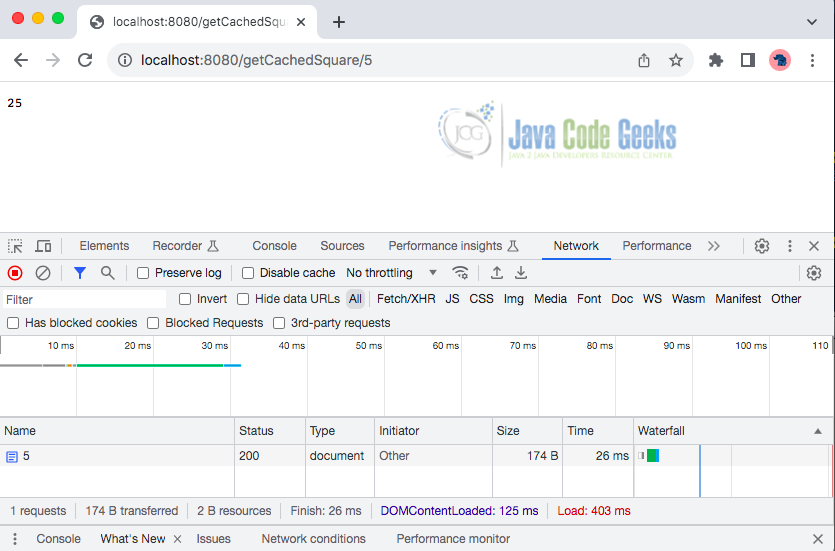
getCachedSquaremethod will be invoked for each unique number. - If a number has been previously cached, its square will be retrieved from the cache without re-executing the
calculateSquaremethod. - Subsequent invocations with the same number will result in faster response times as the result will be retrieved from the cache.
- The
3.5 Explanation of Simulated Example Output
Let’s simulate invoking the endpoints with different integer values of 5 and 8.
GET /calculateSquare/5 – Response: 25 (Method execution)
GET /calculateSquare/8 Response: 64 (Method execution)
GET /getCachedSquare/5 Response: 25 (Method execution)
GET /getCachedSquare/8 Response: 64 (Method execution)

GET /calculateSquare/5 Response: 25 (Method execution)
GET /getCachedSquare/5 Response: 25 (Retrieved from cache) – retrieves the result from the cache.
GET /calculateSquare/8 Response: 64 (Method execution)
GET /getCachedSquare/8 Response: 64 (Retrieved from cache) – retrieves the result from the cache.
This example demonstrates how caching optimizes performance by avoiding redundant calculations for previously processed inputs.
4. Leveraging Compile-Time Weaving or Load-Time Weaving with AspectJ
While Spring AOP is convenient, AspectJ offers advanced features, including load-time weaving (LTW) and compile-time weaving (CTW) for enhanced performance. When using compile-time weaving, the AspectJ compiler (ajc) compiles the source codes and produces woven class files.
This section demonstrates how to configure and integrate compile-time weaving with AspectJ in a Spring Boot application.
4.1 Set up AspectJ in a Spring Boot Project
First, We need to update the Spring Boot project and ensure that all AspectJ dependencies spring-aspects, aspectjweaver, and aspectjrt dependencies are added to the project pom.xml file as well as configure aspectj-maven-plugin Maven plugin.
        <dependency>
            <groupId>org.aspectj</groupId>
            <artifactId>aspectjrt</artifactId>
        </dependency>
        <dependency>
            <groupId>org.aspectj</groupId>
            <artifactId>aspectjweaver</artifactId>
        </dependency>
        <dependency>
            <groupId>org.springframework</groupId>
            <artifactId>spring-aspects</artifactId>
        </dependency>
4.2 Using Compile-Time Weaving
To enable compile-time weaving, add and configure the aspectj-maven-plugin in the project’s pom.xml as follows:
    <build>
        <plugins>
             <plugin>
                <groupId>dev.aspectj</groupId>
                <artifactId>aspectj-maven-plugin</artifactId>
                <version>1.13.1</version>
                <configuration>
                    <complianceLevel>17</complianceLevel>
                    <ource>17</source>
                    <target>17</target>
                    <showWeaveInfo>true</showWeaveInfo>
                    <verbose>true</verbose>
                    <Xlint>ignore</Xlint>
                    <encoding>UTF-8</encoding>
                    <aspectLibraries>
                        <aspectLibrary>
                            <groupId>org.springframework</groupId>
                            <artifactId>spring-aspects</artifactId>
                        </aspectLibrary>
                    </aspectLibraries>
                    <showWeaveInfo>true</showWeaveInfo>
                </configuration>
                <executions>
                    <execution>
                        <goals>
                            <goal>compile</goal>
                            <goal>test-compile</goal>
                        </goals>
                    </execution>
                </executions>
            </plugin>
        </plugins>
    </build>
Next, we need to change the cache configuration in the Spring boot application. To enable caching with AspectJ in our Spring boot application, add @EnableCaching(mode = AdviceMode.ASPECTJ) annotation to our configuration class like this:
import org.springframework.cache.annotation.EnableCaching;
import org.springframework.context.annotation.AdviceMode;

@SpringBootApplication
@EnableCaching(mode = AdviceMode.ASPECTJ)
public class CachingdemoApplication {

	public static void main(String[] args) {
		SpringApplication.run(CachingdemoApplication.class, args);
	}

}
4.3 Using Load-Time Weaving
When using Load-Time weaving (LTW), the binary weaving is postponed until the moment when the class loader loads a class file and defines the class to the JVM. This implies that we need to utilize the Spring Agent while executing the project to dynamically append classes to the class loader during runtime.
To initiate caching with AspectJ mode and load-time weaving in our application, First configure maven-surefire-plugin to use the javaagent option for weaving aspects and then simply affixing two annotations onto our configuration class. Here’s how:
pom.xml
<build>
 <plugins>
  <plugin>
   <groupId>org.apache.maven.plugins</groupId>
   <artifactId>maven-surefire-plugin</artifactId>
   <version>${maven-surefire-plugin.version}</version>
   <configuration>
     <argLine>
      -javaagent:${settings.localRepository}/org/aspectj/aspectjweaver/${aspectj.version}/aspectjweaver-${aspectj.version}.jar
      -classpath ${project.build.outputDirectory}:${project.testClasspath}
     </argLine>
     </configuration>
   </plugin>
 </plugins>
</build>
This plugin configuration adds the aspectjweaver.jar located in our local repository as a javaagent to the JVM running the tests. Replace ${aspectj.version} with your actual AspectJ version.
Then update the configuration class to add the following two annotations – @EnableCaching(mode = AdviceMode.ASPECTJ) and @EnableLoadTimeWeaving:
@EnableCaching(mode = AdviceMode.ASPECTJ)
@EnableLoadTimeWeaving
public class CachingdemoApplication {

	public static void main(String[] args) {
		SpringApplication.run(CachingdemoApplication.class, args);
	}

}
By including this configuration in the pom.xml file, the Maven build process will utilize AspectJ and enable Load-Time Weaving with Java Agent support in the Spring Boot application.
4. Conclusion
In this article, we’ve explored how to implement self-invocation caching using Self-Injection, AspectJ Load-Time Weaving, and AspectJ Compile-Time weaving in a Spring Boot application. By leveraging AspectJ LTW, CTW, and Spring’s @Cacheable annotation, we can dynamically weave caching logic into an application, improving performance by avoiding redundant method invocations within the same class.
5. Download the Source Code
This was an example of spring invoke cacheable from other method of the same bean.
You can download the full source code of this example here: spring invoke cacheable other method same bean


