Welcome, in this tutorial, we will see how to implement google captcha (reCAPTCHA v2) in a spring boot web application. reCAPTCHA is a free service that protects an application from spammers. It uses advanced risk analysis techniques to keep humans and bots apart. But before going anything I would suggest you take a look at the part1 of this tutorial.
1. Introduction
Before going further in this tutorial, we will look at the common terminology such as introduction to Spring Boot and Lombok.
1.1 Spring Boot
- Spring boot is a module that provides rapid application development feature to the spring framework including auto-configuration, standalone-code, and production-ready code
- It creates applications that are packaged as jar and are directly started using embedded servlet container (such as Tomcat, Jetty or, Undertow). Thus, no need to deploy the war files
- It simplifies the maven configuration by providing the starter template and helps to resolve the dependency conflicts. It automatically identifies the required dependencies and imports them into the application
- It helps in removing the boilerplate code, extra annotations, and XML configurations
- It provides powerful batch processing and manages the rest endpoints
- It provides an efficient JPA-starter library to effectively connect the application with the relational databases
- It offers a Microservice architecture and cloud configuration that manages all the application related configuration properties in a centralized manner
1.2 Lombok
- Lombok is nothing but a small library that reduces the amount of boilerplate Java code from the project
- Automatically generates the getters and setters for the object by using the Lombok annotations
- Hooks in via the Annotation processor API
- Raw source code is passed to Lombok for code generation before the Java Compiler continues. Thus, produces properly compiled Java code in conjunction with the Java Compiler
- Under the
target/classesfolder you can view the compiled class files - Can be used with Maven, Gradle IDE, etc.
1.2.1 Lombok features
| Feature | Details |
|---|---|
val |
Local variables are declared as final |
var |
Mutable local variables |
@Slf4J |
Creates an SLF4J logger |
@Cleanup |
Will call close() on the resource in the finally block |
@Getter |
Creates getter methods for all properties |
@Setter |
Creates setter for all non-final properties |
@EqualsAndHashCode |
|
@ToString |
|
@NoArgsConstructor |
|
@RequiredArgsContructor |
|
@AllArgsConstructor |
|
@Data |
|
@Builder |
|
@Value |
|
Let us go ahead with the tutorial implementation but before going any further I’m assuming that you’re aware of the Spring boot basics.
2. Using Google reCaptcha with Spring Boot Application
As this is part2 of the tutorial so we will only focus on the required changes to be made as a part of this tutorial. You can view the part1 tutorial at this link and start with the setup.
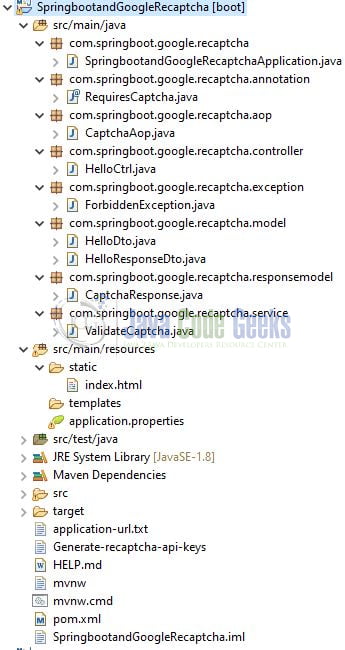
2.1 Tools Used for Spring boot application and Project Structure
We are using Eclipse Kepler SR2, JDK 8, and Maven. In case you’re confused about where you should create the corresponding files or folder, let us review the project structure of the spring boot application.
Let us start building the application!
3. Creating a Spring Boot application
Below are the steps involved in developing the application. Currently at the problem at hand is that if we have to include the Recaptcha validation to other endpoints, we will have to call the service method each time from the controller method. So to avoid this kind of code repetition we will make use of the Spring AOP (Aspect Oriented programming). In simpler words, we will create an AOP annotation to handle the captcha and validate it before passing the program execution to the controller method for sending out the response. Remember, the AOP annotation needs to be added to each controller method.
3.1 Maven Dependency
Add the spring-starter-aop dependency to the project’s pom.xml. Maven will automatically resolve the other dependencies.
pom.xml
<dependency>
	<groupId>org.springframework.boot</groupId>
	<artifactId>spring-boot-starter-aop</artifactId>
</dependency>
3.2 Java Classes
Let us write the important/impacted classes as a part of this tutorial.
3.2.1 Creating a Captcha annotation
Create an annotation that will be used to handle the captcha.
RequiresCaptcha.java
package com.springboot.google.recaptcha.annotation;

import java.lang.annotation.Retention;
import java.lang.annotation.Target;

import static java.lang.annotation.ElementType.METHOD;
import static java.lang.annotation.RetentionPolicy.RUNTIME;

@Retention(RUNTIME)
@Target(METHOD)
public @interface RequiresCaptcha {

}
3.2.2 Creating an Aspect class
Create an annotation that will be used to handle the captcha.
CaptchaAop.java
package com.springboot.google.recaptcha.aop;

import com.springboot.google.recaptcha.exception.ForbiddenException;
import com.springboot.google.recaptcha.service.ValidateCaptcha;
import lombok.extern.slf4j.Slf4j;
import org.aspectj.lang.ProceedingJoinPoint;
import org.aspectj.lang.annotation.Around;
import org.aspectj.lang.annotation.Aspect;
import org.springframework.beans.factory.annotation.Autowired;
import org.springframework.stereotype.Component;
import org.springframework.web.context.request.RequestContextHolder;
import org.springframework.web.context.request.ServletRequestAttributes;

import javax.servlet.http.HttpServletRequest;

//lombok annotation
@Slf4j
//spring annotations
@Aspect
@Component
public class CaptchaAop {

    @Autowired
    ValidateCaptcha service;

    //ensures that the below code is executed before the method(s)
    //annotated with the @RequiresCaptcha annotation
    //note - either keep the annotation class in the same package as the aspect class
    //or use the fully qualified name for the annotation class.
    @Around("@annotation(com.springboot.google.recaptcha.annotation.RequiresCaptcha)")
    public Object validateCaptchaResponse(final ProceedingJoinPoint point)
            throws Throwable {
        final HttpServletRequest request =
                ((ServletRequestAttributes) RequestContextHolder.currentRequestAttributes()).getRequest();
        //receives the captcha header from the request
        final String captchaResponse = request.getHeader("captcha-response");
        //sends it to the service method for validation
        final boolean isValidCaptcha = service.validateCaptcha(captchaResponse);
        if (!isValidCaptcha) {
            log.info("Throwing forbidden exception as the captcha is invalid.");
            throw new ForbiddenException("INVALID_CAPTCHA");
        }
        //if everything is ok the response is returned
        return point.proceed();
    }
}
3.2.3 Controller class
Add the following code to the controller class where each method will be annotated with the @RequiresCaptcha annotation.
HelloCtrl.java
package com.springboot.google.recaptcha.controller;

import com.springboot.google.recaptcha.annotation.RequiresCaptcha;
import com.springboot.google.recaptcha.model.HelloDto;
import com.springboot.google.recaptcha.model.HelloResponseDto;
import com.springboot.google.recaptcha.service.ValidateCaptcha;
import org.springframework.beans.factory.annotation.Autowired;
import org.springframework.http.HttpStatus;
import org.springframework.web.bind.annotation.*;

//Spring annotations
@RestController
@RequestMapping("/api")
public class HelloCtrl {

    //injected to validate the captcha response coming in the request.
    @Autowired
    ValidateCaptcha service;

    //URL - http://localhost:9001/api/welcome
    @PostMapping("/welcome")
    @ResponseStatus(code = HttpStatus.OK)
    //custom annotation
    @RequiresCaptcha
    public HelloResponseDto welcome(@RequestBody final HelloDto dto) {
        return new HelloResponseDto("Greetings " + dto.getName());
    }
}
3.3 Client-side
Update the HTML file at the location: SpringbootandGooglecaptcha/src/main/resources/static to send the captcha response in the request header instead of the body.
index.html
<html lang="en">
<head>
    <title>Springboot and Captcha</title>
    <script src="https://ajax.googleapis.com/ajax/libs/jquery/3.5.1/jquery.min.js" type="text/javascript"></script>
    <script src="https://www.google.com/recaptcha/api.js" type="text/javascript"></script>
</head>
<body>

<script type="text/javascript">
    function validateAndGetCaptchaResponse() {
        const response = grecaptcha.getResponse();
        return response.length === 0 ? null : response;
    }

    $(document).ready(function () {
        $("#button").click(function () {
            $("#captcha-error").html("");

            let captchaResponse = validateAndGetCaptchaResponse();
            if (captchaResponse) {
                console.log("Captcha code accepted.")
                let name = $("#name").val();
                let requestObj = {
                    'name': name.length === 0 ? 'Dummy' : name
                };

                $.ajax({
                    type: "POST",
                    contentType: "application/json",
                    dataType: "json",
                    headers: {
                        "captcha-response": captchaResponse
                    },
                    data: JSON.stringify(requestObj),
                    url: "http://localhost:9001/api/welcome",
                    success: function (data) {
                        alert(data.message);
                    }
                });
            } else {
                $("#captcha-error").html("You cannot leave the captcha code empty.");
            }
        });
    });
</script>

<div>
    <h3>Springboot and Google captcha example</h3>
    <!-- User input -->
    <label for="name">Enter name:</label>
    <input id="name" placeholder="say... Daniel" type="text"/>
    <button id="button" type="submit">Submit</button>

    <div> </div>

    <!-- Google captcha (I'm not robot checkbox) -->
    <!-- SITE_KEY - Represents the site_key generated by the Google reCaptcha service -->
    <div class="g-recaptcha" data-sitekey="YOUR_SITE_KEY" id="recaptcha"></div>
    <span id="captcha-error" style="color:red"></span>
</div>
</body>
</html>
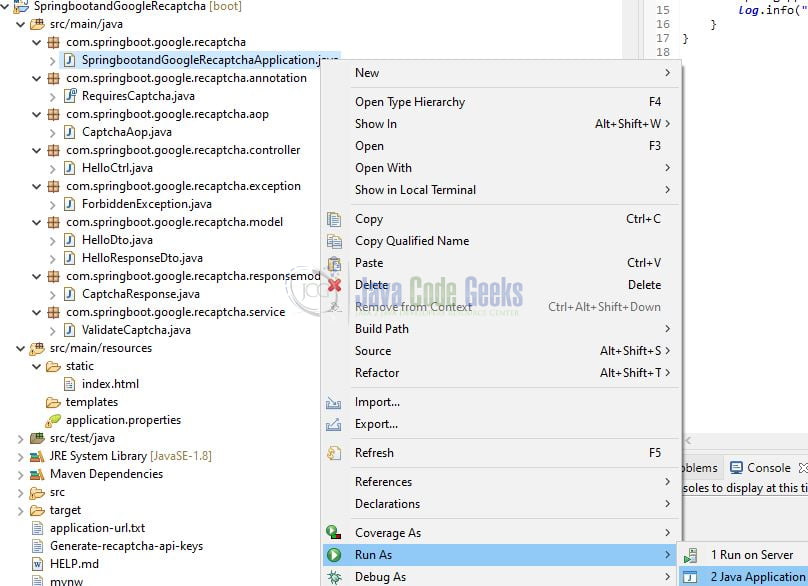
4. Run the Application
To execute the application, right-click on the SpringbootandGoogleRecaptchaApplication.java class, Run As -> Java Application.
5. Project Demo
When the application is started, navigate to the following URL: http://localhost:9001/ and you’ll see the index page of the application with a reCAPTCHA “I’m not a robot” checkbox as shown in Fig. 3.
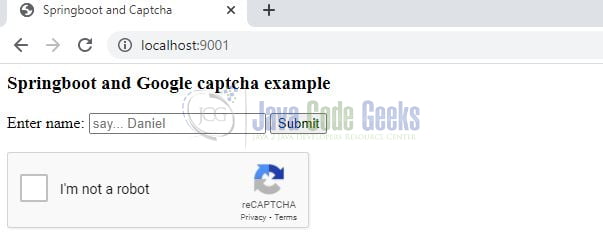
The HTML code will call our backend endpoint (http://localhost:9001/api/welcome) with a name as request body and captcha-response in the request header. Enter the user details, tick the reCAPTCHA checkbox, and press the button. On successful validation by the backend code, we’ll get a greetings alert.

That is all for this tutorial and I hope the article served you whatever you were looking for. Happy Learning and do not forget to share!
6. Summary
In this section, you learned:
- Spring boot and Google reCAPTCHA introduction
- Steps to implement google reCAPTCHA in Spring Boot using Spring AOP
You can download the sample application as an Eclipse project in the Downloads section.
7. Download the Project
This was an example of implementing Google reCAPTCHA through Spring AOP in a Spring Boot application.
You can download the full source code of this example here: Using Google reCaptcha with Spring Boot Application
