Welcome readers, in this tutorial, we will see an interaction of Redis cache with a Spring boot application.
1. Introduction
Before going further in this tutorial we will take a look at the common terminology such as introduction to Spring boot, Docker, and Redis.
1.1 What is Spring boot?
- Spring boot is a module that provides rapid application development feature to the spring framework including auto-configuration, standalone-code, and production-ready code
- It creates applications that are packaged as jar and are directly started using embedded servlet container (such as Tomcat, Jetty or Undertow). Thus, no need to deploy the war files
- It simplifies the maven configuration by providing the starter template and helps to resolve the dependency conflicts. It automatically identifies the required dependencies and imports them in the application
- It helps in removing the boilerplate code, extra annotations, and XML configurations
- It provides a powerful batch processing and manages the rest endpoints
- It provides an efficient JPA-starter library to effectively connect the application with the relational databases
- It offers a Microservice architecture and cloud configuration that manages all the application related configuration properties in a centralized manner.
1.2 What is Docker?
In the present world, Docker is an important term,
- Often used in CI/CD platform that packages and runs the application with its dependencies inside a container
- Is a standard for Linux Containers
- A Container is a runtime that runs under any Linux kernel and provides a private machine-like space under Linux
1.2.1 Docker Terminology
- Image: Representation of Docker container i.e. a JAR or WAR file in Java
- Container: Runtime of Docker i.e. a deployed and running Docker image. For example, an executable Spring Boot jar
- Engine: The code that manages, creates and runs the Docker containers
- Hub: A public developers registry to distribute their code
- Repository: A collection of Docker related images i.e. different versions of the same application
1.3 What is Redis?
- Redis is an open-source in-memory data store written in the C programming language
- Offers a distributed, in-memory key-value database with optional durability
- Often used as a database, cache, or as a message broker and supports different kinds of database types, such as strings, lists, maps, sets or sorted sets, etc.
- It is fast and operations are atomic in nature (i.e. two clients can concurrently access the data and Redis server will receive the updated value)
- Offers utilities like caching and messaging-queues
In this tutorial, we will create a spring boot application and integrate it with Redis to understand its basic concepts. But before going any further I’m assuming that readers are aware of the concepts of creating and running a basic spring boot application.
2. Spring Boot with Redis Tutorial
2.1 Application Pre-requisite
To start with this tutorial, we are hoping that users at present have the Docker installation completed. If someone needs to go through the Docker installation, please watch this video.
2.2 Tools Used and Project Structure
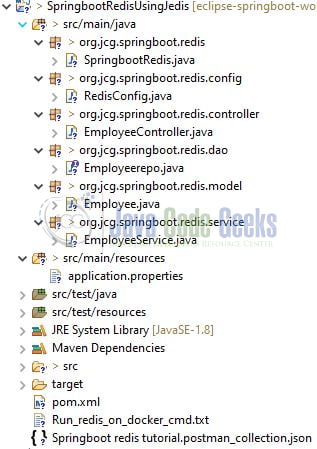
We are using Eclipse, JDK 8, Maven, and Docker. In case you’re confused about where you should create the corresponding files or folder, let us review the project structure of the spring boot application.
Let us start building the application!
3. Pulling the Redis image from Docker Hub & Starting it
To have the Redis up and working on the localhost environment, we will pull the Redis image from Docker and start the container. Users can refer the following commands to pull the image and later start the container.
Docker commands
|
1
2
3
4
5
6
|
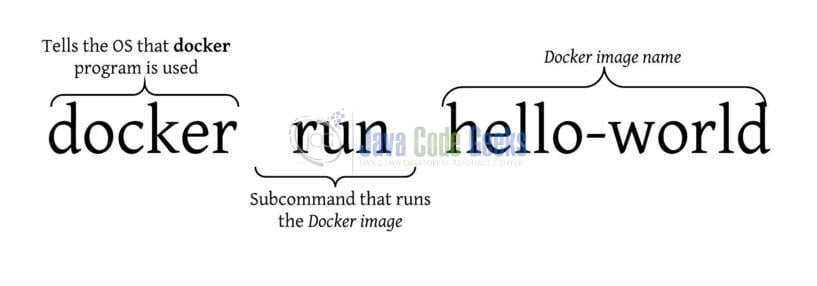
## Docker commands## step1 - Pulling redis image from docker hubdocker pull redis## step2 - Running the containerdocker run -d -p 6379:6379 --name my-redis redis |
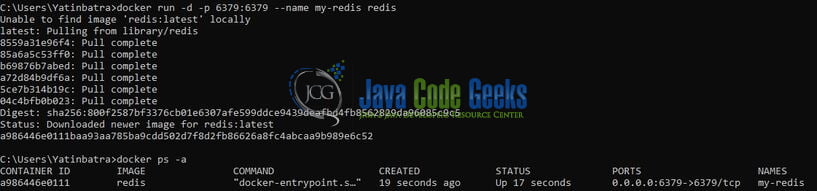
If everything goes well, the Docker image will be successfully pulled from the and started successfully as shown in the below image. Developers can use the docker ps -a command to verify if the container was successfully started or not. Developers can go through this link to understand the Docker basic terminology.
4. Creating Spring boot application
Below are the steps involved in developing the application.
4.1 Maven Dependency
Here, we specify the dependency for the Spring boot, Redis, and Jedis. Maven will automatically resolve the other dependencies. The updated file will have the following code.
pom.xml
|
01
02
03
04
05
06
07
08
09
10
11
12
13
14
15
16
17
18
19
20
21
22
23
24
25
26
27
28
29
30
31
32
33
34
35
36
37
38
39
40
41
42
43
44
45
46
47
48
49
50
51
52
53
54
55
|
xsi:schemaLocation="http://maven.apache.org/POM/4.0.0 https://maven.apache.org/xsd/maven-4.0.0.xsd"> <modelVersion>4.0.0<modelVersion> <!-- project properties --> <groupId>com.springboot.redis<groupId> <artifactId>SpringbootRedisUsingJedis<artifactId> <version>0.0.1-SNAPSHOT<version> <!-- application name --> <name>Springboot Redis tutorial Using Jedis<name> <description>Springboot and Redis tutorial<description> <!-- spring boot starter parent dependency --> <parent> <groupId>org.springframework.boot<groupId> <artifactId>spring-boot-starter-parent<artifactId> <version>2.3.1.RELEASE<version> <parent> <properties> <!-- setting the java version as jdk1.8 --> <java.version>1.8<java.version> <properties> <dependencies> <!-- spring data redis dependency --> <dependency> <groupId>org.springframework.boot<groupId> <artifactId>spring-boot-starter-data-redis<artifactId> <dependency> <dependency> <groupId>org.springframework.boot<groupId> <artifactId>spring-boot-starter-web<artifactId> <dependency> <dependency> <groupId>redis.clients<groupId> <artifactId>jedis<artifactId> <dependency> <dependencies> <build> <!-- final jar name --> <finalName>SpringbootRedisUsingJedis<finalName> <!-- to make the application as fat jar so that spring boot libraries are included --> <plugins> <plugin> <groupId>org.springframework.boot<groupId> <artifactId>spring-boot-maven-plugin<artifactId> <plugin> <plugins> <build><project> |
4.2 Application Properties
Create a new properties file at the location: SpringbootRedisUsingJedis/src/main/resources/ and add the Application and Redis configuration to this file.
application.properties
|
1
2
3
4
5
6
7
8
|
# Application configuration.## Reader can change the server port configuration as per their configuration idea.server.port=10091# Redis configuration.## As we are running Redis on Docker we are setting up its configuration.spring.redis.host=localhostspring.redis.port=6379 |
4.3 Java Classes
Let us write all the java classes involved in this application.
4.3.1 Implementation/Main class
Add the following code to the main class to bootstrap the application from the main method. Always remember, the entry point of the spring boot application is the class containing @SpringBootApplication annotation and the static main method.
SpringbootRedis.java
|
01
02
03
04
05
06
07
08
09
10
11
12
13
14
15
16
17
18
|
package org.jcg.springboot.redis;import org.slf4j.Logger;import org.slf4j.LoggerFactory;import org.springframework.boot.SpringApplication;import org.springframework.boot.autoconfigure.SpringBootApplication;@SpringBootApplicationpublic class SpringbootRedis { private static final Logger LOG = LoggerFactory.getLogger(SpringbootRedis.class); // Main program to start up the spring boot application. public static void main(String[] args) { SpringApplication.run(SpringbootRedis.class, args); LOG.info("Springboot redis application is started successfully."); }} |
4.3.2 Model class
Add the following code to the Employee model class where we’ll define the basic attributes for this class.
Employee.java
|
01
02
03
04
05
06
07
08
09
10
11
12
13
14
15
16
17
18
19
20
21
22
23
24
25
26
27
28
29
30
31
32
33
34
35
36
37
38
39
40
41
42
43
44
45
|
package org.jcg.springboot.redis.model;import java.io.Serializable;import org.springframework.stereotype.Component;// Employee model class has basic employee-related attributes.@Componentpublic class Employee implements Serializable { private static final long serialVersionUID = 1L; private String id; private String name; private int age; private Double salary; public String getId() { return id; } public void setId(String id) { this.id = id; } public String getName() { return name; } public void setName(String name) { this.name = name; } public int getAge() { return age; } public void setAge(int age) { this.age = age; } public Double getSalary() { return salary; } public void setSalary(Double salary) { this.salary = salary; }} |
4.3.3 Configuration class
Add the following code to the configuration class where we define the Jedis Connection Factory and the Redis Template.
RedisConfig.java
|
01
02
03
04
05
06
07
08
09
10
11
12
13
14
15
16
17
18
19
20
21
22
23
24
25
26
27
|
package org.jcg.springboot.redis.config;import org.springframework.context.annotation.Bean;import org.springframework.context.annotation.Configuration;import org.springframework.data.redis.connection.jedis.JedisConnectionFactory;import org.springframework.data.redis.core.RedisTemplate;import org.springframework.data.redis.serializer.GenericToStringSerializer;// Configuration class to set up the Redis configuration.@Configurationpublic class RedisConfig { // Setting up the Jedis connection factory. @Bean JedisConnectionFactory jedisConnectionFactory() { return new JedisConnectionFactory(); } // Setting up the Redis template object. @Bean public RedisTemplate<String, Object> redisTemplate() { final RedisTemplate<String, Object> redisTemplate = new RedisTemplate<String, Object>(); redisTemplate.setConnectionFactory(jedisConnectionFactory()); redisTemplate.setValueSerializer(new GenericToStringSerializer<Object>(Object.class)); return redisTemplate; }} |
4.3.4 Service class
Add the following code to the service class where we will perform the operations using the Redis Template and Hash Operations. Here this class implements the Employeerepo interface. It is a simple interface that declares the methods overridden in this class.
EmployeeService.java
|
01
02
03
04
05
06
07
08
09
10
11
12
13
14
15
16
17
18
19
20
21
22
23
24
25
26
27
28
29
30
31
32
33
34
35
36
37
38
39
40
41
42
43
44
45
46
47
48
49
50
51
52
53
|
package org.jcg.springboot.redis.service;import java.util.Map;import javax.annotation.PostConstruct;import org.jcg.springboot.redis.dao.Employeerepo;import org.jcg.springboot.redis.model.Employee;import org.springframework.beans.factory.annotation.Autowired;import org.springframework.data.redis.core.HashOperations;import org.springframework.data.redis.core.RedisTemplate;import org.springframework.stereotype.Service;@Servicepublic class EmployeeService implements Employeerepo { private final String EMPLOYEE_CACHE = "EMPLOYEE"; @Autowired RedisTemplate<String, Object> redisTemplate; private HashOperations<String, String, Employee> hashOperations; // This annotation makes sure that the method needs to be executed after // dependency injection is done to perform any initialization. @PostConstruct private void intializeHashOperations() { hashOperations = redisTemplate.opsForHash(); } // Save operation. @Override public void save(final Employee employee) { hashOperations.put(EMPLOYEE_CACHE, employee.getId(), employee); } // Find by employee id operation. @Override public Employee findById(final String id) { return (Employee) hashOperations.get(EMPLOYEE_CACHE, id); } // Find all employees' operation. @Override public Map<String, Employee> findAll() { return hashOperations.entries(EMPLOYEE_CACHE); } // Delete employee by id operation. @Override public void delete(String id) { hashOperations.delete(EMPLOYEE_CACHE, id); }} |
4.3.5 Controller class
Add the following code to the controller class designed to handle the incoming requests. The class is annotated with the @RestController annotation where every method returns a domain object as a JSON response instead of a view.
EmployeeController.java
|
01
02
03
04
05
06
07
08
09
10
11
12
13
14
15
16
17
18
19
20
21
22
23
24
25
26
27
28
29
30
31
32
33
34
35
36
37
38
39
40
41
42
43
44
45
46
47
48
49
50
51
52
53
54
55
56
57
58
59
60
61
62
63
64
65
66
|
package org.jcg.springboot.redis.controller;import java.util.Map;import org.jcg.springboot.redis.model.Employee;import org.jcg.springboot.redis.service.EmployeeService;import org.slf4j.Logger;import org.slf4j.LoggerFactory;import org.springframework.beans.factory.annotation.Autowired;import org.springframework.web.bind.annotation.DeleteMapping;import org.springframework.web.bind.annotation.GetMapping;import org.springframework.web.bind.annotation.PathVariable;import org.springframework.web.bind.annotation.PostMapping;import org.springframework.web.bind.annotation.RequestBody;import org.springframework.web.bind.annotation.RequestMapping;import org.springframework.web.bind.annotation.RestController;// In this class, we have left the caching approach for tutorial simplicity.// If users which they can enable caching in this application.@RestController@RequestMapping(value = "/api/redis/employee")public class EmployeeController { private static final Logger LOG = LoggerFactory.getLogger(EmployeeController.class); @Autowired EmployeeService service; // Save a new employee. @PostMapping public String save(@RequestBody final Employee employee) { LOG.info("Saving the new employee to the redis."); service.save(employee); return "Successfully added. Employee with id= " + employee.getId(); } // Get all employees. @GetMapping("/getall") public Map<String, Employee> findAll() { LOG.info("Fetching all employees from the redis."); final Map<String, Employee> employeeMap = service.findAll(); // Todo - If developers like they can sort the map (optional). return employeeMap; } // Get employee by id. @GetMapping("/get/{id}") public Employee findById(@PathVariable("id") final String id) { LOG.info("Fetching employee with id= " + id); return service.findById(id); } // Delete employee by id. @DeleteMapping("/delete/{id}") public Map<String, Employee> delete(@PathVariable("id") final String id) { LOG.info("Deleting employee with id= " + id); // Deleting the employee. service.delete(id); // Returning the all employees (post the deleted one). return findAll(); }} |
5. Run the Application
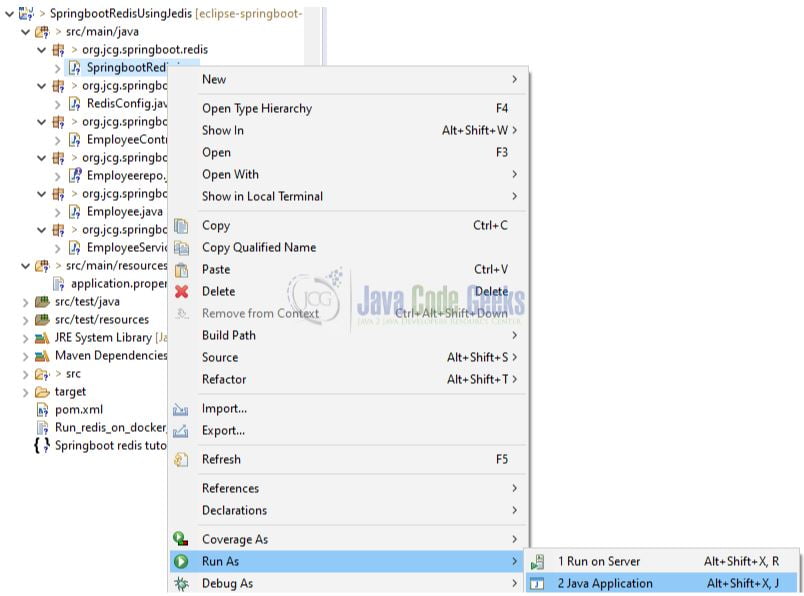
To execute the application, right-click on the SpringbootRedis.java class, Run As -> Java Application.
6. Project Demo
Open the Postman tool and hit the following URLs to display the data in the JSON format.
|
01
02
03
04
05
06
07
08
09
10
11
|
// Save a new employee.// Get all employees.// Get employee by id.// Delete employee by id. |
That is all for this tutorial and I hope the article served you whatever you were looking for. Happy Learning and do not forget to share!
7. Summary
In this section, developers learned,
- Introduction to Spring Boot, Redis, and Docker
- Integrate Redis with a Spring boot application
- Using the postman tool to check the controller mappings for the different scenario’s
Developers can download the sample application as an Eclipse project in the Downloads section.
8. Download the Eclipse Project
This was an example of integrating the Redis cache in a Spring Boot application.
You can download the full source code of this example here: Spring Boot with Redis Tutorial

Great! Thanks!
Thanks a lot for sharing the code and it ran superb, would it be possible to explain also now to to check if the EMPLOYEE is also cached in redis