Welcome readers, in this tutorial, we will see the Session Management in Spring Boot. For this tutorial, we will use the MySQL database for persisting the session information and not the H2 database.
1. Introduction
Before going further in this tutorial we will take a look at the common terminology such as introduction to Spring Boot and Session Management.
1.1 What is Spring boot?
- Spring boot is a module that provides rapid application development feature to the spring framework including auto-configuration, standalone-code, and production-ready code
- It creates applications that are packaged as jar and are directly started using embedded servlet container (such as Tomcat, Jetty, or Undertow). Thus, no need to deploy the war files
- It simplifies the maven configuration by providing the starter template and helps to resolve the dependency conflicts. It automatically identifies the required dependencies and imports them in the application
- It helps in removing the boilerplate code, extra annotations, and XML configurations
- It provides a powerful batch processing and manages the rest endpoints
- It provides an efficient JPA-starter library to effectively connect the application with the relational databases
- It offers a Microservice architecture and cloud configuration that manages all the application related configuration properties in a centralized manner.
1.2 What is Session Management?
Since HTTP is a stateless protocol thus every request and response is independent. Hence it is difficult for the server to identify new and returning visitors. But sometimes or the application requirement asks us to keep this track. To achieve this Spring framework provided the Session Management mechanism where the web container store’s the session information for a particular user. Session management can be achieved through –
- Cookies
- Hidden form fields
- URL rewriting
- HTTP Session
In this example, we will make use of the HTTP Session to maintain the session management in the spring boot application and will use the Spring Session Core (provides spring session functionalities and APIs) and Spring Session JDBC (provides SessionRepository implementation backed by a relational database like MySQL, etc. and configuration support) modules to achieve this functionality. Remember by default the Tomcat server store objects in the memory for HTTP session management but here we will store the session information in persistent storage (such as MySQL, etc.).
2. Spring Boot Session Management
Here is a systematic guide for implementing this tutorial but before going any further I’m assuming that readers are aware of the Spring boot.
2.1 Application Pre-requisite
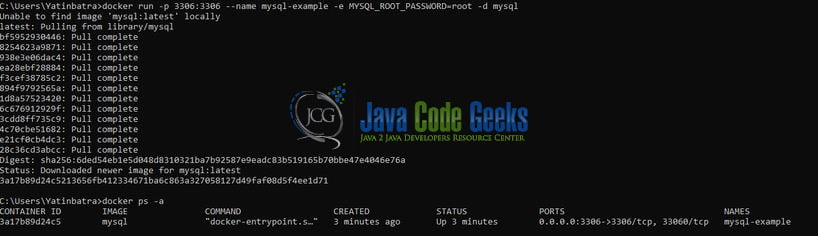
To start with this tutorial, we are hoping that readers at present have the MySQL up and running on their local environment. For easy setup, the reader can have the MySQL up and running on the Docker environment. Readers can execute the below commands to get the MySQL database container running on Docker in minutes.
Docker Commands
|
1
2
3
4
5
6
7
|
# docker command to pull the latest mysql image and run on the given port (i.e. 3006).# MYSQL_ROOT_PASSWORD variable represents the MySQL password.docker run -p 3306:3306 --name mysql-example -e MYSQL_ROOT_PASSWORD=root -d mysql# docker command to check if the container is started successfully or not.docker ps -a |
If everything goes well the container would be started successfully as shown in Fig. 1.
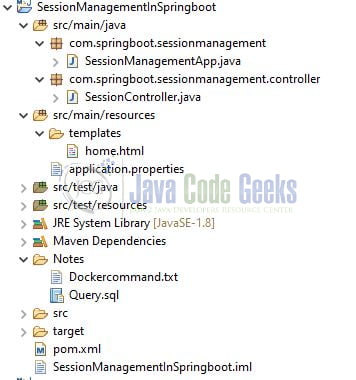
2.2 Tools Used for Spring boot application and Project Structure
We are using Eclipse, JDK 8, and Maven. In case you’re confused about where you should create the corresponding files or folder, let us review the project structure of the spring boot application.
Let us start building the application!
3. Creating a Spring Boot application
Below are the steps involved in developing the application.
3.1 Maven Dependency
Here, we specify the dependency for the Spring Boot, Session Management, and MySQL connector. Maven will automatically resolve the other dependencies. The updated file will have the following code.
pom.xml
|
01
02
03
04
05
06
07
08
09
10
11
12
13
14
15
16
17
18
19
20
21
22
23
24
25
26
27
28
29
30
31
32
33
34
35
36
37
38
39
40
41
42
43
44
45
46
47
48
49
50
51
52
53
54
55
56
57
|
xsi:schemaLocation="http://maven.apache.org/POM/4.0.0 https://maven.apache.org/xsd/maven-4.0.0.xsd"> <modelVersion>4.0.0</modelVersion> <groupId>com.spring.sessionmanagement</groupId> <artifactId>SessionManagementInSpringboot</artifactId> <version>0.0.1-SNAPSHOT</version> <name>Springboot-session-management-example</name> <description>Springboot-session-management-example</description> <parent> <groupId>org.springframework.boot</groupId> <artifactId>spring-boot-starter-parent</artifactId> <version>2.3.3.RELEASE</version> </parent> <properties> <java.version>8</java.version> </properties> <dependencies> <dependency> <groupId>org.springframework.boot</groupId> <artifactId>spring-boot-starter-web</artifactId> </dependency> <dependency> <groupId>org.springframework.boot</groupId> <artifactId>spring-boot-starter-jdbc</artifactId> </dependency> <dependency> <groupId>org.springframework.boot</groupId> <artifactId>spring-boot-starter-thymeleaf</artifactId> </dependency> <dependency> <groupId>org.springframework.session</groupId> <artifactId>spring-session-core</artifactId> </dependency> <dependency> <groupId>org.springframework.session</groupId> <artifactId>spring-session-jdbc</artifactId> </dependency> <dependency> <groupId>mysql</groupId> <artifactId>mysql-connector-java</artifactId> </dependency> </dependencies> <build> <plugins> <plugin> <groupId>org.springframework.boot</groupId> <artifactId>spring-boot-maven-plugin</artifactId> </plugin> </plugins> </build></project> |
3.2 Application Properties file
Create a new properties file at the location: SessionManagementInSpringboot/src/main/resources/ and add the session management configuration details to it. In this file, we will specify the property (spring.session.store-type=jdbc) that helps writing the session objects to the MySQL database and thus avoiding any manual code intervention. The spring session replaces the HttpSession implementation by a custom implementation. To perform this task spring session takes a SessionRepositoryFilter bean named as springSessionRepositoryFilter.
application.properties
|
01
02
03
04
05
06
07
08
09
10
11
12
13
14
15
16
17
|
# mysql database configuration #spring.datasource.driver-class-name=com.mysql.cj.jdbc.Driverspring.datasource.url=jdbc:mysql://localhost:3306/springSession?createDatabaseIfNotExist=true&autoReconnect=true&allowPublicKeyRetrieval=true&useSSL=falsespring.datasource.username=root# NOTE: password should match the one given to the MYSQL_ROOT_PASSWORD variable in the docker run commandspring.datasource.password=root# property to automatically create the schema of a datasource #spring.datasource.initialization-mode=always# property used to write the session object to the dB #spring.session.store-type=jdbc# property helps to create the session table automatically. we can set this property to never to manually create the session table ## spring session JDBC jar contains SQL scripts to create required schema. You can check this under org.springframework.session.jdbc package #spring.session.jdbc.initialize-schema=always# property enables the h2-console #spring.h2.console.enabled=true# application port number #server.port=10093 |
3.3 Java Classes
Let us write all the java classes involved in this application.
3.3.1 Implementation/Main class
Add the following code to the main class to bootstrap the application from the main method.
SessionManagementApp.java
|
01
02
03
04
05
06
07
08
09
10
11
12
13
14
15
16
17
|
package com.springboot.sessionmanagement;import org.slf4j.Logger;import org.slf4j.LoggerFactory;import org.springframework.boot.SpringApplication;import org.springframework.boot.autoconfigure.SpringBootApplication;@SpringBootApplicationpublic class SessionManagementApp { private static final Logger log = LoggerFactory.getLogger(SessionManagementApp.class); public static void main(String[] args) { SpringApplication.run(SessionManagementApp.class, args); log.info("Spring-boot-session-management application started successfully."); }} |
3.3.2 Controller class
Add the following code to the controller class designed to handle the incoming requests. The class is annotated with the @Controller annotation which we will show a template page to the user for the HTTP GET method and this page will have the buttons to receive the user input and invalidate the session.
SessionController.java
|
01
02
03
04
05
06
07
08
09
10
11
12
13
14
15
16
17
18
19
20
21
22
23
24
25
26
27
28
29
30
31
32
33
34
35
36
37
38
39
40
41
42
43
44
45
46
47
48
49
50
51
52
53
54
55
|
package com.springboot.sessionmanagement.controller;import org.slf4j.Logger;import org.slf4j.LoggerFactory;import org.springframework.stereotype.Controller;import org.springframework.ui.Model;import org.springframework.util.CollectionUtils;import org.springframework.web.bind.annotation.GetMapping;import org.springframework.web.bind.annotation.PostMapping;import org.springframework.web.bind.annotation.RequestParam;import javax.servlet.http.HttpServletRequest;import javax.servlet.http.HttpSession;import java.util.ArrayList;import java.util.List;@SuppressWarnings("unchecked")@Controllerpublic class SessionController { private static final String MY_SESSION_NOTES_CONSTANT = "MY_SESSION_NOTES"; private static final Logger log = LoggerFactory.getLogger(SessionController.class); // URL - http://localhost:10093/index @GetMapping(value = "/index") public String home(final Model model, final HttpSession session) { final List<String> notes = (List<String>) session.getAttribute(MY_SESSION_NOTES_CONSTANT); model.addAttribute("sessionNotes", !CollectionUtils.isEmpty(notes) ? notes : new ArrayList<>()); return "home"; // Returning the page to be rendered on the browser. } @PostMapping(value = "/save/note") public String saveNote(@RequestParam("note") final String note, final HttpServletRequest request) { // Get the notes from request session. List<String> notes = (List<String>) request.getSession().getAttribute(MY_SESSION_NOTES_CONSTANT); // Check if notes is present in session or not. if (CollectionUtils.isEmpty(notes)) { log.info("No notes are fetch from the session object. Setting the value in the session object."); notes = new ArrayList<>(); } notes.add(note); request.getSession().setAttribute(MY_SESSION_NOTES_CONSTANT, notes); return "redirect:/index"; } @PostMapping(value = "/destroy/session") public String destroySession(final HttpServletRequest request) { log.info("Invaliding the session and removing the data."); // Invalidate the session and this will clear the data from the configured database. request.getSession().invalidate(); return "redirect:/index"; }} |
4. Thymeleaf Page
Create a new template file at the location: SessionManagementInSpringboot/src/main/resources/templates/home.html which will display a textbox to accept the user input and submit it to the backend. And, a destroy session button to invalidate the user session object and remove all the persisted data.

home.html
|
01
02
03
04
05
06
07
08
09
10
11
12
13
14
15
16
17
18
19
20
21
22
23
24
25
26
27
28
29
|
<!DOCTYPE html><head> <meta charset="UTF-8"> <title>Springboot-session-management-example</title></head><body><div> <form method="post" th:action="@{/save/note}"> <label> <textarea cols="40" name="note" placeholder="Enter some notes. . . ." rows="2"></textarea> </label> <br><input type="submit" value="Save Note"/> </form></div><div> <br> <form method="post" th:action="@{/destroy/session}"> <input type="submit" value="Destroy Session"/> </form></div><div> <h2>Notes</h2> <ul th:each="sessionNotes : ${sessionNotes}"> <li th:text="${sessionNotes}"></li> </ul></div></body></html> |
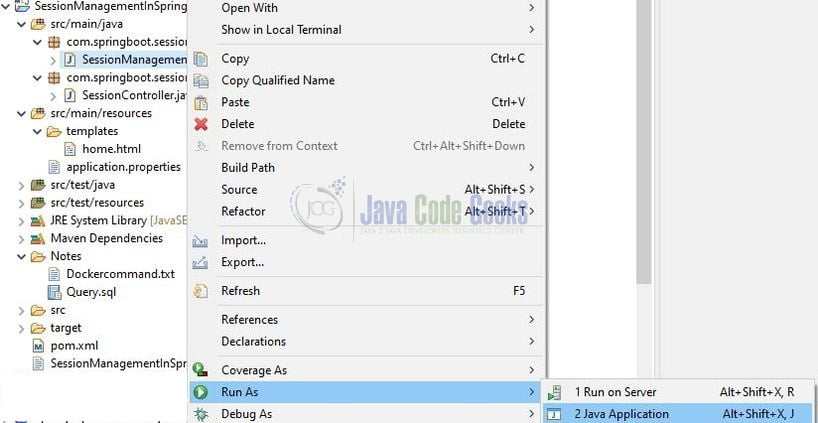
5. Run the Application
To execute the application, right-click on the SessionManagementApp.java class, Run As -> Java Application.
6. Project Demo
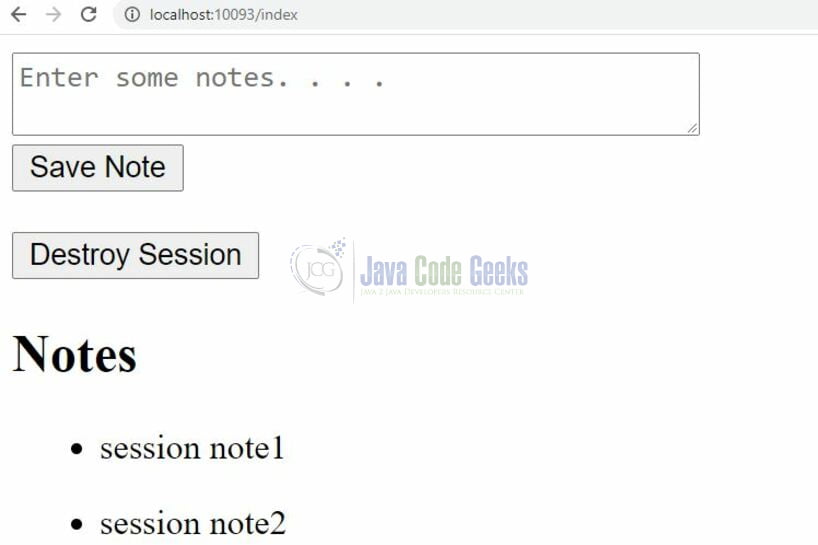
Go to http://localhost:10093/index and the index page of the application will be displayed wherein the user can enter the input as shown in Fig. 4.

We can add items to be stored in the session for a user as shown in Fig. 5.
During this activity in the backend, Spring Session created two tables in the database i.e. SPRING_SESSION and SPRING_SESSION_ATTRIBUTES. We can query these tables using the SQL SELECT query to display the session related information.
SQL Query
|
1
2
3
4
5
6
7
8
|
<-- springSession refers to the database we have created. Name can be found the application.properties file. -->use springSession;show tables;select * from SPRING_SESSION;select * from SPRING_SESSION_ATTRIBUTES; |
That is all for this tutorial and I hope the article served you whatever you were looking for. Happy Learning and do not forget to share!
7. Summary
In this section, we learned:
- Introduction to Spring Boot and Session Management
- Steps to implement Session Management in Spring Boot
You can download the sample application as an Eclipse project in the Downloads section.
8. Download the Eclipse Project
This was an example of Spring Boot Session Management.
You can download the full source code of this example here: Spring Boot Session Management
