Welcome, in this tutorial, we will explain the server events with SseEmitter in a spring boot application. In this approach, we will use the SseEmitter where the service returns a SseEmitter events to the client.
1. Introduction
Before going further in this tutorial, we will look at the common terminology such as introduction to Spring Boot, Lombok, and Server-Sent Events (SSE).
1.1 Spring Boot
- Spring boot is a module that provides rapid application development feature to the spring framework including auto-configuration, standalone-code, and production-ready code
- It creates applications that are packaged as jar and are directly started using embedded servlet container (such as Tomcat, Jetty or, Undertow). Thus, no need to deploy the war files
- It simplifies the maven configuration by providing the starter template and helps to resolve the dependency conflicts. It automatically identifies the required dependencies and imports them into the application
- It helps in removing the boilerplate code, extra annotations, and XML configurations
- It provides powerful batch processing and manages the rest endpoints
- It provides an efficient JPA-starter library to effectively connect the application with the relational databases
- It offers a Microservice architecture and cloud configuration that manages all the application related configuration properties in a centralized manner
1.2 Lombok
- Lombok is nothing but a small library which reduces the amount of boilerplate Java code from the project
- Automatically generates the getters and setters for the object by using the Lombok annotations
- Hooks in via the Annotation processor API
- Raw source code is passed to Lombok for code generation before the Java Compiler continues. Thus, produces properly compiled Java code in conjunction with the Java Compiler
- Under the
target/classesfolder you can view the compiled class files - Can be used with Maven, Gradle IDE, etc.
1.2.1 Lombok features
| Feature | Details |
|---|---|
val | Local variables are declared as final |
var | Mutable local variables |
@Slf4J | Creates an SLF4J logger |
@Cleanup | Will call close() on the resource in the finally block |
@Getter | Creates getter methods for all properties |
@Setter | Creates setter for all non-final properties |
@EqualsAndHashCode |
|
@ToString |
|
@NoArgsConstructor |
|
@RequiredArgsContructor |
|
@AllArgsConstructor |
|
@Data |
|
@Builder |
|
@Value |
|
1.3 Server-Sent Events (SSE)
SSE is a web technology where a browser receives updates from a server via the HTTP connection and offers a better approach than polling as polling causes a lot of HTTP overhead. It is unidirectional (i.e. server to browser) and the events are sent over the traditional HTTP, hence no special implementation is required on the server. It is used to –
- Replace long polling
- Enable applications that use the server to browser data communication
2. Spring Boot Server Events with SseEmitter Tutorial
Here is a systematic guide for implementing this tutorial but before going any further I’m assuming that you are aware of the Spring boot.
2.1 Application Pre-requisite
To start with this tutorial, we are hoping that you at present have the Lombok plugin installed in the IDE of their favorite choice. If someone needs to go through the Lombok installation on IntelliJ IDE, please watch this video. For installation on Eclipse IDE, please watch this video.
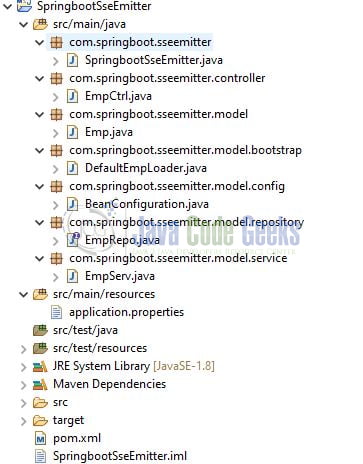
2.2 Tools Used and Project Structure
We are using Eclipse Kepler SR2, JDK 8, and Maven. In case you’re confused about where you should create the corresponding files or folder, let us review the project structure of the spring boot application.
Let us start building the application!
3. Creating a Spring Boot application
Below are the steps involved in developing the application.
3.1 Maven Dependency
Here, we specify the dependency for the Spring Boot (Web and JPA), WebFlux, Faker, Embedded H2 database, and Lombok. Maven will automatically resolve the other dependencies. The updated file will have the following code.
pom.xml
01 02 03 04 05 06 07 08 09 10 11 12 13 14 15 16 17 18 19 20 21 22 23 24 25 26 27 28 29 30 31 32 33 34 35 36 37 38 39 40 41 42 43 44 45 46 47 48 49 50 51 52 53 54 55 56 57 58 59 60 61 62 63 64 65 66 67 68 69 70 71 72 73 74 75 | xsi:schemaLocation="http://maven.apache.org/POM/4.0.0 https://maven.apache.org/xsd/maven-4.0.0.xsd"> <modelVersion>4.0.0</modelVersion> <groupId>com.springboot.sseemitter</groupId> <artifactId>SpringbootSseEmitter</artifactId> <version>0.0.1-SNAPSHOT</version> <name>Springboot sse emitter tutorial</name> <description>A tutorial on springboot and sse emitter tutorial</description> <properties> <!-- java8 dependency --> <java.version>1.8</java.version> </properties> <!-- spring boot starter parent dependency --> <parent> <groupId>org.springframework.boot</groupId> <artifactId>spring-boot-starter-parent</artifactId> <version>2.3.4.RELEASE</version> </parent> <dependencies> <!-- springboot starter web dependency --> <dependency> <groupId>org.springframework.boot</groupId> <artifactId>spring-boot-starter-web</artifactId> </dependency> <!-- springboot starter jpa dependency --> <dependency> <groupId>org.springframework.boot</groupId> <artifactId>spring-boot-starter-data-jpa</artifactId> </dependency> <!-- springboot starter webflux dependency --> <dependency> <groupId>org.springframework.boot</groupId> <artifactId>spring-boot-starter-webflux</artifactId> </dependency> <!-- springboot project reactor dependency --> <dependency> <groupId>io.projectreactor</groupId> <artifactId>reactor-test</artifactId> </dependency> <!-- embedded h2 database --> <dependency> <groupId>com.h2database</groupId> <artifactId>h2</artifactId> <scope>runtime</scope> </dependency> <!-- project lombok dependency --> <dependency> <groupId>org.projectlombok</groupId> <artifactId>lombok</artifactId> <scope>provided</scope> </dependency> <!-- java faker dependency --> <dependency> <groupId>com.github.javafaker</groupId> <artifactId>javafaker</artifactId> <version>1.0.2</version> </dependency> </dependencies> <build> <finalName>SpringbootSseEmitter</finalName> <plugins> <plugin> <groupId>org.springframework.boot</groupId> <artifactId>spring-boot-maven-plugin</artifactId> </plugin> </plugins> </build></project> |
3.2 Application Properties
Create a new properties file at the location: SpringbootSseEmitter/src/main/resources/ and add the following code to it.
application.properties
01 02 03 04 05 06 07 08 09 10 11 12 13 14 15 16 17 18 19 20 | # application port numberserver.port=10093# application namespring.application.name=springboot-sseemitter-application# h2 database settingsspring.datasource.username=saspring.datasource.password=spring.datasource.url=jdbc:h2:mem:testdbspring.datasource.driverClassName=org.h2.Driver# loggingspring.jpa.database-platform=org.hibernate.dialect.H2Dialectspring.jpa.hibernate.ddl-auto=create-dropspring.jpa.properties.hibernate.show_sql=true# browser url for h2 console - http://localhost:10093/h2-consolespring.h2.console.enabled=truespring.h2.console.path=/h2-console# property to override the default async behavior such as thread pool and timeout# time in milliseconds# here in this example we are setting it to 50 minutesspring.mvc.async.request-timeout=3000000 |
3.3 Java Classes
Let us write all the java classes involved in this application.
3.3.1 Implementation/Main class
Add the following code to the main class to bootstrap the application from the main method. Always remember, the entry point of the spring boot application is the class containing @SpringBootApplication annotation and the static main method.
SpringbootSseEmitter.java
01 02 03 04 05 06 07 08 09 10 11 12 13 14 15 16 17 | package com.springboot.sseemitter;import lombok.extern.slf4j.Slf4j;import org.springframework.boot.SpringApplication;import org.springframework.boot.autoconfigure.SpringBootApplication;//Causes Lombok to generate a logger field.@Slf4j//Serves two purposes i.e. configuration and bootstrapping.@SpringBootApplicationpublic class SpringbootSseEmitter { public static void main(String[] args) { SpringApplication.run(SpringbootSseEmitter.class, args); log.info("Springboot sseemitter application is started successfully."); }} |
3.3.2 Model class
Add the following code to the Emp model class where we will define the basic employee attributes.
Emp.java
01 02 03 04 05 06 07 08 09 10 11 12 13 14 15 16 17 18 19 20 21 22 23 24 25 26 27 28 29 30 31 32 33 34 35 36 37 38 39 40 | package com.springboot.sseemitter.model;import lombok.AllArgsConstructor;import lombok.Builder;import lombok.Data;import lombok.NoArgsConstructor;import org.springframework.stereotype.Component;import javax.persistence.*;@Entity@Table(name = "employees")// Causes Lombok to generate toString(), equals(), hashCode(), getter() & setter(), and Required arguments constructor in one go.@Data// Causes Lombok to implement the Builder design pattern for the Pojo class.// Usage can be seen in DefaultEmployeesLoader.java -> createNewEmployee() method.@Builder// Causes Lombok to generate a constructor with no parameters.@NoArgsConstructor// Causes Lombok to generate a constructor with 1 parameter for each field in your class.@AllArgsConstructor@Componentpublic class Emp { @Id @GeneratedValue(strategy = GenerationType.AUTO) long id; @Column(name = "first_name", nullable = false) String firstName; @Column(name = "last_name", nullable = false) String lastName; @Column(name = "gender") String gender; @Column(name = "email", nullable = false) String email; @Column(name = "phone_number", unique = true) String phoneNumber; @Column(name = "home_address") String homeAddress;} |
3.3.3 Configuration class
Add the following code to the bean class that will return the bean objects for the faker, sseEmitter, and executorService. The usage of this object can be seen in the DefaultEmpLoader.java class.
BeanConfiguration.java
01 02 03 04 05 06 07 08 09 10 11 12 13 14 15 16 17 18 19 20 21 22 23 24 25 26 27 28 29 30 31 32 | package com.springboot.sseemitter.model.config;import com.github.javafaker.Faker;import org.springframework.context.annotation.Bean;import org.springframework.context.annotation.Configuration;import org.springframework.web.servlet.mvc.method.annotation.SseEmitter;import java.util.Locale;import java.util.concurrent.ExecutorService;import java.util.concurrent.Executors;@Configurationpublic class BeanConfiguration { // Creating an object for Faker. @Bean public Faker faker() { return new Faker(new Locale("en-US")); } // Creating an object for SseEmitter. @Bean public SseEmitter sseEmitter() { return new SseEmitter(); } // Creating an object for ExecutorService. @Bean public ExecutorService executorService() { return Executors.newSingleThreadExecutor(); }} |
3.3.4 Data-Access-Object interface
Add the following code to the interface that extends the JpaRepository interface.
EmpRepo.java
01 02 03 04 05 06 07 08 09 10 | package com.springboot.sseemitter.model.repository;import com.springboot.sseemitter.model.Emp;import org.springframework.data.jpa.repository.JpaRepository;import org.springframework.stereotype.Repository;@Repositorypublic interface EmpRepo extends JpaRepository<Emp, Long> {} |
3.3.5 Service class
Add the following code to the service class where we will call the DAO interface methods to save the data into the database and also fetch the data from the database.
EmpServ.java
01 02 03 04 05 06 07 08 09 10 11 12 13 14 15 16 17 18 19 20 21 22 23 24 25 26 27 28 29 30 31 32 33 34 35 | package com.springboot.sseemitter.model.service;import com.springboot.sseemitter.model.Emp;import com.springboot.sseemitter.model.repository.EmpRepo;import lombok.extern.slf4j.Slf4j;import org.springframework.beans.factory.annotation.Autowired;import org.springframework.stereotype.Service;import java.util.List;//Causes Lombok to generate a logger field.@Slf4j@Servicepublic class EmpServ { @Autowired private EmpRepo repository; // Save a new employee into the database. public void save(final Emp employee) { repository.save(employee); } // Get the total count of employees from the database. public long getTotalEmployees() { log.info("Finding the total count of employees from the database."); return repository.count(); } // Get all employees from the database. public List<Emp> findAll() { log.info("Fetching all employees from the database."); return repository.findAll(); }} |
3.3.6 Bootstrap class
Add the following code to the bootstrap class to save the dummy data into the database on the application startup. This data will be saved in the H2 database.
DefaultEmpLoader.java
01 02 03 04 05 06 07 08 09 10 11 12 13 14 15 16 17 18 19 20 21 22 23 24 25 26 27 28 29 30 31 32 33 34 35 36 37 38 39 40 41 42 43 44 45 46 47 48 49 50 51 52 53 54 55 56 57 58 59 60 | package com.springboot.sseemitter.model.bootstrap;import com.github.javafaker.Faker;import com.springboot.sseemitter.model.Emp;import com.springboot.sseemitter.model.service.EmpServ;import lombok.RequiredArgsConstructor;import lombok.extern.slf4j.Slf4j;import org.springframework.boot.CommandLineRunner;import org.springframework.stereotype.Component;import java.util.Random;// Causes Lombok to generate a logger field.@Slf4j// Causes Lombok to generate a constructor with 1 parameter for each field that requires special handling.@RequiredArgsConstructor@Componentpublic class DefaultEmpLoader implements CommandLineRunner { private static final String[] GENDER = {"Male", "Female", "Transgender", "Not to specify"}; private static final Random RANDOM = new Random(); private final EmpServ service; private final Faker faker; @Override public void run(String... args) throws Exception { loadEmployees(); } // Saving the default employees data in the database. private void loadEmployees() { int count = 0; if (service.getTotalEmployees() == 0) { for (int x = 0; x < 100; x++) { count = count + 1; service.save(createNewEmployee()); } log.info("Total {} employees are saved in the database.", count); } else { log.info("Default employees are already present in the database."); } } private Emp createNewEmployee() { final String firstName = faker.name().firstName(); final String lastName = faker.name().lastName(); final String gender = GENDER[RANDOM.nextInt(GENDER.length)]; final String emailAddress = firstName.toLowerCase() + "." + lastName.toLowerCase() + "@somecompany.com"; return Emp.builder() .firstName(firstName) .lastName(lastName) .gender(gender) .email(emailAddress) .phoneNumber(faker.phoneNumber().cellPhone()) .homeAddress(faker.address().fullAddress()) .build(); }} |
3.3.7 Async Controller class
Add the following code to the controller class designed to handle the incoming requests. The class is annotated with the @RestController annotation were the HTTP GET method would emit the events from the server to the client.
EmpCtrl.java
01 02 03 04 05 06 07 08 09 10 11 12 13 14 15 16 17 18 19 20 21 22 23 24 25 26 27 28 29 30 31 32 33 34 35 36 37 38 39 40 41 42 43 44 45 46 47 48 49 50 51 52 53 54 55 56 57 58 59 60 61 62 63 64 | package com.springboot.sseemitter.controller;import com.springboot.sseemitter.model.Emp;import com.springboot.sseemitter.model.service.EmpServ;import lombok.extern.slf4j.Slf4j;import org.springframework.beans.factory.annotation.Autowired;import org.springframework.web.bind.annotation.GetMapping;import org.springframework.web.bind.annotation.RestController;import org.springframework.web.servlet.mvc.method.annotation.SseEmitter;import java.io.IOException;import java.util.List;import java.util.concurrent.ExecutorService;//Causes Lombok to generate a logger field.@Slf4j@RestControllerpublic class EmpCtrl { @Autowired private EmpServ service; @Autowired private SseEmitter sseEmitter; @Autowired private ExecutorService executorService; @GetMapping("/emit-data-items") public SseEmitter fetchData() { log.info("Emitting the employee data sets."); executorService.execute(() -> { // Fetching the employees from the dB. final List<Emp> employees = service.findAll(); try { for (final Emp employee : employees) { randomDelay(); // Sending the employee details in the emitter event. sseEmitter.send(employee); } // The request processing is completed so that the responsible thread can complete // the request and be freed up for the next response to handle. sseEmitter.complete(); } catch (final IOException e) { log.info("IO exception occurred while emitting the employee data sets."); // In case of any error while processing the request, complete the process and pass the // exception through the normal exception handling of Spring MVC framework and after that // response is completed. sseEmitter.completeWithError(e); } }); executorService.shutdown(); return sseEmitter; } // Private method to put a random delay in between the records. private void randomDelay() { try { Thread.sleep(1000); } catch (final InterruptedException e) { log.info("Thread is interrupted."); Thread.currentThread().interrupt(); } }} |
4. Run the Application
To execute the application, right-click on the SpringbootSseEmitter.java class, Run As -> Java Application.

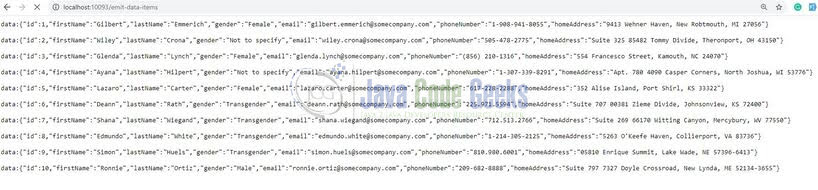
5. Project Demo
Open the browser of your choice and hit the following URL. The stream of data having employee data will be displayed on the browser every 1 second.
That is all for this tutorial and I hope the article served you whatever you were looking for. Happy Learning and do not forget to share!
6. Summary
In this section, you learned,
- Spring Boot, Lombok and it features, and SSE (Service-Sent Events)
SseEmitterimplementation in Spring Boot and displaying the streaming data on the browser
You can download the sample application as an Eclipse project in the Downloads section.
7. Download the Eclipse Project
This was a tutorial on Spring Boot Server Events with SseEmitter.
You can download the full source code of this example here: Spring Boot Server Events with SseEmitter Tutorial
