Welcome readers, in this tutorial, we will see how to load profiles (such as DEV, QA, or PROD) in a simple spring boot application.
1. Introduction
Before going further in this tutorial we will take a look at the common terminology such as introduction to Spring Boot and Profiles in the spring framework.
1.1 What is Spring boot?
- Spring boot is a module that provides rapid application development feature to the spring framework including auto-configuration, standalone-code, and production-ready code
- It creates applications that are packaged as jar and are directly started using embedded servlet container (such as Tomcat, Jetty or Undertow). Thus, no need to deploy the war files
- It simplifies the maven configuration by providing the starter template and helps to resolve the dependency conflicts. It automatically identifies the required dependencies and imports them in the application
- It helps in removing the boilerplate code, extra annotations, and xml configurations
- It provides a powerful batch processing and manages the rest endpoints
- It provides an efficient jpa-starter library to effectively connect the application with the relational databases
- It offers a Microservice architecture and cloud configuration that manages all the application related configuration properties in a centralized manner.
1.2 What are Profiles in Spring boot?
Profiles in simple term can be termed as the different environments which every application comprises of. For example – DEV, QA, or PROD. Each environment has its own specific requirement i.e. database connection, pipeline, and deployment configuration. In spring we maintain profiles with the help of properties and file files.
In this article, we will create a QA profile to enable environment-specific configuration properties. But before going any further I’m assuming that readers are aware of the concepts of creating and running a basic spring boot application.
2. Spring Boot Profiles Tutorial
Here is a systematic guide for implementing this tutorial.
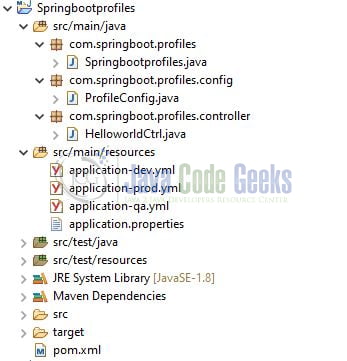
2.1 Tools Used and Project Structure
We are using Eclipse, JDK 8, and Maven. In case you’re confused about where you should create the corresponding files or folder, let us review the project structure of the spring boot application.
Let us start building the application!
3. Creating a Spring boot application
Below are the steps involved in developing the application.
3.1 Maven Dependency
Here, we specify the dependency for the Spring boot. Maven will automatically resolve the other dependencies. The updated file will have the following code.
pom.xml
|
01
02
03
04
05
06
07
08
09
10
11
12
13
14
15
16
17
18
19
20
21
22
23
24
25
26
27
28
29
30
31
32
33
34
35
36
37
38
39
40
41
42
43
44
|
xsi:schemaLocation="http://maven.apache.org/POM/4.0.0 https://maven.apache.org/xsd/maven-4.0.0.xsd"> <modelVersion>4.0.0</modelVersion> <groupId>com.springboot.profiles</groupId> <artifactId>Springbootprofiles</artifactId> <version>0.0.1-SNAPSHOT</version> <name>Profiles in springboot</name> <parent> <groupId>org.springframework.boot</groupId> <artifactId>spring-boot-starter-parent</artifactId> <version>2.3.1.RELEASE</version> </parent> <properties> <java.version>1.8</java.version> </properties> <dependencies> <dependency> <groupId>org.springframework.boot</groupId> <artifactId>spring-boot-starter-web</artifactId> </dependency> <dependency> <groupId>org.springframework.boot</groupId> <artifactId>spring-boot-starter-test</artifactId> <scope>test</scope> </dependency> </dependencies> <build> <plugins> <plugin> <groupId>org.springframework.boot</groupId> <artifactId>spring-boot-maven-plugin</artifactId> </plugin> </plugins> </build></project> |
3.2 Application Properties file
Create a new properties file at the location: Springbootprofiles/src/main/resources/ and add the application configuration to this file. Here we will also define the profile which needs to be picked during the application startup
application.properties
|
01
02
03
04
05
06
07
08
09
10
11
12
13
14
|
## Spring boot application namespring.application.name=Profiles## Profiles are activated using this property## Tells Spring which profiles to use## E.g. - Here we set the profile as "qa"#spring.profiles.active=devspring.profiles.active=qa#spring.profiles.active=prodspring.message=Hello world from localhost environment## If we want to run the application on the same port for all the environments, then we specify the port in the application.properties or application.ymlserver.port=9091 |
3.3 YML file for Profile(s)
Add the following code the QA yml file (i.e. the profile) and this will be picked during the application startup due the spring.profiles.active property defined in the application.properties file.
application-qa.yml
|
1
2
3
4
5
6
|
spring: message: Hello world from testing environment ## profile specific port.server: port: 10092 |
Similarly, we can create multiple profile yml files like DEV, PROD, STAGE, etc. Remember to change the application port number.
3.4 Java Classes
Let us write all the java classes involved in this application.
3.4.1 Implementation/Main class
Add the following code to the main class to bootstrap the application from the main method.
Springbootprofiles.java
|
01
02
03
04
05
06
07
08
09
10
11
12
13
14
15
16
17
|
package com.springboot.profiles;import org.slf4j.Logger;import org.slf4j.LoggerFactory;import org.springframework.boot.SpringApplication;import org.springframework.boot.autoconfigure.SpringBootApplication;@SpringBootApplicationpublic class Springbootprofiles { private static Logger LOGGER = LoggerFactory.getLogger(Springbootprofiles.class); public static void main(String[] args) { SpringApplication.run(Springbootprofiles.class, args); LOGGER.info("Springboot profiles application is running successfully."); }} |
3.4.2 Configuration class
Add the following code to the configuration class where we define the configuration for the different profiles and illustrate the use of @Profile annotation.

ProfileConfig.java
|
01
02
03
04
05
06
07
08
09
10
11
12
13
14
15
16
17
18
19
20
21
22
23
24
25
26
27
28
29
30
31
32
33
34
|
package com.springboot.profiles.config;import org.slf4j.Logger;import org.slf4j.LoggerFactory;import org.springframework.context.annotation.Bean;import org.springframework.context.annotation.Configuration;import org.springframework.context.annotation.Profile;@Configurationpublic class ProfileConfig { private static Logger LOGGER = LoggerFactory.getLogger(ProfileConfig.class); // @Profile annotation is used to conditionally activate/register // Used to develop an "if-then-else" conditional checking to configure // Allows to register beans by condition @Profile(value = "dev") @Bean public void devConfig() { LOGGER.info("Successfully loaded the development environment."); } @Profile(value = "qa") @Bean public void qaConfig() { LOGGER.info("Successfully loaded the testing environment."); } @Profile(value = "prod") @Bean public void prodConfig() { LOGGER.info("Successfully loaded the production environment."); }} |
3.4.3 Controller class
Add the following code to the controller class designed to handle the incoming requests. The class is annotated with the @RestController annotation and the HTTP GET method the response based on the value populated from the selected profile.
HelloworldCtrl.java
|
01
02
03
04
05
06
07
08
09
10
11
12
13
14
15
16
17
18
19
20
21
22
23
24
25
|
package com.springboot.profiles.controller;import org.slf4j.Logger;import org.slf4j.LoggerFactory;import org.springframework.beans.factory.annotation.Value;import org.springframework.web.bind.annotation.GetMapping;import org.springframework.web.bind.annotation.RequestMapping;import org.springframework.web.bind.annotation.RestController;@RestController@RequestMapping(value = "/rest")public class HelloworldCtrl { private static Logger LOGGER = LoggerFactory.getLogger(HelloworldCtrl.class); // The message attribute value is populated based on the selected profile @Value(value = "${spring.message}") private String message; @GetMapping(value = "/hello") public String welcome() { LOGGER.info("Returning the response."); return message; }} |
4. Run the Application
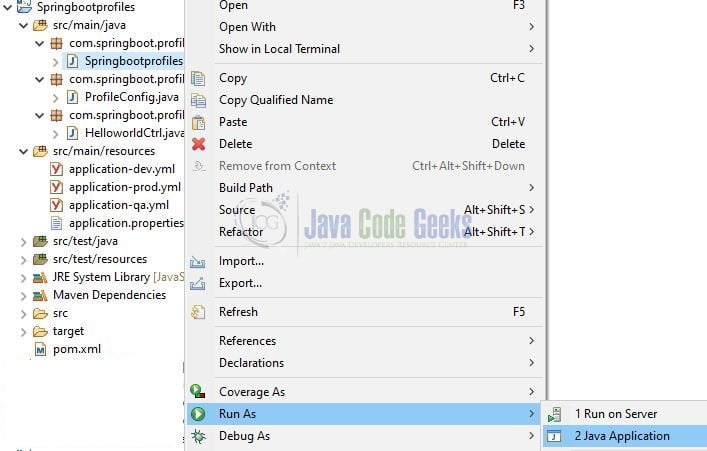
To execute the application, right-click on the Springbootprofiles.java class, Run As -> Java Application.
5. Project Demo
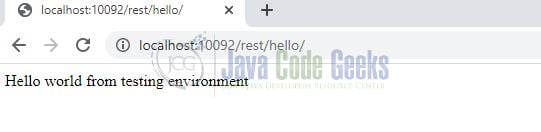
Open the Postman tool or any browser of your choice and hit the following URLs to display the fallback response from the service.
// Get the response from the QA profile yml file
// Application port depends on the port number defined in the profile yml file
http://localhost:10092/rest/hello/
Now on hitting this URL you will get the response from the QA profile yml file.
Similarly, developers can change the profile name through the spring.profiles.active attribute defined in the application.properties file and play around to see the magic of different profiles at runtime.
That is all for this tutorial and I hope the article served you whatever you were looking for. Happy Learning and do not forget to share!
6. Summary
In this tutorial, we learned:
- Spring Boot and Profiles
- Steps to implement the profile(s) in spring boot application
You can download the sample application as an Eclipse project in the Downloads section.
7. Download the Eclipse Project
This was an example of a Profiles in a Spring boot application.
You can download the full source code of this example here: Spring Boot Profiles Tutorial
