In this tutorial, we will see the basic concepts of pagination with a simple spring boot application.
1. Introduction
Before going further in this tutorial we will take a look at the common terminology such as introduction to Spring boot, Docker, and Pagination. We are using Docker to communicate with PostgreSQL.
1.1 What is Spring boot?
- Spring boot is a module that provides rapid application development feature to the spring framework including auto-configuration, standalone-code, and production-ready code
- It creates applications that are packaged as jar and are directly started using embedded servlet container (such as Tomcat, Jetty or Undertow). Thus, no need to deploy the war files
- It simplifies the maven configuration by providing the starter template and helps to resolve the dependency conflicts. It automatically identifies the required dependencies and imports them in the application
- It helps in removing the boilerplate code, extra annotations, and XML configurations
- It provides a powerful batch processing and manages the rest endpoints
- It provides an efficient JPA-starter library to effectively connect the application with the relational databases
- It offers a Microservice architecture and cloud configuration that manages all the application related configuration properties in a centralized manner.
1.2 What is Docker?
In the present world, Docker is an important term,
- Often used in CI/CD platform that packages and runs the application with its dependencies inside a container
- Is a standard for Linux Containers
- A Container is a runtime that runs under any Linux kernel and provides a private machine-like space under Linux
1.3 Pagination
Consider a scenario where an endpoint returns a list of employees having 100000+ records. Now to retrieve such data from the backend is an expensive task as will consume some heavy resources.
To rescue this resource consumption, Pagination came into the picture and played an important page. Pagination is a process of dividing data into suitable sizes to save resources (i.e. displaying a small number of all, by a page). Now this sizeable chunk will return the list of employees and other paging info (which we would see in this tutorial) based on the page-number and page-size parameters that are passed in an HTTP GET request. For instance – a request like /employees/getAll?pageNumber=0&pageSize=10 would return a batch of first 10 employees from the database and /employees/getAll?pageNumber=1&pageSize=10 would return the next batch of 10 employees and so on. . .
In the spring framework, PaginationAndSortingRepository which is an extension of CrudRepository provides this functionality (i.e. to retrieve the records using the pagination and sorting techniques). To begin with, we will create a spring boot application that communicates with the Postgres database. But before going any further I’m assuming that readers are aware of the concepts of creating and running a basic spring boot application.
2. Spring Boot Pagination Tutorial
Here is a systematic guide for implementing this tutorial.
2.1 Application Pre-requisite
To start with this tutorial, we are hoping that users at present have the Docker installation completed. If someone needs to go through the Docker installation, please watch this video.
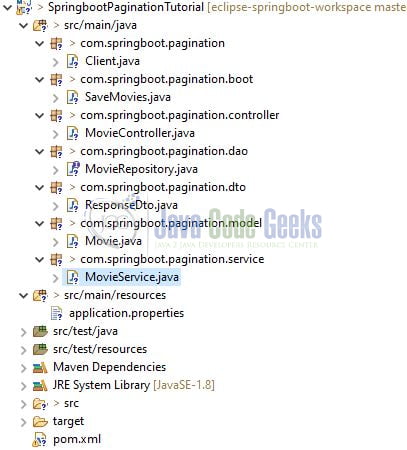
2.2 Tools Used and Project Structure
We are using Eclipse, JDK 8, Maven, and Docker. In case you’re confused about where you should create the corresponding files or folder, let us review the project structure of the spring boot application.
Let us start building the application!
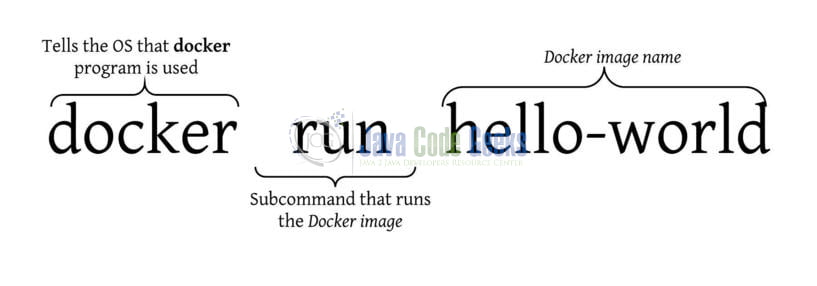
3. Pulling the Postgres image from Docker Hub & Starting it
To have the Postgres up and working on the localhost environment, we will pull the image from Docker and start the container. Users can refer the following commands to pull the image and later start the container.
Docker commands
|
1
2
3
4
5
6
|
## Docker commands## step1 - Pulling redis image from docker hubdocker pull postgres## step2 - Running the containerdocker run -d -p 5433:5432 -e POSTGRES_PASSWORD= --name postgres postgres |
If everything goes well, the Docker image will be pulled and started. Developers can use the docker ps -a command to verify if the container was successfully started or not. Developers can go through this link to understand the Docker basic terminology.
4. Creating Spring boot application
Below are the steps involved in developing the application.
4.1 Maven Dependency
Here, we specify the dependency for the Spring boot, JPA, and Postgres. Maven will automatically resolve the other dependencies. The updated file will have the following code.
pom.xml
|
01
02
03
04
05
06
07
08
09
10
11
12
13
14
15
16
17
18
19
20
21
22
23
24
25
26
27
28
29
30
31
32
33
34
35
36
37
38
39
40
41
42
43
44
45
46
47
48
49
50
51
52
53
54
55
56
57
|
xsi:schemaLocation="http://maven.apache.org/POM/4.0.0 https://maven.apache.org/xsd/maven-4.0.0.xsd"> <modelVersion>4.0.0</modelVersion> <groupId>com.springboot.pagination</groupId> <artifactId>SpringbootPaginationTutorial</artifactId> <version>0.0.1-SNAPSHOT</version> <name>Springboot and pagination tutorial</name> <description>A tutorial on springboot and pagination using h2 database</description> <parent> <groupId>org.springframework.boot</groupId> <artifactId>spring-boot-starter-parent</artifactId> <version>2.3.1.RELEASE</version> </parent> <properties> <java.version>1.8</java.version> </properties> <dependencies> <!-- spring boot web mvc dependency. --> <dependency> <groupId>org.springframework.boot</groupId> <artifactId>spring-boot-starter-web</artifactId> </dependency> <!-- spring boot database communication dependency. --> <dependency> <groupId>org.springframework.boot</groupId> <artifactId>spring-boot-starter-data-jpa</artifactId> </dependency> <!-- postgresql dependency --> <dependency> <groupId>org.postgresql</groupId> <artifactId>postgresql</artifactId> </dependency> <!-- common utils dependency --> <dependency> <groupId>org.apache.commons</groupId> <artifactId>commons-lang3</artifactId> <version>3.10</version> </dependency> </dependencies> <build> <finalName>SpringbootPaginationTutorial</finalName> <!-- to make spring boot as a fat jar so that all required jar files and main file is added for running the code from docker. --> <plugins> <plugin> <groupId>org.springframework.boot</groupId> <artifactId>spring-boot-maven-plugin</artifactId> </plugin> </plugins> </build></project> |
4.2 Application Properties
Create a new properties file at the location: SpringbootPaginationTutorial/src/main/resources/ and add the application and Postgres configuration to this file.
application.properties
|
01
02
03
04
05
06
07
08
09
10
11
12
13
14
15
16
17
|
### Server portserver.port=8089### Springboot application namespring.application.name=SpringbootPaginationTutorial### PostgresSQL## Default postgres port is 5432. But for poc I created a separate instance running on 5433## Developers can use Docker to run multiple postgres on different port numbersspring.datasource.url=jdbc:postgresql://localhost:5433/dvdrentalspring.datasource.username=postgres# Password you have set for your postgres setupspring.datasource.password=### Drop n create table again, good for testing, comment this in productionspring.jpa.hibernate.ddl-auto=create-drop### Spring jpa tracingspring.jpa.show-sql=true## Pretty print the sql on consolespring.jpa.properties.hibernate.format_sql=true |
4.3 Java Classes
Let us write all the java classes involved in this application.
4.3.1 Implementation/Main class
Add the following code to the main class to bootstrap the application from the main method. Always remember, the entry point of the spring boot application is the class containing @SpringBootApplication annotation and the static main method.
Client.java
|
01
02
03
04
05
06
07
08
09
10
11
12
13
14
15
16
17
18
|
package com.springboot.pagination;import org.slf4j.Logger;import org.slf4j.LoggerFactory;import org.springframework.boot.SpringApplication;import org.springframework.boot.autoconfigure.SpringBootApplication;// Serves two purposes i.e. configuration and bootstrapping.@SpringBootApplicationpublic class Client { private static final Logger LOGGER = LoggerFactory.getLogger(Client.class); public static void main(String[] args) { SpringApplication.run(Client.class, args); LOGGER.info("Springboot and pagination application using postgres database started successfully."); }} |
4.3.2 Model class
Add the following code to the Movie model class where we’ll define the basic attributes for this class.
Movie.java
|
01
02
03
04
05
06
07
08
09
10
11
12
13
14
15
16
17
18
19
20
21
22
23
24
25
26
27
28
29
30
31
32
33
34
35
36
37
38
39
40
41
42
43
44
45
46
47
48
49
50
51
52
53
54
55
56
57
|
package com.springboot.pagination.model;import javax.persistence.Entity;import javax.persistence.GeneratedValue;import javax.persistence.GenerationType;import javax.persistence.Id;// @Entity annotation specifies that the class is mapped to a database table.@Entitypublic class Movie { // @Id annotation specifies the primary key of an entity. @Id // @GeneratedValue provides the generation strategy specification for the primary key values. @GeneratedValue(strategy = GenerationType.AUTO) private long id; private String title; private String description; private boolean released; public Movie() { // Default constructor of initialization purpose. } // Getters and Setters. public long getId() { return id; } public void setId(long id) { this.id = id; } public String getTitle() { return title; } public void setTitle(String title) { this.title = title; } public String getDescription() { return description; } public void setDescription(String description) { this.description = description; } public boolean isReleased() { return released; } public void setReleased(boolean released) { this.released = released; }} |
4.3.3 DAO interface
Add the following code the repository interface that will interact with the database to perform CREATE/GET operations.
MovieRepository.java
|
01
02
03
04
05
06
07
08
09
10
11
12
|
package com.springboot.pagination.dao;import com.springboot.pagination.model.Movie;import org.springframework.data.domain.Page;import org.springframework.data.domain.Pageable;import org.springframework.data.jpa.repository.JpaRepository;public interface MovieRepository extends JpaRepository<Movie, Long> { // Fetch all movies by their release status and order them by movie them in ascending order. Page<Movie> findByReleasedOrderByTitleAsc(boolean released, Pageable pageable);} |
4.3.4 Configuration class to Pre-populate the table
Add the following code to this startup class which will populate the table with some random database during the application startup time.
SaveMovies.java
|
01
02
03
04
05
06
07
08
09
10
11
12
13
14
15
16
17
18
19
20
21
22
23
24
25
26
27
28
29
30
31
32
33
34
35
36
37
38
|
package com.springboot.pagination.boot;import com.springboot.pagination.model.Movie;import com.springboot.pagination.service.MovieService;import org.apache.commons.lang3.RandomStringUtils;import org.apache.commons.lang3.RandomUtils;import org.slf4j.Logger;import org.slf4j.LoggerFactory;import org.springframework.beans.factory.annotation.Autowired;import org.springframework.stereotype.Component;import javax.annotation.PostConstruct;@Componentpublic class SaveMovies { private static final Logger LOGGER = LoggerFactory.getLogger(SaveMovies.class); @Autowired MovieService movieService; // The annotation will cause the method to get executed after the spring bean is initialized. @PostConstruct public void onApplicationStartup() { saveRandomMoviesInDatabase(); } private void saveRandomMoviesInDatabase() { LOGGER.info("Saving the random movie details into the database."); for (int i = 0; i < 21; i++) { final Movie movie = new Movie(); movie.setTitle(RandomStringUtils.randomAlphabetic(5)); movie.setDescription(RandomStringUtils.randomAlphabetic(200)); movie.setReleased(RandomUtils.nextBoolean()); movieService.save(movie); } }} |
4.3.5 Controller class
Add the following code to the controller class designed to handle the incoming requests. The class is annotated with the @RestController annotation where every method returns a domain object as a JSON response instead of a view.

MovieController.java
|
01
02
03
04
05
06
07
08
09
10
11
12
13
14
15
16
17
18
19
20
21
22
23
24
25
26
27
28
29
30
31
32
33
34
35
36
37
38
39
40
41
42
43
44
45
46
47
48
49
50
51
52
53
54
55
56
57
58
59
60
61
62
63
64
65
66
67
68
69
70
71
72
73
74
75
76
77
78
79
80
81
82
83
84
85
86
87
88
89
90
91
92
93
94
95
96
97
98
99
|
package com.springboot.pagination.controller;import com.springboot.pagination.dto.ResponseDto;import com.springboot.pagination.model.Movie;import com.springboot.pagination.service.MovieService;import org.slf4j.Logger;import org.slf4j.LoggerFactory;import org.springframework.beans.factory.annotation.Autowired;import org.springframework.data.domain.Page;import org.springframework.data.domain.PageRequest;import org.springframework.data.domain.Pageable;import org.springframework.http.HttpStatus;import org.springframework.http.MediaType;import org.springframework.http.ResponseEntity;import org.springframework.util.CollectionUtils;import org.springframework.web.bind.annotation.GetMapping;import org.springframework.web.bind.annotation.RequestMapping;import org.springframework.web.bind.annotation.RequestParam;import org.springframework.web.bind.annotation.RestController;import java.util.Collections;import java.util.List;// Useful to create the Restful microservices.@RestController@RequestMapping("/api/movies")public class MovieController { private static final Logger LOGGER = LoggerFactory.getLogger(MovieController.class); // @Autowired annotation provides the automatic dependency injection. @Autowired MovieService movieService; // @GetMapping annotation handles the http get request matched with the given uri. // @RequestParam annotation reads the request parameters (i.e. basically is a query string) // Sample urls - @GetMapping(value = "/getAll", produces = MediaType.APPLICATION_JSON_VALUE) public ResponseEntity<ResponseDto> getAllMovies( @RequestParam(name = "pageNumber", defaultValue = "0") final int pageNumber, // In spring the default page number starts with '0'. @RequestParam(name = "pageSize", defaultValue = "5") final int pageSize) { LOGGER.info("Getting all the movies from the database for page-number= {} and page-size= {}.", pageNumber, pageSize); final ResponseEntity<ResponseDto> responseEntity; try { final Pageable pageable = PageRequest.of(pageNumber, pageSize); final Page<Movie> allMovies = movieService.getAllMovies(pageable); responseEntity = createResponseDto(allMovies); } catch (final Exception e) { LOGGER.info("Exception occurred while fetching the response from the database.", e); return new ResponseEntity<>(HttpStatus.INTERNAL_SERVER_ERROR); } return responseEntity; } // @GetMapping annotation handles the http get request matched with the given uri. // @RequestParam annotation reads the request parameters (i.e. basically is a query string) // Sample urls - @GetMapping(value = "/findByReleased", produces = MediaType.APPLICATION_JSON_VALUE) public ResponseEntity<ResponseDto> findByReleased( @RequestParam(name = "pageNumber", defaultValue = "0") final int pageNumber, // In spring the default page number starts with '0'. @RequestParam(name = "pageSize", defaultValue = "5") final int pageSize, @RequestParam(name = "isMovieReleased", defaultValue = "true") final boolean isMovieReleased) { LOGGER.info("Getting all the movies from the database where movie released flag= {} for page-number= {} and " + "page-size= {}.", isMovieReleased, pageNumber, pageSize); final ResponseEntity<ResponseDto> responseEntity; try { final Pageable pageable = PageRequest.of(pageNumber, pageSize); final Page<Movie> allMovies = movieService.findByReleased(isMovieReleased, pageable); responseEntity = createResponseDto(allMovies); } catch (final Exception e) { LOGGER.info("Exception occurred while fetching the response from the database.", e); return new ResponseEntity<>(HttpStatus.INTERNAL_SERVER_ERROR); } return responseEntity; } private ResponseEntity<ResponseDto> createResponseDto(final Page<Movie> moviesPage) { final List<Movie> movies = moviesPage.getContent(); final ResponseEntity<ResponseDto> responseEntity; if (CollectionUtils.isEmpty(movies)) { LOGGER.info("Returning an empty list as no movies are fetched from the database."); responseEntity = new ResponseEntity<>(ResponseDto.create(Collections.emptyList(), 0, 0, 0, null, null), HttpStatus.OK); } else { responseEntity = new ResponseEntity<>(ResponseDto.create(movies, (int) moviesPage.getTotalElements(), moviesPage.getTotalPages(), moviesPage.getNumber(), moviesPage.isFirst(), moviesPage.isLast()), HttpStatus.OK); } return responseEntity; }} |
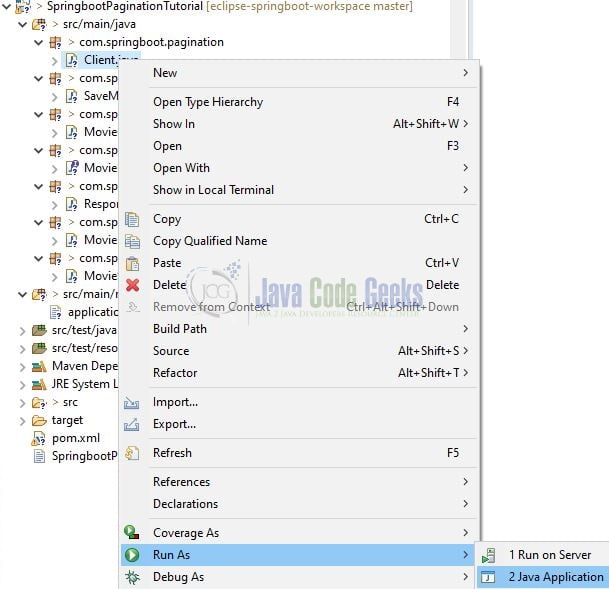
5. Run the Application
To execute the application, right-click on the Client.java class, Run As -> Java Application.
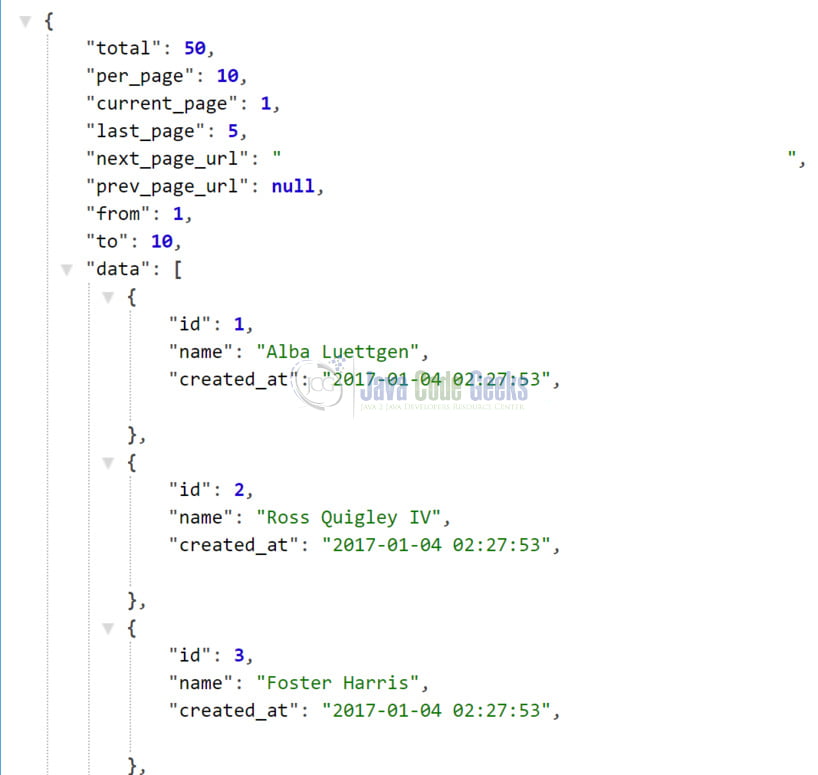
6. Project Demo
Open the Postman tool and hit the following URLs to display the data in the JSON format.
|
1
2
3
4
5
|
// Fetch all movies// Fetch all movies through isReleased boolean |
That is all for this tutorial and I hope the article served you whatever you were looking for. Happy Learning and do not forget to share!
7. Summary
In this tutorial, we learned:
- Introduction to Spring Boot, Docker, and Pagination
- Integrate Pagination in a Spring boot application
- Using the postman tool to check the controller mappings for the different scenario’s
8. Download the Eclipse Project
This was an example of Pagination in a Spring boot application.
You can download the full source code of this example here: Spring Boot Pagination Tutorial
