Welcome, in this tutorial, we will see how to download a CSV file in a spring boot application. We will use the postman tool to view the CSV data however you are free to enhance by adding a simple HTML page containing a link to download the CSV.
1. Introduction
Before going further in this tutorial, we will look at the common terminology such as introduction to Spring Boot and Lombok.
1.1 Spring Boot
- Spring boot is a module that provides rapid application development feature to the spring framework including auto-configuration, standalone-code, and production-ready code
- It creates applications that are packaged as jar and are directly started using embedded servlet container (such as Tomcat, Jetty or, Undertow). Thus, no need to deploy the war files
- It simplifies the maven configuration by providing the starter template and helps to resolve the dependency conflicts. It automatically identifies the required dependencies and imports them into the application
- It helps in removing the boilerplate code, extra annotations, and XML configurations
- It provides powerful batch processing and manages the rest endpoints
- It provides an efficient JPA-starter library to effectively connect the application with the relational databases
- It offers a Microservice architecture and cloud configuration that manages all the application related configuration properties in a centralized manner
1.2 Lombok
- Lombok is nothing but a small library that reduces the amount of boilerplate Java code from the project
- Automatically generates the getters and setters for the object by using the Lombok annotations
- Hooks in via the Annotation processor API
- Raw source code is passed to Lombok for code generation before the Java Compiler continues. Thus, produces properly compiled Java code in conjunction with the Java Compiler
- Under the
target/classesfolder you can view the compiled class files - Can be used with Maven, Gradle IDE, etc.
1.2.1 Lombok features
| Feature | Details |
|---|---|
val |
Local variables are declared as final |
var |
Mutable local variables |
@Slf4J |
Creates an SLF4J logger |
@Cleanup |
Will call close() on the resource in the finally block |
@Getter |
Creates getter methods for all properties |
@Setter |
Creates setter for all non-final properties |
@EqualsAndHashCode |
|
@ToString |
|
@NoArgsConstructor |
|
@RequiredArgsContructor |
|
@AllArgsConstructor |
|
@Data |
|
@Builder |
|
@Value |
|
Let us go ahead with the tutorial implementation but before going any further I’m assuming that you’re aware of the Spring boot basics.
2. Spring Boot Download CSV File Example
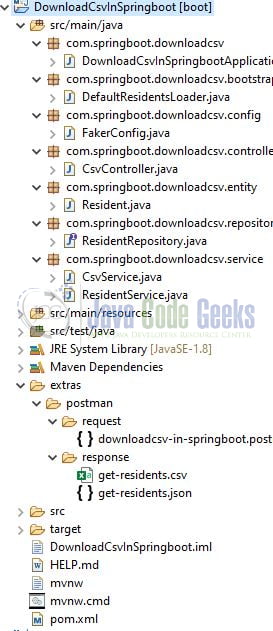
2.1 Tools Used for Spring boot application and Project Structure
We are using Eclipse Kepler SR2, JDK 8, and Maven. In case you’re confused about where you should create the corresponding files or folder, let us review the project structure of the spring boot application.
Let us start building the application!
3. Creating a Spring Boot application
Below are the steps involved in developing the application.
3.1 Maven Dependency
Here, we specify the dependency for the Spring boot (Web and JPA), Common Csv, H2 database, Java Faker, and Lombok. The updated file will have the following code.
pom.xml
<?xml version="1.0" encoding="UTF-8"?>
<project xmlns:xsi="http://www.w3.org/2001/XMLSchema-instance" xmlns="http://maven.apache.org/POM/4.0.0"
         xsi:schemaLocation="http://maven.apache.org/POM/4.0.0 https://maven.apache.org/xsd/maven-4.0.0.xsd">
    <modelVersion>4.0.0</modelVersion>
    <parent>
        <groupId>org.springframework.boot</groupId>
        <artifactId>spring-boot-starter-parent</artifactId>
        <version>2.4.2</version>
        <relativePath/> <!-- lookup parent from repository -->
    </parent>
    <groupId>com.springboot.downloadcsv</groupId>
    <artifactId>DownloadCsvInSpringboot</artifactId>
    <version>0.0.1-SNAPSHOT</version>
    <name>DownloadCsvInSpringboot</name>
    <description>Download csv in springboot application</description>

    <properties>
        <java.version>1.8</java.version>
    </properties>

    <dependencies>
        <dependency>
            <groupId>org.springframework.boot</groupId>
            <artifactId>spring-boot-starter-web</artifactId>
        </dependency>
        <dependency>
            <groupId>org.springframework.boot</groupId>
            <artifactId>spring-boot-starter-data-jpa</artifactId>
        </dependency>

        <dependency>
            <groupId>com.h2database</groupId>
            <artifactId>h2</artifactId>
            <scope>runtime</scope>
        </dependency>
        <dependency>
            <groupId>org.projectlombok</groupId>
            <artifactId>lombok</artifactId>
            <optional>true</optional>
        </dependency>

        <dependency>
            <groupId>org.apache.commons</groupId>
            <artifactId>commons-csv</artifactId>
            <version>1.8</version>
        </dependency>
        <dependency>
            <groupId>com.github.javafaker</groupId>
            <artifactId>javafaker</artifactId>
            <version>1.0.2</version>
        </dependency>

        <dependency>
            <groupId>org.springframework.boot</groupId>
            <artifactId>spring-boot-starter-test</artifactId>
            <scope>test</scope>
        </dependency>
    </dependencies>

    <build>
        <plugins>
            <plugin>
                <groupId>org.springframework.boot</groupId>
                <artifactId>spring-boot-maven-plugin</artifactId>
                <configuration>
                    <excludes>
                        <exclude>
                            <groupId>org.projectlombok</groupId>
                            <artifactId>lombok</artifactId>
                        </exclude>
                    </excludes>
                </configuration>
            </plugin>
        </plugins>
    </build>

</project>
3.2 Application properties file
Create a new properties file at the location: DownloadCsvInSpringboot/src/main/resources/ and add the following code to it. Here we will define the H2 database connection, database creation, and h2 console details. You’re free to change the application or the database details as per your wish.
application.properties
server.port=9800
spring.application.name=downloadcsv-in-springboot
# h2 database settings
spring.datasource.username=sa
spring.datasource.password=
spring.datasource.url=jdbc:h2:mem:testdb
spring.datasource.driverClassName=org.h2.Driver
# db-creation settings
spring.jpa.database-platform=org.hibernate.dialect.H2Dialect
spring.jpa.hibernate.ddl-auto=create-drop
spring.jpa.properties.hibernate.show_sql=true
## browser url for h2 console - http://localhost:9800/h2-console
spring.h2.console.enabled=true
spring.h2.console.path=/h2-console
3.3 Java Classes
Let us write the important java class(es) involved in this application. For brevity, we will skip the following classes –
FakerConfig.java– Configuration class contains a@Beanannotated method that creates aFakerobject during the application startup and will be automatically injected into the applicationResidentRepository.java– Repository interface that extends theCrudRepositoryinterface to perform the SQL operationsResidentService.java– Service class that provide some business facilities and interact with the DAO layer methodsDefaultResidentsLoader.java– Bootstrap class to populate dummy data to the h2 database once the application is started successfully. You can use the /API/get-residents endpoint to fetch residents in JSON format or can directly view the data via the h2-console available at –http://localhost:9800/h2-console
3.3.1 Implementation/Main class
Add the following code to the main class to bootstrap the application from the main method. Always remember, the entry point of the spring boot application is the class containing @SpringBootApplication annotation and the static main method.
DownloadCsvInSpringbootApplication.java
package com.springboot.downloadcsv;

import lombok.extern.slf4j.Slf4j;
import org.springframework.boot.SpringApplication;
import org.springframework.boot.autoconfigure.SpringBootApplication;

//lombok annotation
@Slf4j
//spring annotation
@SpringBootApplication
public class DownloadCsvInSpringbootApplication {

    public static void main(String[] args) {
        SpringApplication.run(DownloadCsvInSpringbootApplication.class, args);
        log.info("Download csv in springboot application started successfully");
    }
}
3.3.2 Entity class
Add the following code to the entity class and the class will be annotated with the Spring JPA and Lombok annotations.
Resident.java
package com.springboot.downloadcsv.entity;

import lombok.AllArgsConstructor;
import lombok.Builder;
import lombok.Data;
import lombok.NoArgsConstructor;
import org.springframework.stereotype.Component;

import javax.persistence.*;
import java.time.LocalDate;

//spring jpa annotations
@Entity
@Table(name = "resident")
//lombok annotations
@NoArgsConstructor
@AllArgsConstructor
@Data
@Builder
//spring annotation
@Component
public class Resident {

    @Id
    @GeneratedValue(strategy = GenerationType.AUTO)
    int id;
    @Column(name = "full_name", nullable = false)
    String fullName;
    int age;
    String gender;
    @Column(name = "phone_number", unique = true)
    String phoneNumber;
    @Column(name = "email_address", nullable = false, unique = true)
    String emailAddress;
    @Column(name = "date_of_birth")
    LocalDate dateOfBirth;
    @Column(name = "home_address")
    String homeAddress;
    String nationality;
}
3.3.3 CSV service class
Add the following code to the CSV service class where the load() method will accept the residents list as an input argument and write the records to the ByteArrayInputStream stream.
CsvService.java
package com.springboot.downloadcsv.service;

import com.springboot.downloadcsv.entity.Resident;
import lombok.extern.slf4j.Slf4j;
import org.apache.commons.csv.CSVFormat;
import org.apache.commons.csv.CSVPrinter;
import org.springframework.stereotype.Service;

import java.io.ByteArrayInputStream;
import java.io.ByteArrayOutputStream;
import java.io.IOException;
import java.io.PrintWriter;
import java.util.Arrays;
import java.util.List;

//lombok annotation
@Slf4j
//spring annotation
@Service
public class CsvService {

    private static final String[] HEADERS = {"Id", "Full name", "Age", "Gender", "Phone number",
            "Email address", "Date of birth", "Home address", "Nationality"};
    private static final CSVFormat FORMAT = CSVFormat.DEFAULT.withHeader(HEADERS);

    //load data into csv
    public ByteArrayInputStream load(final List<Resident> residents) {
        return writeDataToCsv(residents);
    }

    //write data to csv
    private ByteArrayInputStream writeDataToCsv(final List<Resident> residents) {
        log.info("Writing data to the csv printer");
        try (final ByteArrayOutputStream stream = new ByteArrayOutputStream();
             final CSVPrinter printer = new CSVPrinter(new PrintWriter(stream), FORMAT)) {
            for (final Resident resident : residents) {
                final List<String> data = Arrays.asList(
                        String.valueOf(resident.getId()),
                        resident.getFullName(),
                        String.valueOf(resident.getAge()),
                        resident.getGender(),
                        resident.getPhoneNumber(),
                        resident.getEmailAddress(),
                        String.valueOf(resident.getDateOfBirth()),
                        resident.getHomeAddress(),
                        resident.getNationality());

                printer.printRecord(data);
            }

            printer.flush();
            return new ByteArrayInputStream(stream.toByteArray());
        } catch (final IOException e) {
            throw new RuntimeException("Csv writing error: " + e.getMessage());
        }
    }
}
3.3.4 Controller class
Add the following code to the controller class. The class is injected with the Resident service layer dependency to call the DAO layer methods and the CSV service dependency to prepare the data and return a ByteArrayInputStream stream for further use.
CsvController.java
package com.springboot.downloadcsv.controller;

import com.springboot.downloadcsv.entity.Resident;
import com.springboot.downloadcsv.service.CsvService;
import com.springboot.downloadcsv.service.ResidentService;
import lombok.extern.slf4j.Slf4j;
import org.springframework.beans.factory.annotation.Autowired;
import org.springframework.core.io.InputStreamResource;
import org.springframework.core.io.Resource;
import org.springframework.http.HttpHeaders;
import org.springframework.http.HttpStatus;
import org.springframework.http.MediaType;
import org.springframework.http.ResponseEntity;
import org.springframework.web.bind.annotation.*;

import java.util.List;

//note - for simplicity we have removed the ui configuration.
//you're free to add the code changes for the ui (thymeleaf configuration).

//lombok annotation
@Slf4j
//spring annotations
@RestController
@RequestMapping("/api")
public class CsvController {

    @Autowired
    ResidentService service;
    @Autowired
    CsvService csvService;

    //get all residents from db
    //URL - http://localhost:9800/api/get-residents
    @GetMapping("/get-residents")
    @ResponseStatus(HttpStatus.OK)
    public List<Resident> getResidents() {
        log.info("Get all residents");
        return service.getResidents();
    }

    // download all residents info from db
    //URL - http://localhost:9800/api/download-residents-csv
    //note - incoming request to contain the mandatory "Content-disposition" and "Content-Type" headers
    @GetMapping("/download-residents-csv")
    public ResponseEntity<Resource> getCsv(
            @RequestHeader(name = "Content-disposition") final String fileName,
            @RequestHeader(name = "Content-Type") final String mediaType) {
        log.info("Downloading residents csv");
        final List<Resident> residents = service.getResidents();
        final InputStreamResource resource = new InputStreamResource(csvService.load(residents));
        return ResponseEntity.ok()
                .header(HttpHeaders.CONTENT_DISPOSITION, fileName)
                .contentType(MediaType.parseMediaType(mediaType))
                .body(resource);
    }
}
4. Run the Application
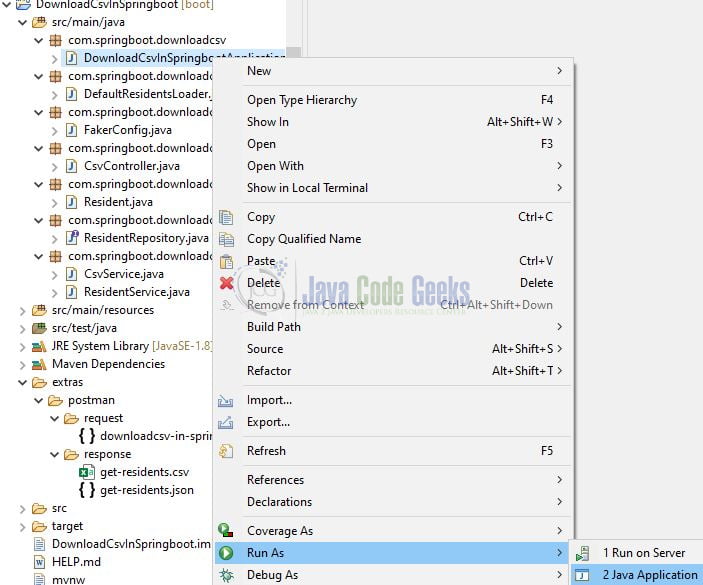
To execute the application, right-click on the DownloadCsvInSpringbootApplication.java class, Run As -> Java Application.
6. Project Demo
When the application is started, open the Postman tool to hit the application endpoints to either fetch the data from the DB and return in a JSON format or to download the data in a CSV format.
Application endpoints
-- HTTP GET endpoint (get all residents from db in json format) –
http://localhost:9800/api/get-residents

-- HTTP GET endpoint (to download the data in CSV format) –
-- note - incoming request to contain the mandatory "Content-disposition" and "Content-Type" headers --
http://localhost:9800/api/download-residents-csv
That is all for this tutorial and I hope the article served you whatever you were looking for. Happy Learning and do not forget to share!
7. Summary
In this section, you learned,
- Spring boot and Lombok introduction
- Steps to download the data in CSV in a spring boot application
You can download the sample application as an Eclipse project in the Downloads section.
8. Download the Project
This was an example of download data in a CSV in a spring boot application.
You can download the full source code of this example here: Spring Boot Download CSV File Example
