Welcome, in this tutorial, we will see how to deploy a simple spring boot application on the Heroku platform.
1. Introduction
Before going further in this tutorial, let us understand Spring Boot.
- Spring boot is a module that provides rapid application development feature to the spring framework including auto-configuration, standalone-code, and production-ready code
- It creates applications that are packaged as jar and are directly started using embedded servlet containers (such as Tomcat, Jetty or, Undertow). Thus, no need to deploy the war files
- It simplifies the maven configuration by providing the starter template and helps to resolve the dependency conflicts. It automatically identifies the required dependencies and imports them into the application
- It helps in removing the boilerplate code, extra annotations, and xml configurations
- It provides powerful batch processing and manages the rest endpoints
- It provides an efficient jpa-starter library to effectively connect the application with the relational databases
- It offers a Microservice architecture and cloud configuration that manages all the application related configuration properties in a centralized manner
Let us dive into the programming stuff. The tutorial will be divided into two parts where part 1 will talk about creating a basic spring boot application and part 2 about the deployment on Heroku.
2. Creating a Spring boot application
Below are the steps involved in developing the application.
2.1 Maven Dependencies
Here, we specify the dependency for the Spring boot and Lombok. The updated file will have the following code.
pom.xml
<?xml version="1.0" encoding="UTF-8"?>
<project xmlns:xsi="http://www.w3.org/2001/XMLSchema-instance" xmlns="http://maven.apache.org/POM/4.0.0"
         xsi:schemaLocation="http://maven.apache.org/POM/4.0.0 https://maven.apache.org/xsd/maven-4.0.0.xsd">
    <modelVersion>4.0.0</modelVersion>

    <parent>
        <groupId>org.springframework.boot</groupId>
        <artifactId>spring-boot-starter-parent</artifactId>
        <version>2.4.5</version>
        <relativePath/> <!-- lookup parent from repository -->
    </parent>

    <groupId>com.springboot</groupId>
    <artifactId>SpringbootHeroku</artifactId>
    <version>0.0.1-SNAPSHOT</version>
    <name>SpringbootHeroku</name>
    <description>Demo project for springboot on heroku</description>

    <properties>
        <java.version>1.8</java.version>
    </properties>

    <dependencies>
        <dependency>
            <groupId>org.springframework.boot</groupId>
            <artifactId>spring-boot-starter</artifactId>
        </dependency>
        <dependency>
            <groupId>org.projectlombok</groupId>
            <artifactId>lombok</artifactId>
            <optional>true</optional>
        </dependency>
        <dependency>
            <groupId>org.springframework.boot</groupId>
            <artifactId>spring-boot-starter-test</artifactId>
            <scope>test</scope>
        </dependency>
        <dependency>
            <groupId>org.springframework.boot</groupId>
            <artifactId>spring-boot-starter-web</artifactId>
        </dependency>
    </dependencies>

    <build>
        <plugins>
            <plugin>
                <groupId>org.springframework.boot</groupId>
                <artifactId>spring-boot-maven-plugin</artifactId>
                <configuration>
                    <excludes>
                        <exclude>
                            <groupId>org.projectlombok</groupId>
                            <artifactId>lombok</artifactId>
                        </exclude>
                    </excludes>
                </configuration>
            </plugin>
        </plugins>
    </build>

</project>
2.2 Application properties file
Creating a properties file in the resources folder and add the following code to it. You are free to change the details as per your wish.
application.properties
server.port=9091
spring.application.name=springboot-heroku
2.3 Java Classes
Let us write the classes involved in this application.
2.3.1 Implementation/Main class
Add the following code to the main class to bootstrap the application from the main method. Always remember, the entry point of the spring boot application is the class containing @SpringBootApplication annotation and the static main method.
SpringbootHerokuApplication.java
package com.springboot.heroku;

import org.springframework.boot.SpringApplication;
import org.springframework.boot.autoconfigure.SpringBootApplication;

import lombok.extern.slf4j.Slf4j;

@Slf4j
@SpringBootApplication
public class SpringbootHerokuApplication {

    public static void main(String[] args) {
        SpringApplication.run(SpringbootHerokuApplication.class, args);
        log.info("Spring boot and heroku application started successfully.");
    }
}
2.3.2 Controller class
Add the following code to the controller class. The class consists of two HTTP GET endpoints i.e. display the index message and get the current time from the server.
SomeController.java
package com.springboot.heroku.controller;

import org.springframework.http.HttpStatus;
import org.springframework.web.bind.annotation.GetMapping;
import org.springframework.web.bind.annotation.RequestMapping;
import org.springframework.web.bind.annotation.ResponseStatus;
import org.springframework.web.bind.annotation.RestController;

import lombok.extern.slf4j.Slf4j;

import java.time.LocalDateTime;

@Slf4j
@RestController
@RequestMapping("/api")
public class SomeController {

    //URL - http://localhost:9091/api/
    @GetMapping("/")
    @ResponseStatus(HttpStatus.OK)
    public String index() {
        log.info("Showing index page");
        return "Application is up and running.";
    }

    //URL - http://localhost:9091/api/time
    @GetMapping("/time")
    @ResponseStatus(HttpStatus.OK)
    public String getCurrentTime() {
        log.info("Showing current time");
        return LocalDateTime.now().toString();
    }
}
To run this application locally you can right-click on the SpringbootHerokuApplication.java class, Run As -> Java Application. Once the application is started successfully it would expose the following endpoints on port number – 9091 and you can hit them in the browser for the testing purpose.
Application endpoints
-- index message endpoint --
http://localhost:9091/api/

-- get-current-time endpoint --
http://localhost:9091/api/time
3. Deploying Spring Boot application on Heroku
To deploy an application on Heroku we will need to Git and Heroku CLI. You will also need to have a Heroku account and if you don’t have one you can create it from the official signup page. Once registered you can follow the below steps to deploy the application on Heroku.
3.1 Login to account via CLI
To use CLI you will need the command line application that will let you create, deploy, and manage the Heroku apps. I assume that you have already downloaded and installed it on your machine. Enter the following command to log in to Heroku account using CLI.
Login command
heroku login
You will be taken to the browser page and be prompted to enter the account’s credentials on the login page. Once the credentials are successfully validated you will be logged in to your Heroku account on the CLI as shown in Fig. 1.
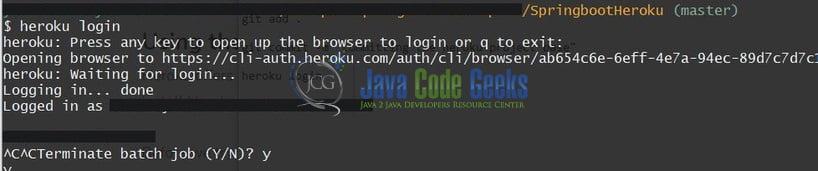
We will now proceed with the application deployment.
3.2 Setting up Git and creating a Heroku application
Navigate to the project root directory from the Git shell and execute the following commands to create a local Git repository for the project.
Git commands
-- creating a repository in our project directory --
git init


-- adding the committing the files --
git add .
git commit -m "committing the Heroku project base"
Once the project’s local Git repository is created we will need to create a new Heroku app using the heroku create command.
Create command
heroku create
The above command will create a new Heroku app and also makes a remote repository for the app as shown in Fig. 2.

Heroku chooses a random unique name for the application by default. If you want to specify a custom name then you can pass the application name in the heroku create command such as – heroku create YOUR_APP_NAME. This command adds a Git remote and a random name to it – in our case, it is represented as – young-castle-30787.
3.3 Deploying the application to Heroku
Finally, to deploy the application on Heroku we will use the push command. Heroku will automatically detect the project type (i.e. Java/Maven by the presence of pom.xml file in the repository) and will trigger the build automatically. This step takes about a minute or two depending on your networking bandwidth and you can keep an eye on the logs.
Deploy command
git push heroku master
If everything goes well the application will be successfully deployed as shown in Fig. 3 and the URL leading to your application will be shown in the logs.
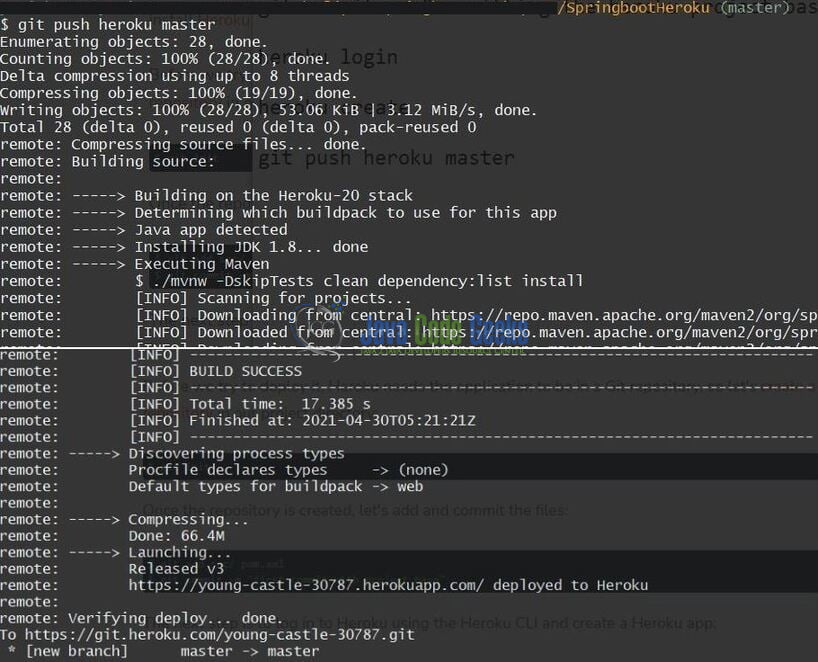
You can also verify the same by logging into your Heroku account and the deployed application will be shown there as well.
4. Verifying the application endpoints on the browser
To verify the application deployment open the browser of your choice and hit the application endpoints. In this tutorial, we have created two endpoints i.e. display the index message and get the current time from the server. Let us hit the index page endpoint https://YOUR_APP_NAME.herokuapp.com/api/ and check the output.
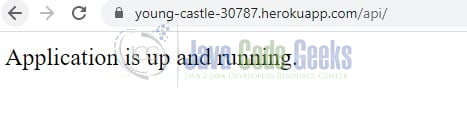
Similarly, you can hit the other endpoint i.e. https://YOUR_APP_NAME.herokuapp.com/api/time to get the current date and time from the server.
5. Summary
In this section, you learned,
- Introduction to Spring boot
- Steps to create a simple spring boot application
- Steps to deploy the spring boot application on the Heroku platform
You can download the sample application as an Eclipse project in the Downloads section.
6. Download the Project
This was an example to deploy the spring boot application on Heroku.
You can download the full source code of this example here: Spring Boot Application Deployment on Heroku
