Welcome readers, in this tutorial, we will see how to implement a simple hello world application with Spring Boot and RabbitMQ.
1. Introduction
Before going further in this tutorial we will take a look at the common terminology such as introduction to Spring Boot and RabbitMQ.
1.1 What is Spring boot?
- Spring boot is a module that provides rapid application development feature to the spring framework including auto-configuration, standalone-code, and production-ready code
- It creates applications that are packaged as jar and are directly started using embedded servlet container (such as Tomcat, Jetty or Undertow). Thus, no need to deploy the war files
- It simplifies the maven configuration by providing the starter template and helps to resolve the dependency conflicts. It automatically identifies the required dependencies and imports them in the application
- It helps in removing the boilerplate code, extra annotations, and XML configurations
- It provides a powerful batch processing and manages the rest endpoints
- It provides an efficient JPA-starter library to effectively connect the application with the relational databases
- It offers a Microservice architecture and cloud configuration that manages all the application related configuration properties in a centralized manner.
1.2 What is RabbitMQ & When is often used?
- It is an AMQP messaging broker and is the famously easy to set up, open-source, and cross-platform message broker
- AMQP stands for Advanced Message Queuing protocol which offers features like Message Orientation, Queuing, Routing (through Point-to-Point or Publish-and-Subscribe), Reliability and Security
- It offers an easy way to exchange different platform applications (like Java and DotNet) and offers helps in communication between different Microservices
- It is a lightweight and easy to deploy application available on-premises and cloud to meet the high scalability and availability requirements
- In the present time, a single application supports multiple tasks (i.e. sending notifications, reports, etc.). So sometimes these tasks add an extra load on the application thereby increasing the maintenance cost (such as space, memory, etc) to serve more requests. Thus, RabbitMQ in such situations acts a blessing to remove some of the heavy tasks

In case readers are interested to read through the detailed theory on RabbitMQ they can read the tutorial present at this link.
2. Spring Boot and RabbitMQ Hello World Example
Here is a systematic guide for implementing this tutorial but before going any further I’m assuming that readers are aware of the Spring boot and RabbitMQ basics.
2.1 Application Pre-requisite
To start with this tutorial, we are hoping that readers at present have the RabbitMQ up and running on their local environment. For easy setup, the reader can have the RabbitMQ up and running on the Docker environment. If someone needs to go through the RabbitMQ installation on Docker, please watch this video.
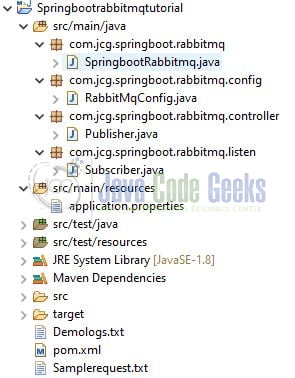
2.2 Tools Used for Spring boot application and Project Structure
We are using Eclipse, JDK 8, and Maven. In case you’re confused about where you should create the corresponding files or folder, let us review the project structure of the spring boot application.
Let us start building the application!
3. Creating a Spring boot application
Below are the steps involved in developing the application.
3.1 Maven Dependency
Here, we specify the dependency for the Spring Boot and RabbitMQ. Maven will automatically resolve the other dependencies. The updated file will have the following code.
pom.xml
<project xmlns="http://maven.apache.org/POM/4.0.0"
	xmlns:xsi="http://www.w3.org/2001/XMLSchema-instance"
	xsi:schemaLocation="http://maven.apache.org/POM/4.0.0 https://maven.apache.org/xsd/maven-4.0.0.xsd">
	<modelVersion>4.0.0</modelVersion>

	<groupId>com.springboot.rabbitmq</groupId>
	<artifactId>Springbootrabbitmqtutorial</artifactId>
	<version>0.0.1-SNAPSHOT</version>

	<parent>
		<groupId>org.springframework.boot</groupId>
		<artifactId>spring-boot-starter-parent</artifactId>
		<version>2.3.2.RELEASE</version>
	</parent>

	<properties>
		<java.version>1.8</java.version>
	</properties>

	<dependencies>
		<dependency>
			<groupId>org.springframework.boot</groupId>
			<artifactId>spring-boot-starter-web</artifactId>
		</dependency>
		<dependency>
			<groupId>org.springframework.boot</groupId>
			<artifactId>spring-boot-starter-amqp</artifactId>
		</dependency>
	</dependencies>

	<build>
		<plugins>
			<plugin>
				<groupId>org.springframework.boot</groupId>
				<artifactId>spring-boot-maven-plugin</artifactId>
			</plugin>
		</plugins>

		<finalName>Spring-Boot-Rabbitmq</finalName>
	</build>
</project>
3.2 Application Properties file
Create a new properties file at the location: Springbootrabbitmqtutorial/src/main/resources/ and add the RabbitMQ and Queue configuration details.
application.properties
## Spring boot application name
spring.application.name=RabbitMqOnSpringboot

## Application port
server.port=9091

## Rabbitmq configuration
spring.rabbitmq.host=<!-- RABBITMQ_HOST -->
spring.rabbitmq.port=<!-- RABBITMQ_PORT_NUMBER -->
spring.rabbitmq.username=<!-- RABBITMQ_USERNAME -->
spring.rabbitmq.password=<!-- RABBITMQ_PASSWORD -->

## Queue and exchange configuration properties for rabbitmq
rabbitmq.queue=queue1
rabbitmq.exchange=jcg-exchange
rabbitmq.routingkey=routingkey1
3.3 Java Classes
Let us write all the java classes involved in this application.
3.3.1 Implementation/Main class
Add the following code to the main class to bootstrap the application from the main method.
SpringbootRabbitmq.java
package com.jcg.springboot.rabbitmq;

import org.slf4j.Logger;
import org.slf4j.LoggerFactory;
import org.springframework.boot.SpringApplication;
import org.springframework.boot.autoconfigure.SpringBootApplication;

// @SpringBootApplication annotation enables the auto-configuration feature of the spring boot module (i.e. java-based configuration and component scanning).
@SpringBootApplication
public class SpringbootRabbitmq {

	private static final Logger LOGGER = LoggerFactory.getLogger(SpringbootRabbitmq.class);

	public static void main(String[] args) {
		// The "run()" method returns the "ConfigurableApplicationContext" instance which can be further used by the spring application.
		SpringApplication.run(SpringbootRabbitmq.class, args);
		LOGGER.info("Springboot application with rabbitmq started successfully.");
	}
}
3.3.2 Configuration class
Add the following code to the configuration class where we map the Queue properties from the properties file and define the configuration for RabbitMQ.
RabbitMqConfig.java
package com.jcg.springboot.rabbitmq.config;

import org.springframework.amqp.core.Binding;
import org.springframework.amqp.core.BindingBuilder;
import org.springframework.amqp.core.Queue;
import org.springframework.amqp.core.TopicExchange;
import org.springframework.beans.factory.annotation.Value;
import org.springframework.context.annotation.Bean;
import org.springframework.context.annotation.Configuration;

// Marker annotation that tells spring to generate bean definitions at runtime for the methods annotated with @Bean annotation.
@Configuration
public class RabbitMqConfig {

	// Value is populated with the queue name from "application.properties" file.
	@Value("${rabbitmq.queue}")
	private String queueName;

	// Value is populated with the exchange name from "application.properties" file.
	@Value("${rabbitmq.exchange}")
	private String exchange;

	// Value is populated with the routing key from "application.properties" file.
	@Value("${rabbitmq.routingkey}")
	private String routingKey;

	// @Bean annotation tells that a method produces a bean which is to be managed by the spring container.
	@Bean
	Queue queue() {
		// Creating a queue.
		return new Queue(queueName, Boolean.FALSE);
	}

	@Bean
	TopicExchange topicExchange() {
		// Creating a topic exchange.
		return new TopicExchange(exchange);
	}

	@Bean
	Binding binding(final Queue queue, final TopicExchange topicExchange) {
		// Binding the queue to the topic with a routing key.
		return BindingBuilder.bind(queue).to(topicExchange).with(routingKey);
	}
}
3.3.3 Controller class
Add the following code to the controller class designed to handle the incoming requests. The class is annotated with the @RestController annotation which consists of the HTTP GET method that receives the user input and publishes the message to the queue.
Publisher.java
package com.jcg.springboot.rabbitmq.controller;

import org.slf4j.Logger;
import org.slf4j.LoggerFactory;
import org.springframework.amqp.core.Binding;
import org.springframework.amqp.rabbit.core.RabbitTemplate;
import org.springframework.beans.factory.annotation.Autowired;
import org.springframework.http.HttpStatus;
import org.springframework.web.bind.annotation.GetMapping;
import org.springframework.web.bind.annotation.PathVariable;
import org.springframework.web.bind.annotation.RequestMapping;
import org.springframework.web.bind.annotation.ResponseStatus;
import org.springframework.web.bind.annotation.RestController;

// For creating the REST controllers.
@RestController
// Used to map incoming web requests onto the handler methods in the controller.
@RequestMapping(value = "/api")
public class Publisher {

	private static final Logger LOGGER = LoggerFactory.getLogger(Publisher.class);

	// TODO -
	@Autowired
	RabbitTemplate rabbitTemplate;
	@Autowired
	Binding binding;

	// HTTP GET url - http://localhost:9091/api/send/{msg}
	@GetMapping(value = "/send/{msg}")
	// @ResponseStatus annotation marks the method with the status-code and the reason message that should be returned.
	@ResponseStatus(code = HttpStatus.OK)
	public String send(@PathVariable("msg") final String message) {
		LOGGER.info("Sending message to the queue.");
		rabbitTemplate.convertAndSend(binding.getExchange(), binding.getRoutingKey(), message);
		LOGGER.info("Message sent successfully to the queue, sending back the response to the user.");
		return "Message sent successfully to the queue.";
	}
}
3.3.4 Subscriber class
Add the following code to the Subscriber class which has a method bonded to the queue with the help of @RabbitListener annotation and listen to the message coming to the queue.
Subscriber.java
package com.jcg.springboot.rabbitmq.listen;

import org.slf4j.Logger;
import org.slf4j.LoggerFactory;
import org.springframework.amqp.core.Queue;
import org.springframework.amqp.rabbit.annotation.RabbitListener;
import org.springframework.beans.factory.annotation.Autowired;
import org.springframework.stereotype.Component;

@Component
public class Subscriber {

	private static final Logger LOGGER = LoggerFactory.getLogger(Subscriber.class);

	@Autowired
	Queue queue;

	@RabbitListener(queues = "#{queue.getName()}")	// Dynamically reading the queue name using SpEL from the "queue" object.
	public void receive(final String message) {
		LOGGER.info("Listening messages from the queue!!");
		LOGGER.info("Received the following message from the queue= " + message);
		LOGGER.info("Message received successfully from the queue.");
	}
}
4. Run the Application
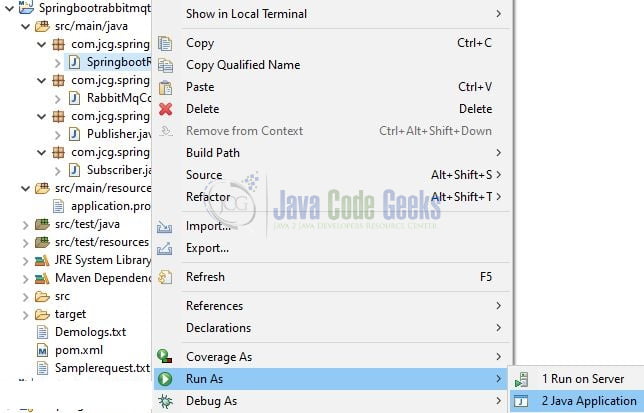
To execute the application, right-click on the SpringbootRabbitmq.java class, Run As -> Java Application.
5. Project Demo
Open the Postman tool and hit the following URL to send an HTTP GET request to the controller method.
1 2 | // HTTP GET URL |
Once the request is successfully processed by the application and the HTTP 200 OK response is received, the message is published to the queue and can be verified from the below logs.
1 2 | 2020-07-27 22:24:03.566 INFO 8228 --- [nio-9091-exec-1] c.j.s.rabbitmq.controller.Publisher : Sending message to the queue.2020-07-27 22:24:03.577 INFO 8228 --- [nio-9091-exec-1] c.j.s.rabbitmq.controller.Publisher : Message sent successfully to the queue, sending back the response to the user. |
Once the message is successfully published, the method in the Subscriber.java will listen to the messages from the queue and can be verified from the below logs.
1 2 3 | 2020-07-27 22:13:46.116 INFO 1604 --- [ntContainer#0-1] c.j.s.rabbitmq.listen.Subscriber : Listening messages from the queue!!2020-07-27 22:13:46.117 INFO 1604 --- [ntContainer#0-1] c.j.s.rabbitmq.listen.Subscriber : Received the following message from the queue= hello-world2020-07-27 22:13:46.117 INFO 1604 --- [ntContainer#0-1] c.j.s.rabbitmq.listen.Subscriber : Message received successfully from the queue. |
That is all for this tutorial and I hope the article served you whatever you were looking for. Happy Learning and do not forget to share!
6. Summary
In this section, we learned:
- Spring Boot and RabbitMQ
- Steps to implement Hello World application with Spring Boot and RabbitMQ
You can download the sample application as an Eclipse project in the Downloads section.
7. Download the Eclipse Project
This was an example of Spring Boot and RabbitMQ.
You can download the full source code of this example here: Spring Boot and RabbitMQ Hello World Example
