Hello. In this tutorial, we will understand the nodemailer module in a simple nodejs application. We will set up a fake smtp server (e.g. smtp4dev) for localhost development and understand the package implementation. smtp4dev is an open-source service that emulates an smtp email server for email testing and debugging purposes.
1. Introduction
Nodemailer is an npm module used for sending emails from the nodejs application. It offers benefits like –
- A single module with zero dependencies and an excellent focus on fixing the security vulnerabilities
- Offers support for html and plain content
- Add attachments to the email
- Secure email delivery
- Custom plugin support for messages manipulation
- Provides authentication support
1.1 Setting up Node.js
To set up Node.js on windows you will need to download the installer from this link. Click on the installer (also include the NPM package manager) for your platform and run the installer to start with the Node.js setup wizard. Follow the wizard steps and click on Finish when it is done. If everything goes well you can navigate to the command prompt to verify if the installation was successful as shown in Fig. 1.

1.2 Setting up Docker
If someone needs to go through the Docker installation, please watch this video.
2. Nodejs Nodemailer example
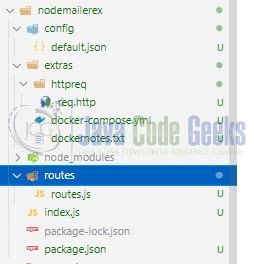
To set up the application, we will need to navigate to a path where our project will reside and I will be using Visual Studio Code as my preferred IDE. Let a take a quick peek at the project structure.
2.1 Running smtp4dev on Docker
docker-compose is a tool for running the docker applications in multiple containers. . In the project’s extras directory create a file named docker-compose.yml and paste the below code into it. We will set up the smtp4dev email server on localhost and you’re free to change the configuration as your needs.
docker-compose.yml
services:
  smtp4dev:
    container_name: dsmtp4dev
    image: rnwood/smtp4dev:latest
    ports:
      - "2525:25" # smtp server
      - "1001:80" # web ui
version: "3"
Use the docker-compose -f /docker-compose.yml up -d command to download the image from the docker hub (if not present) and start it locally as a docker container. Remember to place the path_to_file with the original path where the yml file is residing in your project. Once the command is executed successfully in the terminal window smtp4dev will expose the following –
- SMTP interface exposed on port number
2525 - Web interface exposed on port number
1001 - Open the gui in the browser by typing
localhost:1001in the search bar
Other docker-compose commands (e.g. stopping or removing the container) can be downloaded from the Downloads section.
2.2 Setting up project dependencies
Navigate to the project directory and run npm init -y to create a package.json file. This file holds the metadata relevant to the project and is used for managing the project dependencies, script, version, etc. Replace the generated file with the code given below –
package.json
{
  "name": "nodemailerex",
  "version": "1.0.0",
  "description": "Understanding nodemailer",
  "main": "index.js",
  "scripts": {
    "up": "docker-compose -f extras/docker-compose.yml up -d",
    "down": "docker-compose -f extras/docker-compose.yml down",
    "dev": "nodemon index.js",
    "start": "node index.js",
    "test": "echo \"Error: no test specified\" && exit 1"
  },
  "keywords": [
    "nodemailer",
    "smtp4dev",
    "fakesmtp",
    "docker"
  ],
  "author": "geeks",
  "license": "MIT",
  "devDependencies": {
    "nodemon": "^2.0.16"
  },
  "dependencies": {
    "config": "^3.3.7",
    "express": "^4.18.1",
    "nodemailer": "^6.7.5"
  }
}
Once the file is replaced trigger the below npm command in the terminal window to download the different packages required for this tutorial.
Downloading dependencies
npm install
2.3 Setting up the config json
Create a json file inside the config folder responsible to hold the configuration-related details for the application. You are free to change the values as per your requirement.
config/default.json
{
  "smtp": {
    "host": "localhost",
    "smtp_port": 2525,
    "from_address": "postmaster@localhost"
  },
  "app_port": 3100
}
2.4 Setting up the routes file
Create a file in the routes directory responsible to handle the incoming client calls and set up the nodemailer configuration. The transporter object will be used to send emails to the configured smtp server exposed on the port number – 2525.
routes.js
const nodemailer = require("nodemailer");
const config = require("config");

const transporter = nodemailer.createTransport({
  host: config.get("smtp.host"),
  port: config.get("smtp.smtp_port")
});

const health = (req, res) => {
  console.log("Returning app health");
  return res.status(200).json({ status: "Up" });
};

const send = (req, res) => {
  console.log("Sending email");
  const { to, sub, body } = req.body;

  let mailOptions = {
    from: config.get("smtp.from_address"),
    to: to,
    subject: sub,
    text: body
  };

  transporter.sendMail(mailOptions, (err, data) => {
    if (err) {
      console.log(err);
      return res.status(500).json({ status: "Fail" });
    } else {
      console.log(data);
      return res.status(201).json({ status: "Pass", message: data.response });
    }
  });
};

module.exports = {
  health,
  send
};
2.5 Setting up implementation file
Create an implementation file in the root directory responsible to handle the application startup. The application will start on the port number 3100 and exposes the below endpoints through which the client can interact.
- GET Endpoint –
/is responsible give the application status - POST Endpoint –
/sendis responsible to send email as per the given request body
index.js
const express = require("express");
const config = require("config");

const app = express();
app.use(express.json({ extended: false }));

const routes = require("./routes/routes");

app.get("/", routes.health);
app.post("/send", routes.send);

// driver code
const port = config.get("app_port");
app.listen(port, () => {
  console.log(`Service endpoint http://localhost:${port}`);
});
3. Run the Application
To run the application navigate to the project directory and enter the following command as shown below in the terminal.
Run command
$ npm run start
If everything goes well the application will be started successfully at the service endpoint – http://localhost:3100.
4. Demo
Open the postman or any tool of your choice and hit the /send endpoint with a request body as shown below.
Request
(http post) - Send email
http://localhost:3005/send

request body -
{
    "to": "test@example.com",
    "sub": "Test mail",
    "body": "Hi. I am test email."
}
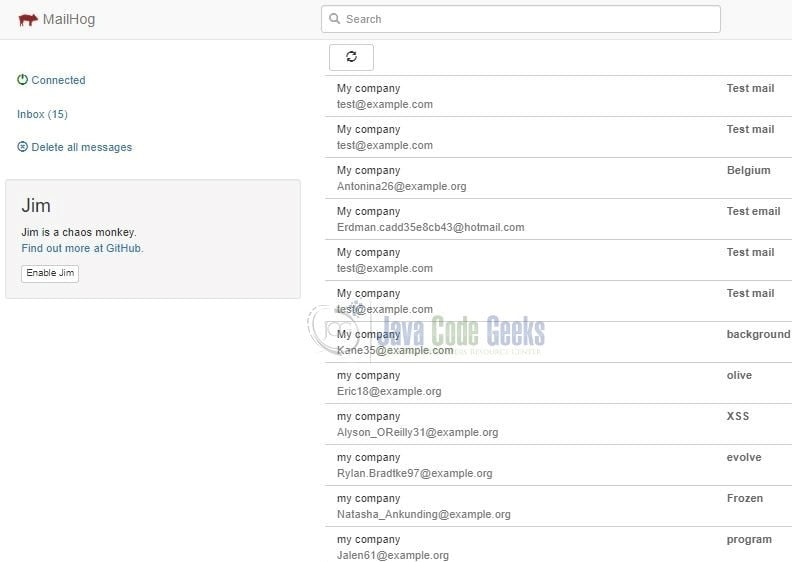
If everything goes well a json response with a status code of 201 will be returned. To validate the sent email open the smtp4dev web ui and check. The sent emails will be shown below.
That is all for this tutorial and I hope the article served you with whatever you were looking for. Happy Learning and do not forget to share!
5. Summary
In this tutorial, we saw the nodemailer implementation by setting up a fake smtp server and creating a simple application. You can download the source code from the Downloads section.
6. Download the Project
This was a tutorial to understand nodemailer and implement it practically with the help of a development smtp server.
You can download the full source code of this example here: Nodejs Nodemailer example
