Hello. In this tutorial, we will create a simple node js application and implement an otp authentication login mechanism. Once the otp will be verified an access token will be generated that can be further used to access the secure api’s.
1. Introduction
Authentication and authorization are the key features of any application. Authentication provides access while authorization specifies what a user can do.
1.1 Setting up Node.js
To set up Node.js on windows you will need to download the installer from this link. Click on the installer (also include the NPM package manager) for your platform and run the installer to start with the Node.js setup wizard. Follow the wizard steps and click on Finish when it is done. If everything goes well you can navigate to the command prompt to verify if the installation was successful as shown in Fig. 1.

1.2 Setting up Docker
If you already have the Docker running on your local machine you can ignore this step or if someone needs to go through the Docker installation, please watch this video.

2. Otp authentication in nodejs
To set up the application, we will need to navigate to a path where our project will reside and I will be using Visual Studio Code as my preferred IDE. Let a take a quick peek at the project structure.

2.1 Setting up related dependencies
2.1.1 Setting up Docker containers
docker-compose is a tool for running the docker applications in multiple containers. . In the project’s setup directory present at the root level create a file named docker-compose.yml and paste the below code into it. We will set up the mongodb and mongo-express on localhost. Mongo-express is a visualization tool for mongodb. You’re free to change the configuration as your needs.
docker-compose.yml
services:
  mongodb:
    container_name: mongodb
    image: mongo
    environment:
      MONGO_INITDB_DATABASE: authentication # should match the db name used in the endpoint given in the default.json
    ports:
      - '27017:27017'
  express:
    container_name: express_1
    image: mongo-express
    ports:
      - '9001:8081'
    environment:
      - ME_CONFIG_MONGODB_SERVER=mongodb
      - ME_CONFIG_MONGODB_PORT=27017
      - ME_CONFIG_MONGODB_ENABLE_ADMIN=true
    depends_on:
      - mongodb
version: '3'
2.1.2 Setting up project packages
Navigate to the project directory and run npm init -y to create a package.json file. This file holds the metadata relevant to the project and is used for managing the project dependencies, script, version, etc. Replace the generated file with the code given below –
package.json
{
  "name": "otplogin",
  "version": "1.0.0",
  "description": "Otp-based authentication mechanism",
  "main": "index.js",
  "scripts": {
    "container-up": "docker-compose -f setup/docker-compose.yml up -d",
    "container-down": "docker-compose -f setup/docker-compose.yml down",
    "dev": "nodemon index.js",
    "start": "node index.js",
    "test": "echo \"Error: no test specified\" && exit 1"
  },
  "keywords": [],
  "author": "javacodegeeks",
  "license": "MIT",
  "dependencies": {
    "bcrypt": "^5.0.1",
    "config": "^3.3.7",
    "express": "^4.18.1",
    "jsonwebtoken": "^8.5.1",
    "mongoose": "^6.4.7"
  },
  "devDependencies": {
    "nodemon": "^2.0.19"
  }
}
Once the file is replaced trigger the below npm command in the terminal window to download the different packages required for this tutorial. The downloaded packages will reside inside the node_modules folder.
Downloading dependencies
npm install
2.2 Setting up code
2.2.1 Setting up the configuration file
Create a configuration file in the config folder that will hold the mongodb and application details.
default.json
{
  "app": {
    "dev": {
      "endpoint": "mongodb://localhost:27017/authentication",
      "app_port": 3100,
      "tkn_secret_key": "8unto0n4oc7903zm"
    }
  }
}
2.2.2 Create a User model
Create a schema file representing the user model. This schema will be created in the mongo database named – authentication and will hold user-related information. The file also contains a method responsible to generate the jwt token once the otp is verified. The generated token can further be used to access the application’s secure api’s.
usr.js
const config = require("config");

const { Schema, model } = require("mongoose");
const jwt = require("jsonwebtoken");

// user schema

const usrSch = Schema(
  {
    number: {
      type: String,
      required: true
    }
  },
  { timestamps: true }
);

usrSch.methods.generateTkn = function () {
  return jwt.sign(
    {
      _id: this._id,
      number: this.number,
      issuer: "jcg"
    },
    config.get("app.dev.tkn_secret_key"),
    { expiresIn: "1d" }
  );
};

module.exports.User = model("User", usrSch);
2.2.3 Create an Otp authentication model
Create a schema file representing the otp model. This schema will be created in the mongo database named – authentication will hold the otp-related information for a given number. The schema is such that the otp record for a user will be auto removed after 5 minutes.
otp.js
const { Schema, model } = require("mongoose");

// otp schema

const otpSch = Schema(
  {
    number: {
      type: String,
      required: true
    },
    otp: {
      type: String,
      required: true
    },
    createdAt: {
      type: Date,
      default: Date.now,
      index: { expires: 300 }
    }
  },
  { timestamps: true } // Auto remove after 5 minutes
);

module.exports.Otp = model("Otp", otpSch);
2.2.4 Create a controller class
Create a controller file in the controller folder responsible to handle the requests from the user. The controller exposes 2 endpoints i.e. /signup and /verify to generate and verify the otp for a number respectively.
/signup: Will persist the signup in the collection and generate the otp/verify: Will perform number and token validation. If pass generate the token to access secure api’s
ctrl.js
const bcrypt = require("bcrypt");

const { User } = require("../model/usr");
const { Otp } = require("../model/otp");

const signUp = async (req, res) => {
  try {
    const input = req.body.number;

    // validating user
    let user = await User.findOne({ number: input });
    if (user) return res.status(409).json({ info: "User already registered" });

    // save user
    const usr = new User({ number: input });
    await usr.save();

    // generating otp
    let random = Math.floor(Math.random() * 90000) + 10000;
    console.log(random);

    // saving otp in db
    const otp = new Otp({ number: input, otp: random });
    const salt = await bcrypt.genSalt(10);
    otp.otp = await bcrypt.hash(otp.otp, salt);
    const result = await otp.save();
    console.log("saved", result);

    return res.status(201).json({ data: random, info: "Otp generated" });
  } catch (err) {
    // console.log(err);
    return res.status(400).json({ info: err });
  }
};

const verifyOtp = async (req, res) => {
  try {
    const input = req.body.number;
    const pwd = req.body.otp;

    if (pwd.length === 0)
      return res.status(400).json({ info: "Otp cannot be blank" });

    // verifying user
    const otp = await Otp.find({ number: input });
    if (!otp) return res.status(404).json({ info: "otp not found" });

    // comparing otp
    const details = otp[otp.length - 1];
    const valid = await bcrypt.compare(pwd, details.otp);

    if (input === details.number && valid) {
      // generating token
      const user = new User({ number: input });
      const token = user.generateTkn();
      // todo - save jwt tkn in db for comparison later
      // access_token for further usage like hitting secure api's etc - skipped for brevity for user to play
      return res
        .status(201)
        .json({ access_token: token, info: "Token generated" });
    } else {
      return res.status(400).json({ info: "Bad request" });
    }
  } catch (err) {
    // console.log(err);
    return res.status(400).json({ info: err });
  }
};

module.exports = {
  signUp,
  verifyOtp
};
2.2.5 Create a router implementation
Create a routes file in the router folder responsible to handle the routing from the user to the backend controller.
routes.js
const { signUp, verifyOtp } = require("../controller/ctrl");

const express = require("express");
const router = express.Router();

//
/*
-- http post
http://localhost:3100/api/user/signup

-- request body
{
    "number": "PHONE_NUMBER"
}
*/
router.route("/signup").post(signUp);

/*
-- http post
http://localhost:3100/api/user/verify

-- request body
{
    "number": "PHONE_NUMBER",
    "otp": "OTP_GENERATED_VIA_SIGN_UP"
}
*/
router.route("/verify").post(verifyOtp);

module.exports = router;
2.2.6 Create an implementation file
Create an implementation file in the project’s root directory responsible to handle the application startup and making a connection to the mongodb.
index.js
const config = require("config");

const express = require("express");
const mongoose = require("mongoose");

const router = require("./router/routes");

const app = express();
app.use(express.json({ extended: false }));

// exposing application routes
app.use("/api/user", router);

// making a connection with mongodb
mongoose
  .connect(config.get("app.dev.endpoint"), {
    useNewUrlParser: true,
    useUnifiedTopology: true
  })
  .then(() => console.log("Successfully connected to mongo"))
  .catch((err) => console.log("Connection failed", err));

// driver code
const port = config.get("app.dev.app_port");
app.listen(port, () => {
  console.log(`Application started at: http://localhost:${port}`);
});
3. Run the setup
3.1 Running the Docker containers
To run the containers I will be using the docker-compose commands. Now you’re free to either execute the docker-compose commands from the terminal window by first navigating to the path where the docker-compose.yml file resides. You can download the file (cmds.txt) that contains the docker commands from the Downloads section. But we will run the containers with the help of the npm command as configured in the package.json file.
Run command
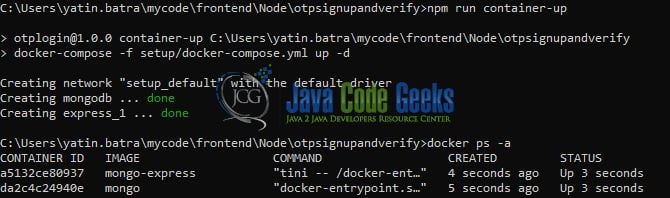
npm run container-up
Once this command is executed successfully the required containers will be downloaded and started up successfully. If everything goes well the container’s status can be verified with the help of the docker ps -a command as shown below.
3.2 Running the node js application
To run the application navigate to the project directory and enter the following command as shown below in the terminal. The application will be started successfully on the port number – 3100.
Run command
$ npm run start
Once the application is started successfully the logger message – “Successfully connected to mongo” will be shown on the terminal window. If the message – “Connection failed” is shown it means something is wrong with the application setup and you need to check the configuration.
4. Demo
The application exposes the below endpoints that you can explore around the application with the help of the postman tool.
Application endpoints
// sign-up and generate otp
/*
-- http post
http://localhost:3100/api/user/signup

-- request body
{
    "number": "PHONE_NUMBER"
}
*/

// verify otp and generate an access token
/*
-- http post
http://localhost:3100/api/user/verify

-- request body
{
    "number": "PHONE_NUMBER",
    "otp": "OTP_GENERATED_VIA_SIGN_UP"
}
*/
That is all for this tutorial and I hope the article served you with whatever you were looking for. Happy Learning and do not forget to share!
5. Summary
In this tutorial, we learned how to set up the otp-based authentication in a nodejs application and persist the result in a mongo collection. You can download the source code from the Downloads section.
6. Download the Project
This was a tutorial to implement an otp authentication in a node js and express application.
You can download the full source code of this example here: otp authentication node js
