Hello. In this tutorial, we will create a simple nodejs application and deploy it on the Kubernetes cluster running on Docker.
1. Introduction
In the present world, Docker is an important term –
- Often used in CI/CD platform that packages and runs the application with its dependencies inside a container
- Is a standard for Linux Containers
- A Container is a runtime that runs under any Linux kernel and provides a private machine-like space under Linux
Kubernetes is an open-source tool managing containerized applications across multiple hosts. It provides an easy mechanism for deploying, maintaining, and scaling the applications. It offers –
- Standard services like local DNS and load-balancing
- Container restart behavior if it dies
- Pods that wrap around containers thus making configurations easy to build around the collection of containers
- Standard api that applications can call to enable more sophisticated behavior
1.1 Setting up Node.js
To set up Node.js on windows you will need to download the installer from this link. Click on the installer (also include the NPM package manager) for your platform and run the installer to start with the Node.js setup wizard. Follow the wizard steps and click on Finish when it is done. If everything goes well you can navigate to the command prompt to verify if the installation was successful as shown in Fig. 1.

1.2 Setting up Docker
If you already have the Docker running on your local machine you can ignore this step or if someone needs to go through the Docker installation, please watch this video.
1.3 Setting up Kubernetes on Docker
For an easy setup, I will be using the docker-desktop to set up a single-node Kubernetes cluster. If you already have the Kubernetes cluster running on your local machine you can ignore this step. If someone needs to go through the Kubernetes setup, please watch this video.
2. Deploy Nodejs application to Kubernetes
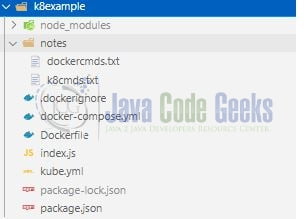
To set up the application, we will need to navigate to a path where our project will reside and I will be using Visual Studio Code as my preferred IDE. Let a take a quick peek at the project structure.
2.1 Setting up project dependencies
Navigate to the project directory and run npm init -y to create a package.json file. This file holds the metadata relevant to the project and is used for managing the project dependencies, script, version, etc. Replace the generated file with the code given below –
package.json
{
  "name": "k8example",
  "version": "1.0.0",
  "description": "",
  "main": "index.js",
  "scripts": {
    "test": "echo \"Error: no test specified\" && exit 1"
  },
  "keywords": [],
  "author": "",
  "license": "ISC",
  "dependencies": {
    "express": "^4.18.1"
  }
}
Once the file is replaced trigger the below npm command in the terminal window to download the different packages required for this tutorial. The downloaded packages will reside inside the node_modules folder.
Downloading dependencies
npm install
2.2 Setting up implementation file
Create an implementation file in the project’s root directory responsible to handle the application startup on port number 4489 and expose the welcome route. The welcome will display the hello world message on the browser.
index.js
const express = require("express");

const app = express();

app.get("/", (req, res) => res.send("Hello world from Kubernetes!"));

// driver code
const PORT = 4489;
const HOST = "0.0.0.0";
app.listen(PORT, HOST, () => console.log(`App started on ${PORT}`));
2.3 Creating a Docker image
A docker image is a read-only template containing the list of instructions for creating a container that runs on a containerized environment such as Docker. A docker image is created with the help of Dockerfile. Add the below code to the Dockerfile created in the project’s root directory.
- The port number exposed in Dockerfile should match the one specified in the
index.jsfile
Dockerfile
FROM node:slim
LABEL Author="itsdanielatlas"
# Create app directory
WORKDIR /app
# Install app dependencies
COPY package*.json ./
RUN npm install
# Bundle app source
COPY index.js /app/
EXPOSE 4489
CMD [ "node", "index.js" ]
Once the Dockerfile is created; use the below command to create a docker image. You’re free to change the properties as per your requirement but ensure that the names are in sync with the Kubernetes file.
Building docker image
# building your image
docker build . -t your_username/app_name

eg.
docker build . -t itsdanielatlas/hello-world
Once the command is executed successfully docker image will be created and you can use the docker images command to verify the image. You can also run the docker run command to play around with the image locally.

2.4 Creating Kubernetes service and deployment yml
To create k8 deployment create a kube.yml file in the project’s root directory. Add the below code to the kube.yml file to create the deployment resource definition.
- The port number exposed in Kubernetes deployment should match the one specified in the
Dockerfile
Once the deployment resource definition is created we will create a service to make the pod accessible to users outside the cluster. Without service, the deployment pod will not be accessible as the service is responsible to forward the request to the pods. In the same file, we will add the service resource definition of the type load balancer running on port number 5000.
- Note that service and deployment resource definitions are in the same file separate by three dashes
kube.yml
apiVersion: v1
kind: Service
metadata:
  name: k8myapp
spec:
  ports:
    -
      nodePort: 31110
      port: 5000
      protocol: TCP
      targetPort: 4489
  selector:
    app: k8myapp
  type: LoadBalancer
---
apiVersion: apps/v1
kind: Deployment
metadata:
  name: k8myapp
spec:
  replicas: 1
  selector:
    matchLabels:
      app: k8myapp
  template:
    metadata:
      labels:
        app: k8myapp
    spec:
      containers:
        -
          image: "itsdanielatlas/hello-world:latest"
          imagePullPolicy: Never
          name: k8myapp
          ports:
            -
              containerPort: 4489
          resources:
            limits:
              cpu: 500m
              memory: 128Mi
3. Run the Application
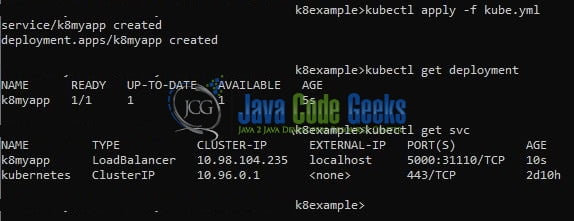
To run the application setup on the Kubernetes environment execute the below commands from the terminal where the kube.yml file resides.
Run command
# step1 - create setup
kubectl apply -f kube.yml

# step2 - get deployment
kubectl get deployment

# step4 - get service
kubectl get svc
If everything goes well the following output of the kubectl commands will be shown on the terminal window.
4. Demo
Open the browser and navigate to the endpoint – http://localhost:5000 and the application welcome page will be shown.

That is all for this tutorial and I hope the article served you with whatever you were looking for. Happy Learning and do not forget to share!
5. Summary
In this tutorial, we learned how to set up Kubernetes on the Docker desktop for running a nodejs application on the Kubernetes cluster running on the docker-desktop. You can download the source code from the Downloads section.
6. Download the Project
This was a tutorial to a nodejs application on the Kubernetes cluster running on docker-desktop.
You can download the full source code of this example here: Deploy Nodejs application to Kubernetes
