Getting Started with RabbitMQ on Docker
Welcome readers, in this tutorial, we will discuss how to start RabbitMQ on Docker.
1. Introduction to Docker and RabbitMQ
Let us take a good look at the Docker and RabbitMQ terminology.
1.1 Introduction to Docker
In the present world, Docker is an important term,
- Often used in CI/CD platform that packages and runs the application with its dependencies inside a container
- Is a standard for Linux Containers
- A Container is a runtime that runs under any Linux kernel and provides a private machine-like space under Linux
1.1.1 Docker Terminology
- Image: Representation of Docker container i.e. a JAR or WAR file in Java
- Container: Runtime of Docker i.e. a deployed and running Docker image. For example, an executable Spring Boot jar
- Engine: The code that manages, creates and runs the Docker containers
- Hub: A public developers registry to distribute their code
- Repository: A collection of Docker related images i.e. different versions of the same application
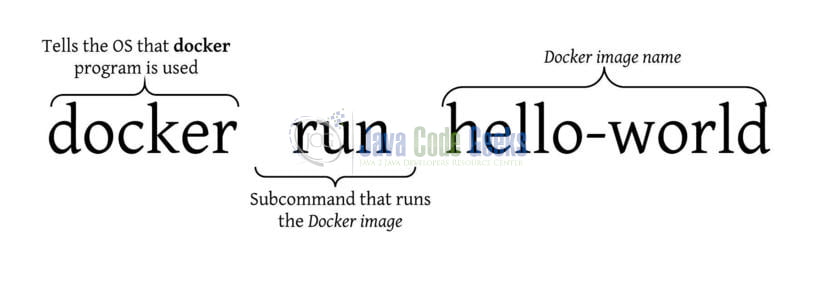
1.1.2 Docker Command Basics
Here’s an example command.

1.1.3 Need for using Docker
- For environment replication, while the code runs locally on the machine
- For numerous deployment phases i.e. Dev/Test/QA
- For version control and distributing the application’s OS within a team
1.1.4 Setting up Docker
If someone needs to go through the Docker installation, please watch this video.
1.2 Introduction to RabbitMQ & When is often used?
- It is an AMQP messaging broker and is the famously easy to set up, open-source, and cross-platform message broker
- AMQP stands for Advanced Message Queuing protocol which offers features like Message Orientation, Queuing, Routing (through Point-to-Point or Publish-and-Subscribe), Reliability and Security
- It offers an easy way to exchange different platform applications (like Java and DotNet) and offers helps in communication between different Microservices
- It is a lightweight and easy to deploy application available on-premises and cloud to meet the high scalability and availability requirements
- In the present time, a single application supports multiple tasks (i.e. sending notifications, reports, etc.). So sometimes these tasks add an extra load on the application thereby increasing the maintenance cost (such as space, memory, etc) to serve more requests. Thus, RabbitMQ in such situations acts a blessing to remove some of the heavy tasks

1.2.1 RabbitMQ Important Concepts
- Queue: A medium through which the messages are transferred or stored until the message is delivered to the consumer or the message time-to-live has expired
- Broker: Offers a storage mechanism for the data produced from one application. Usually meant to be consumed by Consumer(s) of another application(s) that connects to this broker
- Exchange: It is an entry point to the broker as it receives messages from the publisher and routes them to an appropriate queue
- Channel: It is a lightweight connection to a broker via a singular and shared TCP connection
- Producer: Sends or pushes a message to the queue based on the given queue name
- Consumer: Receives or consume the message from the broker, and then process or use it in another process or the application
- VHost: Popularly known as the virtual host makes it possible for a single broker to host multiple isolated environments
In case readers are interested to read through the detailed theory on RabbitMQ they can read the tutorial present at this link. To start with this tutorial, I’m hoping that users at present know the basics of Docker and RabbitMQ.
2. Getting Started with RabbitMQ on Docker
Here is a systematic guide for implementing this lab tutorial.
2.1 Application pre-requisite
To start RabbitMQ on Docker, I am hoping that readers at present having the Docker up and running on their machine. Let us go ahead and explore the steps required to start the RabbitMQ with Docker.
2.2 Pull the image
This is the basic step where obtaining the RabbitMQ image for Docker is simple as issuing the docker pull command against the registry.
Pull the Docker image
1 2 | # To pull the RabbitMQ image from the docker hub.docker pull rabbitmq:3-management |
2.3 Starting the RabbitMQ
For the tutorial purpose, we will keep it simple. To start the RabbitMQ just trigger the following command in the terminal.
Starting RabbitMQ
1 2 | # To start RabbitMQ on default portdocker run -d --hostname my-rabbit --name some-rabbit rabbitmq:3-management |
Please note, this will start a RabbitMQ container listening on the default port of 5672. Now in case you are interested to run the RabbitMQ container on a different port other than the default, we can trigger the following command.
1 2 | # To start RabbitMQ on the port number other than the default portdocker run -d --hostname my-rabbit -p <!--PORT_NUMBER_OF_YOUR_CHOICE--!>:15672 -p 5671:5671 -p 5672:5672 --name rabbitmq rabbitmq:3-management |
3. Output
Once the docker run command is fired and if everyone thing goes well developers can navigate to the following URL – localhost:15672 and they will get an output as shown in Fig. 3.

Users can log in via the default username/password (i.e. guest/guest). Try out these commands in your development environment to practice and learn.
4. Summary
In this tutorial, we saw the following:
- Introduction to Docker and RabbitMQ
- Commands to run RabbitMQ via Docker
I hope the tutorial will help you to set up Elasticsearch on Docker. Happy learning and do not forget to share!
5. Download the source code
You can download the full source code of this example here: Getting Started with RabbitMQ on Docker


