Handling form data is a fundamental aspect of building interactive and dynamic applications. When working with Jersey, a popular framework for building RESTful web services in Java, we often encounter two annotations for processing form data: @FormDataParam and @FormParam. While they might seem similar at first glance, they serve distinct purposes and understanding their differences is crucial for efficient development. This article explores the key differences between @FormDataParam and @FormParam in Jersey.
1. Understanding Form Data Formats
Form data typically comes in two formats:
- URL-encoded (application/x-www-form-urlencoded) is a standard method for encoding form data in HTTP requests. Special characters are replaced with a percent sign
"%"followed by two hexadecimal digits representing the ASCII code. For example, a space becomes"%20"and an ampersand"&"is replaced by"%26". This encoding is used when submitting form data from web pages to web servers. It’s a fundamental aspect of web development and plays a crucial role in maintaining data integrity during communication between clients and servers. - Multipart (multipart/form-data) is a content type used in HTTP requests to transmit files and form data simultaneously. It allows multiple parts of different types (such as text and files) to be sent in a single request. This encoding is commonly used when submitting forms with file uploads where the data is divided into parts, each with its content type and disposition. Unlike URL-encoded forms, multipart allows binary data to be included, making it suitable for transmitting files in addition to text-based form fields.
2. Using @FormParam
The @FormParam annotation is used to extract form parameters from the request body in Jersey applications. It is typically employed when dealing with HTML forms submitted using the application/x-www-form-urlencoded media type. This annotation allows us to bind form parameters directly to method parameters in JAX-RS resource classes.
2.1 Java Code (Jersey Resource Class)
@Path("/form")
public class FormResource {

    @POST
    @Path("/submit")
    @Consumes(MediaType.APPLICATION_FORM_URLENCODED)
    public Response submitForm(
            @FormParam("username") String username,
            @FormParam("password") String password) {
        return Response.ok("Received form submission - Username: " + username + ", Password: " + password).build();
    }

}
The above code defines a REST endpoint that accepts POST requests with URL-encoded form data (like those sent from HTML forms). The submitForm method extracts the values of the “username” and “password” fields/parameters from the submitted data and constructs a response acknowledging receipt of the form data and echoing back the extracted values. Here is a summary of the code:
@POST: This annotation indicates that this method will handle HTTP POST requests.@Path("/submit"): This annotation specifies the endpoint path relative to the base URI where this method will be invoked. In this case, it’s “/submit“.@Consumes(MediaType.APPLICATION_FORM_URLENCODED): This annotation specifies the media type that the method can consume. In this case, it indicates that the method can consume form data encoded in the URL-encoded format.@FormParam("username") String username: This annotation indicates that the parameterusernameis expected to be extracted from the form data. It’s a string parameter.
2.2 HTML Form Page
Simple Form with application/x-www-form-urlencoded Submission
<!DOCTYPE html>
<html lang="en">
<head>
    <meta charset="UTF-8">
    <meta name="viewport" content="width=device-width, initial-scale=1.0">
    <title>Simple Form</title>
</head>
<body>
    <h2>Submit Form</h2>
    <form action="http://localhost:8080/formdata-examples-jersey/resources/form/submit" method="post">
        <label for="username">Username:</label><br>
        <input type="text" id="username" name="username"><br>
        <label for="password">Password:</label><br>
        <input type="password" id="password" name="password"><br><br>
        <input type="submit" value="Submit">
    </form>
</body>
</html>
The above HTML code creates a form with input fields for username and password, along with a submit button. When the form is submitted, the username and password values will be sent to the specified URL using an HTTP POST request. Here is a summary of the main parts of the code:
action="http://localhost:8080/formdata-examples-jersey/resources/form/submit": Theactionattribute specifies the URL where the form data will be sent when the form is submitted. In this case, it’s set tohttp://localhost:8080/formdata-examples-jersey/resources/form/submit, indicating that the form data will be sent to this URL.method="post": Themethodattribute specifies the HTTP method used to submit the form. In this case, it’s set topost, which means that the form data will be sent via an HTTP POST request.
When a POST request is sent to the /submit endpoint with form data in the body, the application extracts the “username” and “password” parameters. It then constructs a response message acknowledging the receipt of the form submission along with the submitted username and password.
Example Output:
If you submit a form with the username “james@jcg.com” and password “javacodegeeks”, the expected output would look like this:
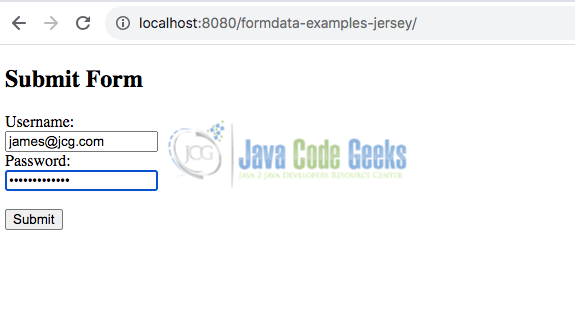

This output confirms the successful processing of the request by the application.
3. Using @FormDataParam
On the other hand, the @FormDataParam annotation is specifically designed for handling multipart/form-data requests. This type of request is commonly used when uploading files alongside other form fields. For instance, when submitting a form that includes a file upload input field (<input type="file">), the request is sent as multipart/form-data.
3.1 Jersey Maven Multipart Dependency
To use multipart feature in our application, firstly, we need to import the jersey-media-multipart module into our project’s pom.xml file.
        <dependency>
            <groupId>org.glassfish.jersey.media</groupId>
            <artifactId>jersey-media-multipart</artifactId>
            <version>2.29.1</version>
        </dependency>
3.2 Java Code
Next, we need to add the MultiPartFeature of Jersey into our application. There are various methods to accomplish this. One approach is to include support via the web.xml file. This example will utilize the JAX-RS configuration by extending ResourceConfig like this:
@ApplicationPath("resources")
public class JakartaRestConfiguration extends ResourceConfig {

    public JakartaRestConfiguration(){
        packages("com.jcg.formdata.examples.jersey.resources").register(MultiPartFeature.class);
    }
}
3.2.1 Jersey REST API for File Upload
    @POST
    @Path("/upload")
    @Consumes(MediaType.MULTIPART_FORM_DATA)
    public Response uploadFile(
            @FormDataParam("file") InputStream fileInputStream,
            @FormDataParam("file") FormDataContentDisposition fileDetail,
            @FormDataParam("description") String description) throws IOException {

        return Response.ok("Received file upload - Filename: " + fileDetail.getFileName() + ", Description: " + description).build();
    }
In this example, the uploadFile method extracts the uploaded file’s input stream and metadata along with the “description” field from the multipart/form-data request. It then proceeds to handle the uploaded file and other form fields accordingly.
3.2 HTML Form Page
Next, let us create a form with file upload and other fields for multipart/form-data submission. Let’s create a file named form.html file in the webapp folder of our application with the following content:
<!DOCTYPE html>
<html lang="en">
<head>
    <meta charset="UTF-8">
    <meta name="viewport" content="width=device-width, initial-scale=1.0">
    <title>File Upload Form</title>
</head>
<body>
    <h2>Upload File</h2>
    <form action="http://localhost:8080/formdata-examples-jersey/resources/form/upload" method="post" enctype="multipart/form-data">
        <label for="file">Select file:</label><br>
        <input type="file" id="file" name="file"><br><br>
        <label for="description">Description:</label><br>
        <textarea id="description" name="description" rows="4" cols="50"></textarea><br><br>
        <input type="submit" value="Upload">
    </form>
</body>
</html>
Upon navigating to the URL http://localhost:8080/formdata-examples-jersey/form.html, an HTML form containing a file upload field will be presented. To initiate the file upload process, click the “Choose file” button and proceed to select the desired file for uploading.
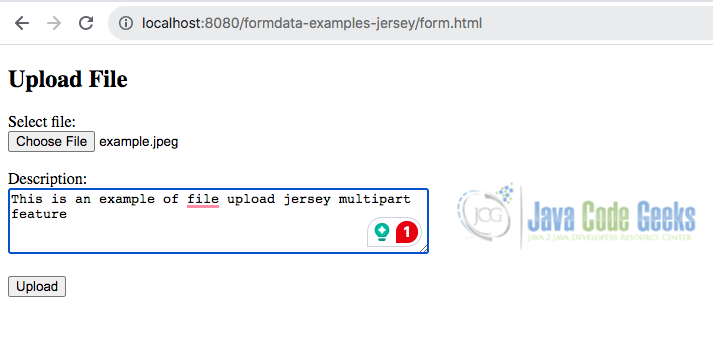
Example Output:
If you upload a file named “example.jpeg” with a description “This is an example of file upload jersey multipart feature“, the expected output is:

4. Key Differences
The primary distinction between @FormParam and @FormDataParam lies in the types of requests they handle and the form data they extract:
@FormParamis used for extracting form parameters fromapplication/x-www-form-urlencodedrequests, typically generated by HTML forms.@FormDataParamis used for processing multipart/form-data requests, commonly utilized for file uploads along with other form fields.
Here’s a table summarizing the key differences:
| Feature | @FormParam | @FormDataParam |
|---|---|---|
| Data format | URL-encoded (application/x-www-form-urlencoded) | Multipart (multipart/form-data) |
| Supported HTTP methods | GET, POST | Primarily POST (technically works with others) |
| Data type handling | Text data (strings) only | Text data (strings) and binary data (file uploads) |
4.1 Choosing the Right Annotation
- @FormParam:
- Use this annotation for processing URL-encoded form data.
- Works with both GET and POST requests.
- Limited to handling text data (strings).
- @FormDataParam:
- Use this annotation for processing multipart form data.
- Primarily used with POST requests (though technically allowed with others).
- Can handle a mix of text data (strings) and binary data (file uploads).
5. Conclusion
In conclusion, while both @FormParam and @FormDataParam annotations serve the purpose of extracting form data in Jersey applications, they cater to different types of requests. We should choose the appropriate annotation based on the content type of the incoming request. Understanding the distinction between these annotations empowers us to handle form submissions effectively and build resilient web applications with Jersey.
6. Download the Source Code
This was an example of FormDataParam vs FormParam in Jersey.
You can download the full source code of this example here: jersey formdataparam vs formparam
