Creating a CRUD (Create, Read, Update, Delete) example using Spring Boot and Thymeleaf involves setting up a basic web application that allows you to perform these operations on a data entity. In this example, we will use an in-memory H2 database, but you can modify it to use any other database of your choice.
1. Introduction
Spring Boot is a powerful framework that simplifies the development of Java applications by providing a convention-over-configuration approach and built-in features, allowing developers to focus on writing business logic. Thymeleaf, on the other hand, is a modern server-side Java template engine that enables seamless integration of dynamic content into HTML files.
2. Set up the project
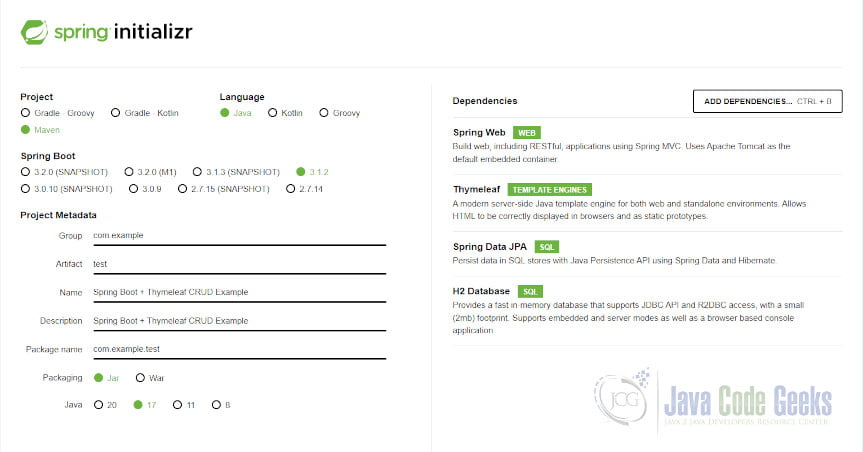
Create a new Spring Boot project using your preferred IDE or use the Spring Initializr (start.spring.io) to generate a project with the following dependencies:
- Spring Web
- Thymeleaf
- Spring Data JPA
- H2 Database (or your preferred database)
3. Domain Layer
In the context of software architecture, the Domain Layer is one of the key layers in the Domain-Driven Design (DDD) approach. It represents the heart of the application, encapsulating the business logic and rules that define the core functionality and behavior of the domain model.
The primary focus of the Domain Layer is to model the real-world entities and business concepts that the application is meant to handle. It abstracts the essential elements of the problem domain and expresses them as domain entities, aggregates, value objects, and domain services. These domain objects are independent of the infrastructure, such as databases or user interfaces, making them easier to maintain and test.
Key components of the Domain Layer:
| Component | Description | Example |
|---|---|---|
| Domain Entities | Primary objects representing core business entities. They enforce business rules. | Product, Company |
| Aggregates | Logical groupings of domain objects treated as a single unit, ensuring consistency. | Product Aggregate (Product and related data) |
| Value Objects | Objects with no identity, defined solely by their attributes, representing concepts. | Name, Date, Price |
| Domain Services | Stateless services for domain logic that doesn’t fit naturally into specific entities. | ProductRecommendationService, SearchService |
| Business Rules | Rules and validations ensuring consistent and valid data adhering to domain requirements. | Product title uniqueness, Price constraints |
The Domain Layer is focused on maintaining the integrity of the domain model and business logic, keeping it decoupled from external concerns like databases, frameworks, or user interfaces. This separation allows for better testability, maintainability, and the ability to evolve the domain model independently of the rest of the application.
In the context of the Spring Boot + Thymeleaf CRUD example, the Domain Layer would include the Product entity class, which represents the core business concept of a product and might contain methods for applying business rules related to products, such as validation of title and prices. Additionally, if your application requires more complex domain logic or calculations, you can incorporate domain services to handle those specific tasks.
3.1 Product.java
Let’s create the Product Entity:
package com.example.test;

import jakarta.persistence.Entity;
import jakarta.persistence.GeneratedValue;
import jakarta.persistence.GenerationType;
import jakarta.persistence.Id;

@Entity
public class Product {
    @Id
    @GeneratedValue(strategy = GenerationType.IDENTITY)
    private Long id;

    private String name;
    private double price;

    public Long getId() {
        return id;
    }

    public void setId(Long id) {
        this.id = id;
    }

    public String getName() {
        return name;
    }

    public void setName(String name) {
        this.name = name;
    }

    public double getPrice() {
        return price;
    }

    public void setPrice(double price) {
        this.price = price;
    }

    public Product(String name, double price) {
        this.name = name;
        this.price = price;
    }

    public Product() {
    }
}
4. Repository Layer
In software architecture, the Repository Layer is a key component of the data access layer. It acts as an intermediary between the application’s domain model (business logic) and the underlying data storage, such as databases or external APIs. The primary responsibility of the Repository Layer is to handle data persistence and retrieval operations, abstracting away the complexities of interacting with the data source.
Key characteristics and responsibilities of the Repository Layer:
| Characteristic | Description |
|---|---|
| Data Abstraction | Abstracts data storage details, providing a clean and consistent API for data interaction. |
| CRUD Operations | Defines methods for basic CRUD operations (Create, Read, Update, Delete) on data entities. |
| Entity Mapping | Maps domain entities to corresponding data structures in the data storage, and vice versa. |
| Encapsulation of Queries | Encapsulates queries and data access logic, keeping the domain layer agnostic to data storage. |
| Data Source Independence | Enables changing data storage implementation without affecting the application’s core logic. |
| Transactions | Handles database transactions to ensure data integrity during complex operations. |
In the context of the Spring Boot + Thymeleaf CRUD example, the Repository Layer would typically include the following components:
ProductRepository Interface: This interface defines the contract for interacting with the data storage for the Product entity. It declares methods for CRUD operations and other queries specific to products.
ProductRepositoryImpl Class: This is the implementation of the ProductRepository interface, where you would write the actual data access code to communicate with the database or any other data source.
Data Source Configuration: In a Spring Boot application, you would configure the data source (e.g., a relational database like MySQL or PostgreSQL) in the application properties or using Java configuration.
The Repository Layer serves as an essential component in building a robust and maintainable application by promoting the separation of concerns and providing a clean abstraction for data access operations. It allows the rest of the application to focus on business logic while leaving data storage concerns to the repository implementation.
4.1 ProductRepository.java
package com.example.test;

import org.springframework.data.jpa.repository.JpaRepository;
import org.springframework.stereotype.Repository;

@Repository
public interface ProductRepository extends JpaRepository<Product, Long> {
}
5. Controller Layer
Apologies for the confusion. Let’s adapt the explanation to the context of a Product Management system instead of a Book Management system.
In the context of a Product Management system, the Controller or Web Layer would have the following key responsibilities:
- Request Handling: It receives incoming HTTP requests from clients, such as web browsers or API consumers.
- User Input Processing: The Controller extracts data from the request parameters, request bodies, or path variables to capture user input related to product management, such as adding new products, updating existing ones, and performing searches.
- Interaction with the Service Layer: After processing user input, the Controller delegates the business logic implementation to the Service Layer to perform various operations on products, such as creating, updating, retrieving, and deleting products.
- Model Population: The Controller populates the model with data that needs to be displayed on the view (UI) or passed back to the client. This data could include a list of products, product details, or success/error messages.
- View Rendering: It prepares the appropriate view (using a templating engine like Thymeleaf) and passes the model data to the view for rendering the response. The view may display a list of products, a product details page, or a form for adding/editing products.
- Response Generation: The Controller generates the HTTP response based on the view and model data and sends it back to the client.
- Exception Handling: It handles exceptions and errors gracefully, providing appropriate error responses to the client, such as when a product is not found or when there is a validation error in the user’s input.
- URL Mapping: The Controller defines URL mappings that map incoming requests to specific methods for processing. For example,
/productsmight be mapped to a method that lists all products, while/products/{id}might be mapped to a method that displays the details of a specific product.
The Controller Layer in a Product Management system, just like in any web application, acts as the intermediary between the user interface and the application’s core logic. It enables seamless communication between users and the backend system, handling user input, processing requests, and presenting the appropriate responses to create a smooth and interactive user experience for managing products.
5.1 ProductController.java
package com.example.test;

import org.springframework.beans.factory.annotation.Autowired;
import org.springframework.stereotype.Controller;
import org.springframework.ui.Model;
import org.springframework.web.bind.annotation.GetMapping;
import org.springframework.web.bind.annotation.ModelAttribute;
import org.springframework.web.bind.annotation.PathVariable;
import org.springframework.web.bind.annotation.PostMapping;

@Controller
public class ProductController {
    @Autowired
    private final ProductRepository productRepository;

    public ProductController(ProductRepository productRepository) {
        this.productRepository = productRepository;
    }


    @GetMapping("/")
    public String listProducts(Model model) {
        model.addAttribute("products", productRepository.findAll());
        return "list";
    }

    @GetMapping("/new")
    public String newProductForm(Model model) {
        model.addAttribute("product", new Product());
        return "form";
    }

    @PostMapping("/save")
    public String saveProduct(@ModelAttribute Product product) {
        productRepository.save(product);
        return "redirect:/";
    }

    @GetMapping("/edit/{id}")
    public String editProductForm(@PathVariable Long id, Model model) {
        model.addAttribute("product", productRepository.findById(id).orElse(null));
        return "form";
    }

    @GetMapping("/delete/{id}")
    public String deleteProduct(@PathVariable Long id) {
        productRepository.deleteById(id);
        return "redirect:/";
    }
}
6 View Layer
The View Layer is one of the essential components in web application architecture. It is responsible for rendering the user interface and presenting the data to the end-users. In the context of the MVC (Model-View-Controller) pattern, the View Layer represents the “V,” where the “M” stands for the Model (business/domain objects), and the “C” stands for the Controller (request handling and business logic).
Key responsibilities of the View Layer:
| Responsibility | Description |
|---|---|
| User Interface Rendering | Generates the visual layout and functionality of the application using HTML, CSS, and JavaScript. |
| Presentation of Data | Presents data from the Model Layer to end-users in a human-readable format (e.g., product list, details, etc.). |
| Interaction with the User | Captures and handles user input, such as form submissions and button clicks, sending data to the Controller. |
| Template Rendering | Uses templating engines (e.g., Thymeleaf, Mustache, or Handlebars) to generate HTML dynamically with data from Models. |
| Separation of Concerns | Ensures a clear separation between presentation logic (View) and business logic (Model and Controller). |
| Responsiveness and Accessibility | Ensures the user interface is responsive and accessible across different devices and browsers for a wide range of users. |
In the context of the Spring Boot + Thymeleaf CRUD example or the Product Management system, the View Layer would consist of HTML templates (using Thymeleaf in this case) that display the products, product details, forms for adding/editing products, and any other user interface components required for managing products.
Thymeleaf, being a server-side templating engine, allows the View Layer to dynamically render HTML based on the data provided by the Controller. This enables a smooth and interactive user experience as the application can update the view with new data without requiring a full page reload.
6.1 Bootstrap
To use Bootstrap in your Spring Boot + Thymeleaf CRUD application, you need to include the Bootstrap CSS and JavaScript files in your Thymeleaf templates. Bootstrap provides a responsive front-end framework that makes it easy to style your application with pre-defined styles and components.
Here’s how you can integrate Bootstrap into your application:
- Download Bootstrap files: You can download Bootstrap from the official website (https://getbootstrap.com/) or include it from a Content Delivery Network (CDN). For simplicity, let’s use the CDN approach.
- Include Bootstrap in your Thymeleaf templates
6.2 form.html
<!DOCTYPE html>
<html xmlns:th="http://thymeleaf.org">
<head>
    <title>Add/Edit Product</title>
    <link rel="stylesheet" href="https://cdn.jsdelivr.net/npm/bootstrap@5.3.0/dist/css/bootstrap.min.css">
</head>
<body>
<div class="container">
    <h2>Add/Edit Product</h2>
    <form th:action="@{/save}" th:object="${product}" method="post">
        <input type="hidden" th:field="*{id}">
        <div class="mb-3">
            <label class="form-label">Name:</label>
            <input class="form-control" type="text" th:field="*{name}">
        </div>
        <div class="mb-3">
            <label class="form-label">Price:</label>
            <input class="form-control" type="text" th:field="*{price}">
        </div>
        <button type="submit" class="btn btn-primary">Save</button>
        <a class="btn btn-secondary" th:href="@{/}">Cancel</a>
    </form>
</div>
</body>
</html>
6.3 list.html
<!DOCTYPE html>
<html xmlns:th="http://thymeleaf.org">
<head>
    <title>Product List</title>
    <link rel="stylesheet" href="https://cdn.jsdelivr.net/npm/bootstrap@5.3.0/dist/css/bootstrap.min.css">
</head>
<body>
<div class="container">
    <h2>Product List</h2>
    <a class="btn btn-primary" href="/new">Add New Product</a>
    <table class="table table-bordered">
        <thead>
        <tr>
            <th>ID</th>
            <th>Name</th>
            <th>Price</th>
            <th>Edit</th>
            <th>Delete</th>
        </tr>
        </thead>
        <tbody>
        <tr th:each="product : ${products}">
            <td th:text="${product.id}"></td>
            <td th:text="${product.name}"></td>
            <td th:text="${product.price}"></td>
            <td><a class="btn btn-info" th:href="@{/edit/{id}(id=${product.id})}">Edit</a></td>
            <td><a class="btn btn-danger" th:href="@{/delete/{id}(id=${product.id})}">Delete</a></td>
        </tr>
        </tbody>
    </table>
</div>
</body>
</html>
7. Configuration Properties
In the context of Spring Boot applications, Configuration Properties are a way to externalize configuration settings and parameters from the codebase. They allow you to configure various aspects of your application without modifying the source code, making it more flexible and easier to manage across different environments.
Spring Boot provides robust support for reading configuration properties from various sources, including property files, environment variables, command-line arguments, YAML files, and more. The properties are then bound to Java beans using Spring’s data binding capabilities.
Key features and benefits of Configuration Properties in Spring Boot:
| Feature | Description |
|---|---|
| Externalized Configuration | Store configuration settings outside of the application code, allowing easy changes without rebuilding or redeploying. |
| Profiles | Define different sets of configuration properties for different environments or scenarios. |
| Type Safety | Configuration properties are bound to Java objects, providing type safety and easy data access. |
| Easy Integration | Spring Boot automatically loads configuration properties from various sources based on precedence order. |
| Consistency | Maintain consistency across multiple instances of your application deployed in different environments. |
How to use Configuration Properties in a Spring Boot application:
- Define Configuration Properties: Create a Java class and annotate it with
@ConfigurationProperties. Define fields in the class that correspond to the configuration properties you want to read. - Enable Configuration Properties: Use
@EnableConfigurationPropertiesto enable the use of your custom configuration properties class in the application. - Provide Property Values: Configuration properties can be provided in various ways, such as through property files (e.g.,
application.propertiesorapplication.yml), environment variables, or command-line arguments. - Bind Properties: During the application startup, Spring Boot will automatically bind the provided configuration property values to the fields in your configuration properties class.
7.1 application.properties
# H2 Database Configuration
spring.datasource.url=jdbc:h2:mem:testdb?useSSL=false
spring.datasource.driverClassName=org.h2.Driver
spring.datasource.username=sa
spring.datasource.password=

# H2 Console Configuration (Optional, only for development/debugging)
spring.h2.console.enabled=true
spring.h2.console.path=/h2-console

# Thymeleaf Template Configuration
spring.thymeleaf.prefix=classpath:/templates/
spring.thymeleaf.suffix=.html
spring.thymeleaf.cache=false

# Spring JPA Configuration
spring.jpa.show-sql=true
spring.jpa.properties.hibernate.dialect=org.hibernate.dialect.H2Dialect
spring.jpa.hibernate.ddl-auto=update

# Application Configuration
server.port=8080
8. Running Application
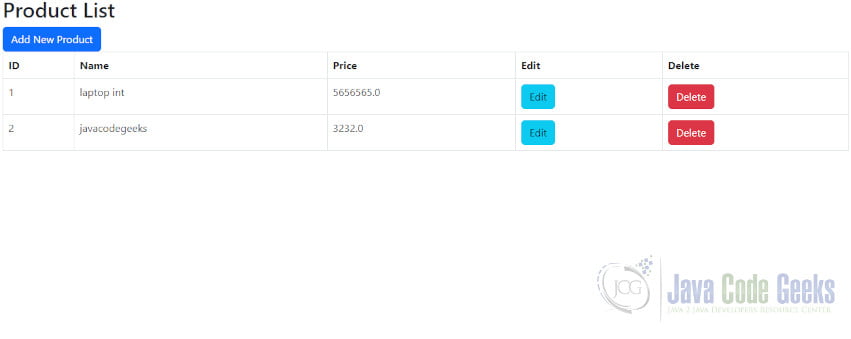
Now, you can run your Spring Boot application, and it should start a server on port 8080 (or any other port you configured). Visit http://localhost:8080/ in your browser to access the product list and perform CRUD operations.
package com.example.test;

import org.springframework.boot.SpringApplication;
import org.springframework.boot.autoconfigure.SpringBootApplication;

@SpringBootApplication
public class SpringBootThymeleafCrudExampleApplication {

    public static void main(String[] args) {
        SpringApplication.run(SpringBootThymeleafCrudExampleApplication.class, args);
    }

}
This is how our example application looks like:
9. Conclusion
In this example, we’ve created a simple CRUD (Create, Read, Update, Delete) application using Spring Boot and Thymeleaf. The application allows users to manage a list of products, including adding new products, viewing the product list, editing existing products, and deleting products.
10. Download the Source Code
This was an example of how to implement a Spring Boot CRUD Application using Thymeleaf and Bootstrap.
You can download the full source code of this example here: Spring Boot + Thymeleaf CRUD Example
