In this tutorial, we will learn about Event-driven microservices architecture and explore a simple Producer-Consumer to illustrate the practical implementation up to an extent.
1. Introduction
Ever wondered what Event-driven pattern is about? How generating events help to decide or trigger the next set of events? Well to explore this niche area we first need to understand what an event is in the context of a system. Any change of information is considered an event i.e. Adding a new record, updating an existing record, or even deleting a record is considered an event.
The event-driven architecture is a three-step process where the producer writes the event to an event bus that is listened to by the consumer. An event only carries the information required for the consumer to be able to perform its job.

This architecture helps developers to allow loose coupling and responsive in an application. Thus it’s a preferable choice for the applications that have been broken down from monolithic to microservice. A quick note as this pattern has been deprecated and replaced by the Saga pattern so we’ll keep it short and crisp. The Event-driven architecture is divided into three parts i.e.
1.1 Event Notification
The only duty of the producers is just to convey about an event for any microservice or system to work on. This duty is called an event notification and segregates the responsibilities of each service.
1.2 Event Source
This concept enables the system to process an event at any time in the future as all events are logged and the application state or the atomicity will depend on the order of its insertion. For instance – Database changelogs or versioning controlling system.
1.3 Event Stream
Once the event sourcing is completed, stream processing tools like event bus or message brokers process the information in parallel. The event streaming framework stores the events in the same order they were received in logical collections called queues and allows parallel processing.
Now let us move ahead and explore this architecture through a practice demonstration where we will create a Producer and Consumer application.
- The Producer microservice will generate an event notification for the incoming request
- The Consumer microservice will perform the further processing of the received event notification
To follow this concept, let us open the eclipse ide and implement this tutorial. But before going any further I’m assuming that readers are aware of the concepts of RabbitMq and creating/running a basic spring boot application.
2. Event-Driven Data Management for Microservices
Here is a systematic guide for implementing this tutorial.
2.1 Tools Used
We are using Eclipse Kepler SR2, RabbitMq, JDK 8, and Maven. In case readers don’t know how to setup RabbitMq on a Windows operating system they can refer to the video at this link.
3. Event-Driven architecture – Producer Example
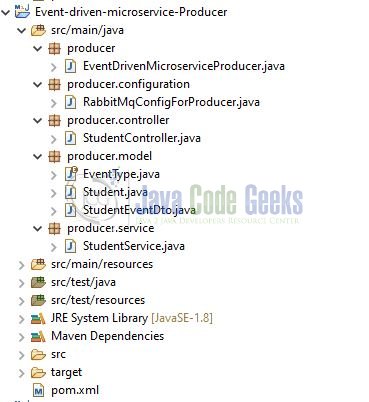
In case you’re confused about where you should create the corresponding files or folder, let us review the project structure of the Producer microservice.
Let us start building the application!
3.1 Create a Spring Boot application
Below are the steps involved in developing the application. Please note, we’ll only cover the important classes required to get a learning experience and assuming that readers are aware of the basic spring boot concepts.
3.1.1 Maven dependency
Add the following dependencies (i.e. spring-boot-web and spring-boot-amqp) to the project’s pom.xml.
pom.xml
1 2 3 4 5 6 7 8 | <dependency> <groupId>org.springframework.boot</groupId> <artifactId>spring-boot-starter-web</artifactId></dependency><dependency> <groupId>org.springframework.boot</groupId> <artifactId>spring-boot-starter-amqp</artifactId></dependency> |
3.1.2 Application properties
Create a new properties file at the location: Event-driven-microservice-Producer/src/main/resources/ and add the following RabbitMq and Queue properties to it.
application.properties
1 2 3 4 5 6 7 8 9 | # Application startup custom port.server.port=10091# Rabbitmq configuration.spring.rabbitmq.host=localhostspring.rabbitmq.port=5672spring.rabbitmq.username=guestspring.rabbitmq.password=guest# Queue detail.student.create.queue=student-create-queue |
3.1.3 RabbitMq configuration
Create a configuration class inside the package producer.configuration and add the following code to it. In this class, we will set up the Queue and Jackson2JsonMessageConverter bean required to get the Producer functionality working (i.e. pushing an event notification to the queue)
RabbitMqConfigForProducer.java
01 02 03 04 05 06 07 08 09 10 11 12 13 14 15 16 17 18 19 20 21 22 23 24 25 | package producer.configuration;import org.springframework.amqp.core.Queue;import org.springframework.amqp.support.converter.Jackson2JsonMessageConverter;import org.springframework.beans.factory.annotation.Value;import org.springframework.context.annotation.Bean;import org.springframework.context.annotation.Configuration;// Required to declare a queue and a message converter on application startup.@Configurationpublic class RabbitMqConfigForProducer { @Value("${student.create.queue}") String studentCreateQueue; @Bean Queue queue() { return new Queue(studentCreateQueue); } @Bean Jackson2JsonMessageConverter producerJackson2MessageConverter() { return new Jackson2JsonMessageConverter(); }} |
3.1.4 Student service
Create a service class inside the package producer.service and add the following code to it. The createStudent(……) method is called from the controller class and publishes an Event notification to the queue.
publishEventToRabbitMq(……)method is annotated with the@Asyncannotation which ensures that the method is executed in a different thread but not the main threadStudentis a model class that represent the student propertiesStudentEventDtoclass represents the Event notification properties are sent to the queue and will be consumed by the Listener
StudentService.java
01 02 03 04 05 06 07 08 09 10 11 12 13 14 15 16 17 18 19 20 21 22 23 24 25 26 27 28 29 30 31 32 33 34 35 36 37 38 39 40 41 42 43 44 45 46 47 | package producer.service;import org.slf4j.Logger;import org.slf4j.LoggerFactory;import org.springframework.amqp.rabbit.core.RabbitTemplate;import org.springframework.beans.factory.annotation.Autowired;import org.springframework.beans.factory.annotation.Value;import org.springframework.scheduling.annotation.Async;import org.springframework.stereotype.Service;import producer.model.EventType;import producer.model.Student;import producer.model.StudentEventDto;@Servicepublic class StudentService { private Logger logger = LoggerFactory.getLogger(this.getClass()); // Getting the rabbitMqTemplate object for sending the student object to the queue where a consumer // is listening and will process the student object further. @Autowired RabbitTemplate rabbitTemplate; @Value("${student.create.queue}") String studentCreateQueue; public String createStudent(final Student student) { // Passing the student email to the queue where the designated consumer will listen to this event // & process further (i.e. something like db processing and triggering an email etc. // We have omitted the other use-cases for simplicity. publishEventToRabbitMq(EventType.NEW_STUDENT_CONFIRMATION, student.getEmail()); final String response = "[" + student.getEmail() + "] created successfully."; return response; } // @Async annotation ensures that the method is executed in a different background thread // but not consume the main thread. @Async private void publishEventToRabbitMq(final EventType eventType, final String email) { final StudentEventDto eventDto = StudentEventDto.create(eventType, email); logger.info("Sending the following event object to the queue: " + eventDto); // Sending the new student object to the rabbitmq queue where a designated consumer will listen to the event // coming on this queue and process the further activities. rabbitTemplate.convertAndSend(studentCreateQueue, eventDto); logger.info("Message successfully sent to the rabbitMq."); }} |
3.1.5 Student controller
Create a controller class inside the package producer.controller that accepts the input through the HTTP POST request.
StudentController.java
01 02 03 04 05 06 07 08 09 10 11 12 13 14 15 16 17 18 19 20 21 22 23 24 25 26 27 28 29 30 31 32 33 34 35 36 | package producer.controller;import org.slf4j.Logger;import org.slf4j.LoggerFactory;import org.springframework.beans.factory.annotation.Autowired;import org.springframework.http.HttpStatus;import org.springframework.http.ResponseEntity;import org.springframework.web.bind.annotation.PostMapping;import org.springframework.web.bind.annotation.RequestBody;import org.springframework.web.bind.annotation.RequestMapping;import org.springframework.web.bind.annotation.RestController;import producer.model.Student;import producer.service.StudentService;//Useful to create the RESTful webservices.@RestController@RequestMapping(value= "/student")public class StudentController { private Logger logger = LoggerFactory.getLogger(this.getClass()); // @Autowired annotation provides the automatic dependency injection. @Autowired StudentService studentService; // Saves the student entity. // @PostMapping annotation handles the http post request matched with the given uri. // @RequestBody annotation binds the http request body to the domain object. @PostMapping(value= "/create") public ResponseEntity<String> createNewStudent(@RequestBody final Student student) { logger.info("Creating a new student= " + student.toString()); final String response = studentService.createStudent(student); return new ResponseEntity<>(response, HttpStatus.OK); }} |
4. Event-Driven architecture – Consumer Example
In case you’re confused about where you should create the corresponding files or folder, let us review the project structure of the Consumer microservice.

Let us start building the application!
4.1 Create a Spring Boot application
Below are the steps involved in developing the application. Do note, we’ll only cover the important classes required to get a learning experience and assuming that readers are aware of the basic spring boot concepts.
4.1.1 Application properties
Create a new properties file at the location: Event-driven-microservice-Consumer/src/main/resources/ and add the following RabbitMq and Queue properties to it.
application.properties
1 2 3 4 5 6 7 8 9 | # Application startup custom port.server.port=10091# Rabbitmq configuration.spring.rabbitmq.host=localhostspring.rabbitmq.port=5672spring.rabbitmq.username=guestspring.rabbitmq.password=guest# Queue detail.student.create.queue=student-create-queue |
4.1.2 RabbitMq configuration
Create a configuration class inside the package consumer.configuration and add the following code to it. In this class, we will set up the RabbitListener and MappingJackson2MessageConvertor to extract, convert, and set the converted message to the method parameter.
RabbitMqConfigForConsumer.java
01 02 03 04 05 06 07 08 09 10 11 12 13 14 15 16 17 18 19 20 21 22 23 24 25 26 27 28 29 30 31 32 33 34 35 36 37 38 39 40 41 42 | package consumer.configuration;import org.springframework.amqp.rabbit.annotation.RabbitListenerConfigurer;import org.springframework.amqp.rabbit.listener.RabbitListenerEndpointRegistrar;import org.springframework.beans.factory.annotation.Autowired;import org.springframework.context.annotation.Bean;import org.springframework.context.annotation.Configuration;import org.springframework.messaging.converter.MappingJackson2MessageConverter;import org.springframework.messaging.handler.annotation.support.DefaultMessageHandlerMethodFactory;import consumer.component.ConsumeEvents;@SuppressWarnings("unused")@Configurationpublic class RabbitMqConfigForConsumer implements RabbitListenerConfigurer { // Spring application uses the PayloadArgumentResolver to extract, convert, and set the // converted message to the method parameter annotated with the @RabbitListener annotation. @Bean public MappingJackson2MessageConverter mappingJackson2MessageConverter() { return new MappingJackson2MessageConverter(); } @Bean public DefaultMessageHandlerMethodFactory myHandlerMethodFactory() { DefaultMessageHandlerMethodFactory handlerMethodFactory = new DefaultMessageHandlerMethodFactory(); handlerMethodFactory.setMessageConverter(mappingJackson2MessageConverter()); return handlerMethodFactory; } // Overridding this method we can set the custom DefaultMessageHandlerMethodFactory where we set the // message converter and the factory will create our PayloadArgumentResolver with the correct convert. @Override public void configureRabbitListeners(final RabbitListenerEndpointRegistrar rabbitListenerEndpointRegistrar) { rabbitListenerEndpointRegistrar.setMessageHandlerMethodFactory(myHandlerMethodFactory()); } // Set of classes that will be consuming the events. // These classes have methods annotated with @RabbitListener annotation. @Autowired private ConsumeEvents consumeEvents;} |
4.1.3 Event consumer Class
Create a service class that will consume the message from the given queue as soon as they are published/pushed to the queue.
ConsumeEvents.java
01 02 03 04 05 06 07 08 09 10 11 12 13 14 15 16 17 18 19 20 21 | package consumer.component;import org.springframework.amqp.rabbit.annotation.RabbitListener;import org.springframework.stereotype.Service;import consumer.model.StudentEventDto;// Service class that will consume the message from the given queue as soon as they are published/pushed to the queue.@Servicepublic class ConsumeEvents { // Annotation allows the message to be listened at the given queue. // Queue name is directly read from the properties file. @RabbitListener(queues = "${student.create.queue}") public void recievedMessage(final StudentEventDto studentEventDto) { System.out.println("Received following message from rabbitmq= " + studentEventDto); // Here once the message by the consumer application, we can add the same to the database of persistence. // This code is not yet implemented for simplicity. }} |
5. Run the Application
To execute the application, right-click on the following main classes (i.e. EventDrivenMicroserviceProducer.java and EventDrivenMicroserviceConsumer.java), Run As -> Java Application.
6. Project Demo
With Producer and Consumer up and running, we’ll execute them. Open the Postman tool and hit the following URL with a simple message body. This HTTP POST request will be handled by the controller in the Producer application and later will send this message to the RabbitMq queue.
01 02 03 04 05 06 07 08 09 10 11 | ## Sample request body ##{ "id": {{$randomInt}}, "name": "{{$randomFirstName}}", "age": {{$randomInt}}, "dateOfBith": "{{$timestamp}}", "email": "{{$randomEmail}}"} |
Once the message is successfully interpreted by the Producer controller and sent to the Event notification queue.
Producer logs
1 2 3 4 5 | 2020-05-01 22:43:59.837 INFO 6832 --- [io-10091-exec-1] producer.controller.StudentController : Creating a new student= Student [id=193, name=Karine, age=523, dateOfBith=1588353240, email=Danny_MacGyver@yahoo.com]2020-05-01 22:43:59.844 INFO 6832 --- [io-10091-exec-1] producer.service.StudentService : Sending the following event object to the queue: StudentEventDto [type=NEW_STUDENT_CONFIRMATION, email=Danny_MacGyver@yahoo.com]2020-05-01 22:43:59.857 INFO 6832 --- [io-10091-exec-1] o.s.a.r.c.CachingConnectionFactory : Attempting to connect to: [localhost:5672]2020-05-01 22:43:59.910 INFO 6832 --- [io-10091-exec-1] o.s.a.r.c.CachingConnectionFactory : Created new connection: rabbitConnectionFactory#49298ce7:0/SimpleConnection@68e2f17c [delegate=amqp://guest@127.0.0.1:5672/, localPort= 62199]2020-05-01 22:43:59.945 INFO 6832 --- [io-10091-exec-1] producer.service.StudentService : Message successfully sent to the rabbitMq. |
The Consumer microservice has different listeners that are listening to the given queues. One of the queues will listen to this notification and does further processing. The following logs will appear on the Consumer side.
Consumer logs
1 | Received following message from rabbitmq= StudentEventDto [type=NEW_STUDENT_CONFIRMATION, email=Danny_MacGyver@yahoo.com] |
That is all for this tutorial and I hope the article served you whatever you were looking for. Happy Learning and do not forget to share!
7. Event-Driven Data Management for Microservices – Summary
In this section, developers learned how to visualize the concept and execute the Event-driven microservice architecture. We also learned –
- Three different parts of Event-driven architecture i.e. Event Notification, Event Source, and Event Stream
- Practical implementation for Event-driven management for Microservices via the Producer & the Consumer microservices
- The relationship between the output of Producer and Consumer microservices i.e. how both can execute independently
You can download the sample application as an Eclipse project in the Downloads section.
8. Download the Eclipse Project
This was an example of Event-driven microservices architecture.
You can download the full source code of this example here: Event-Driven Data Management for Microservices

Thank you for your instructions and article, however there is one point, for me, is not clear.
Can you give me the “exact” example post request, because i’m getting Resolved [org.springframework.web.HttpMediaTypeNotSupportedException: Content type ‘text/plain;charset=UTF-8’ not supported] error while executing the post request. There is also some file about the postman in the project that I didn’t understand what to do. Posting with plain text isn’t easier?