In this tutorial, we will review REST API concepts and provide an example of REST API development using Spring Boot.
1. Introduction
We have heard quite a lot about REST recently. REST (Representational State Transfer) is an architectural style that describes principles and outlines constraints for developing web services on the internet.
Table Of Contents
- 1. Introduction
- 2. Spring Boot REST API Example
- 2.1 Designing the REST Service
- 2.2 Create the Spring Boot Project
- 2.3 Create the Model
- 2.4 Create the Repository
- 2.5 Create the Controller
- 2.6 Inject the Repository in the Controller
- 2.7 Add a Custom Exception Class
- 2.8 Add the Read Operations
- 2.9 Add the Create Operation
- 2.10 Add the Update Operation
- 2.11 Add the Delete Operation
- 2.12 Update RestApiApplication Class
- 2.13 Start the Spring Boot REST API Application
- 2.14 Test the REST API
- 3. Summary
- 4. Download the Source Code
In a REST web service, a representation of a requested web resource is transferred to the client. In return, REST clients can access and manipulate the resource by using stateless operations. Clients use a REST API (Application Programming Interface) to invoke these operations.
REST has gained popularity because its concepts are based on familiar HTTP constructs like Unique Resource Identifiers (URIs), HTTP methods, HTTP status codes, Media Types, and Content Negotiation.
The HTTP request-response model used in web browsing is an example of how these constructs are used. URIs are used to access web resources on the internet. HTTP methods are used to perform actions on these resources. HTTP status codes are used to communicate the result back to the client.
Let’s explore these concepts in more detail.
1.1 Uniform Resource Identifier
Originally, a web resource was an HTML document or a file. Today, the definition of a web resource has extended to include any entity (or collection of entities) that can be identified and cataloged on the web. For example, a record or a group of records in a database can be exposed as resources. A resource can have relationships with other resources.
A URI is used to identify a resource. For example, a collection of Student entities might be identified by the URI /students. A specific student might be accessed by the URI /students/123 (where 123 is the unique ID of the student in the collection).
URIs also offer an intuitive way to describe a 1:N relationship between resources. A student’s course load might be described with the URI /students/123/courses.
1.2 HTTP Methods
Clients perform the following actions on resources:
- Create
- Read
- Update
- Delete
These actions are often referred to as CRUD operations.
REST leverages the following HTTP methods to perform those actions.
- GET
- POST
- PUT
- DELETE
The table below illustrates how these HTTP methods are characteristically used in a REST API for both collections and singletons.
| URI | GET | POST | PUT | DELETE |
| Collection http://jcg.com/restapi/resources | Retrieve a list of entities in the collection. | Create a new entity in the collection. Typically return the URI of the new entity. | Replace the existing collection with another collection. | Remove the collection. |
| Singleton http://jcg.com/restapi/resources/123 (where 123 is the unique ID of the single entity) | Retrieve a representation of the specified entity in the collection. | N/A | Replace the existing entity in the collection with the entity in the payload of the request.(For all intents and purposes, updating the entity.) | Remove the specified entity from the collection. |
GET and DELETE requests have no payloads. POST and PUT requests do require a payload. PUT can be used for resource creation but that would put the onus of specifying the URI for the entity on the client, which is frowned upon.
PUT and DELETE are idempotent operations, meaning the same request can be repeated by the client and have no ill effect on the server. (It will continue to produce the same result.)
1.3 HTTP Status Codes
Some client requests are successful. Others are not. (We’ve all encountered the 404 Not Found message.) HTTP Status codes provide information about the result of processing a request.
REST services communicate their results using standard HTTP status codes. If a GET request is successful, the service will return a “200 OK” status code, which indicates that the request has succeeded. Other common status codes used by REST APIs are “201 Created” for a Post request that successfully created a resource and “404 Not Found” for a Get request when the resource is not found. For a list of all status codes and their definitions, visit HTTP/1.1: Status Code Definitions.
1.4 HTTP Headers
So how are HTTP methods and HTTP status codes communicated between the client and the server? The HTTP header is the answer. Here is a sample HTTP request header for a GET operation:
GET /docs/index.html HTTP/1.1
Host: www.nowhere123.com
Accept: image/gif, image/jpeg, */*
Accept-Language: en-us
Accept-Encoding: gzip, deflate
User-Agent: Mozilla/4.0 (compatible; MSIE 6.0; Windows NT 5.1)
The first line is the Request line. It includes the HTTP method for the request, e.g. GET, POST, PUT or DELETE. The remaining lines are header variables for metadata.
Here is an example of an HTTP response header for a request that was processed successfully:
HTTP/1.1 200 OK
Date: Sun, 18 Oct 2017 08:56:53 GMT
Server: Apache/2.2.14 (Win32)
Last-Modified: Sat, 20 Nov 2004 07:16:26 GMT
ETag: "10000000565a5-2c-3e94b66c2e680"
Accept-Ranges: bytes
Content-Length: 44
Connection: close
Content-Type: text/html
The first line is the Response line which shows the server protocol and status code. The remaining lines are header variables for metadata.
1.5 Media Types
An HTTP request can specify the media type (or types) it will accept and the media type it will send in the payload (as is the case for POST or PUT requests). SOAP-based services use XML as the data exchange format. In RESTful applications, JSON has become prevalent as a data exchange format, though XML is also used.
The client specifies the media type(s) it accepts on the Accept line of the request header:
Accept: application/json, application/xml
If the client is sending data, it specifies the media type on the Content-Type line:
Content-Type: application/json
Content-Type is also used in the response header to specify the media type that is being returned by the server.
1.6 Content Negotiation
REST does not mandate what media type is to be used for exchanging data. It relies on HTTP’s content-negotiating mechanism for mediating the media type. This is done by matching the media types that can be consumed by the client (specified in the request’s Accept header) and the media types made available by the service for the requested resource. The first match found will be used.
1.7 REST Constraints
A truly RESTful service adheres to the following constraints:
| Constraint | Description |
| Uniform Interface | Resources are uniquely identified with a URI and manipulated using HTTP Methods. |
| Client-Server Separation | The responsibility of each component is clearly delineated. The client is concerned with generating the request and rendering the response while the server is concerned with data access, data storage, caching, and security. |
| Stateless | Client-server interactions are independent of prior and/or future interactions. State is managed by the client if required. |
| Layered System | There may be layers (caching, security and load balancing, for example) between the server and the client. This should be transparent to the client. |
| Cacheable | Resources should be cached unless the server sends information declaring the resource is stale. |
| Code-on-Demand (Optional) | The client can request executable code from the server. |
It is important to be aware of these constraints when designing and building a REST API.
1.8 REST API and Spring Boot
Spring Boot has excellent support for developing REST APIs. It helps you get a REST project off the ground very quickly with little or no configuration.
Incorporating the spring-boot-starter-web dependency in your project will add the core libraries used to develop a REST API. For example, it will add the libraries from the Jackson Project used for data-binding between POJOs and JSON or XML.
Additionally, Spring Boot automatically configures REST endpoints with Jackson message converters by default, relieving the developer of the tedious task of working with the Jackson libraries directly. Other HTTP message converters can be configured if required.
REST support includes the @RestController annotation for handling REST requests and responses. @RestController merges the @Controller and @ResponseBody annotations.
1.9 Tools Used in this Example
- Eclipse Java EE IDE for Web Developers Version: Oxygen.3a
- Maven 3.3.9 (Embedded in Eclipse)
- Spring Tools Plugins 3.9.4.RELEASE
- Postman 6.1.4
Spring Tools is a set of plugins for Eclipse that speed up the development of Spring applications. You can add Spring Tools to your existing Eclipse installation by going to the Eclipse Marketplace and searching for “Spring IDE”.
Postman is available from www.getpostman.com.
2. Spring Boot REST API Example
In this example, we will demonstrate how to develop a REST API with Spring Boot. Our application will be a student management service that allows clients to read, add, update and delete students.
2.1 Designing the REST Service
There are generally four tasks to carry out before developing a REST API. Those tasks are:
- Identify the resources to expose in the API.
- Define the URIs for those resources.
- Assign HTTP methods to CRUD operations.
- Choose the media type or types for exchanging data.
In this example, Students will be the resources that we will expose in our REST API.
We will use the following URIs:
| Action | URI |
| Read all students | /students |
| Read a single student | /students/{id} |
| Add a student | /students |
| Update a student | /students |
| Delete a student | /students/{id} |
We will use the GET, POST, PUT and DELETE HTTP methods for our CRUD operations.
Our REST API will use JSON as the media type for exchanging data.
2.2 Create the Spring Boot Project
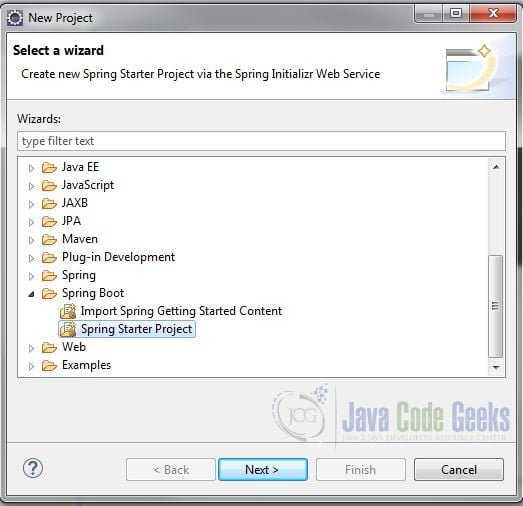
In the New Project – Select a Wizard dialog box, expand Spring Boot and select Spring Starter Project. Click “Next”.
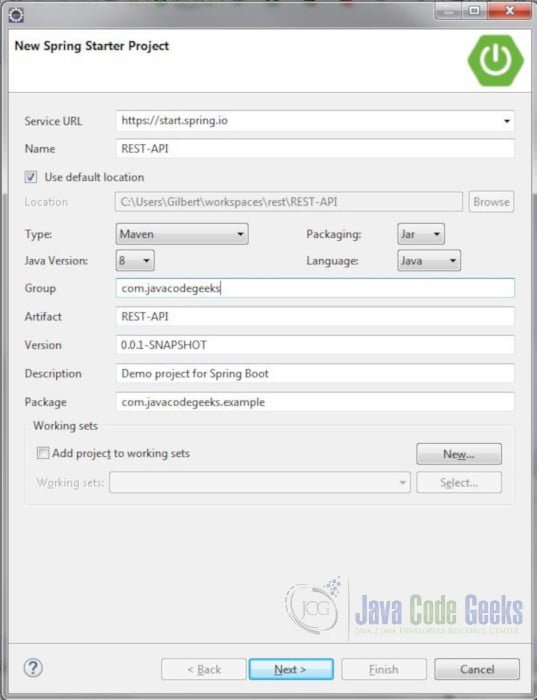
In the New Spring Starter Project dialog box, enter a name for the project. Also, enter the group, artifact and package information. Accept all the other default values. Click “Next”.
Note: This project requires Java 8 at a minimum.
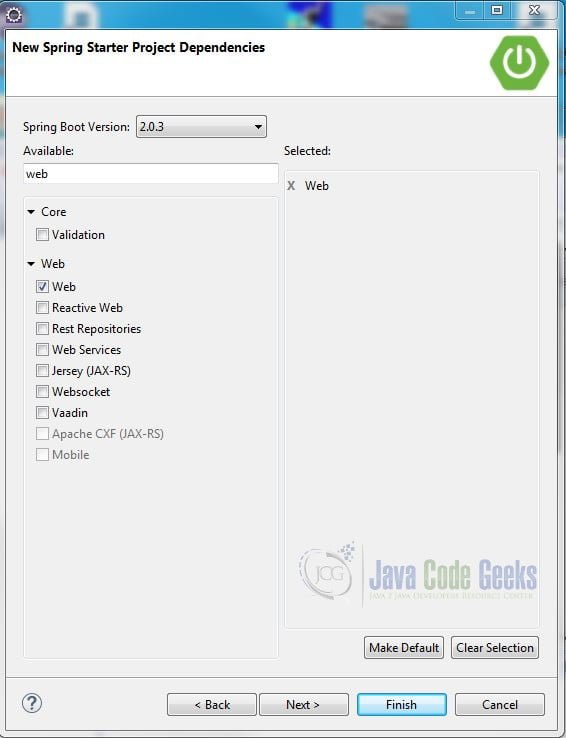
In the New Spring Starter Project Dependencies dialog box, select Spring Boot Version 2.0.3. Also, enter “web” in the Available search box and check Web from the search results. Click “Finish”.
Note: In a real-world application, we would add dependencies for the data layer, e.g. JPA, MySQL.
The result is a Maven project that has an Application class and an ApplicationTests class. For a description of the project artifacts, look at this post: Spring Boot Hello World Example.
2.3 Create the Model
The model (entity) that we will expose in our API is a Student model. Create a new package com.javacodegeeks.example.model and class Student with the following code:
Student.java
public class Student {

	private Long id;
	private String firstName;
	private String lastName;
	private String year;

	// Default no-argument Constructor required
	public Student() {}

	public Student(String firstName, String lastName, String year) {
		this.firstName = firstName;
		this.lastName = lastName;
		this.year = year;
	}

	public Long getId() {
		return id;
	}

	public void setId(Long id) {
		this.id = id;
	}

	public String getFirstName() {
		return firstName;
	}

	public void setFirstName(String firstName) {
		this.firstName = firstName;
	}

	public String getLastName() {
		return lastName;
	}

	public void setLastName(String lastName) {
		this.lastName = lastName;
	}

	public String getYear() {
		return year;
	}

	public void setYear(String year) {
		this.year = year;
	}
}
Note: You must have a default, no-argument constructor for the Student class or the server will throw an InvalidDefinitionException when attempting to add a student.
2.4 Create the Repository
A repository provides a layer of abstraction over data access. It exposes CRUD operations in the data layer.
In a real-world application, a repository interacts with a database using a datasource or entity manager. In our example, we will use a java.util.Map to store our data and access it directly in our repository.
Create a new package com.javacodegeeks.example.repository and class StudentRepository with the following code:
StudentRepository.java
import java.util.Collection;
import java.util.HashMap;
import java.util.Map;
import java.util.Optional;

import org.springframework.stereotype.Repository;

import com.javacodegeeks.example.model.Student;

@Repository
public class StudentRepository {

	Map students = new HashMap();
	long currentId = 100;

	// Return all students
	public Collection findAll(){
		return students.values();
	}

	// Find the student with this id
	public Optional findById(Long id) {
		Student student = null;

		if (students.containsKey(id)) student = students.get(id);
		return Optional.ofNullable(student);
	}

	// Save a new student
	public Student save(Student student) {
		student.setId(++currentId);
		students.put(student.getId(), student);
		return student;
	}

	// Update the student with this id
	public Optional update(Student student) {
		Student currentStudent = students.get(student.getId());

		if (currentStudent != null) {
			students.put(student.getId(), student);
			currentStudent = students.get(student.getId());
		}
		return Optional.ofNullable(currentStudent);
	}

	// Delete student with this id
	public Optional delete(Long id) {
		Student currentStudent = students.get(id);

		if (currentStudent != null) {
			students.remove(id);
		}
		return Optional.ofNullable(currentStudent);
	}
}
We annotate the class with @Repository to indicate it is a repository and to register it as a Spring Bean in the application context. This is important since we plan to autowire the repository in our controller.
The code in the StudentRepository class is straightforward. The Map stores a key (the student’s ID) and the student object itself. The variable currentId is used to assign ids to the students in add operations.
The methods in this class reflect the most commonly used in JPA (Java Persistence API) repositories.
| Method | Use |
| findAll | Returns a Collection of all the students in the Map |
| findById | Searches the Map for a student with the specified ID. If found, the student is returned. |
| save | Assigns the student an ID and saves the student in the Map. |
| update | Replaces the student in the Map if it exists. |
| delete | Deletes the student in the Map if it exists. |
There are a couple of things to note.
- Typically, the database will assign the unique id (or primary key) when adding an entity. Since we are using an in-memory Map, we must explicitly assign the student id in the repository class. Allowing the client to assign the unique id is not RESTful.
- We are using
java.util.Optionalas a container for our Student object as it will help us handle cases where Student is null. This is purely an implementation decision and has nothing to do with REST concepts or constraints.
2.5 Create the Controller
Create a new package com.javacodegeeks.example.controller and class SudentController and add the @RestController and @RequestMapping annotations.
SudentController.java
import org.springframework.web.bind.annotation.RequestMapping;
import org.springframework.web.bind.annotation.RestController;

@RestController
@RequestMapping("/students")
public class StudentController {

}
@RestController is a convenience annotation that adds @ResponseBody to all request mapping methods of a Controller class. With @RequestMapping(“/students”) we are specifying that all requests starting with the endpoint /students will be handled by this controller.
2.6 Inject the Repository in the Controller
We will use constructor-based injection to access the repository in our controller class. Add the following code to the StudentController class:
	private final StudentRepository repository;

	@Autowired
	public StudentController(StudentRepository repository) {
		this.repository = repository;
	}
We use the @Autowired annotation to inject our student repository.
2.7 Add a Custom Exception Class
We will create a custom exception class to handle cases where the student is not found.

	@ResponseStatus(HttpStatus.NOT_FOUND)
	class StudentNotFoundException extends RuntimeException {

		public StudentNotFoundException() {
			super("Student does not exist");
		}
	}
We add a @ResponseStatus(HttpStatus.NOT_FOUND) annotation to the class so that the exception will return a 404 Not Found status code in the response. We will add this class inside our controller class for conciseness.
Next, we will add CRUD operations to our controller.
2.8 Add the Read Operations
First, add the readStudents() method to the controller.
	@GetMapping
	Collection readStudents(){
		return this.repository.findAll();
	}
@GetMapping is a specialized RequestMapping. It specifies that HTTP GET requests to /students are mapped to the readStudents() method.
readStudents() calls the repository’s findAll() method and returns a Collection of all the students in the datastore.
Next add the readStudent() method.
	@GetMapping("/{id}")
	Student readStudent(@PathVariable Long id) {
		return this.repository.findById(id)
				.orElseThrow(StudentNotFoundException::new);
	}
@GetMapping("/{id}" specifies that HTTP GET requests to /students/"{/id}" are mapped to the readStudent() method.
The {/id} token in the path is a path variable. We use @PathVariable to bind the path variable “id” to the method parameter Long id.
The method calls the repository’s findById(Long id) method and returns the student specified by the id method parameter.
So, what is this orElseThrow method at the end of the findById call and what does it do? It is part of the java.util.Optional API. It returns the wrapped Student object if present, otherwise it throws the exception provided by the exception supplier. However, we can substitute the supplier with a method reference to our custom exception class’ constructor. When this exception is thrown, a “404 Not Found” status code is returned, as described above.
For more information on the Optional API, consult the Java documentation at https://docs.oracle.com/javase/8/docs/api/java/util/Optional.html#orElseThrow-java.util.function.Supplier-.
2.9 Add the Create Operation
If you refer to the table in the HTTP Methods section you will notice that you can return a URI for the newly added entity in the header of a POST response. We can implement this by returning a ResponseEntity object. ResponseEntity encapsulates an HTTP response and allows us to set the header, status code, and body.
Add the addStudent() method.
	@PostMapping
	ResponseEntity addStudent(@RequestBody Student student){
		Student result = this.repository.save(student);
		URI location = ServletUriComponentsBuilder
				.fromCurrentRequest()
				.path("/{id}")
				.buildAndExpand(result.getId())
				.toUri();

		return ResponseEntity.created(location).build();
	}
@PostMapping is a specialized RequestMapping. It specifies that HTTP POST requests to /students are to be mapped to the addStudent() method.
The Student student method parameter is marked with the @RequestBody annotation, meaning that the Student object will be retrieved from the body of the request.
Inside the method body, we build a java.net.URI object using ServletUriComponentsBuilder. It builds the object by capturing the URI of the current request and appending the placeholder /{id} to create a template. buildAndExpand(result.getId()) inserts the id of the newly created student into the template. The result is the URI of the new resource.
Finally, we use ResponseEntity static methods to set the status code to “201 Created” and add the URI location to the response header with ResponseEntity.created(location).build() and return the result.
2.10 Add the Update Operation
Add the updateStudent() method.
	@PutMapping
	Student updateStudent(@RequestBody Student student) {
		return this.repository.update(student)
				.orElseThrow(StudentNotFoundException::new);
	}
@PutMapping is a specialized RequestMapping. It specifies that HTTP PUT requests to /students are mapped to the updateStudent() method.
The Student student parameter for this method is also marked with the @RequestBody annotation.
Using the same mechanism used in addStudent, we call the repository’s update method and return a “404 Not Found” status code if the resource doesn’t exist.
2.11 Add the Delete Operation
Add the deleteStudent() method.
	@DeleteMapping("/{id}")
	void deleteStudent(@PathVariable Long id) {
		this.repository.delete(id)
			.orElseThrow(StudentNotFoundException::new);
	}
@DeleteMapping("/{id}" specifies that HTTP DELETE requests to /students/"{/id}" are mapped to the deleteStudent() method. This method also uses @PathVariable to bind the path variable “id” to the method parameter Long id. Using the same mechanism as before, we call the repository’s delete method and return a “404 Not Found” status code if the resource doesn’t exist.
2.12 Update the RestApiApplication Class
Let’s add some dummy data for our tests. Add the following code to the RestApiApplication class:
RestApiApplication.java
	@Bean
	CommandLineRunner init(StudentRepository repository) {
		return args -> {
			repository.save(new Student("Jane", "Doe", "Junior"));
			repository.save(new Student("Martin", "Fowler", "Senior"));
			repository.save(new Student("Roy", "Fielding", "Freshman"));
		};
	}
The CommanLineRunner interface is commonly used to run some task at the startup of a Spring Boot application.
CommanLineRunner is a functional interface that has one callback method, run(). We can take advantage of this and use a Lambda expression to add our data. Passing the StudentRepository as an argument allows us to call its add() method. The @Bean annotation registers CommanLineRunner in the application context. (We can configure beans in the RestApiApplication class since the @SpringBootApplication annotation makes this a configuration class also.)
2.13 Start the Spring Boot REST API Application
Right-click your project in Project Explorer and select Run As > Spring Boot App.
2.14 Test the REST API
There are many tools available for testing REST API endpoints. You can even use cURL. We will use Postman in this example as it will make it easier to POST and PUT data. Also, Postman is a good tool to have in your arsenal if you plan to develop REST APIs.
Start Postman and close the “Create New” dialog box. The top portion of the window is where you select the HTTP method and enter the request URL. The bottom portion of the window is where the response will be displayed.
2.14.1 Retrieve All Students
Enter the request URL http://localhost:8080/students and click Send.
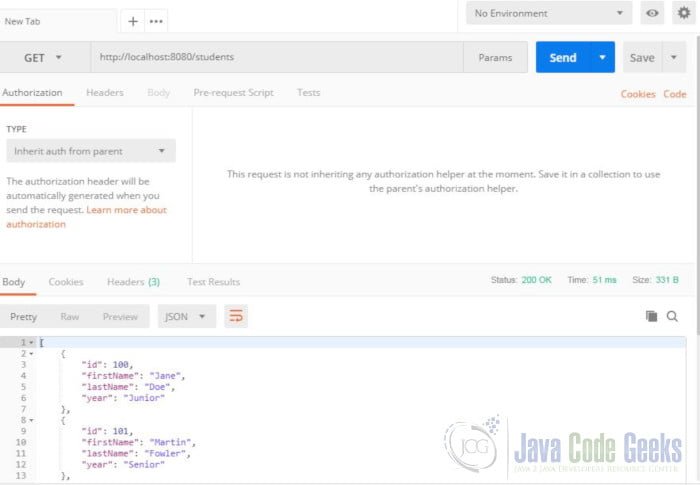
In the Response portion of the window, you will see the list of students in JSON format. (Notice that we did not have to specify the JSON media type in the request. Spring Boot automatically configures JSON message converters by default.) You will also see the status of 200 OK.
2.14.2 Retrieve Single Student
Open a New Tab. Enter the request URL http://localhost:8080/students/101 and click Send.
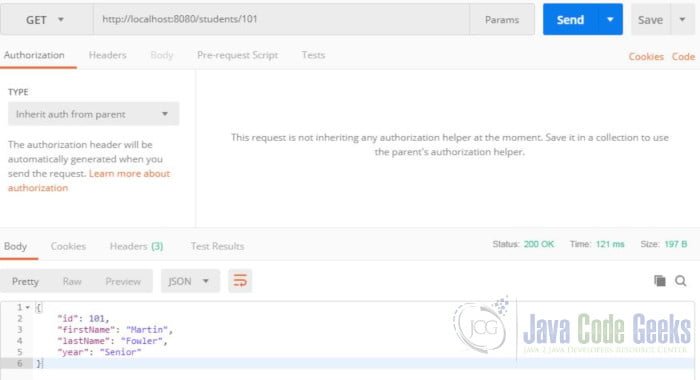
In the Response portion of the window, you will see the details for student 101. You will also see the status of 200 OK.
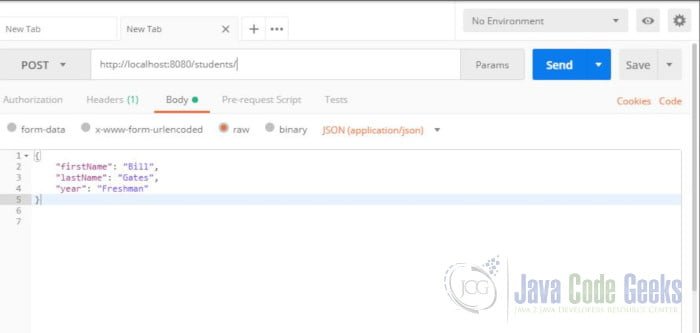
2.14.3 Add a Student
Open a New Tab. Select POST from the drop-down menu to the left of the request URL bar. Select Body and “raw” located underneath the request URL bar. Change “Text” to ‘JSON application/json” from the drop-down menu. Paste the following JSON data structure in the Body area.
{
    "firstName": "Bill",
    "lastName": "Gates",
    "year": "Freshman"
}
Note: The JSON files can be located in the src/main/resources folder of the downloadable project.
Enter the request URL http://localhost:8080/students and click Send.
In the response section, you will see a status code of 201 Created. Click on Headers. You will see a location header whose value is the URI of the newly created student.

Copy the URL and use it to send a GET request. You will see the details of the new student in the response section.
2.14.4 Update a Student
Open a New Tab. Select PUT from the drop-down menu to the left of the request URL bar. Select Body and “raw” located underneath the request URL bar. Change “Text” to ‘JSON application/json” from the drop-down menu. Paste the following JSON data structure in the Body area.
{
    "id": 101,
    "firstName": "Jane",
    "lastName": "Eyre",
    "year": "Junior"
}
Enter the request URL http://localhost:8080/students and click Send.
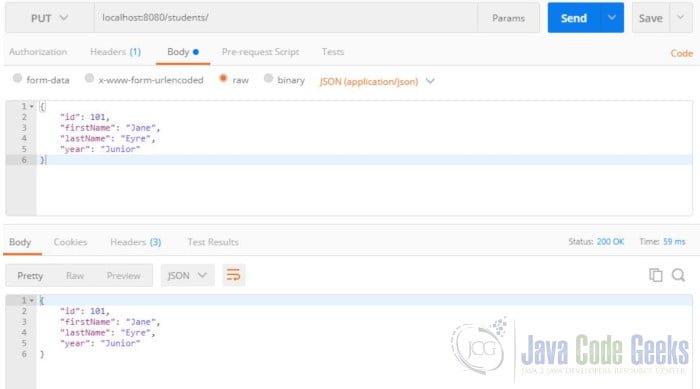
In the response section, you will see a status code of 200 OK. You will also see the details of the updated student.
2.14.5 Delete a Student
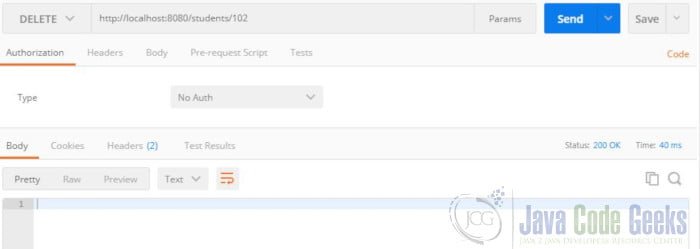
Open a New Tab. Select DELETE from the drop-down menu. Enter the request URL http://localhost:8080/students/102 and click Send. In the response section, you will see a status code of 200 OK.
Go back to the first tab, enter the request URL http://localhost:8080/students and click Send.
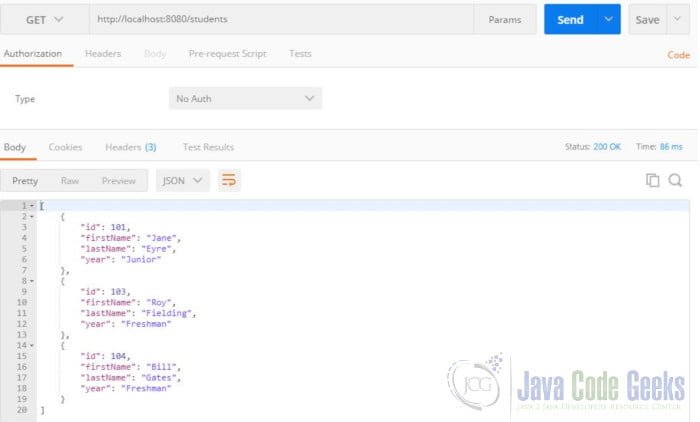
Notice that student 102 has been deleted from the list.
2.14.6 Student Does Not Exist
Open a New Tab. Enter the request URL http://localhost:8080/students/106 and click Send.
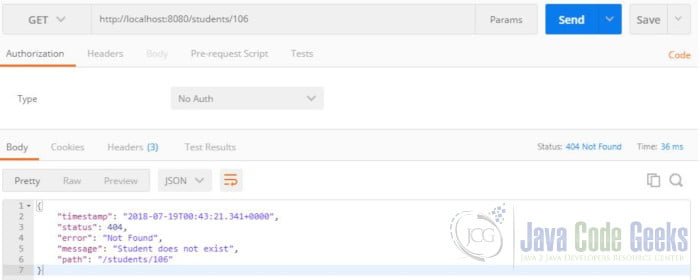
In the Response portion of the window, you will see the details for the “404 Not Found” error and our custom exception message.
3. Summary
In this tutorial, we discussed how REST leverages basic HTTP constructs and explained these concepts in some detail. We also provided an example of REST API development using Spring Boot.
4. Download the Source Code
This was a Spring Boot REST API Example.
You can download the full source code of this example here: Spring Boot REST API Example
