Spring Boot HATEOAS in REST API Example
Welcome readers, in this tutorial, we will implement the HATEOAS principle to REST resources in a spring boot application.
1. Introduction
- Spring Boot is a module that provides rapid application development feature to the spring framework including auto-configuration, standalone-code, and production-ready code
- It creates applications that are packaged as jar and are directly started using embedded servlet container (such as Tomcat, Jetty or Undertow). Thus, no need to deploy the war files
- It simplifies the maven configuration by providing the starter template and helps to resolve the dependency conflicts. It automatically identifies the required dependencies and imports them in the application
- It helps in removing the boilerplate code, extra annotations, and xml configurations
- It provides a powerful batch processing and manages the rest endpoints
- It provides an efficient jpa-starter library to effectively connect the application with the relational databases
- It offers a Microservice architecture and cloud configuration that manages all the application related configuration properties in a centralized manner.
1.1 What is HATEOAS?
HATEOAS is known as Hypermedia As The Engine Of Application State. It is used to present the REST API information to the client allowing better API understanding and documentation. With each request returned from the server it tells the user what interactions he/she can do next as well as where he/she can navigate to. It is the final level of REST API and implements the standard verbs of POST, GET, PUT, PATCH, and DELETE.
Now, open the eclipse ide and let’s see how to implement this tutorial in spring boot.
2. Spring Boot HATEOAS in REST API Example
Here is a systematic guide for implementing this tutorial.
2.1 Tools Used
We are using Eclipse Kepler SR2, JDK 8 and Maven.
2.2 Project Structure
In case you are confused about where you should create the corresponding files or folder, let us review the project structure of the spring boot application.
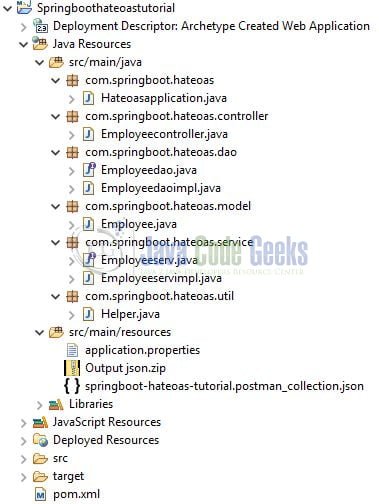
2.3 Project Creation
This section will demonstrate how to create a Java-based Maven project with Eclipse. In Eclipse IDE, go to File -> New -> Maven Project.
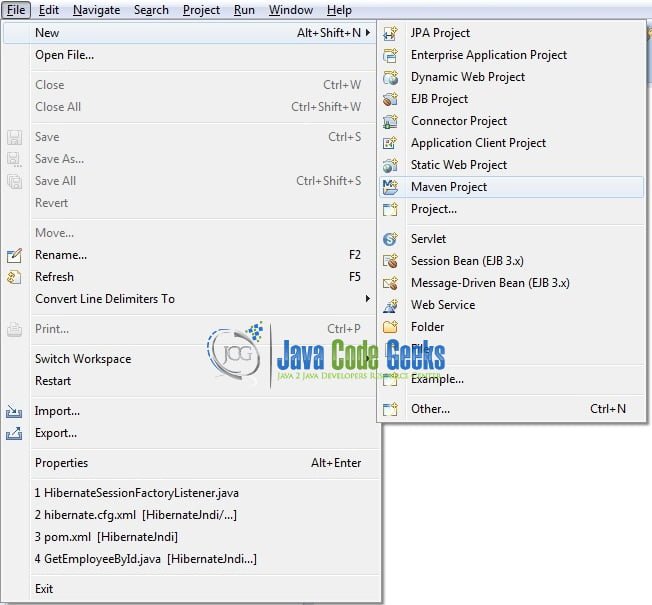
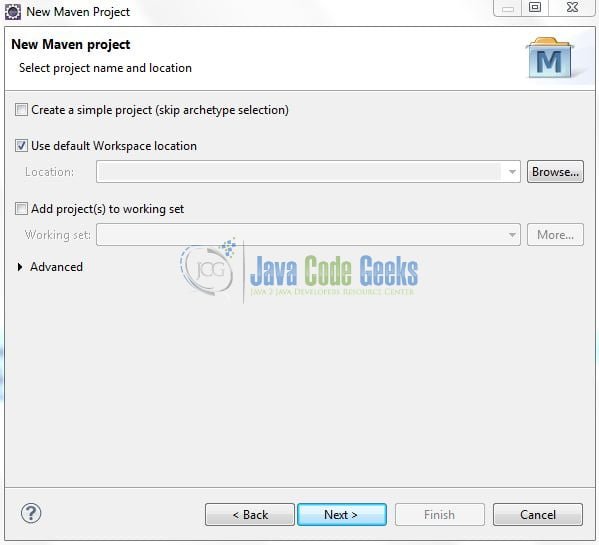
In the New Maven Project window, it will ask you to select a project location. By default, ‘Use default workspace location’ will be selected. Just click on the next button to proceed.
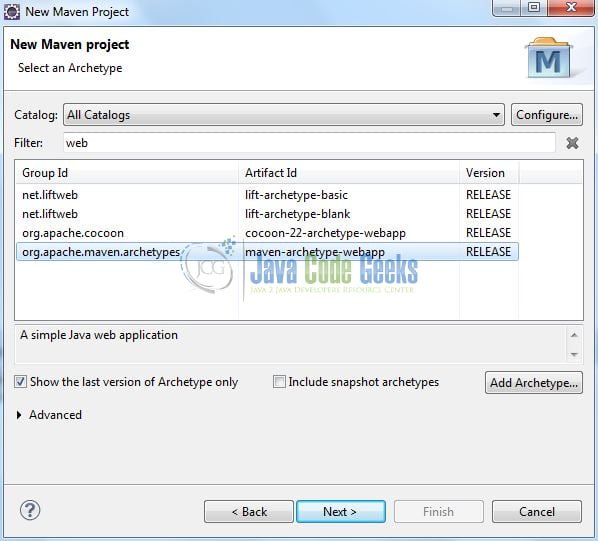
Select the Maven Web App archetype from the list of options and click next.
It will ask you to ‘Enter the group and the artifact id for the project’. We will input the details as shown in Fig. 5. The version number will be by default: 0.0.1-SNAPSHOT.
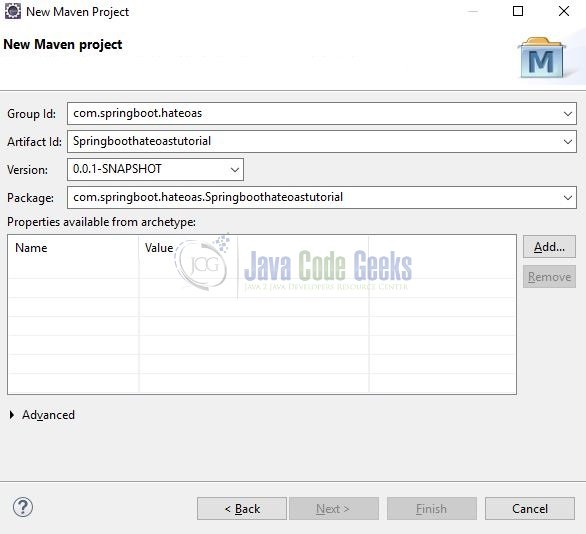
Click on Finish and the creation of the maven project will be completed. If you observe, it has downloaded the maven dependencies and a pom.xml file will be created for the project. Let’s start building the application!
3. Application Creation
Below are the steps involved in developing the application.
3.1 Maven Dependencies
Here, we specify the dependencies for Spring Hateoas and Faker. Maven will automatically resolve the other dependencies. The updated file will have the following code.
pom.xml
01 02 03 04 05 06 07 08 09 10 11 12 13 14 15 16 17 18 19 20 21 22 23 24 25 26 27 28 29 30 31 32 33 34 35 36 37 38 39 40 41 42 43 44 | <modelVersion>4.0.0</modelVersion> <groupId>jcg.tutorial</groupId> <artifactId>Springboothateoastutorial</artifactId> <packaging>war</packaging> <version>0.0.1-SNAPSHOT</version> <name>Springboot Hateoas Tutorial</name> <!-- Spring boot parent dependency jar --> <parent> <groupId>org.springframework.boot</groupId> <artifactId>spring-boot-starter-parent</artifactId> <version>2.1.6.RELEASE</version> </parent> <dependencies> <!-- Spring boot web mvc jar. Automatically adds tomcat and jackson-databind jars. --> <dependency> <groupId>org.springframework.boot</groupId> <artifactId>spring-boot-starter-web</artifactId> </dependency> <!-- Spring boot library to support hateoas principle in rest api resources. --> <dependency> <groupId>org.springframework.boot</groupId> <artifactId>spring-boot-starter-hateoas</artifactId> </dependency> <!-- Library that generates the dummy data for a new project. --> <dependency> <groupId>com.github.javafaker</groupId> <artifactId>javafaker</artifactId> <version>0.18</version> </dependency> </dependencies> <build> <finalName>Springboothateoastutorial</finalName> </build></project> |
3.2 Configuration File
Create a new properties file at the Springboothateoastutorial/src/main/resources/ location and add the following code to it.
application.properties
1 2 3 4 5 | #Application startup port.server.port: 9090#To remove the null fields from the link attribute in the rest api response.spring.jackson.default-property-inclusion=NON_NULL |
3.3 Implementation Class
Add the following code the main class to bootstrap the application from the main method. Always remember, the entry point of the spring boot application is the class containing @SpringBootApplication annotation and the static main method.
Hateoasapplication.java
01 02 03 04 05 06 07 08 09 10 11 12 13 14 15 16 | package com.springboot.hateoas;import org.springframework.boot.SpringApplication;import org.springframework.boot.autoconfigure.SpringBootApplication;/** * @author yatinbatra * */@SpringBootApplication // This annotation boostraps and auto-configure the application.public class Hateoasapplication { public static void main(String[] args) { SpringApplication.run(Hateoasapplication.class, args); }} |
3.4 Model Class
This POJO class defines the employee schema which we’ll use to implement this tutorial. Add the following code the model class.
Employee.java
01 02 03 04 05 06 07 08 09 10 11 12 13 14 15 16 17 18 19 20 21 22 23 24 25 26 27 28 29 30 31 32 33 34 35 36 37 38 39 40 41 42 43 | package com.springboot.hateoas.model;import org.springframework.stereotype.Component;// Model class.@Componentpublic class Employee { private int id; private String name; private String mobile; private String address; public int getId() { return id; } public void setId(int id) { this.id = id; } public String getName() { return name; } public void setName(String name) { this.name = name; } public String getMobile() { return mobile; } public void setMobile(String mobile) { this.mobile = mobile; } public String getAddress() { return address; } public void setAddress(String address) { this.address = address; } @Override public String toString() { return "Employee [id=" + id + ", name=" + name + ", mobile=" + mobile + ", address=" + address + "]"; }} |
3.5 Dao Class
The data-access-object class will prepare the mock data for the employee object. Add the following code to the Dao class.
Employeedaoimpl.java
01 02 03 04 05 06 07 08 09 10 11 12 13 14 15 16 17 18 19 20 21 22 23 24 25 26 27 28 29 30 31 32 33 34 35 36 37 38 39 40 41 42 43 44 45 | package com.springboot.hateoas.dao;import java.util.ArrayList;import java.util.List;import java.util.Optional;import org.springframework.stereotype.Repository;import com.github.javafaker.Faker;import com.springboot.hateoas.model.Employee;@Repositorypublic class Employeedaoimpl implements Employeedao { // Employee list. static List<Employee> employees; static { employees = new ArrayList<Employee>(); // To generate the dummy identity for the employees. Faker faker = new Faker(); // Creating dummy employees. for(int i=1; i<=10; i++) { Employee emp = new Employee(); emp.setId(i); emp.setName(faker.name().fullName()); emp.setMobile(faker.phoneNumber().cellPhone()); emp.setAddress(faker.address().fullAddress()); // Adding the employee records to the list. employees.add(emp); } } // Returning mocked employee details on the basis of employee id. @Override public Optional<Employee> getEmployeeByIdFromDb(int eid) { return employees.stream().filter((employee) -> employee.getId() == eid).findFirst(); } // Returning mocked employee list. @Override public List<Employee> getAllEmployeesFromDb() { return employees; }} |
3.6 Service Class
The Service class calls the implementation methods of the DAO layer class. Add the following code to the service class.
Employeeservimpl.java
01 02 03 04 05 06 07 08 09 10 11 12 13 14 15 16 17 18 19 20 21 22 23 24 25 26 27 28 29 | package com.springboot.hateoas.service;import java.util.List;import java.util.Optional;import org.springframework.beans.factory.annotation.Autowired;import org.springframework.stereotype.Service;import com.springboot.hateoas.dao.Employeedao;import com.springboot.hateoas.model.Employee;@Servicepublic class Employeeservimpl implements Employeeserv { @Autowired Employeedao edao; // Service method to fetch employee details from the repository. @Override public Optional<Employee> getEmployeeByIdFromService(int eid) { return edao.getEmployeeByIdFromDb(eid); } // Service method to fetch the employee list. @Override public List<Employee> getAllEmployeesFromService() { return edao.getAllEmployeesFromDb(); }} |
3.7 Controller Class
This Controller class consists of the request mapping methods that interacts with the Service and Dao layer to fetch the employee data. Add the following code to the controller class.
Employeecontroller.java
01 02 03 04 05 06 07 08 09 10 11 12 13 14 15 16 17 18 19 20 21 22 23 24 25 26 27 28 29 30 31 32 33 34 35 36 37 38 39 40 41 42 43 44 45 46 47 48 49 50 51 52 53 54 55 56 57 58 59 60 61 62 63 | package com.springboot.hateoas.controller;import static org.springframework.hateoas.mvc.ControllerLinkBuilder.linkTo;import static org.springframework.hateoas.mvc.ControllerLinkBuilder.methodOn;import java.util.ArrayList;import java.util.List;import org.slf4j.Logger;import org.slf4j.LoggerFactory;import org.springframework.beans.factory.annotation.Autowired;import org.springframework.hateoas.Resource;import org.springframework.web.bind.annotation.GetMapping;import org.springframework.web.bind.annotation.PathVariable;import org.springframework.web.bind.annotation.RequestMapping;import org.springframework.web.bind.annotation.RestController;import com.springboot.hateoas.model.Employee;import com.springboot.hateoas.service.Employeeserv;import com.springboot.hateoas.util.Helper;@RestController@RequestMapping(value= "/employee")public class Employeecontroller { @Autowired Employeeserv eserv; private final Logger logger = LoggerFactory.getLogger(this.getClass()); // Fetch employee details on the basis of employee id. @GetMapping(value= "/get/{id}") public Resource<Employee> getEmployeeById(@PathVariable(name= "id") int eid) { logger.info("employee byId() invoked= " + eid); // Fetching employee details from the mocked service. Employee emp= eserv.getEmployeeByIdFromService(eid).get(); logger.info("employee byId() found= " + emp.toString()); // Creating links as per the hateoas principle. Resource<Employee> empres= new Resource<Employee>(emp); empres.add(linkTo(methodOn(Employeecontroller.class).getEmployeeById(eid)).withRel("_self")); return empres; } // Fetch all employees. @GetMapping(value= "/getall") public List<Resource<Employee>> getAllEmployees() { logger.info("employees all() invoked"); // Fetching employees from the mocked service. List<Employee> employees = eserv.getAllEmployeesFromService(); List<Resource<Employee>> empreslist= new ArrayList<Resource<Employee>>(); // Creating links as per the hateoas principle. for (Employee employee : employees) { empreslist.add(Helper.getEmployeeResource(employee)); } logger.info("employees all() found: " + empreslist.size()); return empreslist; }} |
3.8 Helper Class
Add the following code the helper class for creating the HATEOAS link for the controller method.
Helper.java
package com.springboot.hateoas.util;

import static org.springframework.hateoas.mvc.ControllerLinkBuilder.linkTo;
import static org.springframework.hateoas.mvc.ControllerLinkBuilder.methodOn;

import org.springframework.hateoas.Resource;

import com.springboot.hateoas.controller.Employeecontroller;
import com.springboot.hateoas.model.Employee;

public class Helper {

	// Utility method to prepare the self link.
	public static Resource<Employee> getEmployeeResource(Employee employee) {
		Resource<Employee> resource = new Resource<Employee>(employee);
		resource.add(linkTo(methodOn(Employeecontroller.class).getEmployeeById(employee.getId())).withRel("_self"));
		return resource;
	}
}
4. Run the Applications
As we are ready with all the changes, let us compile the project and run the application as a java project.
- Right click on the
Hateoasapplication.javaclass,Run As -> Java Application. The application will be started on the9090port
Developers can debug the example and see what happens after every step. Enjoy!
5. Project Demo
We will test this sample application using a GUI based client. Launch the Postman tool and hit the different URL’s to fetch the data from the database and display the results in the JSON format.
5.1 Get all Employees
The HTTP Get method fetches the resources. Hit the following URL in the Postman tool to display the list of employees and the links in the JSON format.
1 | localhost:9090/employee/getall |
Output
001 002 003 004 005 006 007 008 009 010 011 012 013 014 015 016 017 018 019 020 021 022 023 024 025 026 027 028 029 030 031 032 033 034 035 036 037 038 039 040 041 042 043 044 045 046 047 048 049 050 051 052 053 054 055 056 057 058 059 060 061 062 063 064 065 066 067 068 069 070 071 072 073 074 075 076 077 078 079 080 081 082 083 084 085 086 087 088 089 090 091 092 093 094 095 096 097 098 099 100 101 102 103 104 105 106 107 108 109 110 111 112 113 114 115 116 117 118 119 120 121 122 | [ { "id": 1, "name": "Anjelica Hudson", "mobile": "864-889-3507", "address": "Apt. 318 035 Brown Mall, Lake Amaltown, KY 96909", "links": [ { "rel": "_self", "href": "http://localhost:9090/employee/get/1" } ] }, { "id": 2, "name": "Criselda Towne", "mobile": "(303) 343-0486", "address": "00621 Hintz Freeway, West Nida, AK 42886-0284", "links": [ { "rel": "_self", "href": "http://localhost:9090/employee/get/2" } ] }, { "id": 3, "name": "Chung Johns", "mobile": "209.424.0014", "address": "65888 Mia Grove, Lake Demetrius, NH 39781-6111", "links": [ { "rel": "_self", "href": "http://localhost:9090/employee/get/3" } ] }, { "id": 4, "name": "Lupe Bartell", "mobile": "788-049-6951", "address": "1950 Runolfsson Street, South Isaborough, MD 01756-5925", "links": [ { "rel": "_self", "href": "http://localhost:9090/employee/get/4" } ] }, { "id": 5, "name": "Randal Hirthe II", "mobile": "1-384-142-3230", "address": "6676 Manual Curve, Myongburgh, GA 54069", "links": [ { "rel": "_self", "href": "http://localhost:9090/employee/get/5" } ] }, { "id": 6, "name": "Daryl D'Amore", "mobile": "825.047.4049", "address": "2031 Patricia Views, South Erasmomouth, AZ 06034-3243", "links": [ { "rel": "_self", "href": "http://localhost:9090/employee/get/6" } ] }, { "id": 7, "name": "Joelle Kerluke", "mobile": "834.393.3339", "address": "22436 Vikki Green, Lake Marilee, TX 30069", "links": [ { "rel": "_self", "href": "http://localhost:9090/employee/get/7" } ] }, { "id": 8, "name": "Terese Hahn", "mobile": "1-846-627-3143", "address": "Apt. 993 73270 Marlin Coves, Wehnerberg, KS 00485-8780", "links": [ { "rel": "_self", "href": "http://localhost:9090/employee/get/8" } ] }, { "id": 9, "name": "Bryce Ebert DVM", "mobile": "(894) 479-0826", "address": "Apt. 798 3224 Bianca Cliffs, New Shalanda, SD 70088", "links": [ { "rel": "_self", "href": "http://localhost:9090/employee/get/9" } ] }, { "id": 10, "name": "Cherryl Heidenreich MD", "mobile": "652-528-5738", "address": "98135 Zulauf Land, East Charismouth, AK 24104-1016", "links": [ { "rel": "_self", "href": "http://localhost:9090/employee/get/10" } ] }] |
5.2 Get Employee by Id
The HTTP Get method fetches the resources. Hit the following URL in the Postman tool to display the details of an employee and the link in the JSON format.
1 | localhost:9090/employee/get/1 |
Output
01 02 03 04 05 06 07 08 09 10 11 | { "id": 1, "name": "Anjelica Hudson", "mobile": "864-889-3507", "address": "Apt. 318 035 Brown Mall, Lake Amaltown, KY 96909", "_links": { "_self": { "href": "http://localhost:9090/employee/get/1" } }} |
That is all for this tutorial and I hope the article served you whatever you were looking for. Happy Learning and do not forget to share!
6. Conclusion
In this section, developers learned how to implement HATEOAS to the REST API in a spring boot application. Developers can download the sample application as an Eclipse project in the Downloads section.
7. Download the Eclipse Project
This was an example of implementing HATEOAS in the REST API.
You can download the full source code of this example here: Spring Boot HATEOAS in REST API Example


what is the difference between hateoas and swagger
Swagger: Swagger aides in development across the entire API lifecycle, from design and documentation, to test and deployment. [Refer to swagger.io]
HATEOAS: Hypermedia as the Engine of Application State