This tutorial helps you to build a simple spring boot application. Also, you might like to implement a simple UI such as an administrator tool or control panel to work with the backend. This is when I start learning about Angularjs to develop a simple UI for a monitoring project at work. I’ve found Spring boot and Angularjs very easy to work with, especially when there is a tight deadline for the project. Let’s see what are these frameworks and how we can integrate them.
1. Why Spring Boot?
Spring Boot makes it easy to create stand-alone, production-grade Spring based Applications. Most Spring Boot applications need very little Spring configuration. Spring Boot provides an easy way to quickly and simply run a java application, through an embedded server – by default it uses an embedded version of tomcat – thus eliminating the need of any Java EE containers. With Spring Boot, we can expose components such as REST services independently, exactly as proposed in microservices architecture, so that in any maintenance of the components, we no longer make the redeploy of all the system.
AngularJS Programming Cookbook
In this ebook, we provide a compilation of AngularJS based examples that will help you kick-start your own web projects. We cover a wide range of topics, from Single Page Apps and Routing, to Data Binding and JSON Fetching. With our straightforward tutorials, you will be able to get your own projects up and running in minimum time. Download the cookbook by joining the Web Code Geeks Newsletter.
2. Why Angularjs?
AngularJS is a JavaScript framework. It is a library written in JavaScript. It lets you use HTML as your template language and lets you extend HTML’s syntax to express your application’s components clearly and succinctly. Angular’s data binding and dependency injection eliminate much of the code you would otherwise have to write. And it all happens within the browser, making it an ideal partner with any server technology.
3. Create a Spring Boot Application
Now, let’s create a spring boot application and go through more details. The following application is created in IntellijIDEA 15 CE. The project is developed based on JDK 1.8 and uses maven 4.
First of all, create a Maven project in your IDEA and configure the pom.xml file to include all required dependencies in the project. In this tutorial, we use spring-boot-1.3.3-RELEASE to configure the spring boot application. Also, we use webjars libraries to include all necessary js files for Angularjs.
pom.xml
<?xml version="1.0" encoding="UTF-8"?>
<project xmlns="http://maven.apache.org/POM/4.0.0"
         xmlns:xsi="http://www.w3.org/2001/XMLSchema-instance"
         xsi:schemaLocation="http://maven.apache.org/POM/4.0.0 http://maven.apache.org/xsd/maven-4.0.0.xsd">
    <modelVersion>4.0.0</modelVersion>

    <groupId>springboot-angularjs</groupId>
    <artifactId>springboot-angularjs</artifactId>
    <version>1.0-SNAPSHOT</version>

    <parent>
        <groupId>org.springframework.boot</groupId>
        <artifactId>spring-boot-starter-parent</artifactId>
        <version>1.3.3.RELEASE</version>
    </parent>
    <dependencies>
        <dependency>
            <groupId>org.springframework.boot</groupId>
            <artifactId>spring-boot-starter-web</artifactId>
        </dependency>
        <dependency>
            <groupId>org.webjars</groupId>
            <artifactId>angularjs</artifactId>
            <version>1.4.9</version>
            <scope>runtime</scope>
        </dependency>
        <dependency>
            <groupId>org.webjars</groupId>
            <artifactId>bootstrap</artifactId>
            <version>3.3.6</version>
            <scope>runtime</scope>
        </dependency>
    </dependencies>
</project>
WebJars is simply taking the concept of a JAR and applying it to client-side libraries or resources. For example, the Angularjs library may be packaged as a JAR and made available to your Spring Boot application. Many WebJars are available through Maven Central with a GroupID for org.webjars. A complete list is available at webjars.org.
JavaScript package management is not a new concept. In fact, npm and bower are two of the more popular tools, and currently offer solutions to managing JavaScript dependencies. Spring’s Understanding JavaScript Package Managers guide has more information on these. Most JavaScript developers are likely familiar with npm and bower and make use of those in their projects. However, WebJars utilizes Maven’s dependency management model to include JavaScript libraries in a project, making it more accessible to Java developers.
4. Spring boot application configuration
The SpringApplication class provides a convenient way to bootstrap a Spring boot application that will be started from a main() method. In many situations you can just delegate to the static SpringApplication.run method similar to the following class:
WebAppInitializer.java
package com.javacodegeeks.examples;

import org.springframework.boot.SpringApplication;
import org.springframework.boot.autoconfigure.EnableAutoConfiguration;
import org.springframework.context.annotation.ComponentScan;
import org.springframework.context.annotation.Configuration;

@Configuration
@EnableAutoConfiguration
@ComponentScan("com.javacodegeeks.examples")
public class WebAppInitializer{

    public static void main(String[] args) throws Exception{
        SpringApplication.run(WebAppInitializer.class, args);
    }
}
@Configuration tags the class as a source of bean definitions for the application context.
@EnableAutoConfiguration tells Spring Boot to start adding beans based on classpath settings, other beans and various property settings.
@ComponentScan tells Spring to look for other components, configurations and services in the specified package which allows the application to find the MainController.
By default Spring Boot will serve static content from a directory called /static (or /public or /resources or /META-INF/resources) in the classpath or from the root of the ServletContext. Here, the static content is under the /resources directory.
5. A simple Controller
The following class is only a simple controller which is implemented to handle the request to '/' and render the request to index.html.
MainController.java
package com.javacodegeeks.examples.controller;

import org.springframework.stereotype.Controller;
import org.springframework.web.bind.annotation.RequestMapping;
import org.springframework.web.bind.annotation.RequestMethod;

@Controller
public class MainController {

    @RequestMapping(value="/",method = RequestMethod.GET)
    public String homepage(){
        return "index";
    }
}
6. Angularjs controllers and js, html files
In the index.html, there is some front-end code to display links in the page which are handled by Angularjs. Also, there are some script tags that included all necessary Angularjs js files.
index.html
<!DOCTYPE html>
<!--[if lt IE 7]>      <html lang="en" ng-app="app" class="no-js lt-ie9 lt-ie8 lt-ie7"> <![endif]-->
<!--[if IE 7]>         <html lang="en" ng-app="app" class="no-js lt-ie9 lt-ie8"> <![endif]-->
<!--[if IE 8]>         <html lang="en" ng-app="app" class="no-js lt-ie9"> <![endif]-->
<!--[if gt IE 8]><!--> <html lang="en" ng-app="app" class="no-js"> <!--<![endif]-->
<head>
    <meta charset="utf-8">
    <meta http-equiv="X-UA-Compatible" content="IE=edge">
    <title>Spring boot and Angularjs Tutorial</title>
    <meta name="description" content="">
    <meta name="viewport" content="width=device-width, initial-scale=1">
    <link rel="stylesheet" href="/css/app.css">
</head>
<body>
<h2>Administrator Panel</h2>
<div class="home-section">
    <ul class="menu-list">
        <li><a href="#/users">Users</a></li>
        <li><a href="#/roles">Roles</a></li>
    </ul>
</div>
<div ng-view></div>
<script src="/webjars/angularjs/1.4.9/angular.js"></script>
<script src="/webjars/angularjs/1.4.9/angular-resource.js"></script>
<script src="/webjars/angularjs/1.4.9/angular-route.js"></script>
<script src="/js/app.js"></script>
<script src="/js/controller.js"></script>
<link rel="stylesheet" href="/webjars/bootstrap/3.3.6/css/bootstrap.css">
</body>
</html>
ng-view is a directive that complements the $route service by including the rendered template of the current route into the main layout. Every time the current route changes, the included view changes with it according to the configuration of the $routeProvider.
app.js file defines the application module configuration and routes. To handle a request to e.g. '/', it needs an Angularjs module, called ngRoute. To use ngRoute and inject it into our application. We use angular.module to add the ngRoute module to our app as shown below.
app.js
var app = angular.module('app', ['ngRoute','ngResource']);
app.config(function($routeProvider){
    $routeProvider
        .when('/users',{
            templateUrl: '/views/users.html',
            controller: 'usersController'
        })
        .when('/roles',{
            templateUrl: '/views/roles.html',
            controller: 'rolesController'
        })
        .otherwise(
            { redirectTo: '/'}
        );
});
Then, in the app.config, each route is mapped to a template and controller. Controller.js contains the implementation of controllers. The controller is simply a constructor function that takes a $scope parameter. You might notice that we are injecting the $scope service into our controller. Actually, AngularJS comes with a dependency injection container built into it.
Here, a headingtitle is set in scope to display in the view, either gallery or contactInfo.
controller.js
app.controller('usersController', function($scope) {
    $scope.headingTitle = "User List";
});

app.controller('rolesController', function($scope) {
    $scope.headingTitle = "Roles List";
});
The concept of a $scope in Angular is crucial. A $scope can be seen as the glue which allows the template, model and controller to work together. Angular uses scopes, along with the information contained in the template, data model, and controller, to keep models and views separate, but in sync. Any changes made to the model are reflected in the view; any changes that occur in the view are reflected in the model.
users.html
<div class="section">
    <h3>{{headingTitle}}</h3>
    <div>
        <ul type="square">
            <li>Luke</li>
            <li>Darth</li>
            <li>Anakin</li>
            <li>Leia</li>
        </ul>
    </div>
</div>
In this two html files, you can see the {{headingTitle}} which will be filled later by the value that is set in scope.
roles.html
<div class="section">
    <h3>{{headingTitle}}</h3>
    <div>
        <ul type="square">
            <li>Administrator</li>
            <li>Super Admin</li>
            <li>User</li>
            <li>View-Only</li>
        </ul>
    </div>
</div>
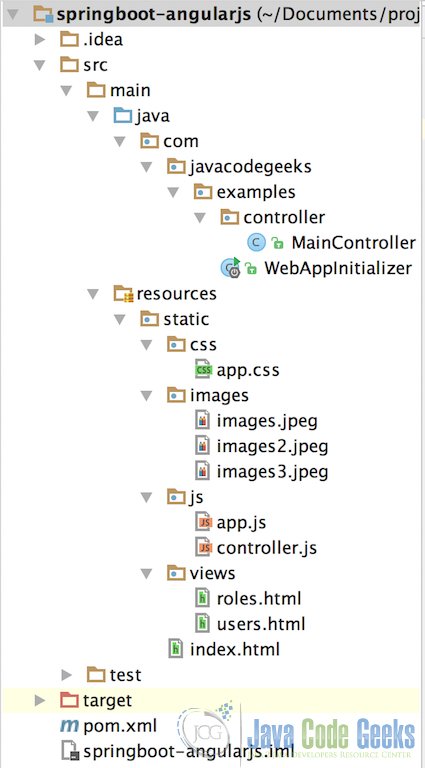
The source directory of the project is as below at the end.
7. Build and run the application
Now, it is time to deploy and run the project in action. To do so, go to the project directory and run:
mvn clean install
Then, run the application on tomcat.
mvn spring-boot:run
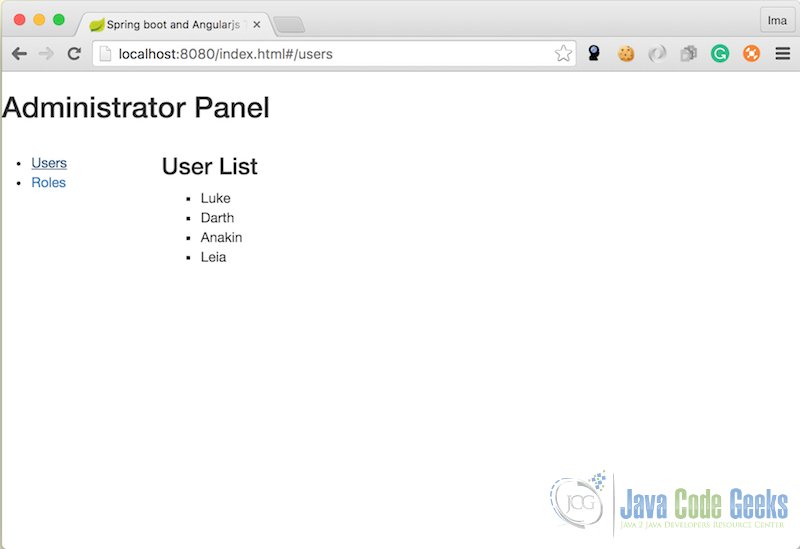
And you can now navigate the project as below.
8. Download the Source Code
You can download the full source code of this example here: Integration Spring Boot and AngularJS Tutorial.

Good one for first step in understanding Angular and SpringBoot.
Hi,
Is it possible with angular 4 ?
what is this? Even though i removed the main controller,its working properly….whats the purpose of “WebInitializer” class and “Main Controller” class
Thanks this was very helpful. Note if running your tutorial with angular 1.6.9 a quick hack is to and a bang to the urls in index.html. So #!/roles instead of #/roles.
What is the purpose of the images folder?
Can you please explain where is angular code which is used to integrate with spring Boot