1. Introduction
In this example, we will be going through the process of creating a basic user interface using the tab layout constructs available on the Android platform. In Android, the TabLayout is a construct for better organizing a user interface. It does so by making the user interface more organized and less cluttered.
This example will also explain the different aspect which makes an android application briefly. These aspects include the XML configuration of an android application, the basics of Android activities, the manifest file and some of Gradle basic usages and features in an Android context.
At the end of this article, we will have a working example build using Android Studio, Gradle, The Android SDK which in our case will come packaged with Android Studio.
2. Technologies used
- Android Studio 3
- Android 7.1.1 (Nougat): API 25
- Android Virtual Device: Nexus 5X.
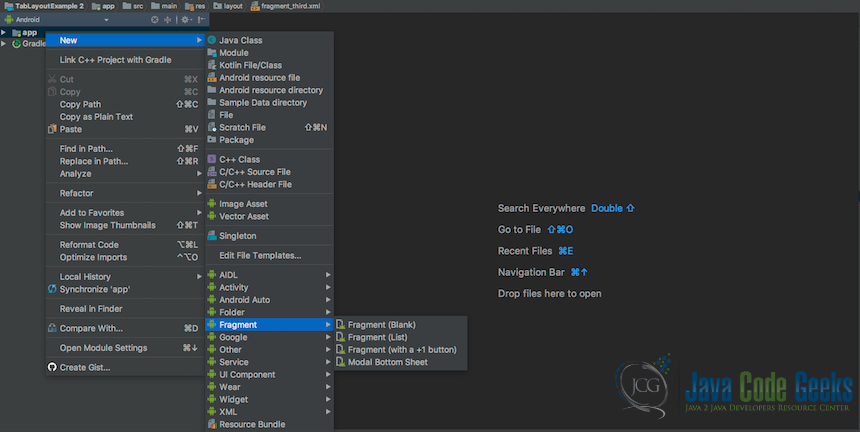
3. Create a Fragment
Below is the very first step when creating a fragment in Android Studio.
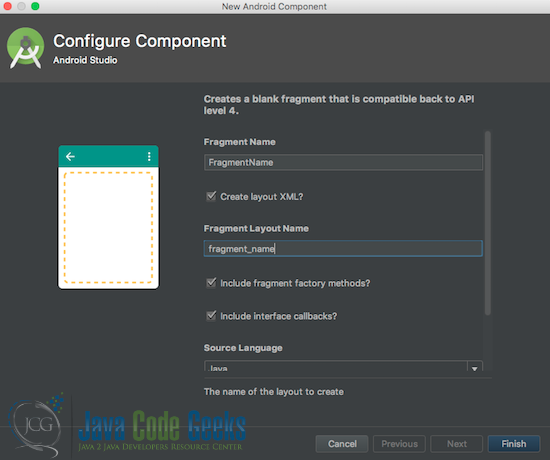
Below is the second step when creating a fragment in Android Studio.
4. Implement the First Fragment class
Below is a basic implementation of a fragment. In this Fragment all we are basically doing is setting the layout which must be rendered when this fragment loads. This concept applies to all the other fragments implementations in this articles namely SecondFragment and ThirdFragment
FirstFragment.java
package com.tablelayout.javacodegeeks.tablayoutexample;
import android.os.Bundle;
import android.support.v4.app.Fragment;
import android.view.LayoutInflater;
import android.view.View;
import android.view.ViewGroup;

public class FirstFragment extends Fragment {
    @Override
    public View onCreateView(LayoutInflater inflater, ViewGroup container,
                             Bundle savedInstanceState) {
        // Inflate the layout for this fragment
        return inflater.inflate(R.layout.fragment_first, container, false);
    }
}
- line 2 to 6: we import all the required dependencies for this class.
- line 8: we define the
FirstFragmentClass which extends theFragmentsupper class from the Android platform. - line 10: we override the
onCreateViewMethod from theFragmentsuperclass. This method is a lifecycle method that gets executed when the Fragment component is been loaded for the first time. - line 13: we use the
LayoutInflatercomponent to register our XML layout configuration with the rest of the application. This is accomplished by calling theinflatemethod of theinflaterobject and passing to thefragment_firstas its layout definition.
5. Implement the Second Fragment class
SecondFragment.java
package com.tablelayout.javacodegeeks.tablayoutexample;
import android.support.v4.app.Fragment;
import android.view.LayoutInflater;
import android.view.View;
import android.view.ViewGroup;

public class SecondFragment extends Fragment {
    @Override
    public View onCreateView(LayoutInflater inflater, ViewGroup container,
                             Bundle savedInstanceState) {
        // Inflate the layout for this fragment
        return inflater.inflate(R.layout.fragment_second, container, false);
    }
}
- line 2 to 6: we import all the required dependencies for this class.
- line 8: we define the
SecondFragmentClass which extends theFragmentsupper class from the Android platform. - line 10: we override the
onCreateViewMethod from theFragmentsuperclass. This method is a lifecycle method that gets executed when the Fragment component is been loaded for the first time. - line 13: we use the
LayoutInflatercomponent to register our XML layout configuration with the rest of the application. This is accomplished by calling theinflatemethod of theinflaterobject and passing to thefragment_secondas its layout definition.
6. Implement the Third Fragment class
ThirdFragment.java
package com.tablelayout.javacodegeeks.tablayoutexample;
import android.os.Bundle;
import android.support.v4.app.Fragment;
import android.view.LayoutInflater;
import android.view.View;
import android.view.ViewGroup;

public class ThirdFragment extends Fragment {
    @Override
    public View onCreateView(LayoutInflater inflater, ViewGroup container,
                             Bundle savedInstanceState) {
        // Inflate the layout for this fragment
        return inflater.inflate(R.layout.fragment_third, container, false);
    }
}
- line 2 to 6: we import all the required dependencies for this class.
- line 8: we define the
ThirdFragmentClass which extends theFragmentsupper class from the Android platform. - line 10: we override the
onCreateViewMethod from theFragmentsuperclass. This method is a lifecycle method that gets executed when the Fragment component is been loaded for the first time. - line 13: we use the
LayoutInflatercomponent to register our XML layout configuration with the rest of the application. This is accomplished by calling theinflatemethod of theinflaterobject and passing to thefragment_thirdas its layout definition.
7. Fragment Layouts
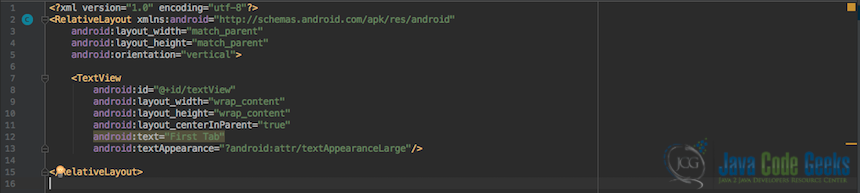
Below is the corresponding xml layout configuration for all 3 fragments respectively. All that’s happening in a nutshell is, we are defining a text that will get displayed whenever we are on the correct tab. For example when we are on the First Tab, the First Tab text will be displayed in its body. This is accomplished by using the TextView tag and its textproperty.
Below is the first fragment s layout file.
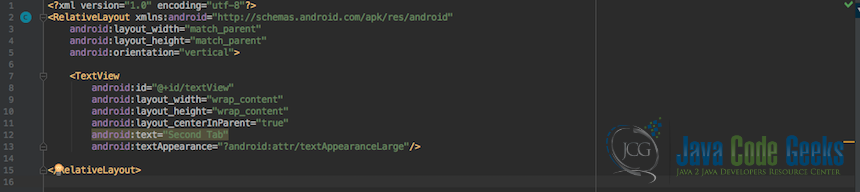
Below is the second fragment s layout file.
Below is the third fragment s layout file.

8. Implement the PagerAdapter class
In order for us to manage all our defined fragments as a single unit, we need to implement an adapter which will help us configure our Fragments from the client application.
Below is our implementation of a FragmentPagerAdapter
PagerAdapter.java
package com.tablelayout.javacodegeeks.tablayoutexample;
import android.support.v4.app.Fragment;
import android.support.v4.app.FragmentManager;
import android.support.v4.app.FragmentPagerAdapter;

public class PagerAdapter extends FragmentPagerAdapter {
    int numberOfTabs;
    public PagerAdapter(FragmentManager fm, int NumOfTabs) {
        super(fm);
        this.numberOfTabs = NumOfTabs;
    }

    @Override
    public Fragment getItem(int position) {
        switch (position) {
            case 0:
                FirstFragment tab1 = new FirstFragment();
                return tab1;
            case 1:
                SecondFragment tab2 = new SecondFragment();
                return tab2;
            case 2:
                ThirdFragment tab3 = new ThirdFragment();
                return tab3;
            default:
                return null;
        }
    }

    @Override
    public int getCount() {
        return numberOfTabs;
    }
}
- line 1 to 4: we import all the required dependencies for this class.
- line 6: we define the
PagerAdapterClass which extends theFragmentPagerAdaptersupper class from the Android platform. - line 7: we define the
numberOfTabsvariable to hold the tab number - line 8 to 10: we define the constructor which will help initialize the
FragmentManagerand thenumberOfTabs - line 14: we override the
getItemmethod of theFragmentPagerAdaptersuper class - line 15 to 26: we define the logic via a switch statement which will be responsible fo assigning the right Fragment to correct Tab.
- line 31: we override the
getCountmethod of theFragmentPagerAdapterclass, so that the client code could determine the number of tabs beforehand.
9. Implement the MainActivity class
Any Android or even Java application must always have an entry point. This is why we have to create the MainActivity class which will be in our example, the entry point to the application.

MainActivity.java
package com.tablelayout.javacodegeeks.tablayoutexample;
import android.support.v4.view.ViewPager;
import android.support.v7.app.AppCompatActivity;
import android.os.Bundle;
import android.support.design.widget.TabLayout;

public class MainActivity extends AppCompatActivity {
    @Override
    protected void onCreate(Bundle savedInstanceState) {
        super.onCreate(savedInstanceState);
        setContentView(R.layout.activity_main);

        TabLayout tabLayout = (TabLayout) findViewById(R.id.tab_layout);
        tabLayout.addTab(tabLayout.newTab().setText("First Tab"));
        tabLayout.addTab(tabLayout.newTab().setText("Second Tab"));
        tabLayout.addTab(tabLayout.newTab().setText("Third Tab"));
        tabLayout.setTabGravity(TabLayout.GRAVITY_FILL);

        final ViewPager viewPager = (ViewPager) findViewById(R.id.pager);
        final PagerAdapter adapter = new PagerAdapter
                (getSupportFragmentManager(), tabLayout.getTabCount());
        viewPager.setAdapter(adapter);
        viewPager.addOnPageChangeListener(new TabLayout.TabLayoutOnPageChangeListener(tabLayout));
        tabLayout.addOnTabSelectedListener(new TabLayout.OnTabSelectedListener() {
            @Override
            public void onTabSelected(TabLayout.Tab tab) {
                viewPager.setCurrentItem(tab.getPosition());
            }

            @Override
            public void onTabUnselected(TabLayout.Tab tab) {
            }

            @Override
            public void onTabReselected(TabLayout.Tab tab) {
            }
        });
    }
}- line 2 to 5: we import all the required dependencies for this class.
- line 7: we define the
MainActivityclass which will be the entry point to our application. This class extends theAppCompatActivityclass from the android platform. - line 9: we override the
onCreatemethod of theAppCompatActivityclass. This method is a lifecycle method and it gets excecuted only once and that is when the application loads up for the first time. - line 10: we call the
onCreatemethod of theAppCompatActivityclass in order to save the state of our activity each time we close the application - line 11: we set the content view of the activity to the
activity_mainlayout. - line 13 to 17: we define the tab layout using the
TabLayoutclass and thetab_layoutdefinition from theactivity_mainlayout. Next, we add tabs to the layout. Then the Gravity. - line 19 to 39: here we define the view pager for our tab layout. The very first step in this process is to load the pager configuration from the main activities layout. Then instantiate an object of the
PagerAdapterclass which will be used to set the number of Tabs most importantly. Once the pager adapter object has been instantiated we have to use theViewPager‘s setAdapter method to register the adapter with the view pager. Afterward we have to add a page change listener using theaddOnPageChangeListenermethod of the viewPager. The last step is to add aTabSelectedListenerusing theaddOnTabSelectedListenerof the tabLayout object.
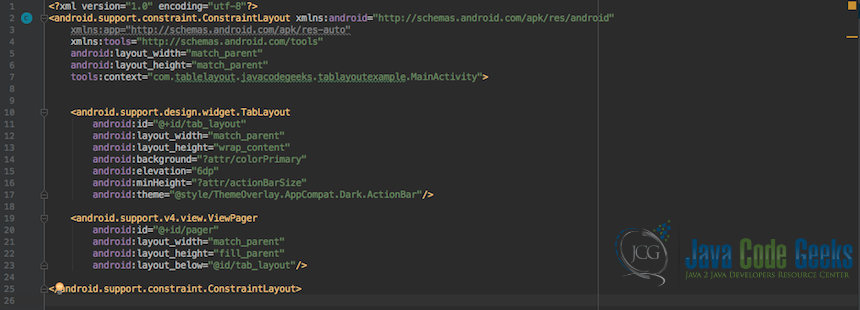
10. MainActivity Layout
Main activity s layout file activity_main.xml contains all the layout definitions for the MainActivity. In this layout the few things that happen are:
- We create a TabLayout component using the
TabLayouttag. Then we add some basic properties to align the view. - We create a ViewPager component using the
ViewPagerTagtag. Then we add some basic properties to align the view
11. Final Application
Below is a screenshot of the final running application.

12. Conclusion
In this example, we’ve seen our to create a tab layout user interface. We did all this by creating Fragments, a PagerAdapter and a MainActivity to wire everything together into an android application.
We also learned a bit about lifecycle methods of fragments and pager adapters. We have intentionally omitted the Manifest file explanation due to the length of the example and the fact it falls more as a general android construct.
13. Download the Source Code
That was Android TabLayout Example.
You can download the full source code of this example here: TabLayoutExample
