1. Introduction
The Floating Action Button is a special type of button primarily used for functionalities such as morphing, launching, and the transferring anchor point. Further, this type of button is often found on the floating surface of a user interface. The primary difference between the Floating Action Button and the other types buttons is that the Floating Action Button, like the name, says it is found on the surface of the Form or the User interface of the Application.
In this article, we will be going through the process of creating a Floating Action button which will display an action message when the button is clicked.
2. Technologies used
- Android Studio 3
- Android 7.1.1 (Nougat): API 25
- Android Virtual Device: Nexus 5X.
3. Creating the Project
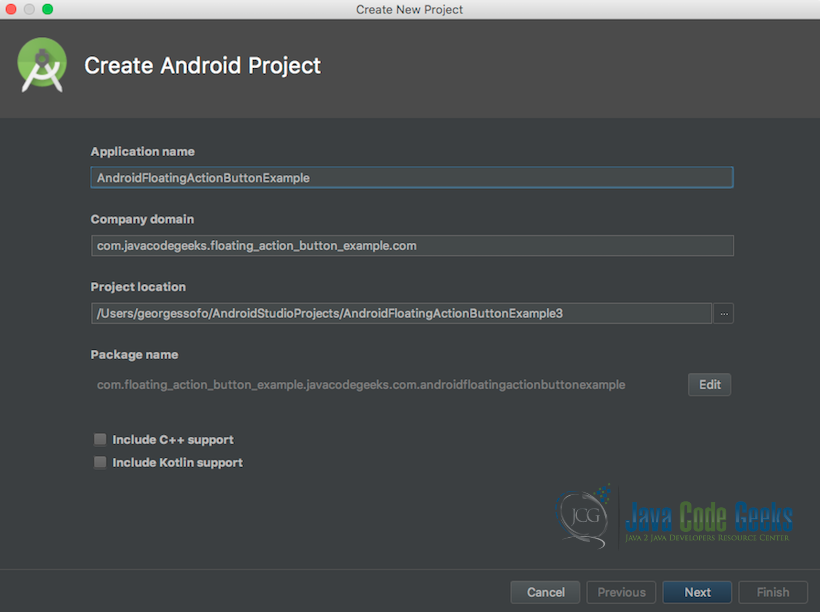
Below is the first screen when creating a new Android project in Android Studio.
Follow the below instructions as our first step in creating our application:
- Go to the main menu of the Android Studio IDE and select “New Project”
- Then give your project a name
- Then give it a package name
- Then click next
Below is the second screen when creating a new Android project in Android Studio.
Follow the below instructions as our next step in creating our application:
- Select the “Phone and Tablet” you are targeting with your application: in our case, we will be using “Android Nougat”
- Then since we are only building for the cell phone devices we are going to ignore all the other devices.
- Lastly, click Next.

Below is the third screen when creating a new Android project in Android Studio.
Follow the below instructions as our last step in creating our application:
- Select the Activity template you would like to use for the first Activity of the project: in our case, we are going to choose the “Empty Activity” template.
- Then click Next

Below is the last screen when creating a new Android project in Android Studio.
Follow the below instructions as our last step in creating our application:
- Choose a name for the Activity.
- Select the “Generate Layout File” option. The corresponding layout file for our activity gets automatically generated.
- Select the “Backwards Compatibility (AppCompact)” option. Our activity becomes backward compatible each time there is an upgrade to the Android platform.
- Then click Finish.

4. Implementing the FloatingActionButton Activity
Below is the code snippet of our completed Activity which will contain our Floating Action button which will be responsible for displaying the SnackBar once the Floating Action button is clicked. It extends the class AppCompatActivity from the Android platform in order to be compatible with future and previous versions of the Android platform.
MainActivity.java
package com.floating_action_button_example.javacodegeeks.com.androidfloatingactionbuttonexample;

import android.support.design.widget.FloatingActionButton;
import android.support.design.widget.Snackbar;
import android.support.v7.app.AppCompatActivity;
import android.os.Bundle;
import android.view.View;

public class MainActivity extends AppCompatActivity {

    @Override
    protected void onCreate(Bundle savedInstanceState) {
        super.onCreate(savedInstanceState);
        setContentView(R.layout.activity_main);

        FloatingActionButton floatingActionButton = findViewById(R.id.floatingButton);
        floatingActionButton.setOnClickListener(new View.OnClickListener() {
        @Override
        public void onClick(View view) {
           Snackbar.make(view, "The done floating button was clicked.", Snackbar.LENGTH_LONG)
                  .setAction("Action", null).show();
        }
      });
    }
}
In this Activity, all we are doing is loading our Floating Action button using the FloatingActionButton component. We then use the component id we’ ve assigned to our Floating Action button in the layout configuration to load the Floating Action button and cast it to the actual FloatingActionButton object. Further, we then register a listener on the button which will display a SnackBar once the button is clicked.

5. The FloatingActionButton Layout Configuration
Below is the main layout file in which we define the Floating Action button that we have used in our activity, to trigger our SnackBar.
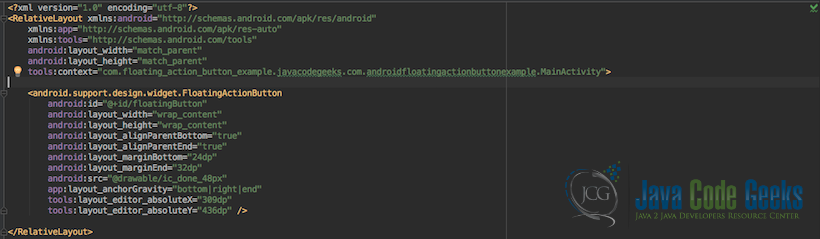
The android.support.design.widget.FloatingActionButton Tag component is used in order to successfully create and configure our Floating Action button. The button will be used for displaying our SnackBar which will be displayed once the Floating Action button is clicked.
6. Manifest file
Below is the manifest file of our application. It contains our application configuration mainly of Activities that are in the application. In our example, we only have the MainActivity, so therefore we only have a configuration for one Activity. The tag activity is used to define our configuration, in which we specify that this Activity is the entry point to our application. Further, we also specify the name of the Activity.

7. The Final Running Application
Below is a screenshot of our Floating Action button demonstration.
In order to see the SnackBar, we must click on the Floating Action Button.

8. Conclusion
In this example, we went through the process of creating an Activity which has a Floating Action Button. This button was hocked with an event listener which enable the button when clicked to display a SnackBar. In order to remain within the scope of our example, we only implemented a SnackBar with a long Duration.
9. Download the Source Code
That was Android Floating Action Button.
You can download the full source code of this example here: AndroidFloatingActionButtonExample
