Spring Boot is a widely used Java framework that simplifies the development of robust and scalable applications. It offers rapid application setup and configuration, along with built-in tools for dependency management and deployment. Keycloak, on the other hand, is an open-source identity and access management solution that integrates seamlessly with Spring Boot. It provides secure authentication, single sign-on, and authorization services, helping developers enhance the security of their applications while ensuring a seamless user experience. Together, Spring Boot and Keycloak empower developers to build modern, secure, and feature-rich applications with ease.
1. Introduction
Spring Boot is a popular Java framework designed to simplify the development of production-ready applications. It offers a streamlined approach to building stand-alone, production-grade Spring-based applications without requiring extensive manual configuration.
1.1 Advantages of Spring Boot
- Simplicity: Spring Boot reduces boilerplate code by providing sensible defaults and automated configurations, enabling developers to focus on writing business logic.
- Rapid Development: It offers a range of pre-built components and starters, which speed up the development process by providing ready-to-use functionalities.
- Microservices Ready: Spring Boot’s architecture is well-suited for building microservices applications, allowing teams to create and deploy services independently.
- Embedded Servers: Spring Boot includes embedded servers like Tomcat, Jetty, and Undertow, eliminating the need for external server deployment.
- Auto Configuration: It automatically configures application components based on classpath settings, reducing the need for manual configuration.
- Spring Ecosystem: Spring Boot integrates seamlessly with other Spring projects, leveraging the full power of the Spring ecosystem.
1.2 Disadvantages of Spring Boot
- Learning Curve: Despite its simplifications, Spring Boot might have a learning curve for beginners due to the multitude of features and concepts it encompasses.
- Overhead: Spring Boot’s convenience may lead to increased memory usage and a larger application footprint compared to traditional Java applications.
- Opinionated: While Spring Boot’s opinionated approach speeds up development, it might not align with specific project requirements, potentially leading to conflicts.
- Complexity: For complex applications, the automation provided by Spring Boot might not cover all unique use cases, requiring additional manual configurations.
- Dependency Management: Automatic dependency management can sometimes lead to version conflicts or unexpected behavior when integrating third-party libraries.
2. What is a Keycloak?
Keycloak is an open-source identity and access management solution developed by Red Hat. It provides robust authentication, authorization, and single sign-on capabilities, making it an essential tool for securing applications and ensuring a seamless user experience.
2.1 Advantages of Keycloak
- Single Sign-On (SSO): Keycloak allows users to log in once and access multiple applications without needing to re-enter credentials, enhancing user convenience and security.
- Centralized Identity Management: It provides a central repository for managing user identities, roles, and permissions, simplifying user administration.
- Multi-Factor Authentication (MFA): Keycloak supports various MFA methods, such as OTP and biometric authentication, adding an extra layer of security.
- Role-Based Access Control: It enables fine-grained access control by assigning roles and permissions to users, ensuring the principle of least privilege.
- Social Identity Providers: Keycloak supports integration with social identity providers like Google and Facebook, enabling users to log in using their existing accounts.
- Customizable Themes: It allows customization of login pages and user interfaces to maintain brand consistency.
2.2 Disadvantages of Keycloak
- Complexity: Setting up and configuring Keycloak might be complex, especially for those new to identity and access management concepts.
- Resource Intensive: Running a Keycloak server could require significant resources, particularly in environments with a large number of users.
- Integration Challenges: Integrating Keycloak with existing applications may require changes to application code and architecture.
- Learning Curve: Learning to use Keycloak effectively and understanding its features might take time for some development teams.
2.3 Use Cases of Keycloak
- Web Applications: Keycloak is ideal for securing web applications with SSO, role-based access, and authentication mechanisms.
- Microservices: It can be used to secure APIs and microservices within a distributed architecture.
- Enterprise Solutions: Keycloak is suitable for securing internal enterprise applications and providing seamless access to employees.
- Cloud-Native Applications: It can be integrated with cloud-native applications to ensure secure access and identity management.
3. Establishment and Configuration of Keycloak
3.1 Setting up Keycloak on Docker
In today’s world, the term Docker holds significant importance. It is frequently employed within CI/CD platforms to encapsulate and execute applications alongside their dependencies in isolated containers. Serving as a Linux container standard, Docker facilitates the creation of consistent environments across various systems. Operating as a runtime under the Linux kernel, a Container establishes an isolated space reminiscent of an independent machine within the Linux framework. For those seeking guidance on Docker installation, a comprehensive video tutorial can be found here.
To configure Keycloak, I will utilize Docker. You can initiate the following run directive to fetch the image and initiate the Keycloak server on port 8180.
Docker run command
docker run -p 8180:8080 -e KEYCLOAK_ADMIN=admin -e KEYCLOAK_ADMIN_PASSWORD=admin quay.io/keycloak/keycloak:22.0.1 start-dev
Once the command is done the Keycloak container will be up as shown in the below image.

3.2 Configure Keycloak Server
After the Keycloak server is operational, navigate to the administration console by entering the subsequent URL in your web browser: http://localhost:8180. Click on the Administration console link and it will open the Keycloak server login page.
Enter the administrator credentials as admin/admin. Upon successful authentication, you’ll proceed to establish a fresh realm tailored for our Spring Boot application. Within Keycloak, realms oversee users, credentials, roles, and groups as a cohesive unit. Each user is associated with distinct roles and accesses a specific realm. Furthermore, each realm functions as an isolated ecosystem, adding an extra security stratum for applications. Moving forward, click on the “Create Realm” button and input the realm particulars as illustrated in Figure 3. Once completed, simply click the “Create” button.

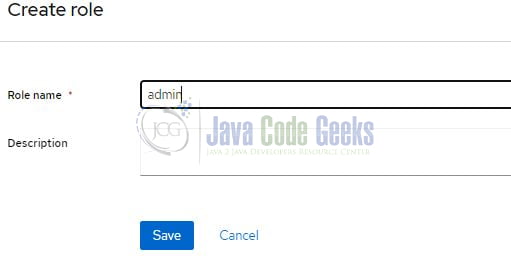
Generate roles for users, as each user will be associated with a role that forms the basis for authorization within the Spring Boot application, determining the corresponding response. Head to the “Realm roles” section found in the left sidebar. On the ensuing screen, you’ll encounter a “Create role” button situated on the right-hand side. To begin, establish an “admin”, as illustrated in Figure 4, then proceed to save your configuration.
Similarly, create the “super_admin” role.
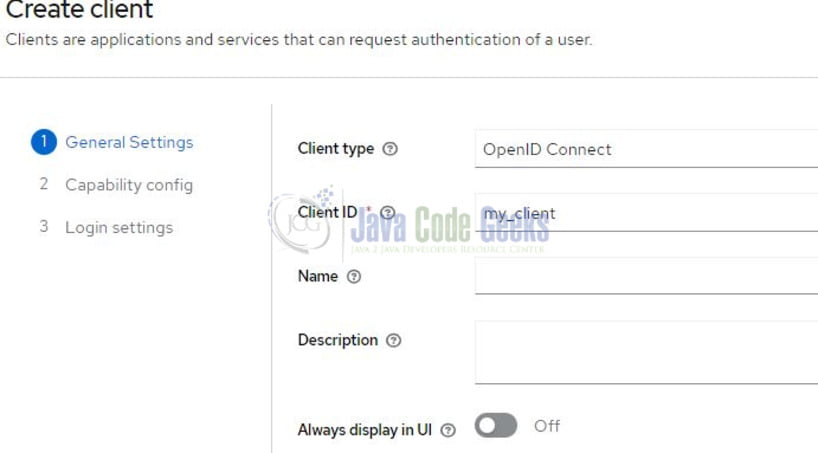
Moving forward, our subsequent task involves the creation of clients. These clients play a vital role in safeguarding the services and acquiring access tokens essential for application access. To commence, let’s establish the client named “my_client” tailored specifically for our Spring Boot application. Access the Clients section located within the left sidebar. Subsequently, on the ensuing screen, you’ll spot a “Create client” button positioned on the right side. Input the client particulars as illustrated in Figure 5. Configure the client to enable client authentication, authorization, standard flow, implicit flow, and direct access grants. Conclude by pressing the save button.
Upon creating the client, proceed to the “Credentials” tab to generate the client’s secret. This secret will be utilized as a client_secret header in the authentication token api generation request sent to the Keycloak authentication server.
Now, in this phase, we’ll generate a user and allocate a role to them. Access the “Users” segment located within the left sidebar. On the following screen, you’ll come across an “Add user” button positioned on the right side. Remember to select the Email verified radio button.
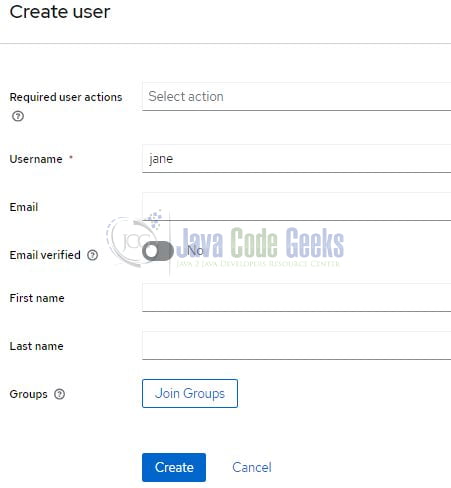
Upon creating the user, proceed to link them with a role. Navigate to the “Role mapping” tab and select the “Assign role” option. Choose the “admin” role and confirm by clicking the “Assign” button.
Similarly, generate another user named “john” and designate the “super_admin” role to her.
4. Developing a Spring Boot Application
You can use the Spring Initializr to generate a basic Spring Boot project with the necessary dependencies.
4.1 Configuring the pom.xml File
Here’s a list of Maven dependencies you should add to your Spring Boot project (pom.xml) for this tutorial.
spring-boot-starter-security: This starter provides basic Spring Security configurations and functionalities to secure your application.spring-boot-starter-web: This starter includes components required for building web applications using Spring MVC, including embedded Tomcat.spring-boot-starter-test: This starter adds testing dependencies to your project, ensuring you have the necessary tools for writing and executing tests.<scope>test</scope>ensures that these dependencies are only available during testing.spring-security-test: This dependency provides testing utilities and support for Spring Security, allowing you to write unit and integration tests for security features.<scope>test</scope>confines its usage to testing.keycloak-spring-boot-starter: This starter integrates Keycloak with your Spring Boot application, enabling seamless authentication, authorization, and single sign-on capabilities.
pom.xml
<dependencies>
	<dependency>
		<groupId>org.springframework.boot</groupId>
		<artifactId>spring-boot-starter-security</artifactId>
	</dependency>
	<dependency>
		<groupId>org.springframework.boot</groupId>
		<artifactId>spring-boot-starter-web</artifactId>
	</dependency>

	<dependency>
		<groupId>org.springframework.boot</groupId>
		<artifactId>spring-boot-starter-test</artifactId>
		<scope>test</scope>
	</dependency>
	<dependency>
		<groupId>org.springframework.security</groupId>
		<artifactId>spring-security-test</artifactId>
		<scope>test</scope>
	</dependency>
	<dependency>
		<groupId>org.keycloak</groupId>
		<artifactId>keycloak-spring-boot-starter</artifactId>
	</dependency>
</dependencies>
4.2 Establish a Security Configuration
The provided class is pivotal in establishing security configurations for the application. This class encapsulates the necessary directives for integrating Keycloak-based security into the application’s architecture. The annotations @KeycloakConfiguration and @EnableGlobalMethodSecurity(jsr250Enabled = true) signify Keycloak-specific configuration and global method security activation. Moreover, it imports the Keycloak Spring Boot configuration resolver. Extending KeycloakWebSecurityConfigurerAdapter, the class harnesses Keycloak’s authentication and authorization capabilities. The overridden configureGlobal(AuthenticationManagerBuilder auth) method registers the KeycloakAuthenticationProvider and configures authority mapping. Session management strategy is defined through the @Bean-annotated methods for session authentication and session registry. Additionally, the configure(HttpSecurity http) method tailors endpoint access, permitting unauthenticated access to specific routes while enforcing authentication for others, and establishing stateless session management.
SecurityConfig.java
package com.code.springbootkeycloak.config;

import org.keycloak.adapters.springboot.KeycloakSpringBootConfigResolver;
import org.keycloak.adapters.springsecurity.KeycloakConfiguration;
import org.keycloak.adapters.springsecurity.authentication.KeycloakAuthenticationProvider;
import org.keycloak.adapters.springsecurity.config.KeycloakWebSecurityConfigurerAdapter;
import org.springframework.beans.factory.annotation.Autowired;
import org.springframework.context.annotation.Bean;
import org.springframework.context.annotation.Import;
import org.springframework.security.config.annotation.authentication.builders.AuthenticationManagerBuilder;
import org.springframework.security.config.annotation.method.configuration.EnableGlobalMethodSecurity;
import org.springframework.security.config.annotation.web.builders.HttpSecurity;
import org.springframework.security.config.http.SessionCreationPolicy;
import org.springframework.security.core.authority.mapping.SimpleAuthorityMapper;
import org.springframework.security.core.session.SessionRegistry;
import org.springframework.security.core.session.SessionRegistryImpl;
import org.springframework.security.web.authentication.session.RegisterSessionAuthenticationStrategy;
import org.springframework.security.web.authentication.session.SessionAuthenticationStrategy;

@KeycloakConfiguration
@EnableGlobalMethodSecurity(jsr250Enabled = true)
@Import(KeycloakSpringBootConfigResolver.class)
public class SecurityConfig extends KeycloakWebSecurityConfigurerAdapter {

    // Registers the KeycloakAuthenticationProvider with the authentication manager.
    @Autowired
    public void configureGlobal(AuthenticationManagerBuilder auth) throws Exception {
        KeycloakAuthenticationProvider provider = new KeycloakAuthenticationProvider();
        provider.setGrantedAuthoritiesMapper(new SimpleAuthorityMapper());
        auth.authenticationProvider(provider);
    }

    // Defines the session authentication strategy.
    @Bean
    @Override
    protected SessionAuthenticationStrategy sessionAuthenticationStrategy() {
        return new RegisterSessionAuthenticationStrategy(buildSessionRegistry());
    }

    @Bean
    protected SessionRegistry buildSessionRegistry() {
        return new SessionRegistryImpl();
    }

    @Override
    protected void configure(HttpSecurity http) throws Exception {
        super.configure(http);
        // Disable Cross-Site Request Forgery (CSRF) protection
        http.csrf().disable()
                // Configure authorization for specific requests
                .authorizeRequests()
                // Allow unauthenticated access to the "/error" endpoint
                .antMatchers("/error").permitAll()
                // Require authentication for any other requests
                .anyRequest().authenticated()
                // Configure session management to use stateless sessions
                .and().sessionManagement()
                .sessionCreationPolicy(SessionCreationPolicy.STATELESS);
    }
}
4.3 Creating a Controller
The presented class encapsulates the logic for handling different endpoints within the application, with the inclusion of Keycloak-based role-based authorization. Annotated with @RestController, the class designates it as a Spring MVC controller. It specifies a base mapping with @RequestMapping("/test"), defining the root path for the controller’s endpoints. The class comprises three methods, each corresponding to a specific endpoint.
- The first method, accessible at
http://localhost:9200/test/user1, is restricted via@RolesAllowed("admin")to users with an “admin” role. - Similarly, the second method, available at
http://localhost:9200/test/user2, is limited to users holding a “super_admin” role. - Lastly, the
http://localhost:9200/test/allendpoint is openly accessible to all users.
These role-specific annotations determine the authorization constraints for the corresponding endpoints, ensuring controlled access based on predefined roles. Each method returns a message corresponding to its endpoint, reinforcing its purpose.
TestController.java
package com.code.springbootkeycloak.controller;

import org.springframework.web.bind.annotation.GetMapping;
import org.springframework.web.bind.annotation.RequestMapping;
import org.springframework.web.bind.annotation.RestController;

import javax.annotation.security.RolesAllowed;

@RestController
@RequestMapping("/test")
public class TestController {

    // http://localhost:9200/test/user1
    // only accessible by the user who has an admin role attached in keycloak
    // e.g. John has an admin role assigned. If an invalid role tries to log in 403 forbidden exception will be thrown
    @GetMapping("/user1")
    @RolesAllowed("admin")
    public String user1() {
        return "Hi i am user1";
    }

    // http://localhost:9200/test/user2
    // only accessible by the user who has a super_admin role attached in keycloak
    // e.g. Jane has an admin role assigned. If an invalid role tries to log in 403 forbidden exception will be thrown
    @GetMapping("/user2")
    @RolesAllowed("super_admin")
    public String user2() {
        return "Hi i am user2";
    }

    // http://localhost:9200/test/all
    // guest url accessible by any role
    @GetMapping("/all")
    public String all() {
        return "all";
    }
}
4.4 Update Application properties
The provided configuration file serves as a crucial element in configuring the Spring Boot application’s integration with Keycloak for authentication and authorization. The content is explained below:
server:This section specifies server-related properties for the Spring Boot application.port:Specifies the port number (9200) on which the Spring Boot application will run.
keycloak:This section configures the integration with Keycloak.realm:Specifies the realm name that corresponds to the defined realm in the Keycloak instance.auth-server-url:Defines the URL of the Keycloak server’s authentication endpoint (http://localhost:8180 in this case).resource:Specifies the client ID as defined within the Keycloak realm. The application will use this client to interact with Keycloak.public-client:Indicates that the client is public, meaning it doesn’t maintain the client’s secret.bearer-only:Specifies that the application only accepts bearer token authentication, enhancing security.
application.yml
server:
  port: 9200                                  # spring boot application port
keycloak:
  realm: springbootkeycloak                   # realm name as defined in the keycloak
  auth-server-url: http://localhost:8180      # endpoint of keycloak server
  resource: my_client                         # client id as defined in the realm
  public-client: true
  bearer-only: true
This configuration file is crucial for aligning the Spring Boot application with the Keycloak realm, enabling secure authentication and authorization processes based on the defined settings.
4.5 Creating an Implementation File
Creating an implementation class responsible for starting the Spring boot application.
SpringbootkeycloakApplication.java
package com.code.springbootkeycloak;

import org.springframework.boot.SpringApplication;
import org.springframework.boot.autoconfigure.SpringBootApplication;

// Main class

@SpringBootApplication
public class SpringbootkeycloakApplication {

	public static void main(String[] args) {
		SpringApplication.run(SpringbootkeycloakApplication.class, args);
	}
}
4.6 Run the Application
Now you can run your Spring Boot application. You can test the different endpoints using tools like curl or a REST client like the Postman tool.
Here’s a brief overview of what each endpoint does:
Requests endpoint
-- POST: Generate access token from the Keycloak authentication server
-- The username and password represent the ones created in the Keycloak configuration
-- a. Jane has an admin role (Username- jane, Password- jane)
-- b. John has a super_admin role (Username- john, Password- john)
curl 'http://localhost:8180/realms/springbootkeycloak/protocol/openid-connect/token' -H 'Content-Type: application/x-www-form-urlencoded' -d 'username=jane' -d 'password=jane' -d 'grant_type=password' -d 'client_id=my_client' -d 'client_secret='

-- The POST api generates the access token that will be used for calling the secured apis

-- GET: Hit the '/user1' secured api
-- The ACCESS_TOKEN in the header represents the token generated via the POST endpoint
-- This endpoint will be accessible by the person who has the admin role assigned. If an invalid role user tries to access the endpoint an HTTP 403 forbidden error will be thrown.
curl 'http://localhost:9200/test/user1' -H 'Authorization: Bearer access_token'


-- GET: Hit the '/user2' secured api
-- The ACCESS_TOKEN in the header represents the token generated via the POST endpoint
-- This endpoint will be accessible by the person who has the super_admin role assigned. If an invalid role user tries to access the endpoint an HTTP 403 forbidden error will be thrown.
curl 'http://localhost:9200/test/user2' -H 'Authorization: Bearer access_token'

-- GET: Hit the '/all' public api
-- This is a public endpoint and will be accessible by any user.
curl 'http://localhost:9200/test/user2' -H 'Authorization: Bearer access_token'
5. Conclusion
In the fast-paced world of modern application development, simplicity, security, and efficiency are paramount. Spring Boot and Keycloak stand out as two powerful tools that address these needs seamlessly.
5.1 Streamlined Development with Spring Boot
Spring Boot revolutionizes the way applications are developed. With its auto-configuration and convention-over-configuration principles, developers can focus on crafting business logic rather than wrestling with intricate setup processes. The ease of creating stand-alone, production-ready applications further expedites the development cycle. Whether you’re building microservices, web applications, or APIs, Spring Boot’s starter packs and comprehensive documentation pave the way for efficient and effective development.
5.2 Securing Applications with Keycloak
Security is non-negotiable in today’s digital landscape. Keycloak emerges as a robust identity and access management solution that seamlessly integrates into your applications. Its support for standards like OAuth 2.0 and OpenID Connect ensures a solid foundation for authentication, authorization, and single sign-on. Whether you’re managing user identities, enforcing role-based access control, or integrating with external identity providers, Keycloak simplifies the complexities of security, allowing developers to create safer applications without compromising on user experience.
5.3 A Perfect Duo: Spring Boot and Keycloak
When combined, Spring Boot and Keycloak create a powerful synergy. Spring Boot streamlines development, while Keycloak fortifies applications with comprehensive security features. This partnership ensures that applications not only perform well but are also safeguarded against modern security threats. From rapid development cycles to robust security implementations, this duo empowers developers to deliver top-notch applications that meet both functional and security requirements.
6. Download the Project
In summary, Spring Boot and Keycloak can work well together in building secure, modern applications. Spring Boot simplifies application development, while Keycloak handles identity and access management, providing a comprehensive solution for building robust and secure applications with user authentication and authorization capabilities. This was an example of using Keycloak identity and access management in a Spring boot application.
You can download the full source code of this example here: Spring Boot with Keycloak
