Welcome, in this tutorial, we will use Redis and Spring boot to demonstrate a URL shortener (also known as TinyURL) application. This application will create and stores the original URL in Redis in-memory cache.
1. Introduction
Before going further in this tutorial we will take a look at the common terminology such as introduction to Spring boot, Docker, and Redis.
1.1 What is Spring boot?
- Spring boot is a module that provides rapid application development feature to the spring framework including auto-configuration, standalone-code, and production-ready code
- It creates applications that are packaged as jar and are directly started using embedded servlet container (such as Tomcat, Jetty, or Undertow). Thus, no need to deploy the war files
- It simplifies the maven configuration by providing the starter template and helps to resolve the dependency conflicts. It automatically identifies the required dependencies and imports them into the application
- It helps in removing the boilerplate code, extra annotations, and xml configurations
- It provides powerful batch processing and manages the rest endpoints
- It provides an efficient jpa-starter library to effectively connect the application with the relational databases
- It offers a Microservice architecture and cloud configuration that manages all the application related configuration properties in a centralized manner.
1.2 What is Docker?
In the present world, Docker is an important term,
- Often used in CI/CD platform that packages and runs the application with its dependencies inside a container
- Is a standard for Linux Containers
- A Container is a runtime that runs under any Linux kernel and provides a private machine-like space under Linux
1.2.1 Docker Terminology
- Image: Representation of Docker container i.e. a JAR or WAR file in Java
- Container: Runtime of Docker i.e. a deployed and running Docker image. For example, an executable Spring Boot jar
- Engine: The code that manages, creates and runs the Docker containers
- Hub: A public developers registry to distribute their code
- Repository: A collection of Docker related images i.e. different versions of the same application
1.3 What is Redis?
- Redis is an open-source in-memory data store written in the C programming language
- Offers a distributed, in-memory key-value database with optional durability
- Often used as a database, cache, or as a message broker and supports different kinds of database types, such as strings, lists, maps, sets or sorted sets, etc.
- It is fast and operations are atomic in nature (i.e. two clients can concurrently access the data and Redis server will receive the updated value)
- Offers utilities like caching and messaging-queues
2. Spring Boot URL Shortener
Here is a systematic guide for implementing this tutorial.
2.1 Application Pre-requisite
To start with this tutorial, we are hoping that users at present have the Docker installation completed. If someone needs to go through the Docker installation, please watch this video.
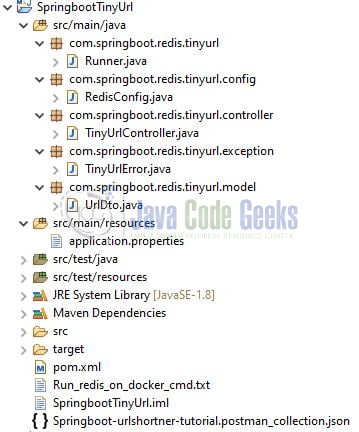
2.2 Tools Used and Project Structure
We are using Eclipse, JDK 8, Maven, and Docker. In case you’re confused about where you should create the corresponding files or folder, let us review the project structure of the spring boot application.
Let us start building the application!
3. Pulling the Redis image from Docker Hub & Starting it
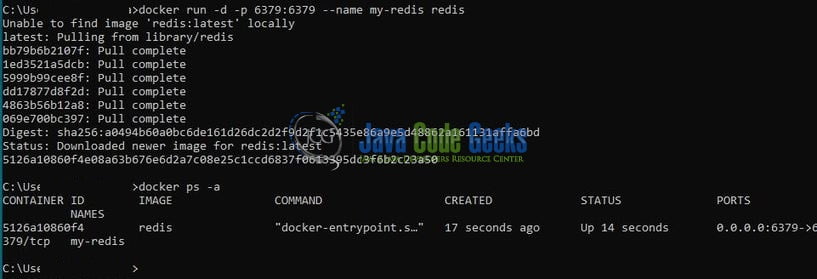
To have the Redis up and working on the localhost environment, we will pull the Redis image from Docker and start the container. Users can refer to the following commands to pull the image and later start the container.
Docker commands
1 2 3 4 5 6 | ## Docker commands## step1 - Pulling redis image from docker hubdocker pull redis## step2 - Running the containerdocker run -d -p 6379:6379 --name my-redis redis |
If everything goes well, the Docker image will be successfully pulled from the and started successfully as shown in the below image. You can use the docker ps -a command to verify if the container was successfully started or not. You can go through this link to understand the Docker basic terminology.
4. Creating a Spring boot application
Below are the steps involved in developing the application.
4.1 Maven Dependency
Here, we specify the dependency for the Spring boot, Redis, Lombok, Guava, and Commons Validator. Maven will automatically resolve the other dependencies. The updated file will have the following code.
pom.xml
01 02 03 04 05 06 07 08 09 10 11 12 13 14 15 16 17 18 19 20 21 22 23 24 25 26 27 28 29 30 31 32 33 34 35 36 37 38 39 40 41 42 43 44 45 46 47 48 49 50 51 52 53 54 55 56 | xsi:schemaLocation="http://maven.apache.org/POM/4.0.0 https://maven.apache.org/xsd/maven-4.0.0.xsd"> <!-- project properties --> <modelVersion>4.0.0</modelVersion> <groupId>com.springboot.redis.tinyurl</groupId> <artifactId>SpringbootTinyUrl</artifactId> <version>0.0.1-SNAPSHOT</version> <parent> <groupId>org.springframework.boot</groupId> <artifactId>spring-boot-starter-parent</artifactId> <version>2.3.1.RELEASE</version> </parent> <properties> <java.version>1.8</java.version> </properties> <dependencies> <dependency> <groupId>org.springframework.boot</groupId> <artifactId>spring-boot-starter-data-redis</artifactId> </dependency> <dependency> <groupId>org.springframework.boot</groupId> <artifactId>spring-boot-starter-web</artifactId> </dependency> <dependency> <groupId>commons-validator</groupId> <artifactId>commons-validator</artifactId> <version>1.7</version> </dependency> <dependency> <groupId>com.google.guava</groupId> <artifactId>guava</artifactId> <version>18.0</version> </dependency> <dependency> <groupId>org.projectlombok</groupId> <artifactId>lombok</artifactId> </dependency> </dependencies> <build> <!-- to make the application as fat jar so that spring boot libraries are included --> <plugins> <plugin> <groupId>org.springframework.boot</groupId> <artifactId>spring-boot-maven-plugin</artifactId> </plugin> </plugins> </build></project> |
4.2 Application Properties
Create a new properties file at the location: SpringbootTinyUrl/src/main/resources/ and add the application and redis configuration to this file.
application.properties
1 2 3 4 5 6 7 8 | # Application configuration.## You can change the server port configuration as per their configuration idea.server.port=10091# Redis configuration.## As we are running Redis on Docker we are setting up its configuration.spring.redis.host=localhostspring.redis.port=6379 |
4.3 Java Classes
Let us write all the java classes involved in this application.
4.3.1 Implementation/Main class
Add the following code to the main class to bootstrap the application from the main method. Always remember, the entry point of the spring boot application is the class containing @SpringBootApplication annotation and the static main method.
Runner.java
01 02 03 04 05 06 07 08 09 10 11 12 13 14 15 | package com.springboot.redis.tinyurl;import lombok.extern.slf4j.Slf4j;import org.springframework.boot.SpringApplication;import org.springframework.boot.autoconfigure.SpringBootApplication;@Slf4j@SpringBootApplicationpublic class Runner { public static void main(String[] args) { SpringApplication.run(Runner.class, args); log.info("Springboot and tinyurl application started successfully."); }} |
4.3.2 Model class
Add the following code to the model class.
UrlDto.java
01 02 03 04 05 06 07 08 09 10 11 12 13 14 15 16 17 18 19 20 21 22 | package com.springboot.redis.tinyurl.model;import com.google.common.hash.Hashing;import lombok.AllArgsConstructor;import lombok.Getter;import java.nio.charset.StandardCharsets;import java.time.LocalDateTime;@Getter@AllArgsConstructorpublic class UrlDto { private final String id; private final String url; private final LocalDateTime created; public static UrlDto create(final String url) { final String id = Hashing.murmur3_32().hashString(url, StandardCharsets.UTF_8).toString(); return new UrlDto(id, url, LocalDateTime.now()); }} |
4.3.3 Configuration class
Add the following code to the configuration class. By default, Spring boot is auto-configured to work with String base key/value pair Redis-template. However, in this tutorial, we will store the key as a string and value as the JSON object.
RedisConfig.java
01 02 03 04 05 06 07 08 09 10 11 12 13 14 15 16 17 18 19 20 21 22 23 24 25 26 27 28 29 30 31 32 33 34 35 | package com.springboot.redis.tinyurl.config;import com.fasterxml.jackson.databind.ObjectMapper;import com.springboot.redis.tinyurl.model.UrlDto;import org.springframework.beans.factory.annotation.Autowired;import org.springframework.context.annotation.Bean;import org.springframework.context.annotation.Configuration;import org.springframework.data.redis.connection.RedisConnectionFactory;import org.springframework.data.redis.core.RedisTemplate;import org.springframework.data.redis.serializer.Jackson2JsonRedisSerializer;import org.springframework.data.redis.serializer.StringRedisSerializer;@Configurationpublic class RedisConfig { @Autowired private ObjectMapper objectMapper; @Autowired private RedisConnectionFactory redisConnectionFactory; // Setting up the Redis template object. @SuppressWarnings({"rawtypes", "unchecked"}) @Bean public RedisTemplate<String, UrlDto> redisTemplate() { final Jackson2JsonRedisSerializer jackson2JsonRedisSerializer = new Jackson2JsonRedisSerializer(UrlDto.class); jackson2JsonRedisSerializer.setObjectMapper(objectMapper); final RedisTemplate<String, UrlDto> redisTemplate = new RedisTemplate<>(); redisTemplate.setConnectionFactory(redisConnectionFactory); redisTemplate.setKeySerializer(new StringRedisSerializer()); redisTemplate.setValueSerializer(jackson2JsonRedisSerializer); return redisTemplate; }} |
4.3.4 Controller class
Add the following code to the controller class where the methods will be used to create a shorter URL and obtain the original URL in exchange for the shorter URL.

TinyUrlController.java
01 02 03 04 05 06 07 08 09 10 11 12 13 14 15 16 17 18 19 20 21 22 23 24 25 26 27 28 29 30 31 32 33 34 35 36 37 38 39 40 41 42 43 44 45 46 47 48 49 50 51 52 53 54 55 56 57 58 | package com.springboot.redis.tinyurl.controller;import com.springboot.redis.tinyurl.exception.TinyUrlError;import com.springboot.redis.tinyurl.model.UrlDto;import lombok.extern.slf4j.Slf4j;import org.apache.commons.validator.routines.UrlValidator;import org.springframework.beans.factory.annotation.Autowired;import org.springframework.beans.factory.annotation.Value;import org.springframework.data.redis.core.RedisTemplate;import org.springframework.http.HttpStatus;import org.springframework.http.ResponseEntity;import org.springframework.web.bind.annotation.*;import java.util.Objects;import java.util.concurrent.TimeUnit;@Slf4j@RestController@RequestMapping(value = "/rest/url")public class TinyUrlController { @Autowired private RedisTemplate<String, UrlDto> redisTemplate; @Value("${redis.ttl}") private long ttl; @PostMapping public ResponseEntity create(@RequestBody final String url) { // Using commons-validator library to validate the input URL. final UrlValidator urlValidator = new UrlValidator(new String[]{"http", "https"}); if (!urlValidator.isValid(url)) { // Invalid url return HTTP 400 bad request. return ResponseEntity.badRequest().body(new TinyUrlError("Invalid URL.")); } // If valid URL, generate a hash key using guava's murmur3 hashing algorithm. final UrlDto urlDto = UrlDto.create(url); log.info("URL id generated = {}", urlDto.getId()); // Store both hasing key and url object in redis. redisTemplate.opsForValue().set(urlDto.getId(), urlDto, ttl, TimeUnit.SECONDS); // Return the generated id as a response header. return ResponseEntity.noContent().header("id", urlDto.getId()).build(); } @GetMapping(value = "/{id}") public ResponseEntity getUrl(@PathVariable final String id) { // Get from redis. final UrlDto urlDto = redisTemplate.opsForValue().get(id); if (Objects.isNull(urlDto)) { return ResponseEntity.status(HttpStatus.NOT_FOUND).body(new TinyUrlError("No such key exists.")); } else { log.info("URL retrieved = {}", urlDto.getUrl()); } return ResponseEntity.ok(urlDto); }} |
5. Run the Application
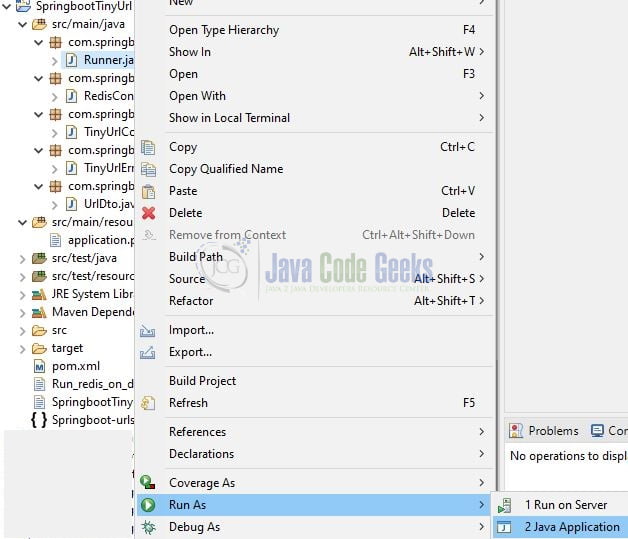
To execute the application, right-click on the Runner.java class, Run As -> Java Application.
6. Project Demo
Open the Postman tool and hit the following URLs.
1 2 3 4 5 |
That is all for this tutorial and I hope the article served you whatever you were looking for. Happy Learning and do not forget to share!
7. Summary
In this section, we learned:
- Introduction to Spring Boot, Redis, and Docker
- Integrate Redis with a Spring boot application to build an URL shortener API
- Using the postman tool to create a short URL and get the original URL
You can download the sample application as an Eclipse project in the Downloads section.
8. Download the Eclipse Project
This was an example of build an URL shortener API popularly known as TinyURL.
You can download the full source code of this example here: Spring Boot URL Shortener

Thanks very good self explainatory article I will definitely start my own url shortener right now thanks