Welcome, in this tutorial, we will see how to configure a spring boot application to use the localhost DynamoDB instance using the spring data. As the DynamoDb AWS service incur changes after frequent HTTP requests so in this tutorial we will use the dynamodb-local on docker (provided by AWS) for learning purpose.
1. Introduction
Before going further in this tutorial, we will look at the common terminology such as introduction to Spring Boot, DynamoDb, and Lombok.
1.1 Spring Boot
- Spring boot is a module that provides rapid application development feature to the spring framework including auto-configuration, standalone-code, and production-ready code
- It creates applications that are packaged as jar and are directly started using embedded servlet container (such as Tomcat, Jetty or, Undertow). Thus, no need to deploy the war files
- It simplifies the maven configuration by providing the starter template and helps to resolve the dependency conflicts. It automatically identifies the required dependencies and imports them into the application
- It helps in removing the boilerplate code, extra annotations, and XML configurations
- It provides powerful batch processing and manages the rest endpoints
- It provides an efficient JPA-starter library to effectively connect the application with the relational databases
- It offers a Microservice architecture and cloud configuration that manages all the application related configuration properties in a centralized manner
1.2 DynamoDb
- DynamoDb is a fast and flexible NoSQL database service for all applications that need consistent, single-digit ms latency
- It is a fully managed cloud database and supports both document and key-value store
- It also offers a flexible data model, reliable performance, and automatic scaling of the throughput capacity making it the best fit for applications that have inconsistent data for storage
- It is similar to other NoSQL databases like Cassandra or MongoDB
1.3 Lombok
- Lombok is nothing but a small library that reduces the amount of boilerplate Java code from the project
- Automatically generates the getters and setters for the object by using the Lombok annotations
- Hooks in via the Annotation processor API
- Raw source code is passed to Lombok for code generation before the Java Compiler continues. Thus, produces properly compiled Java code in conjunction with the Java Compiler
- Under the
target/classesfolder you can view the compiled class files - Can be used with Maven, Gradle IDE, etc.
1.3.1 Lombok features
| Feature | Details |
|---|---|
val | Local variables are declared as final |
var | Mutable local variables |
@Slf4J | Creates an SLF4J logger |
@Cleanup | Will call close() on the resource in the finally block |
@Getter | Creates getter methods for all properties |
@Setter | Creates setter for all non-final properties |
@EqualsAndHashCode |
|
@ToString |
|
@NoArgsConstructor |
|
@RequiredArgsContructor |
|
@AllArgsConstructor |
|
@Data |
|
@Builder |
|
@Value |
|
Let us go ahead with the tutorial implementation but before going any further I’m assuming that you’re aware of the Spring boot basics.
2. Spring Boot CRUD with AWS DynamoDB
2.1 Application Pre-requisite
To start with this Spring Boot CRUD with AWS DynamoDB tutorial, I am hoping you have the dynamodb-local up and running in your localhost environment. For easy setup, I have the dynamodb-local and dynamodb-admin-gui up and running on the Docker environment. You can execute the below script using the docker-compose command to get the dynamodb-local and dynamodb-admin-gui containers running on Docker in minutes. If you’re doing it for the first time the docker image will be downloaded from the docker hub.
docker-compose.yml
services:
  dynamodb-local-admin-gui:
    container_name: dynamodb-local-admin-gui
    image: instructure/dynamo-local-admin
    ports:
      - '8000:8000'
version: '3.7'
If everything goes well the dynamodb-local and dynamodb-admin-gui containers would be started successfully as shown in Fig. 1. You can use the docker ps -a command to confirm that the containers are started successfully. For further information on docker basics, you can navigate to this tutorial.

2.2 Tools Used for Spring boot application and Project Structure
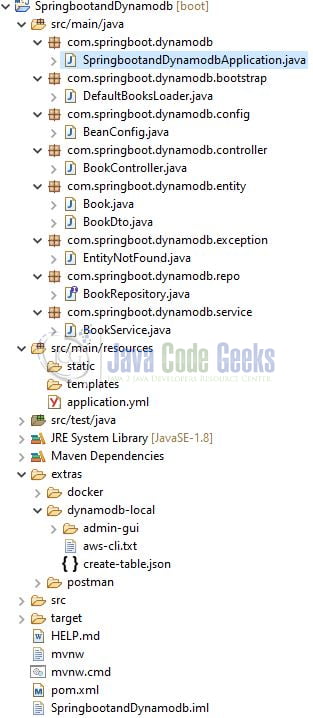
We are using Eclipse Kepler SR2, JDK 8, and Maven. In case you’re confused about where you should create the corresponding files or folder, let us review the project structure of the spring boot application.
Let us start building the application!
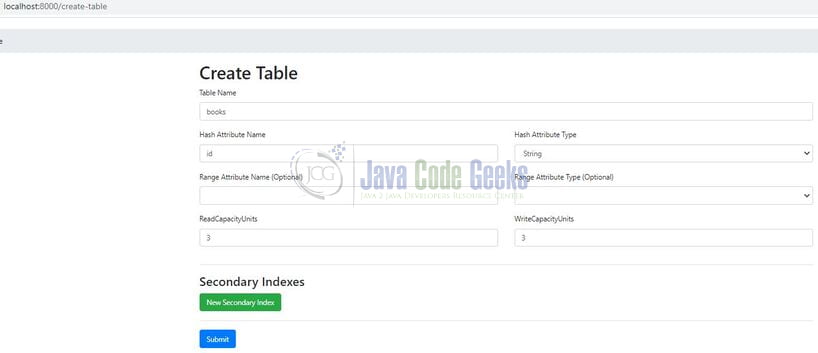
3. Create a table in Dynamodb
Once the vault server is up and running, head over to the administration console by typing the following address in the browser – http://localhost:8080/. The administration console will open having the Create table button. Click on the button and enter the details as shown in Fig. 3.
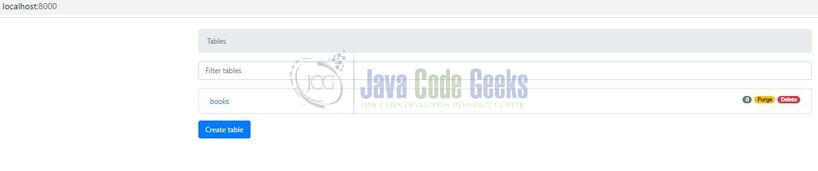
Once done click on the Submit button. If everything goes well the table (named – books) would be created as shown in Fig. 4.
4. Creating a Spring Boot application
Below are the steps involved in developing the application.
4.1 Maven Dependency
Here, we specify the dependency for the Spring boot (Web), Java Faker, AWS Dynamodb SDK, Lombok, and Spring Data JPA (to perform the crud operations). Maven will automatically resolve the other dependencies. The updated file will have the following code.
pom.xml
<?xml version="1.0" encoding="UTF-8"?>
<project xmlns:xsi="http://www.w3.org/2001/XMLSchema-instance"
         xmlns="http://maven.apache.org/POM/4.0.0"
         xsi:schemaLocation="http://maven.apache.org/POM/4.0.0 https://maven.apache.org/xsd/maven-4.0.0.xsd">
    <modelVersion>4.0.0</modelVersion>
    <parent>
        <groupId>org.springframework.boot</groupId>
        <artifactId>spring-boot-starter-parent</artifactId>
        <version>2.4.1</version>
        <relativePath/> <!-- lookup parent from repository -->
    </parent>
    <groupId>com.springboot.dynamodb</groupId>
    <artifactId>SpringbootandDynamodb</artifactId>
    <version>0.0.1-SNAPSHOT</version>
    <name>SpringbootandDynamodb</name>
    <description>Springboot and Dynamodb</description>

    <properties>
        <java.version>1.8</java.version>
    </properties>

    <dependencies>
        <dependency>
            <groupId>org.springframework.boot</groupId>
            <artifactId>spring-boot-starter-web</artifactId>
        </dependency>

        <dependency>
            <groupId>org.projectlombok</groupId>
            <artifactId>lombok</artifactId>
            <optional>true</optional>
        </dependency>
        <!-- aws-java-dynamodb-sdk -->
        <dependency>
            <groupId>com.amazonaws</groupId>
            <artifactId>aws-java-sdk-dynamodb</artifactId>
            <version>1.11.926</version>
        </dependency>
        <!-- spring-data-dynamodb-support -->
        <dependency>
            <groupId>com.github.derjust</groupId>
            <artifactId>spring-data-dynamodb</artifactId>
            <version>5.1.0</version>
        </dependency>
        <!-- java-faker -->
        <dependency>
            <groupId>com.github.javafaker</groupId>
            <artifactId>javafaker</artifactId>
            <version>1.0.2</version>
        </dependency>

        <dependency>
            <groupId>org.springframework.boot</groupId>
            <artifactId>spring-boot-starter-test</artifactId>
            <scope>test</scope>
        </dependency>
    </dependencies>

    <build>
        <plugins>
            <plugin>
                <groupId>org.springframework.boot</groupId>
                <artifactId>spring-boot-maven-plugin</artifactId>
                <configuration>
                    <excludes>
                        <exclude>
                            <groupId>org.projectlombok</groupId>
                            <artifactId>lombok</artifactId>
                        </exclude>
                    </excludes>
                </configuration>
            </plugin>
        </plugins>
    </build>

</project>
4.2 Application YML file
Create a new yml file at the location: SpringbootandDynamodb/src/main/resources/ and add the following code to it. Here we will define the application and aws dynamodb configuration. In this tutorial as we’re using the localhost instance of dynamodb so, we will pass the static information but in the real world, this would be replaced with the actual AWS configuration.
application.yml
amazon:
  aws:
    accesskey: key
    region: us-east-1
    secretkey: ''
  dynamodb:
    endpoint: 'http://localhost:8000/'
server:
  port: 9500
spring:
  application:
    name: springboot-aws-dynamodb
4.3 Java Classes
Let us write the important java class(es) involved in this application. For brevity, we will skip the following classes –
DefaultBooksLoader.java– Bootstrap class to populate dummy data to the dynamodb table (named –books) once the application is started successfully. You can use the get-all-books endpoint to fetch all the booksBookService.java– Service class that provide some business facilities and interact with the DAO layer methodsEntityNotFound.java– Exception class to return the 404 status code if an item does not exist in the databaseBookDto.java– Model class used in the controller to map the incoming request body attributes during the POST and PUT operations
4.3.1 Implementation/Main class
Add the following code to the main class to bootstrap the application from the main method. Always remember, the entry point of the spring boot application is the class containing @SpringBootApplication annotation and the static main method.
SpringbootandDynamodbApplication.java
package com.springboot.dynamodb;

import lombok.extern.slf4j.Slf4j;
import org.springframework.boot.SpringApplication;
import org.springframework.boot.autoconfigure.SpringBootApplication;

//lombok annotation for logger
@Slf4j
//spring annotation
@SpringBootApplication
public class SpringbootandDynamodbApplication {

    public static void main(String[] args) {
        SpringApplication.run(SpringbootandDynamodbApplication.class, args);
        log.info("Springboot and dynamodb application started successfully.");
    }
}
4.3.2 Configuration class
Add the following code to the configuration class. The class will be annotated with the @EnableDynamoDBRepositories and will contain the @Bean annotated methods to create the AmazonDynamodbDB instance.
BeanConfig.java
package com.springboot.dynamodb.config;

import com.amazonaws.auth.AWSCredentialsProvider;
import com.amazonaws.auth.AWSStaticCredentialsProvider;
import com.amazonaws.auth.BasicAWSCredentials;
import com.amazonaws.client.builder.AwsClientBuilder;
import com.amazonaws.services.dynamodbv2.AmazonDynamoDB;
import com.amazonaws.services.dynamodbv2.AmazonDynamoDBClientBuilder;
import com.github.javafaker.Faker;
import org.socialsignin.spring.data.dynamodb.repository.config.EnableDynamoDBRepositories;
import org.springframework.beans.factory.annotation.Value;
import org.springframework.context.annotation.Bean;
import org.springframework.context.annotation.Configuration;

import java.util.Locale;

@Configuration
//annotation enables the dynamodb repositories
@EnableDynamoDBRepositories(basePackages = "com.springboot.dynamodb.repo")
public class BeanConfig {

    @Value("${amazon.dynamodb.endpoint}")
    String endpoint;
    @Value("${amazon.aws.accesskey}")
    String accesskey;
    @Value("${amazon.aws.secretkey}")
    String secretkey;
    @Value("${amazon.aws.region}")
    String region;

    public AwsClientBuilder.EndpointConfiguration endpointConfiguration() {
        return new AwsClientBuilder.EndpointConfiguration(endpoint, region);
    }

    public AWSCredentialsProvider awsCredentialsProvider() {
        return new AWSStaticCredentialsProvider(new BasicAWSCredentials(accesskey, secretkey));
    }

    @Bean
    public AmazonDynamoDB amazonDynamoDB() {
        return AmazonDynamoDBClientBuilder
                .standard()
                .withEndpointConfiguration(endpointConfiguration())
                .withCredentials(awsCredentialsProvider())
                .build();
    }

    @Bean
    public Faker faker() {
        return new Faker(new Locale("en-US"));
    }
}
4.3.3 Entity class
Add the following code to the model class that will be stored in the dynamodb.
Book.java
package com.springboot.dynamodb.entity;

import com.amazonaws.services.dynamodbv2.datamodeling.DynamoDBAttribute;
import com.amazonaws.services.dynamodbv2.datamodeling.DynamoDBAutoGeneratedKey;
import com.amazonaws.services.dynamodbv2.datamodeling.DynamoDBHashKey;
import com.amazonaws.services.dynamodbv2.datamodeling.DynamoDBTable;
import lombok.AllArgsConstructor;
import lombok.Builder;
import lombok.Data;
import lombok.NoArgsConstructor;
import org.springframework.stereotype.Component;

//annotation validates if the dynamodb table exists or not
//if not throws 'ResourceNotFoundException'
//note - dynamodb does not create collection automatically like mongodb so it
//is important to create dynamodb before hand
@DynamoDBTable(tableName = "books")
//lombok annotations
//annotation helps to generate toString(), equals(), hashcode(), getter(), setter()
@Data
//annotation helps to generate a no-argument constructor
@NoArgsConstructor
//annotation helps to generate a constructor with 1 parameter for each field in the class
@AllArgsConstructor
//annotation helps to implement the builder design pattern
//usage can be seen in BookService.java
@Builder
//spring stereotype annotation
@Component
public class Book {

	//annotation for marking the property as the hashkey
	@DynamoDBHashKey(attributeName = "id")
	//annotation for making the hashkey property to autogenerate
	//the key. supports string datatype only
	@DynamoDBAutoGeneratedKey
	String id;
	//describes the field name as it will be represented in dynamodb table
	//offers the name to be different than the field name of the class
	@DynamoDBAttribute
	String title;
	@DynamoDBAttribute
	String author;
	@DynamoDBAttribute
	String genre;
	@DynamoDBAttribute
	String publisher;
	@DynamoDBAttribute
	int quantity;
}
4.3.4 Repository interface
Add the following code to the repository interface to define the SQL CRUD functionality.
BookRepository.java
package com.springboot.dynamodb.repo;

import com.springboot.dynamodb.entity.Book;
import org.socialsignin.spring.data.dynamodb.repository.EnableScan;
import org.socialsignin.spring.data.dynamodb.repository.EnableScanCount;
import org.springframework.data.repository.CrudRepository;
import org.springframework.stereotype.Repository;

import java.util.List;

//annotation enables the scan operations
@EnableScan
//spring annotation
@Repository
public interface BookRepository extends CrudRepository<Book, String> {

    @EnableScanCount
    long countByGenre(String genre);

    List<Book> findAllByGenre(String genre);
}
4.3.5 Controller class
Add the following code to the controller class. The class is injected with the service dependency whose method will call the DAO layer methods to persist the data into the database or fetch from it.
BookController.java
package com.springboot.dynamodb.controller;

import com.springboot.dynamodb.entity.Book;
import com.springboot.dynamodb.entity.BookDto;
import com.springboot.dynamodb.exception.EntityNotFound;
import com.springboot.dynamodb.service.BookService;
import lombok.extern.slf4j.Slf4j;
import org.springframework.beans.factory.annotation.Autowired;
import org.springframework.http.HttpStatus;
import org.springframework.web.bind.annotation.*;

import java.util.List;

//lombok annotation for logger
@Slf4j
//spring annotations
@RestController
@RequestMapping("/api")
public class BookController {

    @Autowired
    BookService service;

    // HTTP GET URL - http://localhost:9500/api/books
    @GetMapping("/books")
    @ResponseStatus(HttpStatus.OK)
    public List<Book> getBooks() {
        log.info("Getting all books from the db");
        return service.getBooks();
    }

    // HTTP GET URL - http://localhost:9500/api/books/<book_genre>
    @GetMapping("/books/{genre}")
    @ResponseStatus(HttpStatus.OK)
    public List<Book> getBooksByGenre(@PathVariable("genre") final String genre) {
        log.info("Getting books by genre = {} from the db", genre);
        return service.getBooksByGenre(genre);
    }

    // HTTP GET URL - http://localhost:9500/api/book/<book_id>
    @GetMapping("/book/{id}")
    @ResponseStatus(HttpStatus.OK)
    public Book getBookById(@PathVariable("id") final String id) throws EntityNotFound {
        log.info("Getting book id = {} from the db", id);
        return service.getBookById(id);
    }

    // HTTP DELETE URL - http://localhost:9500/api/book/<book_id>
    @DeleteMapping("/book/{id}")
    @ResponseStatus(HttpStatus.NO_CONTENT)
    public void deleteBook(@PathVariable("id") final String id) throws EntityNotFound {
        log.info("Delete book id = {} from the db", id);
        service.delete(id);
    }

    // HTTP PUT URL  - http://localhost:9500/api/book/<book_id>
    // Sample request body
    /*
    {
        "author": "J. K. Rowling",
        "genre": "Fantasy Fiction",
        "publisher": "Bloomsbury Publishing",
        "title": "Harry Potter",
        "quantity": 100
    }
    */
    @PutMapping("/book/{id}")
    @ResponseStatus(HttpStatus.NO_CONTENT)
    public void update(@PathVariable("id") final String id, @RequestBody final BookDto dto)
            throws EntityNotFound {
        log.info("Updating book id = {} into the db", id);
        service.update(id, dto);
    }

    // HTTP POST URL  - http://localhost:9500/api/book
    // Sample request body
    /*
    {
        "author": "Vasdev Mohi",
        "genre": "Ghazals",
        "publisher": "Central Sahitya Akademi",
        "title": "Cheque book",
        "quantity": 5
    }
    */
    @PostMapping("/book")
    @ResponseStatus(HttpStatus.CREATED)
    public void save(@RequestBody final BookDto dto) {
        log.info("Saving new book = {} into the db", dto.toString());
        service.save(dto);
    }

    // HTTP POST URL - http://localhost:9500/api/books/count/<book_genre>
    @GetMapping("/books/count/{genre}")
    @ResponseStatus(HttpStatus.OK)
    public long getCountByGenre(@PathVariable("genre") final String genre) {
        return service.getCountByGenre(genre);
    }
}
5. Run the Application
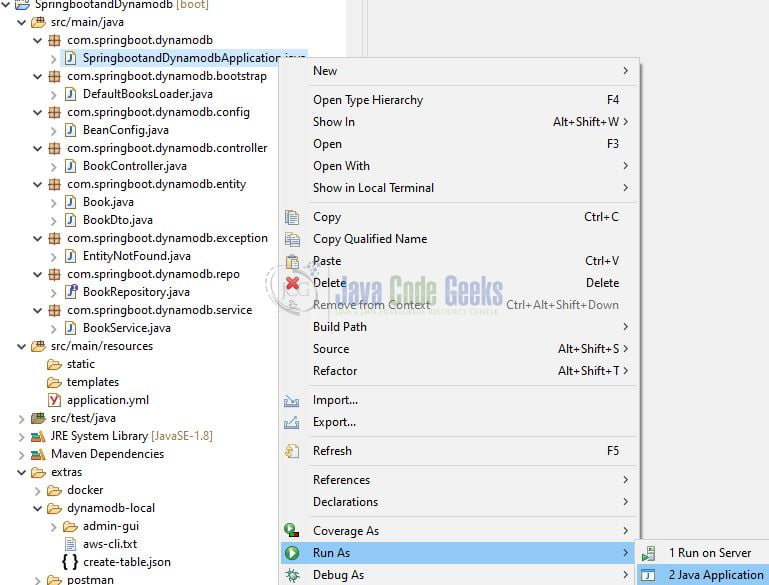
To execute the application, right-click on the SpringbootandDynamodbApplication.java class, Run As -> Java Application.
6. Project Demo
When the application is started, open the Postman tool to hit the application endpoints to persist the data into the database or fetch from it. You are free to use any other tool of your choice to make the post and get requests to the endpoints.
Application endpoints
-- HTTP GET endpoint (to fetch all the books) –
http://localhost:9500/api/books

-- HTTP GET endpoint (to fetch all books by genre) --
http://localhost:9500/api/books/<book_genre>

-- HTTP GET endpoint (to fetch book by id) --
http://localhost:9500/api/book/<book_id>

-- HTTP DELETE endpoint (to delete book by id) –
http://localhost:9500/api/book/<book_id>

-- HTTP PUT endpoint (to update an existing book into the database) –
http://localhost:9500/api/book/<book_id>

-- sample request body –
{
        "author": "Harry Potter",
        "genre": "Fantasy Fiction",
        "publisher": "Bloomsbury Publishing",
        "title": "J. K. Rowling",
        "quantity": 1,
}

-- HTTP POST endpoint (to save a new book into the database) –
http://localhost:9500/api/book

-- sample request body –
{
        "author": "Vasdev Mohi",
        "genre": "Ghazals",
        "publisher": "Central Sahitya Akademi",
        "title": "Cheque book",
        "quantity": 1,
}

-- HTTP GET endpoint (to fetch books count by genre) --
http://localhost:9500/api/books/count/<book_genre>
That is all for this tutorial and I hope the article served you whatever you were looking for. Happy Learning and do not forget to share!
7. Summary
In this section, you learned,
- Spring boot, Lombok, and Dynamodb introduction
- Steps to setup dynamodb and dynamodb-admin-gui on docker
- Steps to create a dynamodb table through admin-gui
- Steps to configure dynamodb in a spring-boot application through spring data
You can download the sample application as an Eclipse project in the Downloads section.
8. Download the Project
This was an example of how to configure Dynamodb in a Spring Boot application.
You can download the full source code of this example here: Spring Boot CRUD with AWS DynamoDB

Hi,
The dynamodb admin GUI is running in port http://localhost:8000/, it is stated as http://localhost:8080/ in Section 3. Kindly confirm. Thanks.