It’s my second post in my Kubernetes – Objects series. In my previous post, we discussed Kubernetes Pods with some useful examples. In this post, we are going to discuss another important Kubernetes Object which is Service.
1. Introduction
Like Pod, Service is also one of the important Kubernetes (K8S) objects. Each Pod has a unique IP address but it’s a private IP and ephemeral. We cannot rely on it and cannot access it from outside the K8S cluster.
In order to access Pods with the Cluster or from the outside world, we need to use the Service object. It provides a loose coupling approach to accessing Pods without worrying about Pod’s IP address.
1.1. Why Services? Why not Pods?
In this section, we will discuss why we really need Services. Why don’t we use Pods directly?
When we create a new Pod, it gets a new, unique, and private IP Address (not a static IP Address). Pods are ephemeral resources in a K8S cluster. That means they live and die at any time, they don’t live a long time and also we cannot recreate the same Pod. It’s possible to recreate the same kid of Pod but it gets a different IP address.
If a new Pod gets a new IP address, we cannot rely on them. Our external Applications or Services or other Pods from the same K8S Cluster cannot reach that new Pod with the old IP address because it has a new IP address. Every time we create a new Pod, we need to update our configuration details with that new Pod’s new IP address. It’s not a possible and cumbersome process.
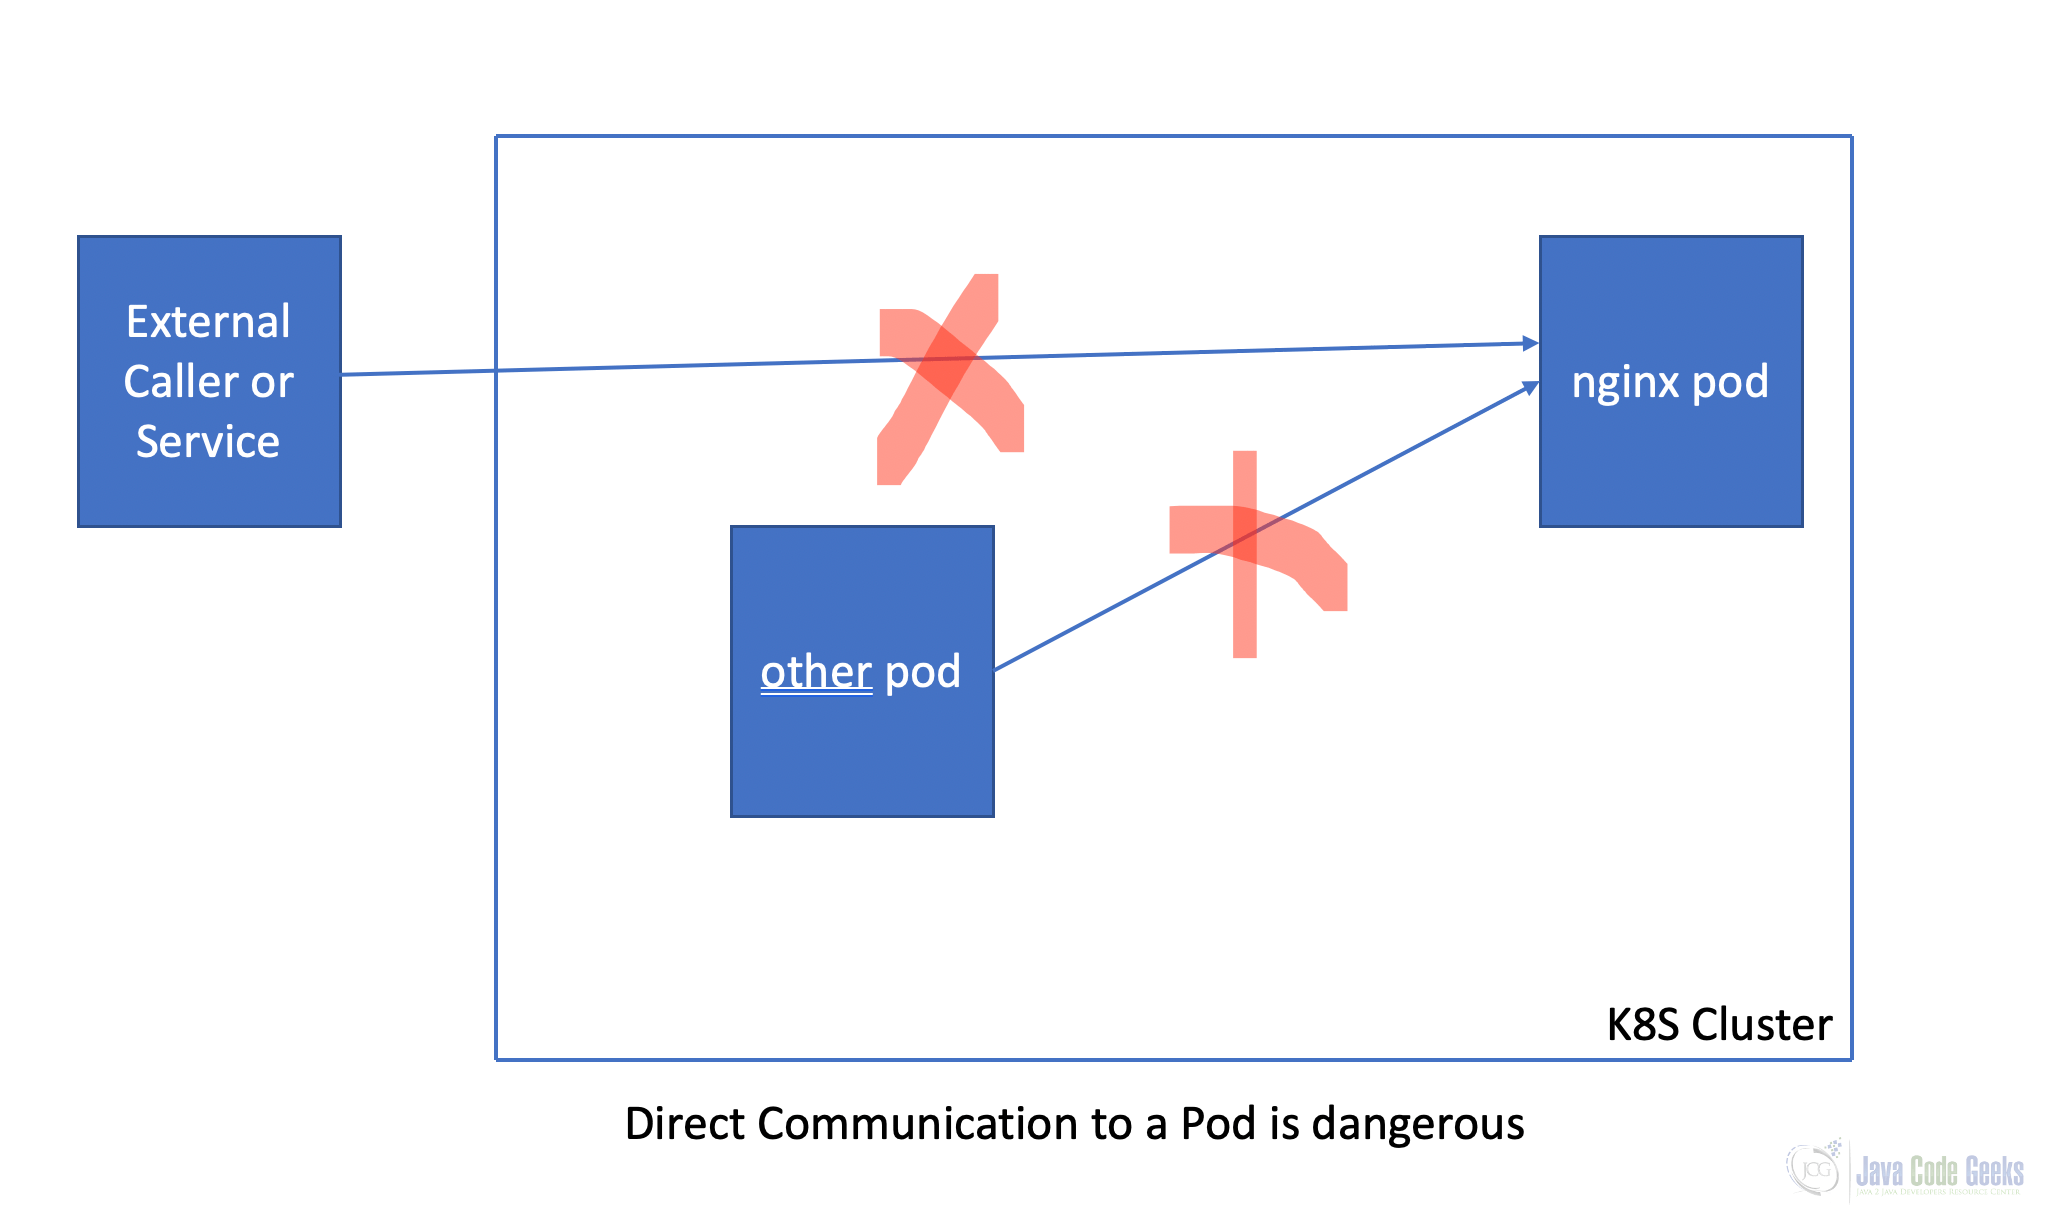
So we need an approach to connect to Pods without worrying about their IP address and ephemeral status. We can solve this problem using the Kubernetes Service object.
The main goal of the K8s Service object is:
To expose one or a group of Pods to other Pods within the same K8s Cluster or to the outside world (for external callers or applications or services).
By using Service objects, Pods are reachable from anywhere without using their IP address.
Unlike Pods, Services are not ephemeral K8s resources. They live a long time and even if they die, we can create the same Service object very easily. That means when we create a Service object, it gets an IP address and name (DNS). Both IP address and name are stable or static. When a Service die and recreate a new one, that new Service will get the same name and same IP address. So we can use a Service name or IP address without any issues.
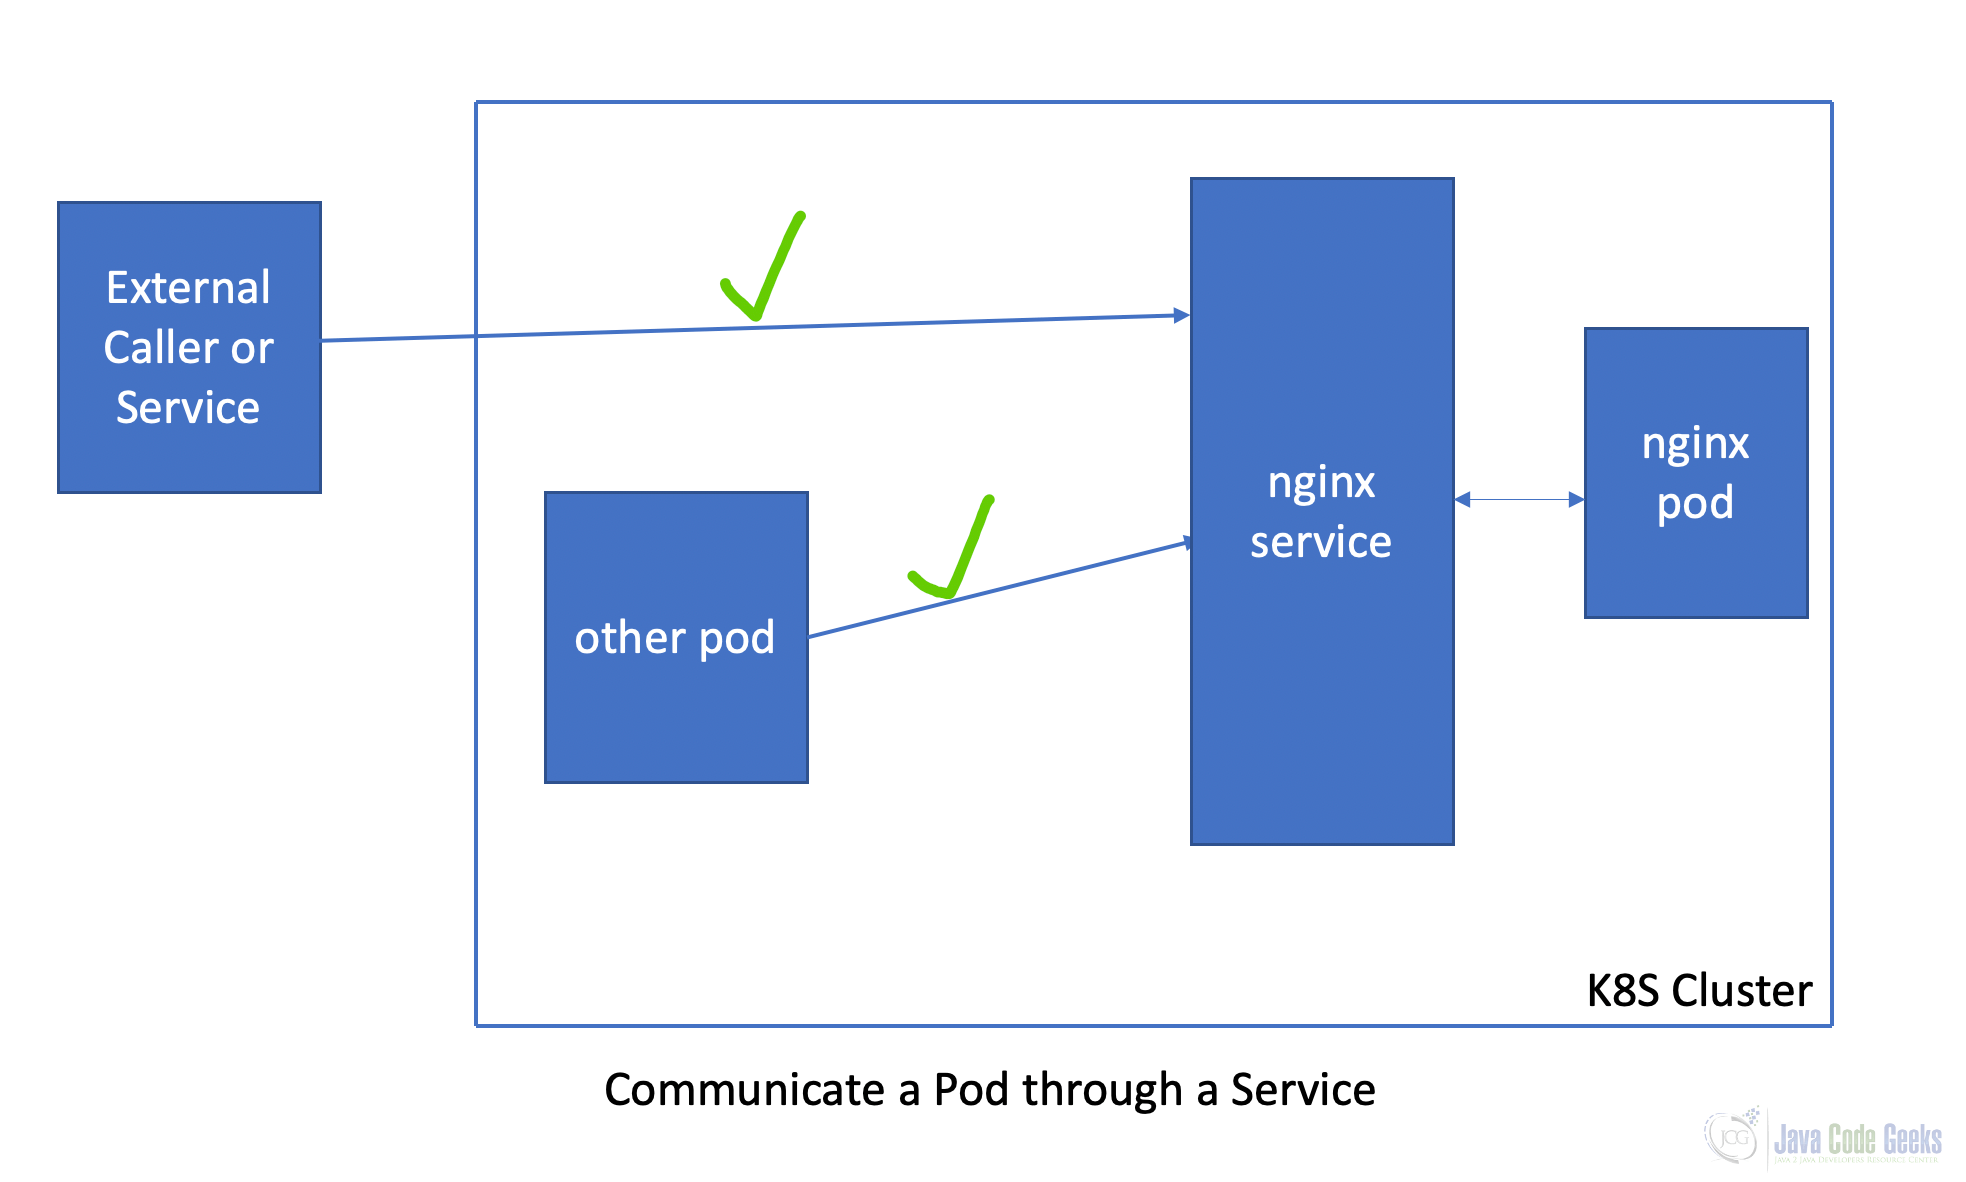
Another important point is that a Pod cannot spawn more than one Node which means we should create a Pod within a Node only. We cannot use two or more Nodes to create a single Pod. However, a Service can spawn more than one node without any issues as shown below:

2. Types of K8S Services
There are mainly 4 types of Services available in the Kubernetes world:
- ClusterIP:- It’s a default service type and uses cluster IP to provide access to a Pod or a group of Pods within the K8s cluster only. That means it allows internal access only.
- NodePort:- It uses a Node port and provides access to a Pod or a group of Pods within the K8s cluster and also to the outside world. That means it allows internal and external access.
- LoadBalancer:- This type of service is only allowed to use in public Clouds like GCP, AWS, etc. It creates an external load balancer in the cloud platform and assigns a static IP address
- ExternalName:- It works using DNS name
3. Kubernetes Service operations
We can perform Service operations like create, update and delete Services in two ways: 1. Imperative approach 2. Declarative approach
The imperative approach is only for learning or experimental purpose. Always recommended to use the Declarative approach in real-time projects or production systems.
3.1. Create Services in an Imperative Way
We can create K8S services in different ways in an imperative way. We will discuss one simple way here.
In my previous post, Kubernetes Pods, we discussed how to create an Nginx pod with Nginx image with this kubectl run command:
kubectl run nginx --image=nginxThis step creates an Nginx Pod with a container Nginx. I have deleted this Nginx pod and going to do the next step.
Now, we are going to create both a Pod and its Service using kubectl run command as shown below:
kubectl run nginx --image=nginx --expose --port 80In this step, we have created an Nginx Pod and also a Service named nginx using one simple option i.e. –expose. When we executed this kubectl command, we will see two messages saying that service and pod are created as shown in the below picture.
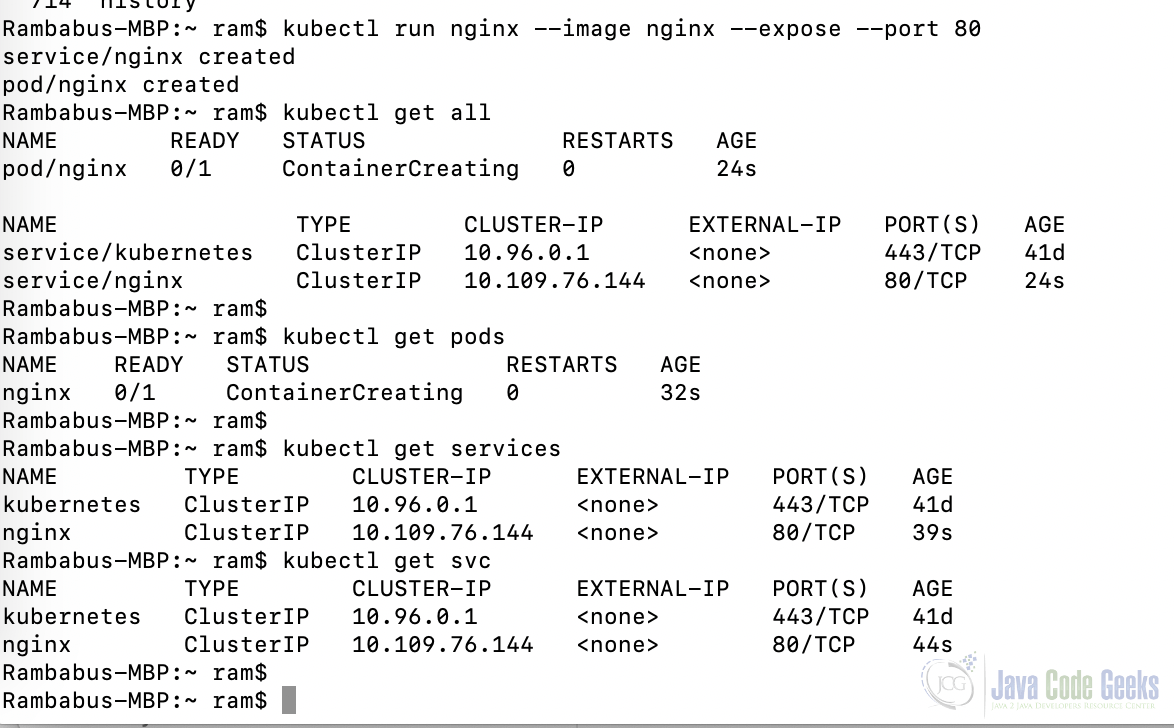
Here we can observe that both Pod and Services are created with the same name. After some time we can observe that both are up and running as shown below:

We can use the following kubectl command to know more details about each K8S object
kubectl describe <object> <object-name>Here <object> is any K8S object like Pod, Deployment, Service, etc.
<object-name> is the name of the K8S object, for instance, pod name or service name.
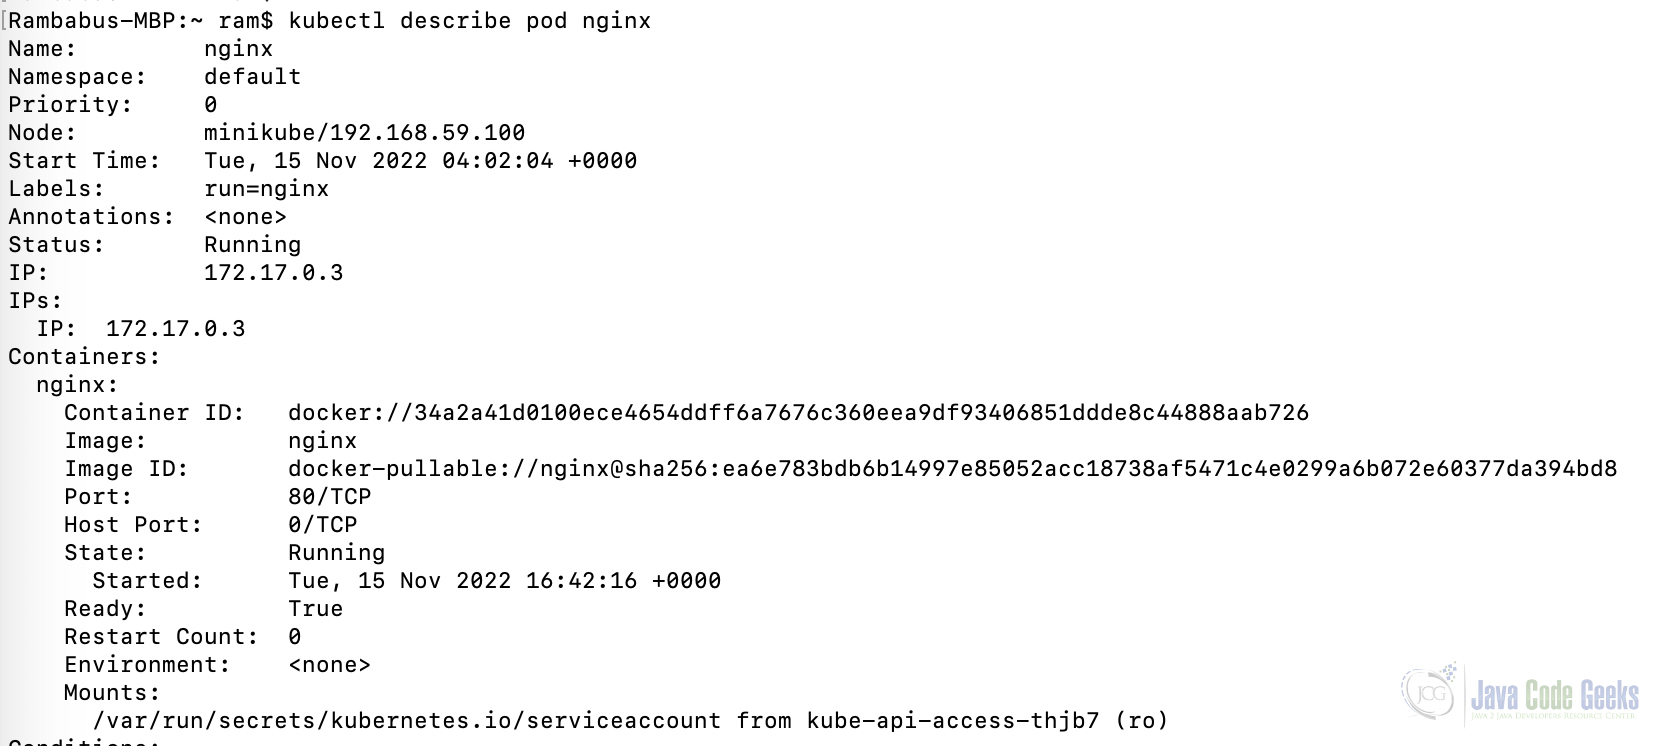
kubectl describe pod nginxThis command displays full details about Nginx Pod as shown below
We have a shortcut for the service name as shown below:
kubectl describe service nginxor
kubectl describe svc nginxThis command displays full details about Nginx Service as shown below

3.2. How a Service is linked to a Pod or a group of Pods?
When we create a Service either in an Imperative or Declarative way, we don’t need to create them at once or we don’t need to link them by ourselves. But they are linked using a Selector concept. It is also known as LabelSelector.
When we create a Pod or Service, it gets a default label. We can assign a label or a set of labels to any K8S Object manually.
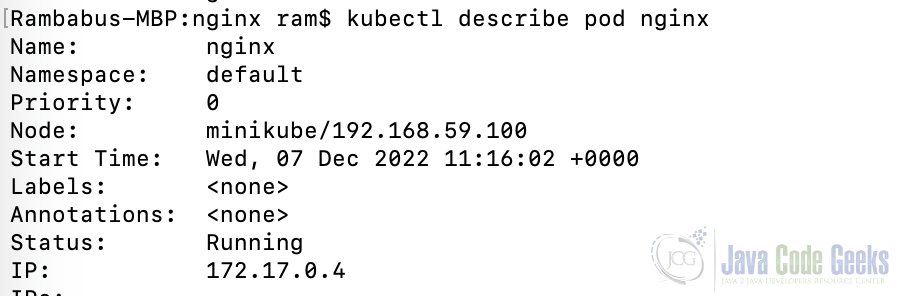
If you see Fig-3:- Nginx pod description image in the previous section, we can observe that Nginx pod got the following default label:
Labels: run=nginxIt’s a default label with the same name as Pod’s name. In the same way, Nginx Service also got a Selector as shown in Fig-4: The Nginx Service Description picture
Selector: run=nginxService object uses this Selector clause to connect to all Pods which are having this label and provides a static IP address and DNS name to other Pods in the same K8s cluster or outside world. That means Service provides a single point of access to a Pod or a group of Pods that matches the select criteria which is the Selector clause.

when a Service Selector matches with a Pod Label, that Service will expose that Pod to other Pods within the same K8S cluster (if it’s a ClusterIP service) or to the outside world too (if it’s a NodePortService).
3.3. Test Nginx Service
In the previous section, we created an Nginx service (which is a ClusterIP by default) for Nginx Pod but we have not tested or accessed it.
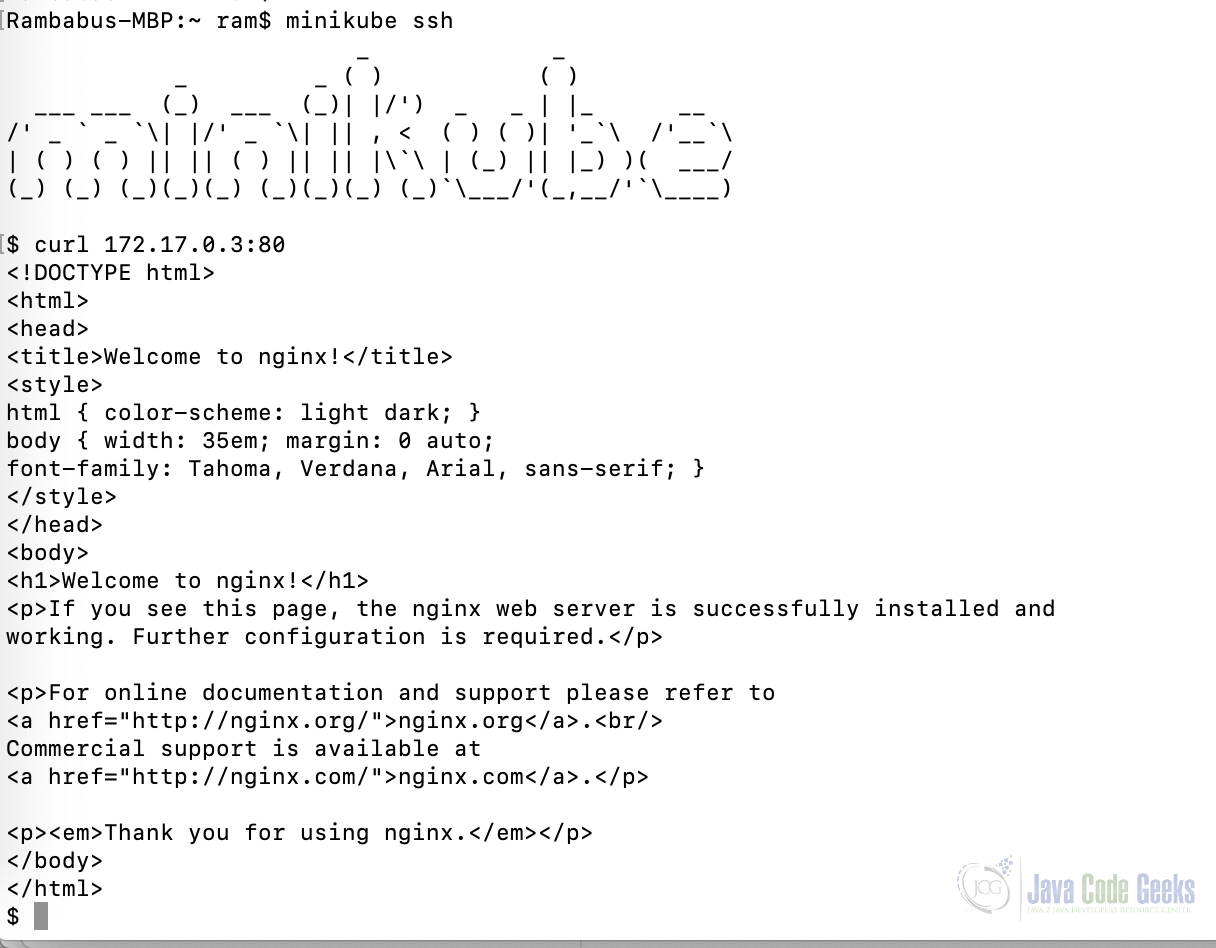
In this section, we will test the ClusterIP service. As it’s accessible within the same K8S cluster, we cannot access it using our Web Browser. So I’m going to log in to my Minikube K8S cluster using ssh and try to access this service.
First, we need to execute the following command from the terminal to log in to Minikube K8S cluster.
$ minikube sshThen we can curl that Nginx service using its Endpoint to access the service. If we observe the service description figure ( at Fig-4: kubectl description about Nginx service), we can find this endpoint value:
Endpoints: 172.17.0.3:80Here IP address is 171.17.0.3, which is our Nginx Service’s IP address and 80 is its port number. We can access this service as shown below:
3.4. How to know the apiVersion value of a K8s Object?
In my previous post, Kubernetes Pods, we discussed how to create a Pod in a Declarative way by using the YAML manifest file.
In that Pod’s YAML file, we have defined its apiVersion entry as shown below:
apiVersion: v1It defines the Kubernetes API version. Is it the same for all K8S Objects like Pod, Deployment, Service, etc? The answer is No. Some objects have the same version and some may have different versions. Then how to know which version we need to use in the YMAL file definition?
We have one simple technique to know the value of apiVersion for each K8s object as shown below:
To know the value of apiVersion for Pod YAML definition

Here we can observe that the apiVersion value of a Pod kind is v1.
To know the value of apiVersion for Service YAML definition
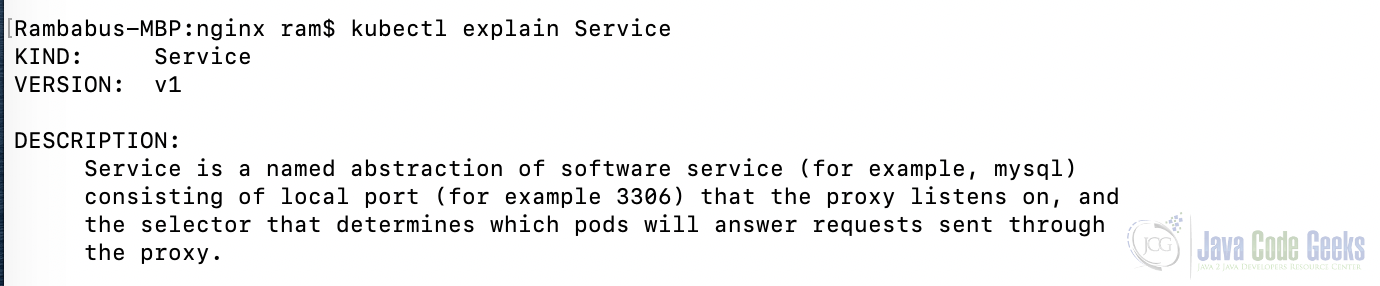
Here we can observe that the apiVersion value of a Service kind is v1. So both Pod and Service objects have the same apiVersion value.
To know the value of apiVersion for Deployment YAML definition

Here we can observe that the apiVersion value of a Deployment kind is apps/v1. So Deployment object has a different value for apiVersion.
NOTE:- If you don’t know anything about the Deployment object, please don’t worry. Like Pod and Service, Deployment is also a kind or an object in K8s world. I’m going to discuss it in my next post.
3.5. Create Services in a Declarative Way
In the previous section, we discussed how to create a Service in an Imperative way. That’s useful only for practice purposes and not recommended in a real-time project or Production environment. It’s always recommended to do the same steps in a Declarative way.
Now we will discuss how to create a Service in a Declarative way using a YAML file.
YAML syntax to create a Service object:-
apiVersion:
kind:
metadata:
spec:
  type:

  selector:

  ports:
Here apiVersion: Kubernetes(K8S) API version for Service object
kind: The type of K8S object like Pod, Service, etc.
metadata: To define the name of the Service object and labels
spec: We define the type of Service object, Selector clause, and Ports details
type: Type of Service objects like ClusterIP (default value), NodePort, LoadBalancer, and ExternalName
selector: To define a Label Selector clause to find out all matching Pods
ports: To define ports, targetPorts, and nodePorts, etc.
3.5.1. Create nginx ClusterIP Service with YAML file
First, we need to create nginx pod with the following YAML file.
apiVersion: v1
kind: Pod
metadata:
  name: nginx
  labels:
    app=nginx
spec:
  containers:
  - name: nginx
    image: nginx
Here we define our pod name as Nginx with Nginx as its container.
NOTE:- Please read this 3.2.1. Define a YAML File section from my Kubernetes – Pods post to know more about these YAML elements.
In nginx-pod.yaml file, we can find only one new element that is
labels:
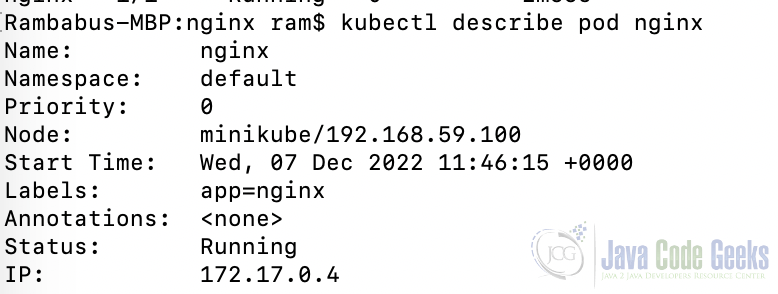
app=indexWe can define labels using this element under the metadata element. It’s an optional element. If we don’t define any label, we will see empty Labels list as shown below:
In our example, we have defined one label app=index so that when we create a LableSelector in a Service, that Service will pick up this Pod as shown in a few moments.
Please execute the following kubectl command to create Nginx pod.
kubectl apply -f nginx-pod.yamlHere we can use either -filename or -f options.
Now create the Nginx service using the following YAML file.
apiVersion: v1
kind: Service
metadata:
  name: cip-nginx
spec:
  type: ClusterIP
  selector:
	app: nginx
  ports:
    - protocol: TCP
      port: 9090
      targetPort: 80
Here we define our service name as Nginx, service type as ClusterIP, service port as 9090, and targetPort (i.e. Pod port number) as 80.
Please execute the following kubectl command to create the Nginx service.
kubectl apply -f nginx-clusterip-service.yaml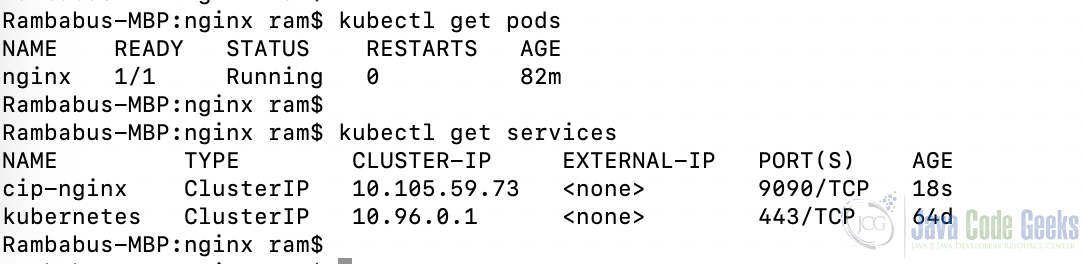
As discussed in the Imperative Way approach in 3.3. Test Nginx Service section, we can test how to access this service also.

As ClusterIP service allows access to Pods within the K8S Cluster only, we or other Pods can access this nginx Pod from within our cluster.
Please execute the following kubectl command to delete the previously created nginx service.
kubectl delete -f nginx-clusterip-service.yaml3.6. Create Nginx NodePort Service with YAML file
In the previous section, we discussed how to create a ClusterIP service to access nginx Pod in a Declarative way.
If we want to access our nginx Pod from within the K8S cluster or from the outside world, we need to create NodePort Service. It’s very easy to create it using a YAML file with a few changes as shown below:
apiVersion: v1
kind: Service
metadata:
  name: np-nginx
spec:
  type: NodePort
  selector:
	app: nginx
  ports:
    - port: 8080
      targetPort: 80
      nodePort: 30100
Here we can observe only a few changes compared to the ClusterIP YAML file
type: we need to change this field value from ClusterIP to NodePort Service
nodePort: By default, the K8S allocates a port from a range between 30000 and 32767. Here we have taken 30100 as per our environment or project requirements.
We can use the same commands to create a service, view service status, and delete a service object.
To create a NodePort Service
kubectl apply -f nginx-nodeport-service.yamlTo view NodePort Services
kubectl get svcTo delete a NodePort Service
kubectl delete -f nginx-nodeport-service.yaml4. Conclusion
So we need to use the Service object to expose or access Pods from within K8S Cluster or the outside world without worrying about Pod’s IP Address and its ephemeral status. We need to select the best suitable Service type based on our project requirements.
Difference between ClusterIP and NodePort Services:
- ClusterIP service is used to expose Pods to other Pods inside the Kubernetes(K8S) cluster
- NodePort service is used to expose Pods to the outside world (it is also used to expose Pods to other Pods inside the K8S cluster)
NodePort service = ClusterIP service + To expose to the outside world
5. Download
That’s it about the Kubernetes Service object. We will meet in my next post with another important concept of K8S. Happy Learning!
For my previous post, you can download the code here: Kubernetes – Pods.
You can download the full source code of this example here: Kubernetes – Services
