Welcome, in this tutorial, we will see how to implement Keycloak in a spring boot application.
1. Introduction
Before going further in this tutorial, we will look at the common terminology such as introduction to Spring Boot and Keycloak.
1.1 Spring Boot
- Spring boot is a module that provides rapid application development feature to the spring framework including auto-configuration, standalone-code, and production-ready code
- It creates applications that are packaged as jar and are directly started using embedded servlet container (such as Tomcat, Jetty or, Undertow). Thus, no need to deploy the war files
- It simplifies the maven configuration by providing the starter template and helps to resolve the dependency conflicts. It automatically identifies the required dependencies and imports them into the application
- It helps in removing the boilerplate code, extra annotations, and XML configurations
- It provides powerful batch processing and manages the rest endpoints
- It provides an efficient JPA-starter library to effectively connect the application with the relational databases
- It offers a Microservice architecture and cloud configuration that manages all the application related configuration properties in a centralized manner
1.2 Keycloak
- Keycloak is an open-source Identity and access management solution. Provides both SAML and OpenID protocol solutions
- Allows user’s authentication and security with minimum effort
- For an easy setup, we need to use the following stater library in our spring boot application –
keycloak-spring-boot-starter
Let us go ahead with the tutorial implementation but before going any further I’m assuming that you’re aware of the Spring boot basics.
2. Keycloak in a Spring Boot Application
2.1 Application Pre-requisite
To start with this tutorial, I am hoping that you have the Keycloak server up and running in your localhost environment. For easy setup, I have the Keycloak server up and running on the Docker environment. You can execute the below script using the docker-compose command to get the keycloak server container running on Docker in minutes. If you’re doing it for the first time the keycloak server docker image will be downloaded from the docker hub.
docker-compose.yml
services:
  keycloak:
    container_name: keycloak
    environment:
      KEYCLOAK_USER: admin
      KEYCLOAK_PASSWORD: admin
    image: jboss/keycloak
    ports:
      - '8100:8080'
version: '3'
If everything goes well the keycloak server container would be started successfully as shown in Fig. 1. You can use the docker ps -a command to confirm that the Keycloak server container is started successfully. For further information on docker basics, you can navigate to this tutorial.

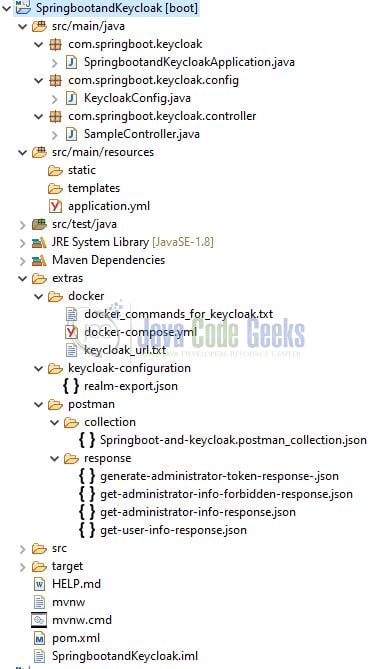
2.2 Tools Used for Spring boot application and Project Structure
We are using Eclipse Kepler SR2, JDK 8, and Maven. In case you’re confused about where you should create the corresponding files or folder, let us review the project structure of the spring boot application.
Let us start building the application!
3. Configure Keycloack server
Once the keycloak server is up and running, head over to the administration console by typing the following address in the browser – http://localhost:8100/auth/admin/master/console/#/realms/master. A login page will be displayed where you will enter the administrator credentials (admin/admin) specified in the docker-compose.yml file.
3.1 Create Realm
After the successful authentication, you will create a new realm for our spring boot application. In keycloak, realms manage a set of users, credentials, roles, and groups. Each user has some specific roles and logs into some realm. Moreover, each realm acts as an isolated environment which introduces an additional security layer for the applications. As the next steps, navigate to the Add realm button. Add the realm details as shown in Fig. 3 and once done hit the create button.

3.2 Create Roles
Create some roles for our users as each user will be attached to a role basis which the spring boot application will perform authorization and return the appropriate response. Navigate to the Roles tab on the left sidebar and on the next screen you will see an Add Role button in the right part of the screen. Firstly we will create a ROLE_USER as shown in Fig. 4 and hit the save button.

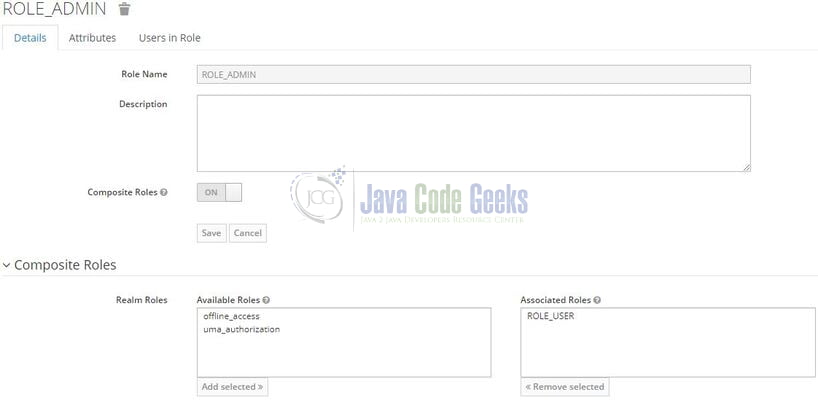
Similarly, we will create the ROLE_ADMIN and add a composite role to it. A composite role combines the multiple roles i.e. ROLE_ADMIN will be able to access all endpoints. Both roles have the prefix keyword – ROLE_ and spring security will automatically prefix the hasRole(…) method checks with the same value.
3.3 Create Clients
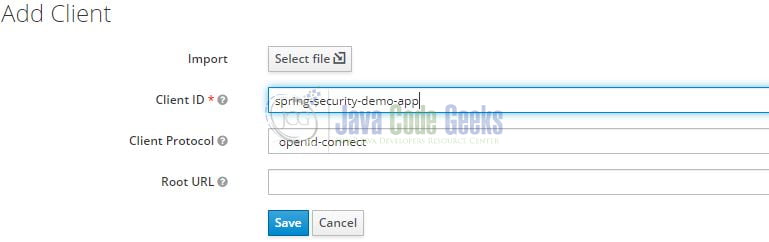
As a next step, we will create the clients. The clients are required to secure the services and obtain the access tokens to access the applications. For this tutorial, we’ll create two clients, and let us start by creating the one (named – spring-security-demo-app) required for our spring boot application. Navigate to the Clients tab on the left sidebar and on the next screen you will see an Add Client button in the right part of the screen. Add the client information as shown in Fig. 6 and hit the save button.
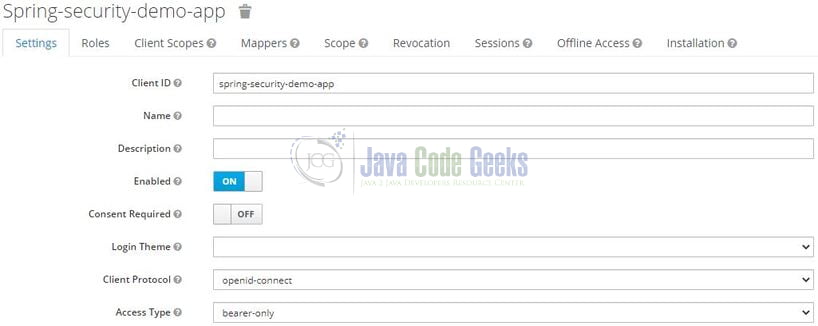
Once the client is created successfully change the Access Type to bearer-only as shown in Fig. 7. This means that the spring boot application will not initiate a login and will just pass the access token coming in the request to the keycloak server for validation.
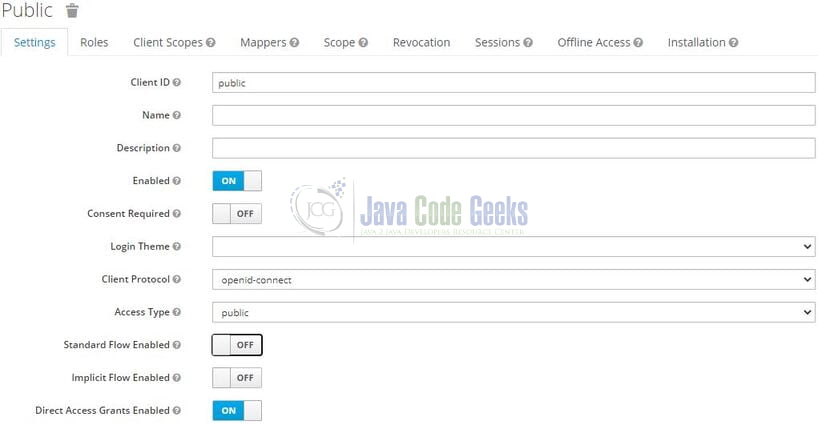
Similarly, create a public client which will be used to generate an access token on the user’s behalf. Once created change the Direct Access Grant Flow to enabled and the Access Type set to public as shown in Fig. 8.
3.4 Create Users
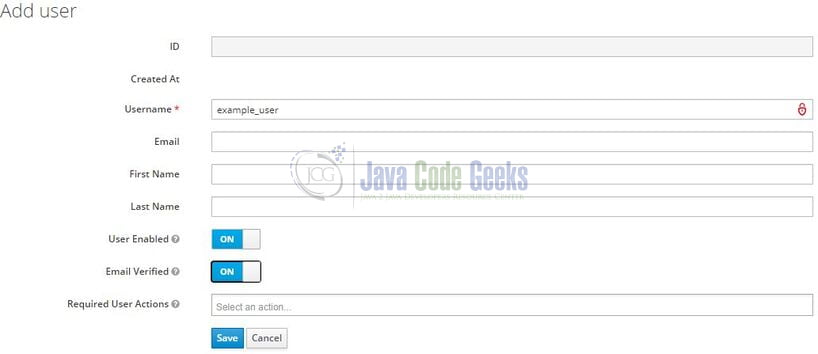
At this step, we will create an administrative and non-administrative user. Navigate to the Users page and create the non-administrative user first (named – example_user) as shown in Fig. 9. Remember to mark him enabled and his email verified as well for the tutorial purpose.
The next important thing is to set the password for this user in the Credentials tab as shown in Fig. 10. You are free to keep the password of your choice but to keep it simple we are keeping it the same as the username.

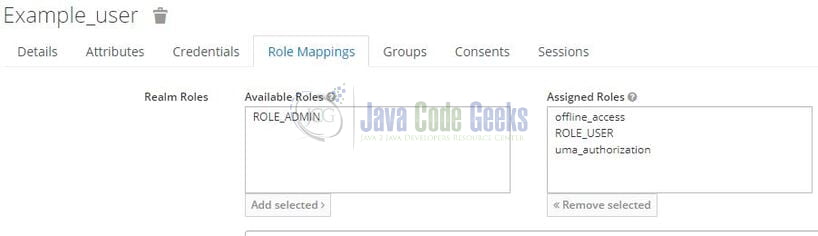
As the last step add the desired role for the non-administrative user. Select the ROLE_USER and hit the Add Selected button as shown in Fig. 11.
Repeat the same user creation steps for the administrative user (named – admin_user) but assign the user ROLE_ADMIN instead.
4. Creating a Spring Boot application
Below are the steps involved in developing the application.
4.1 Maven Dependency
Here, we specify the dependency for the Spring boot (web and security), Lombok, and Keycloak spring boot starter (required for keycloak configuration). Maven will automatically resolve the other dependencies. The updated file will have the following code.
pom.xml
<?xml version="1.0" encoding="UTF-8"?>
<project xmlns="http://maven.apache.org/POM/4.0.0"
	xmlns:xsi="http://www.w3.org/2001/XMLSchema-instance"
	xsi:schemaLocation="http://maven.apache.org/POM/4.0.0 https://maven.apache.org/xsd/maven-4.0.0.xsd">
	<modelVersion>4.0.0</modelVersion>

	<parent>
		<groupId>org.springframework.boot</groupId>
		<artifactId>spring-boot-starter-parent</artifactId>
		<version>2.4.1</version>
		<relativePath /> <!-- lookup parent from repository -->
	</parent>

	<groupId>com.springboot.keycloak</groupId>
	<artifactId>SpringbootandKeycloak</artifactId>
	<version>0.0.1-SNAPSHOT</version>
	<name>SpringbootandKeycloak</name>
	<description>Springboot and Keycloak</description>

	<properties>
		<java.version>1.8</java.version>
		<keycloak.springboot.version>11.0.3</keycloak.springboot.version>
	</properties>

	<dependencies>
		<dependency>
			<groupId>org.springframework.boot</groupId>
			<artifactId>spring-boot-starter</artifactId>
		</dependency>
		<dependency>
			<groupId>org.springframework.boot</groupId>
			<artifactId>spring-boot-starter-security</artifactId>
		</dependency>
		<dependency>
			<groupId>org.springframework.boot</groupId>
			<artifactId>spring-boot-starter-web</artifactId>
		</dependency>
		<dependency>
			<groupId>org.keycloak</groupId>
			<artifactId>keycloak-spring-boot-starter</artifactId>
			<version>${keycloak.springboot.version}</version>
		</dependency>
		<dependency>
			<groupId>org.projectlombok</groupId>
			<artifactId>lombok</artifactId>
			<optional>true</optional>
		</dependency>

		<dependency>
			<groupId>org.springframework.boot</groupId>
			<artifactId>spring-boot-starter-test</artifactId>
			<scope>test</scope>
		</dependency>
		<dependency>
			<groupId>org.springframework.security</groupId>
			<artifactId>spring-security-test</artifactId>
			<scope>test</scope>
		</dependency>
	</dependencies>

	<build>
		<plugins>
			<plugin>
				<groupId>org.springframework.boot</groupId>
				<artifactId>spring-boot-maven-plugin</artifactId>
				<configuration>
					<excludes>
						<exclude>
							<groupId>org.projectlombok</groupId>
							<artifactId>lombok</artifactId>
						</exclude>
					</excludes>
				</configuration>
			</plugin>
		</plugins>
	</build>

</project>
4.2 Application YML file
Create a new Yml file at the location: SpringbootandKeycloak/src/main/resources/ and add the following code to it. Here we will define the application and keycloak server configuration (such as – realm, resource, bearer-only, and authentication-server-url).
application.yml
# application configuration
server:
  port: 9000
# keycloak configuration
keycloak:
  # name of the created realm
  realm: jcgassignment
  # name of the created client
  resource: spring-security-demo-app
  # indicates that our service has been created as a bearer-only (by default it is false)
  bearer-only: true
  # url of our Keycloak server
  auth-server-url: 'http://localhost:8100/auth'
4.3 Java Classes
Let us write all the java class(es) involved in this application.
4.3.1 Implementation/Main class
Add the following code to the main class to bootstrap the application from the main method. Always remember, the entry point of the spring boot application is the class containing @SpringBootApplication annotation and the static main method.
SpringbootandKeycloakApplication.java
package com.springboot.keycloak;

import lombok.extern.slf4j.Slf4j;
import org.springframework.boot.SpringApplication;
import org.springframework.boot.autoconfigure.SpringBootApplication;

@SpringBootApplication
@Slf4j
public class SpringbootandKeycloakApplication {

    public static void main(String[] args) {
        SpringApplication.run(SpringbootandKeycloakApplication.class, args);
        log.info("Spring boot and keycloak application is started successfully.");
    }
}
4.3.2 Security configuration class
Add the following code to the security configuration class. The class will be annotated with the @KeycloakConfiguration annotation to provide a keycloak based spring security configuration.
KeycloakConfig.java
package com.springboot.keycloak.config;

import org.keycloak.adapters.KeycloakConfigResolver;
import org.keycloak.adapters.springboot.KeycloakSpringBootConfigResolver;
import org.keycloak.adapters.springsecurity.KeycloakConfiguration;
import org.keycloak.adapters.springsecurity.authentication.KeycloakAuthenticationProvider;
import org.keycloak.adapters.springsecurity.config.KeycloakWebSecurityConfigurerAdapter;
import org.springframework.beans.factory.annotation.Autowired;
import org.springframework.context.annotation.Bean;
import org.springframework.security.config.annotation.authentication.builders.AuthenticationManagerBuilder;
import org.springframework.security.config.annotation.method.configuration.EnableGlobalMethodSecurity;
import org.springframework.security.config.annotation.web.builders.HttpSecurity;
import org.springframework.security.core.authority.mapping.SimpleAuthorityMapper;
import org.springframework.security.web.authentication.session.NullAuthenticatedSessionStrategy;
import org.springframework.security.web.authentication.session.SessionAuthenticationStrategy;

// provides keycloak based spring security configuration
// annotation covers 2 annotations - @Configuration and @EnableWebSecurity
@KeycloakConfiguration
// enables global method security and @PreAuthorize annotations
@EnableGlobalMethodSecurity(prePostEnabled = true)
public class KeycloakConfig extends KeycloakWebSecurityConfigurerAdapter {

    // sets KeycloakAuthenticationProvider as an authentication provider
    // sets SimpleAuthorityMapper as the authority mapper
    @Autowired
    protected void configureGlobal(final AuthenticationManagerBuilder auth) {
        final KeycloakAuthenticationProvider provider = super.keycloakAuthenticationProvider();
        provider.setGrantedAuthoritiesMapper(new SimpleAuthorityMapper());
        auth.authenticationProvider(provider);
    }

    @Bean
    @Override
    protected SessionAuthenticationStrategy sessionAuthenticationStrategy() {
        return new NullAuthenticatedSessionStrategy();
    }

    // ensure that spring boot will resolve the keycloak configuration
    // from application.yml (or application.properties)
    @Bean
    public KeycloakConfigResolver keycloakConfigResolver() {
        return new KeycloakSpringBootConfigResolver();
    }

    @Override
    protected void configure(final HttpSecurity httpSecurity) throws Exception {
        super.configure(httpSecurity);
        httpSecurity
                .authorizeRequests()
                .antMatchers("/api/public/**").permitAll()
                .anyRequest().fullyAuthenticated();
    }
}
4.3.3 Controller class
Add the following code to the controller class. The two methods require the bearer-token to either have the ROLE_USER or ROLE_ADMIN assigned to the user. If not, the forbidden exception will be thrown by the API. The last method will work without a bearer token as it offers public access.
SampleController.java
package com.springboot.keycloak.controller;

import lombok.extern.slf4j.Slf4j;
import org.keycloak.KeycloakSecurityContext;
import org.springframework.http.ResponseEntity;
import org.springframework.security.access.prepost.PreAuthorize;
import org.springframework.web.bind.annotation.GetMapping;
import org.springframework.web.bind.annotation.RequestMapping;
import org.springframework.web.bind.annotation.RestController;
import org.springframework.web.context.request.RequestContextHolder;
import org.springframework.web.context.request.ServletRequestAttributes;

import javax.servlet.http.HttpServletRequest;

@RestController
@RequestMapping(value = "/api")
@Slf4j
public class SampleController {

    // url - http://localhost:9000/api/keycloak/user
	// permits only the authenticated user having either the ROLE_ADMIN or ROLE_USER
	// throws forbidden exception for the invalidated token or non authorized user
    @GetMapping("/keycloak/user")
    @PreAuthorize("hasRole('USER')")
    public ResponseEntity<String> getUser() {
        log.info("Returning user information");
        final String name = getSecurityContext().getToken().getPreferredUsername();
        return ResponseEntity.ok("hello " + name);
    }

    // url - http://localhost:9000/api/keycloak/admin
    // permits only the authenticated user having the ROLE_ADMIN
    // throws forbidden exception for the invalidated token or non authorized user
    @GetMapping("/keycloak/admin")
    @PreAuthorize("hasRole('ADMIN')")
    public ResponseEntity<String> getAdmin() {
        log.info("Returning administrator information");
        final String name = getSecurityContext().getToken().getPreferredUsername();
        return ResponseEntity.ok("hello " + name);
    }

    // url - http://localhost:9000/api/public/anonymous
    // permits everyone without a bearer token i.e. offers public access
    @GetMapping("/public/anonymous")
    public ResponseEntity<String> getAnonymous() {
        log.info("Returning anonymous information");
        return ResponseEntity.ok("hello anonymous user");
    }

    // helper method to return the KeycloakSecurityContext object to fetch details from access token
    private KeycloakSecurityContext getSecurityContext() {
        final HttpServletRequest request = ((ServletRequestAttributes) RequestContextHolder.currentRequestAttributes()).getRequest();
        return (KeycloakSecurityContext) request.getAttribute(KeycloakSecurityContext.class.getName());
    }
}
5. Run the Application
To execute the application, right-click on the SpringbootandKeycloakApplication.java class, Run As -> Java Application.

6. Project Demo
When the application is started, you can use the generate access token endpoint exposed by the keycloak server to generate the JWT token for the user (remember to add the client_id, grant_type, username, and password headers in the POST request). You are free to use postman or any other tool of your choice to make a post request to the endpoint.
Generate access token endpoint
-- HTTP POST endpoint url –
-- the url should be of the keycloak server and jcgassignment denotes the realm name --
http://localhost:8100/auth/realms/jcgassignment/protocol/openid-connect/token
Once the user credential is validated successfully; the response returned by the keycloak server will contain the administrator access token. You can read the contents of this access token on the jwt.io website by pasting the token string in the encoded textbox. Remember that this JWT token will be used to query the application’s protected endpoints.
{
	"access_token": "[SOME_ACCESS_TOKEN]",
	"expires_in": 300,
	"refresh_expires_in": 1800,
	"refresh_token": "[SOME_REFRESH_TOKEN]",
	"token_type": "bearer",
	"not-before-policy": 0,
	"session_state": "01f91559-d895-49fd-90f4-975e17ff952a",
	"scope": "profile email"
}
To fully validate the other endpoints you can query all of them with different tokens (i.e. administrative user and non-administrative user access tokens) and analyze the results. Remember to add the authorization header in the request as the header will contain the bearer token. You can download the sample postman collection from the downloads section
-- HTTP GET endpoint url (for non-administrative user) –
-- permits only the authenticated user having either the ROLE_ADMIN or ROLE_USER –
-- throws a forbidden exception for the invalidated token or non authorized user --
http://localhost:9000/api/keycloak/user

-- HTTP GET endpoint url (for administrative user) –
-- permits only the authenticated user having the ROLE_ADMIN –
-- throws a forbidden exception for the invalidated token or non authorized user --
http://localhost:9000/api/keycloak/admin

-- HTTP GET endpoint url (for administrative user) –
-- permits everyone without a bearer token i.e. offers public access --
http://localhost:9000/api/public/anonymous
That is all for this tutorial and I hope the article served you whatever you were looking for. Happy Learning and do not forget to share!
7. Summary
In this section, you learned,
- Spring boot, Keycloak, and Lombok introduction
- Steps to run the keycloak server on Docker using the
docker-composecommand - Steps to configure the keycloak server for creating realm, clients, users, and roles
- Steps to implement keycloak in Spring Boot
You can download the sample application as an Eclipse project in the Downloads section.
8. Download the Project
This was an example of implementing Keycloak in a Spring Boot application.
You can download the full source code of this example here: Keycloak in a Spring Boot Application
