This article discusses Weblogic(J2EE application server) plugin for Maven, a robust build and dependency manager.
1. Introduction
WebLogic is a J2EE application server and also an HTTP web server for Unix, Linux, Microsoft Windows, and other platforms. WebLogic supports Oracle, DB2, Microsoft SQL Server, and other JDBC-compliant databases. It provides a standard set of APIs for creating distributed Java applications that can access a wide variety of services like
- Web Services
- Web applications (HTML, Java ServerPages-JSP, ..)
- Remote Method Invocation (RMI)
- Java Database Connectivity (JDBC)
Maven is a build automation tool used primarily for Java projects. Maven describes how software is built and the dependencies needed for building it. Maven uses convention over configuration and only non default behaviours need to be explicitly defined. XML is used as the configuration language of choice. It comes with pre-defined targets for performing certain well-defined tasks such as compilation of code and its packaging.
Maven dynamically downloads Java libraries and Maven plug-ins from one or more repositories such as the Maven 2 Central Repository, and stores them in a local cache. This local cache of downloaded artifacts can also be updated with artifacts created by local projects.
2. Installation
This section will cover the detailed steps of installing WebLogic and also Maven. The final subsection will walk through creating a simple spring project and its deploy to WebLogic. The prerequisite for installation is that the system must already have JDK installed.
2.1 WebLogic
WebLogic can be downloaded from the Oracle site for the appropriate platform of choice. The download needs an oracle account and the downloaded artifact is a zip file. Unzip the file to a location of choice and navigate to the archived directory in the command line. The config.sh file located in thebin directory should be executed as below
sh wls12213/oracle_common/common/bin/config.sh
This opens up a configuration wizard similar to the screenshot below.
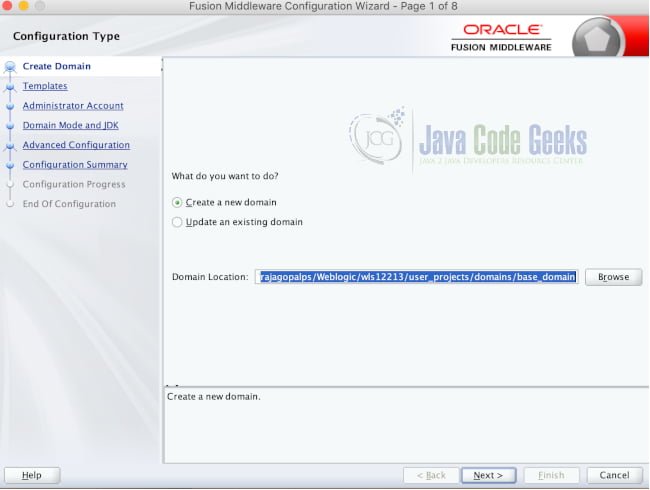
This will help to create a webLogic Domain under which servers and subsequently our application deployments can be created. By default there will be a single admin server under a domain. The Wizard steps should be followed as specified below in list
- In Create Domain Using Product Templates Screen, Select default and navigate to the next wizard
- Next is the configuration of administrator account. Provide a username and password for the WebLogic Domain.
- The next screen is Domain Mode and JDK which has values populated by default as development and the JDK installation path.
- Click Next till the summary page for the defaults and click on Create to create the WebLogic domain.
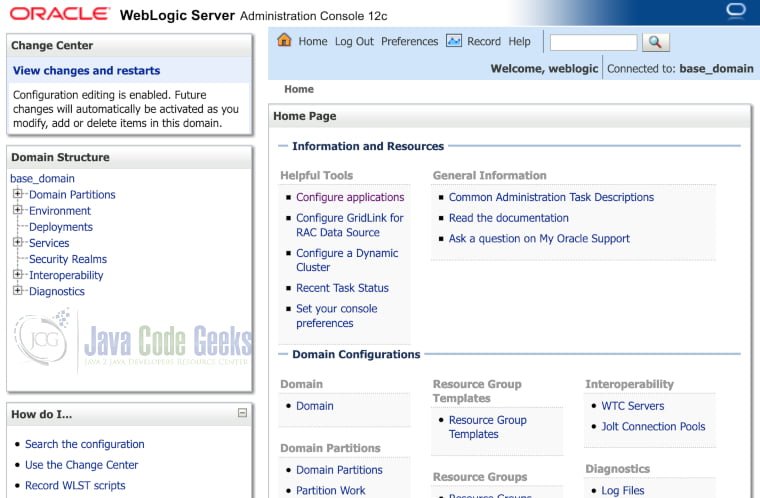
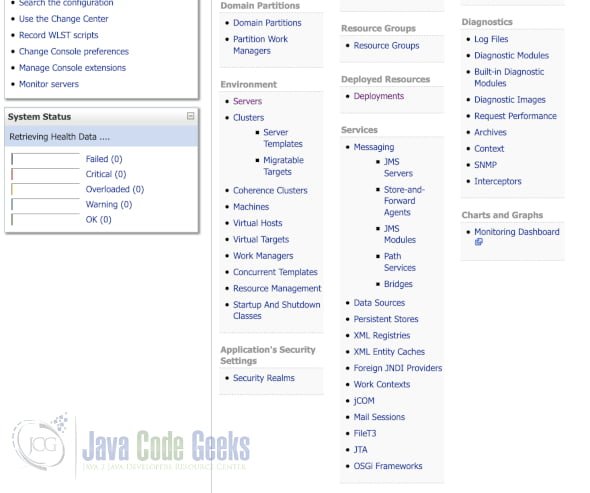
Once the domain is created, navigate to the domain directory created similar to wls12213/user_projects/domains/base_domain in the command line. Execute the startWeblogic.sh from the command line. This starts the WebLogic daemon and once the startup complete is identified from the console logs, navigate to the link in the browser. Use the already provided username and password in the console. This should take us to the WebLogic administration page as shown below.
2.2 Maven
This involves installing the maven in our platform for dependency management and building the application.
Maven can be downloaded from the URL. This provides maven binaries for the appropriate platforms. Alternatively in Linux and Mac environments maven can be installed by the default installers(eg: brew for mac and apt for Ubuntu). Maven installation can be verified by executing the command mvn -version.
Almost all Java IDEs support creating a maven project. We will create a simple maven project in the next subsection.
2.3 Simple Project
The below section shows a configuration for Spring boot Maven project will all dependencies required for running the project.
pom.xml
<?xml version="1.0" encoding="UTF-8"?>
<project xmlns="http://maven.apache.org/POM/4.0.0"
         xmlns:xsi="http://www.w3.org/2001/XMLSchema-instance"
         xsi:schemaLocation="http://maven.apache.org/POM/4.0.0 http://maven.apache.org/xsd/maven-4.0.0.xsd">
    <modelVersion>4.0.0</modelVersion>

    <groupId>com.jcg</groupId>
    <artifactId>webappdemo</artifactId>
    <version>1.0</version>
    <packaging>war</packaging>

    <parent>
        <groupId>org.springframework.boot</groupId>
        <artifactId>spring-boot-starter-parent</artifactId>
        <version>2.1.3.RELEASE</version>
        <relativePath/>
    </parent>

    <properties>
        <java.version>1.8</java.version>
    </properties>

    <dependencies>
        <dependency>
            <groupId>org.springframework.boot</groupId>
            <artifactId>spring-boot-starter-web</artifactId>
        </dependency>

        <dependency>
            <groupId>org.springframework.boot</groupId>
            <artifactId>spring-boot-starter-tomcat</artifactId>
            <scope>provided</scope>
        </dependency>
    </dependencies>

    <build>
        <plugins>
            <plugin>
                <groupId>org.springframework.boot</groupId>
                <artifactId>spring-boot-maven-plugin</artifactId>
            </plugin>
            <plugin>
                <groupId>org.apache.maven.plugins</groupId>
                <artifactId>maven-war-plugin</artifactId>
                <configuration>
                    <failOnMissingWebXml>false</failOnMissingWebXml>
                    <archive>
                        <manifest>
                            <addDefaultImplementationEntries>false</addDefaultImplementationEntries>
                        </manifest>
                    </archive>
                </configuration>
            </plugin>
        </plugins>
    </build>
</project>
- Since the project needs to be installed to WebLogic Server, the packaging is provided as
WARfile. - Spring Boot Starter for Web is provided to create a web application and Tomcat is added for local testing.
- Spring Boot Maven plugin is provided to add the capability for Maven to build a Spring Boot project.
- To support
WARpackaging, the Maven WAR plugin is added and is configured not to throw an error whenWEB.xmlis not found.
The project contains a simple controller which just displays Hello on the screen. For the controller to work, We need to add the following supporting files
HelloController.java
@RestController
@RequestMapping("/hello")
public class HelloController {

    @RequestMapping(method = RequestMethod.GET)
    String sayHello() {
        return "hello!";
    }
}- This is a simple Spring Rest controller which is running at endpoint /hello
- A get Method is configured for the root endpoint which returns the string hello!
SpringBootWebLogicApplication.java
@SpringBootApplication
public class SpringBootWebLogicApplication extends SpringBootServletInitializer implements WebApplicationInitializer {
    public static void main(String[] args) {
        SpringApplication.run(SpringBootWebLogicApplication.class, args);
    }

    @Override
    protected SpringApplicationBuilder configure(SpringApplicationBuilder builder) {
        return builder.sources(SpringBootWebLogicApplication.class);
    }
}- This is the main starting point of execution for SpringBoot Application which is indicated by annotating with
SpringBootApplication. - The class extends
SpringBootServletInitializerandWebApplicationInitializerto indicate it is a web application. - The class also initializes
DispatcherServletwhich will be used to serve requests.
application.properties
server.port=8080
server.servlet.context-path=/demo
- We specify the application should be running on port 8080 in embedded mode
- The context path is also provided as
/demoso that in embedded mode application runs under the specified root.
dispatcher-servlet.xml
<beans xmlns="http://www.springframework.org/schema/beans"
       xmlns:xsi="http://www.w3.org/2001/XMLSchema-instance"
       xsi:schemaLocation="http://www.springframework.org/schema/beans http://www.springframework.org/schema/beans/spring-beans.xsd">
</beans>
- Only spring beans declaration has been provided to indicate that spring dispatcher Servlet will be used to handle incoming requests for the application.
weblogic.xml
<?xml version = '1.0' encoding = 'UTF-8'?>
<weblogic-web-app
        xmlns:xsi="http://www.w3.org/2001/XMLSchema-instance"
        xsi:schemaLocation="http://xmlns.oracle.com/weblogic/weblogic-web-app http://xmlns.oracle.com/weblogic/weblogic-web-app/1.5/weblogic-web-app.xsd"
        xmlns="http://xmlns.oracle.com/weblogic/weblogic-web-app">
    <context-root>/demo</context-root>
    <container-descriptor>
        <prefer-application-packages>
            <package-name>org.slf4j.*</package-name>
            <package-name>org.springframework.*</package-name>
        </prefer-application-packages>
    </container-descriptor>

</weblogic-web-app>
- We specify the context root as /demo for our WebLogic application.
- We specified the list of application packages such as spring and
slf4jalso to be retained under WebLogic application. This ensures that SpringServletserves the request andSLF4Jlogging package is also included for logging purpose.
The application can be executed by running the file SpringBootWebLogicApplication.java. On Execution, we can open the browser with the URL. This opens a webpage with the text Hello!. The application can be built as a war file by executing the command mvn install. This generates a WAR artifact in the target directory. This WAR file can be manually deployed to the WebLogic Server configured as part of section 2.1. This can be done by moving to the deployment section in the WebLogic Server administration console and uploading the WAR file.
3. Maven Plugin
We already covered two plugins in the previous section( Maven WAR and SpringBoot plugin). Plugins are way to extend additional capability to the Maven using the interface specified by Maven. We will use the maven plugin architecture to add the weblogic dependencies to our local maven repository in the next subsection.
3.1 Push Goal
The first aim is to use the Weblogic Dependencies in our Maven project. To enable this, We need to use Oracle Maven Sync plugin. We cannot directly access Oracle Maven dependencies directly. To obtain the Oracle dependencies, navigate to the directory wls12213/oracle_common/plugins/maven/com/oracle/maven/oracle-maven-sync/12.2.1 and run the below command
mvn install:install-file -DpomFile=oracle-maven-sync-12.2.1.pom -Dfile=oracle-maven-sync-12.2.1.jar
Executing the above command copies the Oracle dependencies to the local maven repository available in <userdir>/.m2. This will serve as the basis for adding the Oracle plugins in maven. The below configuration utilizes the maven plugin to configure the push goal
pom.xml
<plugin>
                <groupId>com.oracle.maven</groupId>
                <artifactId>oracle-maven-sync</artifactId>
                <version>12.2.1-3-0</version>
                <configuration>
                    <oracleHome>/Weblogic/wls12213/</oracleHome>
                </configuration>
            </plugin>
- The above configuration specifies the Oracle Home directory to be used for copying the dependencies
- All the weblogic dependencies can be pushed by executing the command below
mvn com.oracle.maven:oracle-maven-sync:push -Dmaven.local.repo=/.m2/repository/
3.2 WebLogic Deploy
The previous subsection is a dependency for this subsection to work. Once all the WebLogic dependencies are copied to our local repository, We can use the WebLogic Maven Plugin to deploy the artifact to WebLogic Directly.
pom.xml
<plugin>
                <groupId>com.oracle.weblogic</groupId>
                <artifactId>weblogic-maven-plugin</artifactId>
                <version>12.2.1-3-0</version>
                <configuration>
                    <adminurl>t3://localhost:7001</adminurl>
                    <user>username</user>
                    <password>password</password>
                    <upload>true</upload>
                    <remote>false</remote>
                    <verbose>true</verbose>
                    <source>./target/webappdemo-1.0.war</source>
                    <name>${project.build.finalName}</name>
                </configuration>
                <executions>
                    <execution>
                        <phase>install</phase>
                        <goals>
                            <goal>deploy</goal>
                        </goals>
                    </execution>
                </executions>
            </plugin>
- We specify the local URL of WebLogic along with the username and password needed for the administration console.
- We provide the location to the WAR file available in our target directory.
- We provide the application name as build name.
- We indicate deploy as a subgoal of install phase ensuring that the deploy task is called when
mvn installis executed.
Now running mvn install not only generates the artifact but also automatically deploys to the WebLogic Server. The WebLogic Server must be up and running for this command to work.
4. Download the Source code
You can download the full source code of this example here: WebLogic Maven Plugin Example

Nicely put with actual steps. Can you also post an example with jndi lookup defined in weblogic server example