1. Introduction
In this example, we will learn how to use JDBC shipped with Java SE. The purpose of JDBC is to make possible interaction with any database in a generic way. This is to hide such details which are specific to the database vendor and expose a generic interface for client applications. We will see how to connect to a database and how to manipulate data stored in it. We will create a register which stores personal contact data like email and phone number.
Table Of Contents
2. Environment and project setup
2.1 Tools used
We will use MySQL as the database and MySQL Workbench as the client. Eclipse as IDE and Java 8 SE.
2.2 Database setup
We will use MySQL Workbench to manage the database status and create table. If you haven’t done this already, download MySQL from here https://dev.mysql.com/downloads/mysql/ and install it. Having successfully installed MySQL you can start up the database and connect to it via Workbench.
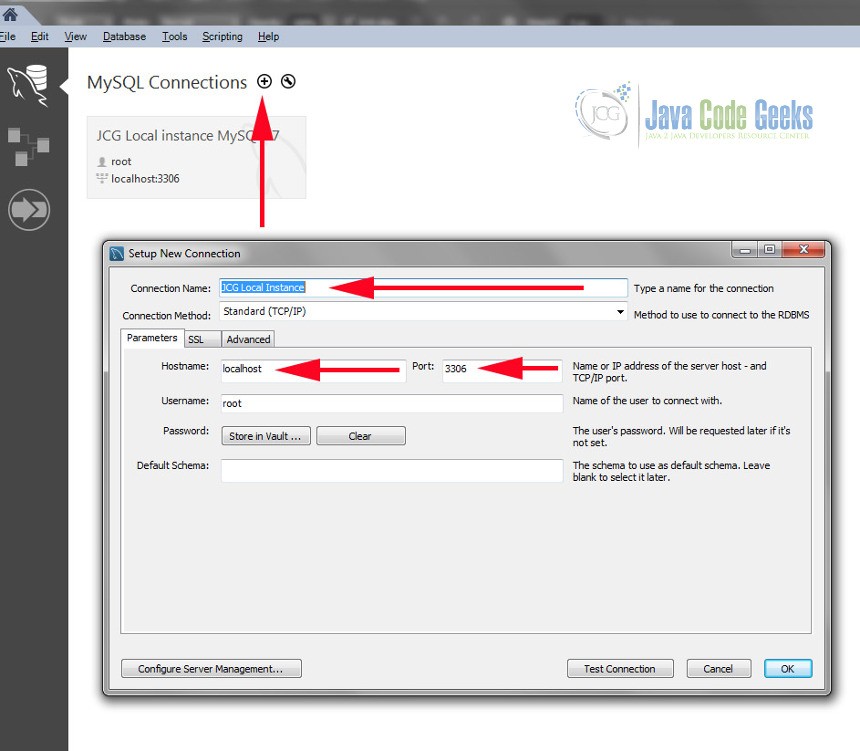
Start Workbench and click on MySQL connections to create a new connection. Make sure you are connecting to the locally installed instance hostname: localhost port: 3306 and then click OK.
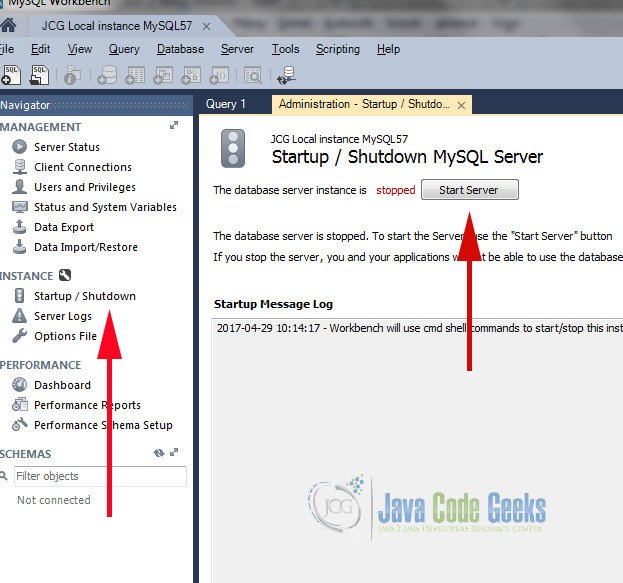
Followed a successful connection the instance can be managed. Probably this is the first time you’re trying to connect hence the database needs to be started up. Go to the left menu and under INSTACE you will find Startup / Shutdown.
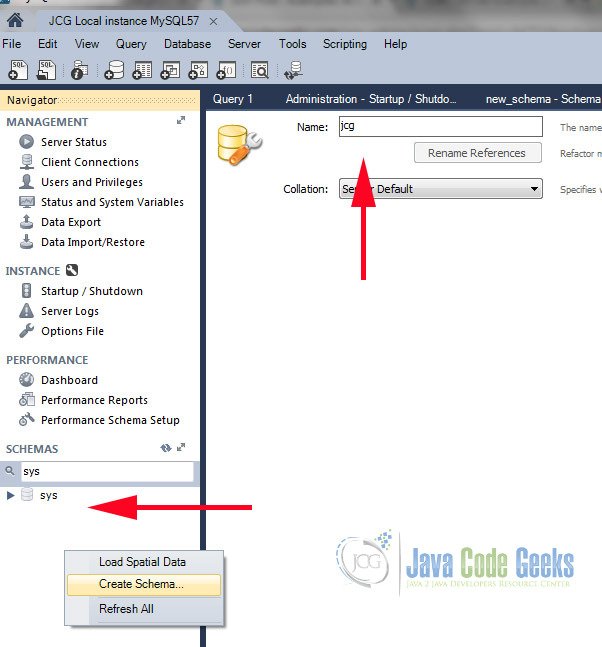
As a next step create a schema. The schema is a logical unit which groups database entities. To create one go to the empty area under SCHEMAS and right click on it. Name it arbitrarily e.g. jcg.
Now you need to create a table within that schema. To create a table called register execute the below SQL expression in workbench.
create register table
|
1
2
3
4
5
6
|
CREATE TABLE `jcg`.`register` (`first_name` VARCHAR(45) NOT NULL,`last_name` VARCHAR(45) NOT NULL,`phone` VARCHAR(45) NULL,`email` VARCHAR(45) NULL,PRIMARY KEY (`first_name`,`last_name`)); |
We are done with the preparation. We can start setup the Eclipse project and do the programming part.
2.3 Eclipse project setup
Download maven from here: https://maven.apache.org/download.cgi . We will use it for dependency management. Create a java project called example and add a pom.xml to the project. The pom.xml describes the project dependencies. We use a single dependency which is the driver of the MySql database. Add the below snippet to the dependency section in the pom.xml
MySql dependency
|
1
2
3
4
5
|
<dependency> <groupId>mysql</groupId> <artifactId>mysql-connector-java</artifactId> <version>5.1.6</version></dependency> |
Start a terminal on windows. Go to the directory where your project is located. Execute the mvn eclipse:eclipse command. The dependencies are now downloaded and added to your eclipse project. Finally, create a package jcg and within the jcg package, create a class named register.java. Your project should look like the below picture now.

3. The JDBC register example
There are three main activities we will cover and demonstrate the implementation of them, with the help of an example application which can be download from here. These are the most typical use-cases which you would face in a real-word project:
- setup the connection with the Database
- execute SQL commands
- process the result of queries
3.1 Common part of the application
The application can handle INSERT, SELECT or UPDATE requests. You can select one of them with the help of the first argument which can be accordingly INSERT , SELECT or UPDATE. We have an enum which represents these values. We convert the input string argument to an enum type. If the input parameter does not match with any of the enum entries, then an IllegalArgumentException is thrown and, as a result, the application terminates.
Handling arguments
|
01
02
03
04
05
06
07
08
09
10
11
12
13
14
15
16
17
18
19
20
21
22
23
24
25
26
|
public enum SQLType { INSERT, UPDATE, SELECT, DELETE;}public static void main(String [] args) { if (args.length == 0) { System.err.println("Specify cmd type and parameters: INSERT|UPDATE|SELECT [columns ...]"); System.exit(1); } SQLType type = SQLType.valueOf(args[0]); switch(type) { case INSERT: insert(args); break; case SELECT: select(); break; case UPDATE: update(args); break; case DELETE: delete(args); }} |
The next step is when a switch statement decides which functionality (insert, select, update) to execute.
Whatever you choose, the first thing which will be done is an attempt to make a database connection. Connecting to the database is implemented in the connect method. In the connect method we compose the connection string and pass it to the getConnection method. In the connection string jdbc:mysql://localhost:3306/jcg?user=test&password=test we specify the protocol, address of the Database, user and password. Finally, it is the DriverManager responsibility to select an appropriate driver to the Database. Having successfully connected, arbitrary SQL commands can be issued.
Create a Connection object
|
1
2
3
4
5
|
private static Connection connect() throws SQLException { String connectStr = "jdbc:mysql://localhost:3306/jcg?user=test&password=test"; System.out.println("Connecting to: "+ connectStr); return DriverManager.getConnection(connectStr);} |
The application demonstrates different approaches how you can execute INSERT, SELECT, UPDATE, DELETE SQL requests. We start with INSERT.
3.2 Insert data to the database
To start up the application go to Run and click on Run Configuration. As a result Run Configuration menu comes up:
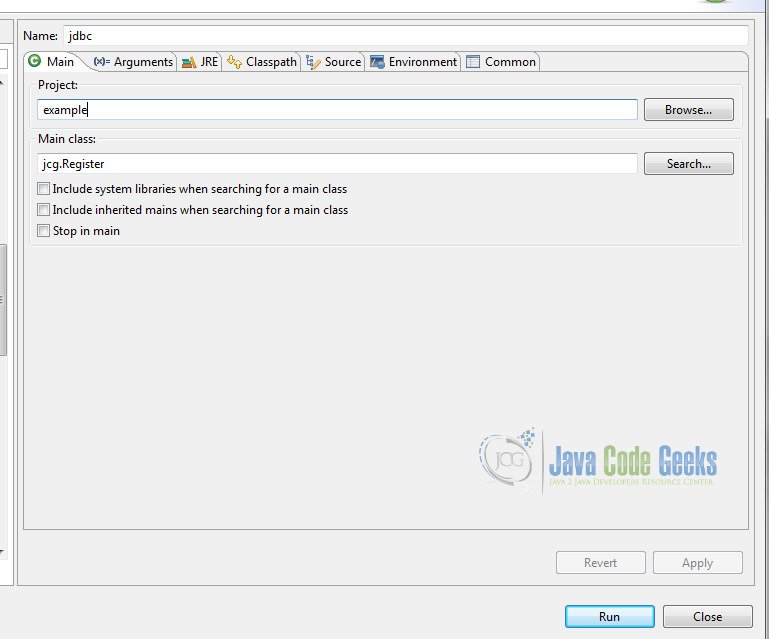
Next step is to specify the program arguments: SQL command type, first name, last name, phone number, mail:
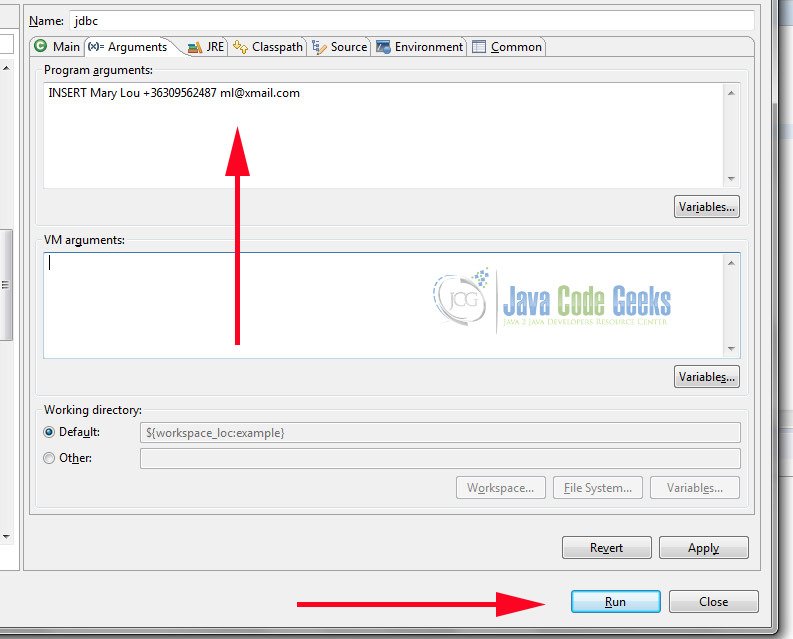
You have just specified the content you want to insert to the database as arguments, finally click on run. Followed successfully execution a new entry is inserted to the database which you can verify via workbench. Or as the next step do a SELECT query.
See the whole code below which was executed. We go through the steps in the next section where we can compare with the flow of querying data.
Insert an entry to the database
|
01
02
03
04
05
06
07
08
09
10
11
12
13
|
public static void insert(String[] args) { System.out.println("insert"); try(Connection dbc = connect() ) { PreparedStatement ppStmt = dbc.prepareStatement("INSERT INTO jcg.register VALUES (?,?,?,?)"); ppStmt.setString(1,args[1]); ppStmt.setString(2,args[2]); ppStmt.setString(3,args[3]); ppStmt.setString(4,args[4]); ppStmt.execute(); } catch (SQLException se) { System.out.println(se); }} |
3.3 Select data from the database
The flow is petty much as it was before, but the type of the SQL command in the first argument is different. If you take a closer look at the implementation of the select and insert method, you will realise that something is fundamentally different. JDBC provides a hierarchy of Statement interfaces which consequently provides different level of control i.e. on the SQL parameters. In the SELECT statement we do not use parameters therefore a static query is appropriate consequently we use Statement.
Execute select with Statement
|
01
02
03
04
05
06
07
08
09
10
11
12
13
14
15
|
public static void select() { try(Connection dbc = connect() ) { Statement stmt = dbc.createStatement(); ResultSet result = stmt.executeQuery("SELECT * from jcg.register"); while(result.next()) { for(int i = 1; i <= result.getMetaData().getColumnCount(); i++) { System.out.println("Column Name: " + result.getMetaData().getColumnName(i) + " Value: " +result.getObject(i)); } System.out.println(); } } catch (SQLException se) { System.out.println(se); }} |
However if you want to reuse the SQL query with different parameters then use PreparedStatement as we did it in the insert method.
Usage of PreparedStatement
|
1
2
3
4
5
6
|
PreparedStatement ppStmt = dbc.prepareStatement("INSERT INTO jcg.register VALUES (?,?,?,?)");ppStmt.setString(1,args[1]);ppStmt.setString(2,args[2]);ppStmt.setString(3,args[3]);ppStmt.setString(4,args[4]);ppStmt.execute(); |
Parameters are specified via setter methods where the first argument is the parameter index and the second parameter is the value. If you happen to use Spring JDBC there is a much convenient way to define the query parameters. You can define them as key value pairs where the key it the name of the column. To learn more about JDBC Named Parameters read : https://examples.javacodegeeks.com/enterprise-java/spring/jdbc/jdbc-named-parameters-example-spring-namedparameterjdbctemplate/
Let’s move back to the end of the select method. In the final part of the method we process the returned ResultSet object. On one hand the ResultSet contains the actual values in tabular format, on the other hand it contains metadata. To iterate over the result simply call next on it. The call to next, moves the cursor one row from its current position.
If you run the application with a single argument SELECT, your output should look like below
Output of the select query
|
1
2
3
4
|
Column Name: first_name Value: MaryColumn Name: last_name Value: LouColumn Name: phone Value: +36309562487Column Name: email Value: ml@xmail.com |
3.4 Update database
Updating the database not necessarily means directly issuing an UPDATE SQL command. Let’s see a different way of updating the database. In this example we select data using the first_name and last_name column content. If columns data is matching with the vale specified in the arguments then we do the update.
Select and filter data
|
1
2
3
|
PreparedStatement ppStmt = dbc.prepareStatement("SELECT * FROM jcg.register WHERE first_name = ? AND last_name = ?", ResultSet.TYPE_SCROLL_SENSITIVE, ResultSet.CONCUR_UPDATABLE);ppStmt.setString(1, args[1]);ppStmt.setString(2, args[2]); |
Note the additional parameters in the prepareStatement call. The first parameter is the SQL query itself the second instructs the library to reflect underlying database changes and the third one makes possible to update the ResutSet.
We update the ResultSet object using key value pairs where the key is the column label. Finally, an updateRow call updates the underlying database.
Update database
|
1
2
3
|
result.updateString("phone", args[3]);result.updateString("email", args[4]);result.updateRow(); |
If you run the application with the parameters: UPDATE Mary Lou +3630111111 ml@ymail.com then it will update Mary Lou’s phone number and email. The output is:
Database update output
|
01
02
03
04
05
06
07
08
09
10
11
|
Before update:Column Name: first_name Value: MaryColumn Name: last_name Value: LouColumn Name: phone Value: +36309562487Column Name: email Value: ml@xmail.comAfter update:Column Name: first_name Value: MaryColumn Name: last_name Value: LouColumn Name: phone Value: +3630111111Column Name: email Value: ml@ymail.com |
3.5 Update database
To delete data from the database specify DELETE as the first argument. Additionally we use the second and the third arguments in the WHERE condition. If first_name and last_name matches then the entry will be deleted from the database. We use PreparedStatement to build the query. From JDBC point of view there isn’t any new to thing to explore in the below code. Only The SQL statement differs from the previously described constructs.
Delete an entry from the database
|
01
02
03
04
05
06
07
08
09
10
11
|
public static void delete(String[] args) { System.out.println("delete"); try(Connection dbc = connect() ) { PreparedStatement ppStmt = dbc.prepareStatement("DELETE FROM jcg.register WHERE first_name = ? AND last_name = ?"); ppStmt.setString(1,args[1]); ppStmt.setString(2,args[2]); ppStmt.execute(); } catch (SQLException se) { System.out.println(se); }} |
4. Summary
In this post we focused on demonstrating the usage of JDBC with the help of an example.
We covered the below areas:
- set up the proper driver for a RDBMS
- connecting to a database, content of the connection url
- we saw how to INSERT, SELECT, UPDATE, DELETE data in or from a database
- difference between Statement and PreparedStatement
- usage of the ResultSet object
