In this tutorial, we will learn about how to set up a JDBC connection to an Amazon Redshift cluster. We will also discuss and analyze a coding example where we connect to an Amazon Redshift Cluster via JDBC and perform CRUD operations on a table.
1. What is Amazon Redshift?
Amazon Redshift is a fully managed data warehouse service in the cloud. It is based on PostgreSQL 8.0.2. However, there a number of important differences between the two.
Amazon Redshift comes with the following set of rich features:
- Faster performance
- Easy to set up, deploy, & manage
- Cluster management
- Cost-effective
- Quickly scalable (Petabyte-scale data warehousing)
- Amazon S3 Data Lake Query Support
First-time users of Redshift are recommended to go through the sections on the Home Page of Amazon Redshift.
1.1. Databases and Users
When we provision a Redshift cluster, a database is also created which can be utilised to load data and run queries on the loaded data. We can also create additional databases by following the Create Database section of the Amazon Redshift Database developers guide.
At the time of provisioning a Redshift cluster, we need to define a master user. This user is a superuser and has access to all the databases created within the cluster and also has the privileges to create additional Superusers and Users.
2. JDBC Connection to Redshift
Since Redshift is a PostgreSQL variant, Amazon previously recommended using the JDBC4 Postgresql driver. Amazon also provides a Redshift specific JDBC driver and now recommends to use the same going forward.
In this tutorial, we will use the Amazon Redshift JDBC driver instead of the PostgreSQL driver.
2.1. Redshift Cluster JDBC URL
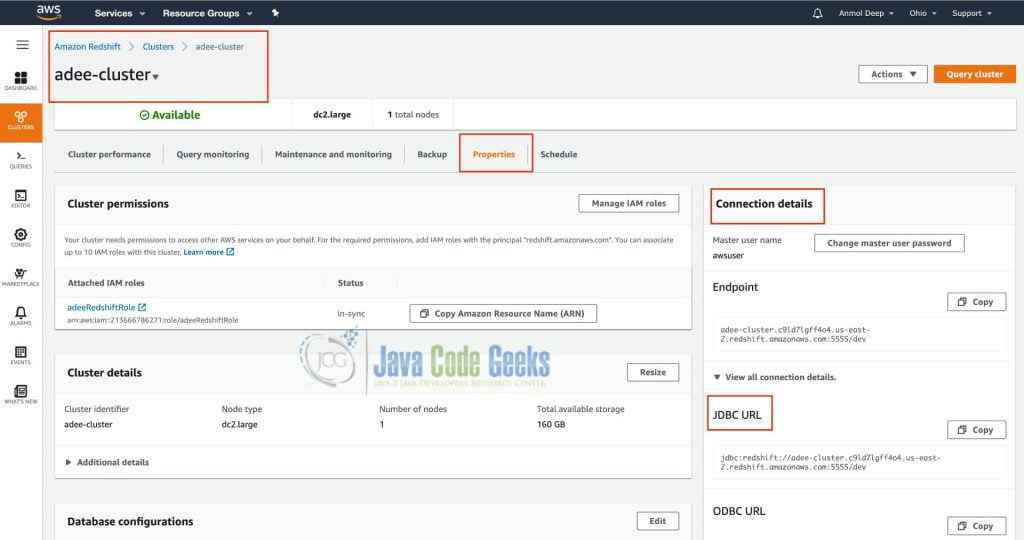
To establish a JDBC connection to a redshift cluster, we need the cluster JDBC URL that can be found on the Amazon Redshift console, on the cluster’s details page under the Properties tab.
The red outlined boxes in the below image will help you locate the JDBC URL on the Amazon Redshift Console.
The format of the JDBC URL for Amazon Redshift looks like this:
jdbc:redshift://endpoint:port/database-name
The below table specifies the fields used above with their meaning.
| Field | Information |
| jdbc | The connection protocol. |
| redshift | The subprotocol that specifies the use of redshift driver to connect to the database. |
| endpoint | The Amazon Redshift cluster’s endpoint. |
| port | The port number which is LISTENING for an incoming connection. |
| database | The database created on the cluster, to which we are going to connect to. |
The following is a sample JDBC URL of a database in Amazon Redshift Cluster
jdbc:redshift://adee-cluster.c9ld7lgff4o4.us-east-2.redshift.amazonaws.com:5555/dev
2.2. JDBC Driver for Amazon Redshift
First things first. Download the ZIP of the latest JDBC 4.2-compatible driver (version 1.2.45) and the dependent libraries.
Next, extract the contents of the ZIP file to a directory. This directory should contain the JDBC driver as well as the dependent jar files.
The class required to load this driver in the Java Runtime is com.amazon.redshift.jdbc42.Driver.
Some points to be noted here are:
- Only the JDBC driver needs to be in the CLASSPATH of our Java application and the driver Manifest file will take care of all the other dependent libraries.
- Java Runtime Environment (JRE 8.0 and above) is the minimum requirement to use the Amazon Redshift JDBC driver within an application to connect to the Redshift cluster.
2.3. Setting up the Connection
In this section, we will use the JDBC URL and the Amazon Redshift JDBC 4.2 Driver to get a connection to our Redshift cluster.
ConnectionManager.java
public class ConnectionManager {

	private static final String JDBC_URL =
		"jdbc:redshift://adee-cluster.c9ld7lgff4o4.us-east-2."
		+ "redshift.amazonaws.com:5555/dev";
	private static final String USERNAME = "awsuser";
	private static final String PASSWORD = "Qwerty1234";
	private static final String CLASS_NAME = "com.amazon.redshift.jdbc42.Driver";

	private Connection connection = null;

	public void connect() {
		// Dynamically load driver at runtime.
		try {
			Class.forName(CLASS_NAME);
		} catch (ClassNotFoundException e) {
			System.out.println("JDBC Driver class could not loaded");
			System.out.println(e.getMessage());
		}
		Properties properties = getPropertiesForDriverManager();
		try {
			System.out.println("Connecting to the database...");
			this.connection = DriverManager.getConnection(JDBC_URL, properties);
		} catch (SQLException e) {
			System.out.println(e.getMessage());
		}
	}

	private Properties getPropertiesForDriverManager() {
		Properties props = new Properties();
		props.setProperty("user", USERNAME);
		props.setProperty("password", PASSWORD);
		return props;
	}
}
In the above code snippet, we have dynamically loaded the Redshift JDBC driver at runtime and used the standard DriverManager to get a connection to our Redshift cluster.
3. CRUD Operations
Next, we will perform basic CRUD operations using the Connection instance obtained in the previous section. We will write code for the following operations on the Amazon Redshift database:
- Create a new table
- Insert rows into the newly created table
- Query the table for data
- Delete the rows from the table and delete the table
- Query system tables in the database
3.1. CRUD Operations Example
Now let’s see the coding examples to execute CRUD operations on our Redshift database.
We will use the standard java.sql PreparedStatement and ResultSet throughout this coding example.
RedShiftCRUDOps.java
public class RedShiftCRUDOps {

	private Connection connection = null;
	private Statement statement = null;
	private PreparedStatement pStatement = null;
	private ResultSet rs = null;

	private static final String SQL_SELECT =
		"select * from public.employee;";
	private static final String SQL_INSERT =
		"INSERT INTO EMPLOYEE (ID, NAME, AGE) VALUES (?,?,?)";
	private static final String SQL_CREATE =
		"create table employee(id integer, name varchar(25), age integer);";
	private static final String SQL_DELETE =
		"delete from employee;";
	private static final String SQL_DROP =
		"drop table employee;";

	private static final String SYS_TABLES_SELECT =
		"select * from information_schema.tables;";

	public RedShiftCRUDOps(Connection connection) {
		this.connection = connection;
	}

	public void createTable() {
		System.out.println("Creating Table Employee..");
		try {
			statement = connection.createStatement();
			statement.executeUpdate(SQL_CREATE);
			System.out.println("Employee Table Created.");
		} catch (SQLException ex) {
			System.out.println(ex.getMessage());
		} finally {
			closeStatement();
		}
	}

	public void insertRows() {
		System.out.println("Inserting Rows in Table Employee..");
		try {
			pStatement = connection.prepareStatement(SQL_INSERT);
			pStatement.setInt(1, 1);
			pStatement.setString(2, "Alex");
			pStatement.setInt(3, 25);
			pStatement.executeUpdate();

			pStatement.setInt(1, 2);
			pStatement.setString(2, "Andy");
			pStatement.setInt(3, 30);
			pStatement.executeUpdate();

			pStatement.setInt(1, 3);
			pStatement.setString(2, "Robert");
			pStatement.setInt(3, 15);
			pStatement.executeUpdate();
			System.out.println("Rows Inserted in Table Employee");
		} catch (SQLException ex) {
			System.out.println(ex.getMessage());
		} finally {
			closeStatement();
		}
	}

	public void queryTable() {
		System.out.println("Querying Table Employee..");
		try {
			statement = connection.createStatement();
			rs = statement.executeQuery(SQL_SELECT);
			if (rs != null) {
				while (rs.next()) {
					System.out.print("Employee ID: " +
						rs.getInt("id"));
					System.out.print(",Employee Name: " +
						rs.getString("name"));
					System.out.print(", Employee Age: " +
						rs.getInt("age"));
					System.out.println();
				}
			}
		} catch (SQLException ex) {
			System.out.println(ex.getMessage());
		} finally {
			closeResultSet();
			closeStatement();
		}
	}

	public void deleteDataAndTable() {
		System.out.println("Deleting Data in Table Employee..");
		try {
			statement = connection.createStatement();
			int rows = statement.executeUpdate(SQL_DELETE);
			System.out.println(rows);
			System.out.println("Deleted Rows in Table Employee "
				+ rows);
			System.out.println("Dropping Table Employee..");
			statement.executeUpdate(SQL_DROP);
			System.out.println("Dropped Table Employee..");
		} catch (SQLException ex) {
			System.out.println(ex.getMessage());
		} finally {
			closeStatement();
		}
	}

	public void querySystemTables() {
		try {
			System.out.println("Listing system tables...");
			statement = connection.createStatement();
			rs = statement.executeQuery(SYS_TABLES_SELECT);
			if (rs != null) {
				while (rs.next()) {
					System.out.print("Table_Catalog: " +
						rs.getString("table_catalog"));
					System.out.print(", Schema: " +
						rs.getString("table_schema"));
					System.out.print(", Table_Name: " +
						rs.getString("table_name"));
					System.out.println();

				}
			}
		} catch (SQLException ex) {
			System.out.println(ex.getMessage());
		} finally {
			closeResultSet();
			closeStatement();
		}
	}

	private void closeResultSet() {
		if (rs != null) {
			try {
				rs.close();
			} catch (SQLException e) {
				e.printStackTrace();
			}
		}
	}

	private void closeStatement() {
		if (pStatement != null) {
			try {
				pStatement.close();
			} catch (SQLException e) {
				e.printStackTrace();
			}
		}
		if (statement != null) {
			try {
				statement.close();
			} catch (SQLException e) {
				e.printStackTrace();
			}
		}
	}
}
Lastly, we have the Launcher class with the main method to start and run the application.It connects to the database and uses that connection to perform the above described operations.
Launcher.java
public class Launcher {

	public static void main(String[] args) {
		ConnectionManager connMgr = new ConnectionManager();
		connMgr.connect();
		RedShiftCRUDOps ops = new RedShiftCRUDOps(connMgr.getConnection());
		ops.createTable();
		ops.insertRows();
		ops.queryTable();
		ops.deleteDataAndTable();
		ops.querySystemTables();
	}
}
Output
Connecting to the database...
Creating Table Employee..
Employee Table Created.
Inserting Rows in Table Employee..
Rows Inserted in Table Employee
Querying Table Employee..
Employee ID: 1,Employee Name: Alex, Employee Age: 25
Employee ID: 2,Employee Name: Andy, Employee Age: 30
Employee ID: 3,Employee Name: Robert, Employee Age: 15
Deleting Data in Table Employee..
Deleted Rows in Table Employee 3
Dropping Table Employee..
Dropped Table Employee..
Listing system tables...
Table_Catalog: dev, Schema: pg_internal,
	Table_Name: redshift_auto_health_check_330039
Table_Catalog: dev, Schema: pg_catalog,
	Table_Name: pg_default_acl
Table_Catalog: dev, Schema: pg_catalog,
	 Table_Name: pg_conf
Table_Catalog: dev, Schema: pg_catalog,
	Table_Name: pg_library
4. Summary
In this tutorial, we learned how to set-up a JDBC connection to the Amazon Redshift Cluster.
Firstly, we introduced the Amazon Redshift cluster. Next, we discussed the Database and the Users available when we provision a cluster.
After that, we saw how to obtain the database connection string or the JDBC URL for our database and where to download the JDBC driver from, to connect to our database.
Lastly, we set-up a connection and saw a coding example to perform some basic operations on our database.
5. Download the source code
As always, all the code examples provided in this tutorial are available in a Java project and should be easy to download, import and run.
You can download the full source code of this example here: Amazon Redshift JDBC Connection Example
