In this post, we feature a comprehensive Example on Spring Boot WAR Deployment. We will demonstrate how to convert a Spring Boot JAR web application to a WAR file that can be deployed to a servlet container.
1. Introduction
Spring Boot has become very popular among web application developers. Spring Boot will automatically configure a DispatcherServlet and register HandlerMappings, Adapters, and a ViewResolver for your application. This is a huge time-saver for developers.
If you use a build tool to package your web application, it will create an executable JAR file (the default for Spring Boot). This will include an embedded web server. You can then run your application from the command line since all dependencies are included in the archive.
There are certain situations when you may want to deploy your web application to a servlet container, however. For example:
- There are existing company policies and regulations requiring the use of WAR files.
- There is an existing infrastructure where application servers are already in place.
- The organization requires the use of WAR files as part of a change control process.
When this is the case, you may want to repackage your existing Spring Boot web application as a deployable WAR file. In general, you can accomplish this with three steps. These steps are:
- Extend (subclass) the
SpringBootServletInitializerabstract class in your application and override its configure method. This will add Spring Framework’s Servlet 3.0 support to your application. - Change the Tomcat dependency scope to “provided”. This will exclude JAR files that may conflict with the servlet container’s runtime environment.
- Change the build configuration to package the application as a WAR file.
We will create a sample project to demonstrate these steps.
1.1 Tools Used in this Example
- Eclipse Java EE IDE for Web Developers Version: Oxygen.3a
- Maven 3.3.9 (Embedded in Eclipse)
- Spring Tools Plugins 3.9.4.RELEASE
- Tomcat 9.0
Spring Tools is a set of plugins for Eclipse that speed up the development of Spring applications. You can add Spring Tools to your existing Eclipse installation by going to the Eclipse Marketplace and searching for “Spring IDE”. For more information on Spring Tools for Eclipse visit Spring Tools for Eclipse IDE.
For instructions on Tomcat installation and setup, visit https://tomcat.apache.org/tomcat-9.0-doc/appdev/installation.html.
2. Spring Boot WAR Deployment Example
In this example, we will create a Spring Boot web application and package it as an executable JAR file. We will then convert the application into a deployable WAR file. Finally, we will deploy the WAR file to a servlet container.
2.1 Create the Spring Boot Project
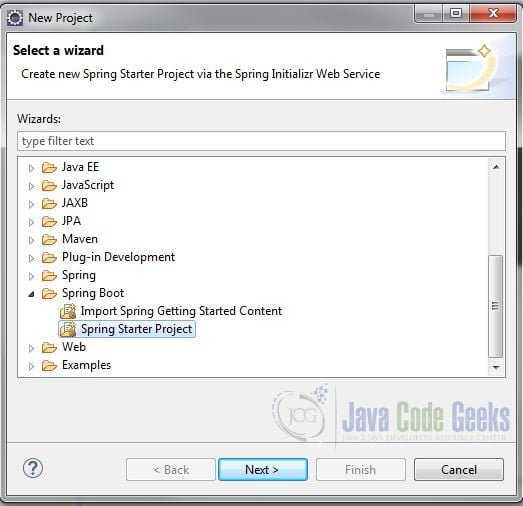
In the New Project – Select a Wizard dialog box, expand Spring Boot and select Spring Starter Project. Click “Next”.
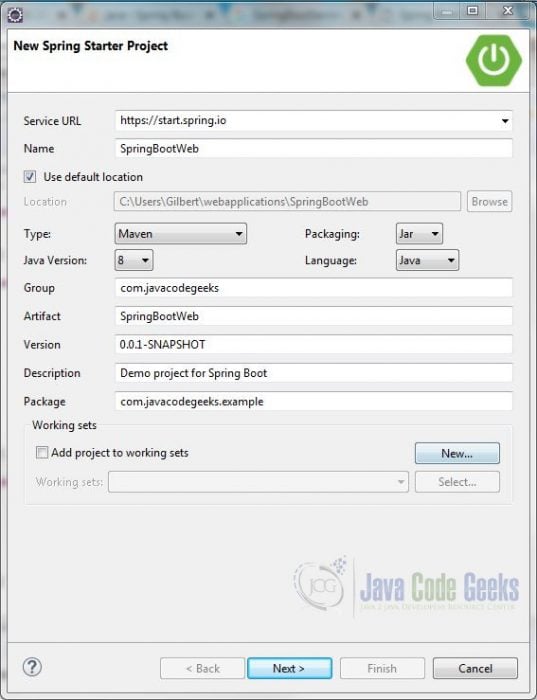
In the New Spring Starter Project dialog box, enter a name for the project. Also, enter the group, artifact and package information. Accept all the other default values. Click “Next”.
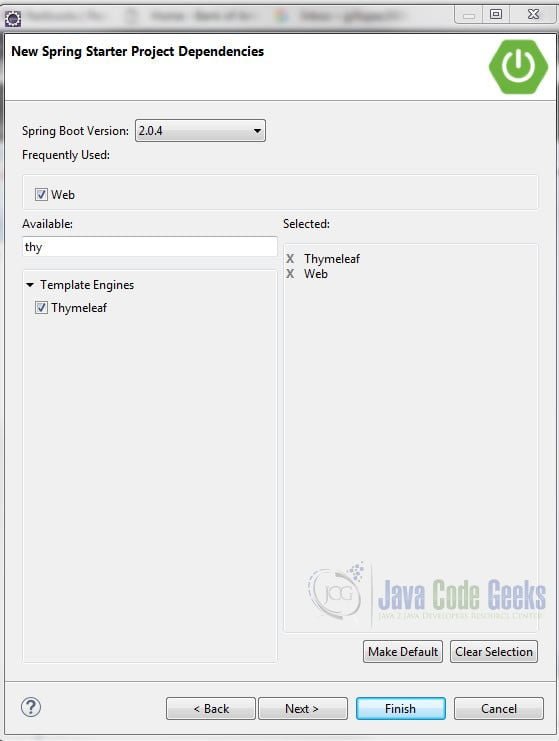
In the New Spring Starter Project Dependencies dialog box, select Spring Boot Version 2.0.4. Also, enter “web” in the Available search box and check Web from the search results. Repeat this procedure for adding the ‘Thymeleaf’ template engine dependency. Click “Finish”.
2.2 Change the Name of the Generated Package
(Note: This step is optional.) Let’s first change the name that will be used when we generate the package. This will make it easier to work with the archive. We can accomplish this by adding the <finalName> tag inside the element of the pom.xml file as follows:
pom.xml
<build>
	<plugins>
		<plugin>
			<groupId>org.springframework.boot</groupId>
			<artifactId>spring-boot-maven-plugin</artifactId>
		</plugin>
	</plugins>
	<finalName>${project.artifactId}</finalName>
</build>
2.3 Add a Controller
Let’s add a Controller. Create a new package com.javacodegeeks.example.controllers and class MyController with the following code.
MyController.java
import java.util.Map;
import java.util.concurrent.atomic.AtomicInteger;

import org.springframework.stereotype.Controller;
import org.springframework.web.bind.annotation.GetMapping;

@Controller
public class MyController {

	private final AtomicInteger counter = new AtomicInteger(0);

	@GetMapping("/counter")
	public String myView(Map model) {
		counter.set(counter.get()+1);
		model.put("counter", counter.get());
		return "view-page";
	}
}
The @Controller annotation registers this class in Spring MVC as a controller that handles inbound HTTP requests.
@GetMapping is a specialized RequestMapping. It specifies that HTTP GET requests to “/counter” are mapped to the myView() method. The method increments the counter to be displayed, puts this attribute in our model, and returns the name of the view. In our application the view will be a Thymeleaf HTML template.
2.4 Create a Thymleaf HTML Page
Thymeleaf is a templating technology for developing dynamic HTML pages. Create a file view-page.html in the 'src/main/resources/templates' folder with the following content:
view-page.html
<!DOCTYPE html>
<html>
<head>
<meta charset="ISO-8859-1">
<title>My View</title>
</head>
<body>
<h3>You have visited this page <span th:text="${counter}" /> times.</h3>
</body>
</html>
<span th:text="${counter}" /> is used to render the counter attribute from our model. For a short introduction to Thymeleaf in Spring, visit http://www.baeldung.com/thymeleaf-in-spring-mvc.
Notice that we did not have to configure a view resolver. Spring Boot automatically configured a ThymeleafViewResolver when it found the Thymeleaf JAR files in the classpath. Also, we did not have to specify the location or the filename extension for the Thymeleaf template. The default values for the prefix and suffix are src/main/resources/templates/ and .html, respectively.
2.5 Create and Run an Executable JAR
Let’s create a JAR file that we can run from the command line. Right-click the project and select Run As -> Maven Install. Maven will build the JAR file and place it in the {project-name}/target directory. For example:
Building jar: /Users/gilbertlopez/JCG/SpringBootWeb/target/SpringBootWeb.jar
Open a command prompt in the ‘target’ directory. (You can right click the folder and select ‘Show in -> Terminal’.) Run the following command at the prompt: java -jar {JAR-file-name}
For example:
java -jar SpringBootWeb.jar
Once the application has started, open a browser and visit localhost:8080. Reload the page a few times to watch the counter increment.
We now have our Spring Boot application running inside an executable JAR file. But what if we decide later that we would like to deploy it to a standalone Tomcat instance?
Note: The following steps shown here are used to convert an existing web application that runs inside an executable JAR file to a deployable WAR file. If you know beforehand that you are going to deploy your Spring Boot application to a servlet container, specify WAR packaging during project initialization. This will generate a ServletInitializer class that extends SpringBootServletInitializer. It will also set the spring-boot-starter-tomcat dependency scope to “provided” and create the typical directory structure for a web application (i.e., a webapp folder).

2.6 Change Packaging to WAR
The first step is to change the packaging scheme to WAR. Open your pom.xml file and change the packaging element from JAR to WAR.
<packaging>war</packaging>
Save the file. You will see a Maven error in the Problems view.

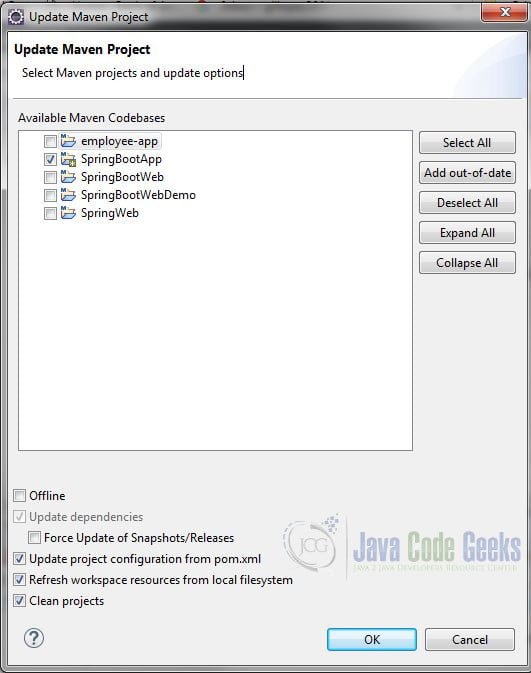
To fix the Maven error right-click the project and select Maven -> Update Project… Select your project from ‘Available Maven Codebases’. Leave the other defaults and click OK.
We now have a proper Maven web application.
2.7 Extend SpringBootServletInitializer
We can modify our application to run in a servlet container by extending the SpringBootServletInitializer abstract class. We can achieve this by either:
- Extending the Spring Boot application’s main class or,
- Creating a subclass of
SpringBootServletInitializer.
In this example, we will do the former.
Open the Spring Boot application class and modify it as follows:
import org.springframework.boot.SpringApplication;
import org.springframework.boot.autoconfigure.SpringBootApplication;
import org.springframework.boot.builder.SpringApplicationBuilder;
import org.springframework.boot.web.servlet.support.SpringBootServletInitializer;

@SpringBootApplication
public class SpringBootWebApplication extends SpringBootServletInitializer{

	public static void main(String[] args) {
		SpringApplication.run(SpringBootWebApplication.class, args);
	}

	@Override
	protected SpringApplicationBuilder configure(SpringApplicationBuilder builder) {
		return builder.sources(SpringBootWebApplication.class);
	}
}
On line 7 we subclass SpringBootServletInitializer. On line 14 we configure the servlet initializer to include our Spring Boot application. This creates an entry point that the servlet container will use to launch our application.
2.8 Declare Tomcat JAR Files as Provided
Building a Spring Boot application produces a runnable jar file by default. If your application includes web server functionality, then the Tomcat libraries will be bundled with it. When we package the WAR file, we need to ensure the Tomcat libraries are excluded. Otherwise, they will clash with those of the container (since the servlet container will contain the same libraries).
Open pom.xml and add the following dependency:
pom.xml
<dependency>
  <groupId>org.springframework.boot</groupId>
  <artifactId>spring-boot-starter-tomcat</artifactId>
  <scope>provided</scope>
</dependency>
Save the file.
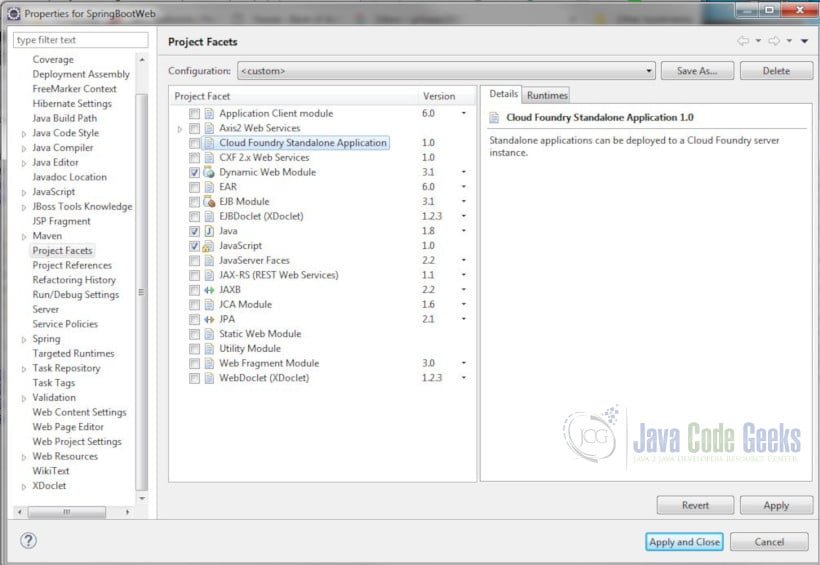
2.9 Remove Cloud Foundry Standalone Application Facet
If you have Cloud Foundry tooling in Eclipse, you will need to remove the Cloud Foundry Standalone Application facet from your project as this will prevent you from deploying your application. Right-click the project and select Properties. In the Properties dialog box, select Project Facets and deselect Cloud Foundry Standalone Application. Click ‘Apply and Close’.
2.10 Create the WAR File
Right-click the project and select Run As -> Maven Install. Maven will build the WAR file and place it in the “target” directory.
We now have an executable WAR file that can be deployed to any 3.0+ compliant servlet container.
2.11 Deploy the WAR File
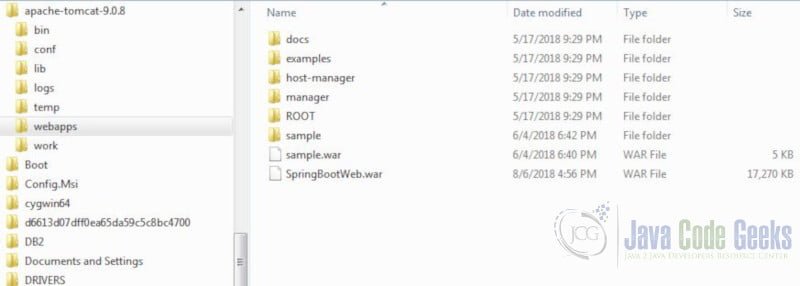
Copy the WAR file and paste it in the {tomcat-installation-folder}/webapps folder.
2.12 Run and Test the Application
Open a command prompt and change to the {tomcat-installation-folder}/bin directory. Run the catalina start command.
On Mac OS X: $ ./catalina.sh start
On Windows: >catalina start
This will start the Tomcat server. Enter the following URL in a browser: http://localhost:8080/{project-name}/counter . For example, http://localhost:8080/SpringBootWeb/counter
3. Summary
Spring Boot configures much of your web project automatically, which is a boon for rapid application development. In this example, we demonstrated how to convert a Spring Boot JAR web application to a WAR file that can be deployed to a servlet container.
4. Download the Source Code
This was a Spring Boot WAR Deployment example.
You can download the full source code of this example here: Spring Boot WAR Deployment Example

springBootServletInitilizer binds servlet, filter and servletContextInitializer beans from application context to server , so what does this mean , can you please explain it little more ?