Welcome readers, in this tutorial, we will explore EhCache integration with spring boot application.
1. Introduction
- Spring Boot is a module that provides rapid application development feature to the spring framework including auto-configuration, standalone-code, and production-ready code
- It creates applications that are packaged as jar and are directly started using embedded servlet container (such as Tomcat, Jetty or Undertow). Thus, no need to deploy the war files
- It simplifies the maven configuration by providing the starter template and helps to resolve the dependency conflicts. It automatically identifies the required dependencies and imports them in the application
- It helps in removing the boilerplate code, extra annotations, and xml configurations
- It provides a powerful batch processing and manages the rest endpoints
- It provides an efficient jpa-starter library to effectively connect the application with the relational databases
1.1 Introduction to Caching
Caching represents a mechanism to increase system performance by storing the recently used data items by reducing database trips. It acts as a temporary memory present between application and database. In general, there are four types of caches i.e.
- In-memory caching
- Database caching
- Web server caching
- CDN caching
1.1.1 Caching annotations in spring boot
Following annotations are used in a spring boot application.
@EnableCaching: This annotation enables the caching capability in a spring boot application@Cacheable: This method level annotation tells the spring framework to make the method response is cacheable@CachePut: This annotation updates the cache before the method execution@CacheEvict: This annotation removes the specific key from the cache. If developers want to remove all the entries from the cache they can use theallEntries=trueattribute
Now, open the eclipse ide and let’s see how to implement this tutorial in spring boot.
2. Spring Boot Ehcache Example
Here is a systematic guide for implementing this tutorial.
2.1 Tools Used
We are using Eclipse Kepler SR2, JDK 8, MongoDB, and Maven.
2.2 Project Structure
In case you are confused about where you should create the corresponding files or folder, let us review the project structure of the spring boot application.

2.3 Project Creation
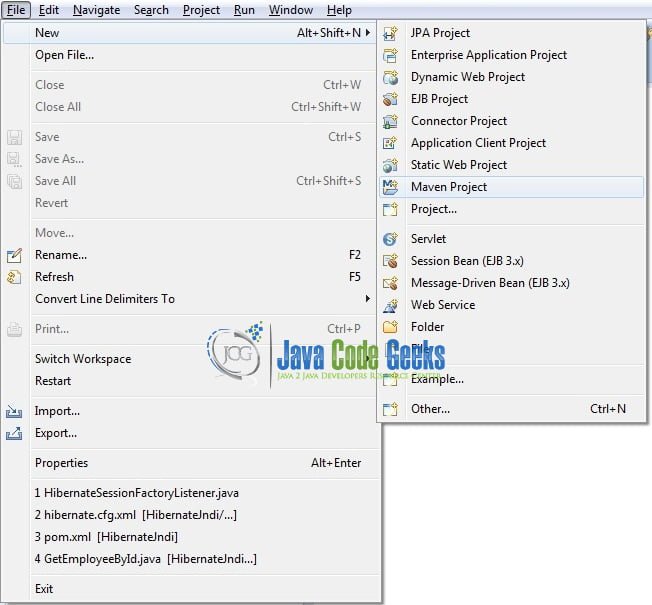
This section will demonstrate how to create a Java-based Maven project with Eclipse. In Eclipse IDE, go to File -> New -> Maven Project.
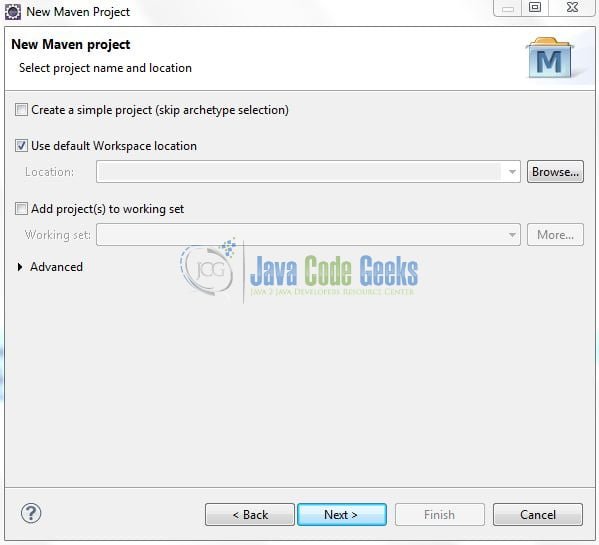
In the New Maven Project window, it will ask you to select a project location. By default, ‘Use default workspace location’ will be selected. Just click on the next button to proceed.
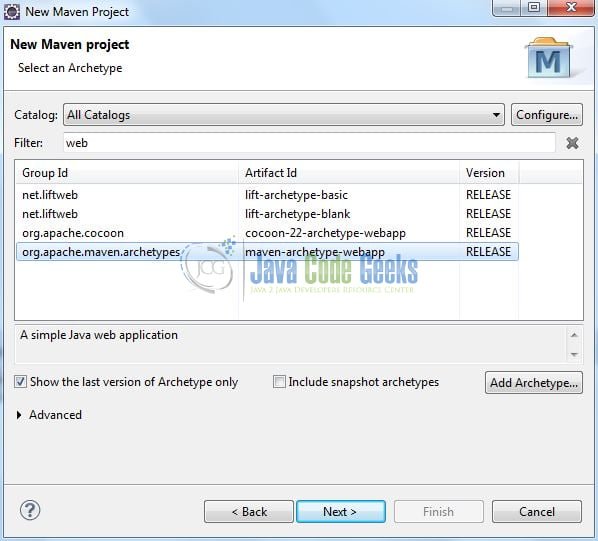
Select the Maven Web App archetype from the list of options and click next.
It will ask you to ‘Enter the group and the artifact id for the project’. We will input the details as shown in the below image. The version number will be by default: 0.0.1-SNAPSHOT.

Click on Finish and the creation of a maven project is completed. If you observe, it has downloaded the maven dependencies and a pom.xml file will be created. It will have the following code:
pom.xml
<project xmlns="http://maven.apache.org/POM/4.0.0" xmlns:xsi="http://www.w3.org/2001/XMLSchema-instance" xsi:schemaLocation="http://maven.apache.org/POM/4.0.0 http://maven.apache.org/xsd/maven-4.0.0.xsd">
	<modelVersion>4.0.0</modelVersion>
	<groupId>com.springboot.ehcache</groupId>
	<artifactId>Springbootehcachetutorial</artifactId>
	<version>0.0.1-SNAPSHOT</version>
	<packaging>war</packaging>
</project>
Let’s start building the application!
3. Creating a Spring Boot application
Below are the steps involved in developing the application. But before starting we are assuming that developers have installed the MySQL on their machine.
3.1 Database and Table Creation
The following script creates a database called sampledb and a table called product. Open MySQL terminal or workbench to execute the sql script.
SQL script
create database if not exists sampledb;

create table if not exists product (
	product_id int(10) not null auto_increment,
	product_name varchar(50) not null,
	product_price decimal(4,1) null,
	primary key  (product_id)
);

insert into product (product_id, product_name, product_price) values (1, 'Turnip - Mini', 353.29);
insert into product (product_id, product_name, product_price) values (2, 'Sobe - Cranberry Grapefruit', 557.58);
insert into product (product_id, product_name, product_price) values (3, 'Soup - Campbells, Creamy', 963.35);
insert into product (product_id, product_name, product_price) values (4, 'Rice - Brown', 281.87);
insert into product (product_id, product_name, product_price) values (5, 'Sour Puss Raspberry', 322.67);
insert into product (product_id, product_name, product_price) values (6, 'Apples - Sliced / Wedge', 899.83);
insert into product (product_id, product_name, product_price) values (7, 'Bread - White, Unsliced', 969.27);
insert into product (product_id, product_name, product_price) values (8, 'Jam - Raspberry,jar', 785.06);
insert into product (product_id, product_name, product_price) values (9, 'Bagel - Everything', 944.77);
insert into product (product_id, product_name, product_price) values (10, 'Sauce - Oyster', 877.9);
insert into product (product_id, product_name, product_price) values (11, 'Cranberries - Frozen', 747.52);
insert into product (product_id, product_name, product_price) values (12, 'Bread - Kimel Stick Poly', 669.52);
insert into product (product_id, product_name, product_price) values (13, 'Tomatoes - Cherry, Yellow', 533.1);
insert into product (product_id, product_name, product_price) values (14, 'Garlic - Elephant', 262.16);
insert into product (product_id, product_name, product_price) values (15, 'Yogurt - Cherry, 175 Gr', 690.96);
insert into product (product_id, product_name, product_price) values (16, 'Chicken - Leg / Back Attach', 104.69);
insert into product (product_id, product_name, product_price) values (17, 'Wine - Champagne Brut Veuve', 577.09);
insert into product (product_id, product_name, product_price) values (18, 'Pepper - Scotch Bonnet', 218.87);
insert into product (product_id, product_name, product_price) values (19, 'Sesame Seed Black', 244.4);
insert into product (product_id, product_name, product_price) values (20, 'Remy Red Berry Infusion', 306.14);
If everything goes well, the records will be shown in Fig. 6.

3.2 Maven Dependencies
Here, we specify the dependencies for the Spring Boot, Ehcache, and MySQL. Maven will automatically resolve the other dependencies. The updated file will have the following code.
pom.xml
<project xmlns="http://maven.apache.org/POM/4.0.0"
	xmlns:xsi="http://www.w3.org/2001/XMLSchema-instance"
	xsi:schemaLocation="http://maven.apache.org/POM/4.0.0 http://maven.apache.org/maven-v4_0_0.xsd">
	<modelVersion>4.0.0</modelVersion>
	<groupId>com.springboot.ehcache</groupId>
	<artifactId>Springbootehcachetutorial</artifactId>
	<packaging>war</packaging>
	<version>0.0.1-SNAPSHOT</version>

	<name>Springboot ehcache tutorial</name>
	<url>http://maven.apache.org</url>

	<!-- spring boot parent dependency jar. -->
	<parent>
		<groupId>org.springframework.boot</groupId>
		<artifactId>spring-boot-starter-parent</artifactId>
		<version>2.1.2.RELEASE</version>
	</parent>

	<dependencies>
		<!-- spring boot web mvc jar. -->
		<dependency>
			<groupId>org.springframework.boot</groupId>
			<artifactId>spring-boot-starter-web</artifactId>
		</dependency>
		<!-- spring boot jpa dependency. -->
		<dependency>
			<groupId>org.springframework.boot</groupId>
			<artifactId>spring-boot-starter-data-jpa</artifactId>
		</dependency>
		<!-- spring boot cache dependency. -->
		<dependency>
			<groupId>org.springframework.boot</groupId>
			<artifactId>spring-boot-starter-cache</artifactId>
		</dependency>
		<!-- ehcache dependency. -->
		<dependency>
			<groupId>net.sf.ehcache</groupId>
			<artifactId>ehcache</artifactId>
		</dependency>
		<!-- mysql dependency. -->
		<dependency>
			<groupId>mysql</groupId>
			<artifactId>mysql-connector-java</artifactId>
			<scope>runtime</scope>
		</dependency>
	</dependencies>

	<build>
		<finalName>Springbootehcachetutorial</finalName>
	</build>
</project>
3.3 Configuration Files
Following configuration files will be used to implement this tutorial.
3.3.1 Application Properties
Create a new properties file at the location: Springbootehcachetutorial/src/main/resources/ and add the following code to it.
application.properties
# Application configuration.
server.port=8102

# Local mysql database configuration.
spring.datasource.driver-class-name=com.mysql.cj.jdbc.Driver
spring.datasource.url=jdbc:mysql://localhost:3306/sampledb
spring.datasource.username=root
spring.datasource.password=

# Hibernate configuration.
spring.jpa.show-sql=true
spring.jpa.hibernate.ddl-auto=validate
spring.jpa.properties.hibernate.dialect=org.hibernate.dialect.MySQL5Dialect

# Ehcache configuration.
spring.cache.cache-names=productsCache
spring.cache.type=ehcache
spring.cache.ehcache.config=classpath:ehcache.xml
3.3.2 EhCache Configuration
Create a new xml file at the location: Springbootehcachetutorial/src/main/resources/ and add the following code to it.
ehcache.xml
<?xml version="1.0" encoding="UTF-8"?>
<ehcache
	xmlns:xsi="http://www.w3.org/2001/XMLSchema-instance"
         xsi:noNamespaceSchemaLocation="http://www.ehcache.org/ehcache.xsd"
         updateCheck="true"
         monitoring="autodetect"
         dynamicConfig="true">

	<cache name="productsCache"
           maxElementsInMemory="100"
           eternal="false"
           overflowToDisk="false"
           timeToLiveSeconds="300"
           timeToIdleSeconds="0"
           memoryStoreEvictionPolicy="LFU"
           transactionalMode="off" />
</ehcache>
3.4 Java Classes
Let’s write all the java classes involved in this application.
3.4.1 Implementation/Main class
Add the following code the main class to bootstrap the application from the main method. Always remember, the entry point of the spring boot application is the class containing @SpringBootApplication annotation and the static main method.
Myapplication.java
package com.ducat.springboot.ehcache;

import org.springframework.boot.SpringApplication;
import org.springframework.boot.autoconfigure.SpringBootApplication;
import org.springframework.cache.annotation.EnableCaching;

/**
 * @author yatin-batra
 * Main implementation class which serves following purpose in a spring boot application:
 * 		a. Configuration and bootstrapping.
 * 		b. Enables the cache-management ability in a spring framework.
 */
@SpringBootApplication
@EnableCaching
public class Myapplication {

	public static void main(String[] args) {
		SpringApplication.run(Myapplication.class, args);
	}
}
3.4.2 Model class
Add the following code to the product model class.
Product.java
package com.ducat.springboot.ehcache.model;

import java.math.BigDecimal;

import javax.persistence.Column;
import javax.persistence.Entity;
import javax.persistence.GeneratedValue;
import javax.persistence.GenerationType;
import javax.persistence.Id;
import javax.persistence.Table;

@Entity
@Table(name= "product")
public class Product {

	@Id
	@GeneratedValue(strategy= GenerationType.IDENTITY)
	@Column(name="product_id")
	private int id;
	@Column(name="product_name")
	private String name;
	@Column(name="product_price")
	private BigDecimal price;

	public int getId() {
		return id;
	}
	public void setId(int id) {
		this.id = id;
	}
	public String getName() {
		return name;
	}
	public void setName(String name) {
		this.name = name;
	}
	public BigDecimal getPrice() {
		return price;
	}
	public void setPrice(BigDecimal price) {
		this.price = price;
	}

	@Override
	public String toString() {
		return "Product [id=" + id + ", name=" + name + ", price=" + price + "]";
	}
}
3.4.3 Data-Access-Object interface
Add the following code to the Dao interface that extends the Crud Repository to automatically handle the crud queries.

ProductRepo.java
package com.ducat.springboot.ehcache.dao;

import org.springframework.data.repository.CrudRepository;
import org.springframework.stereotype.Repository;

import com.ducat.springboot.ehcache.model.Product;

@Repository
public interface ProductRepo extends CrudRepository<Product, Integer> {

}
3.4.4 Service class
Add the following code to the service class where we will call the methods of the Dao interface to handle the sql operations. The methods of this class are annotated with caching annotations to enable the caching support for the application.
ProductService.java
package com.ducat.springboot.ehcache.service;

import java.util.Optional;

import org.springframework.beans.factory.annotation.Autowired;
import org.springframework.cache.annotation.CacheEvict;
import org.springframework.cache.annotation.CachePut;
import org.springframework.cache.annotation.Cacheable;
import org.springframework.stereotype.Service;

import com.ducat.springboot.ehcache.dao.ProductRepo;
import com.ducat.springboot.ehcache.model.Product;

@Service
public class ProductService {
	@Autowired
	private ProductRepo prepo;

	/**
	 * Method to fetch product details on the basis of product id.
	 * @param productId
	 * @return
	 */
	// @Cacheable annotation adds the caching behaviour.
	// If multiple requests are received, then the method won't be repeatedly executed, instead, the results are shared from cached storage.
	@Cacheable(value="productsCache", key="#p0")
	public Optional<Product> getProductById(int productId) {
		return prepo.findById(productId);
	}

	/**
	 * Method to update product on the basis of product id.
	 * @param product
	 * @param productName
	 * @return
	 */
	// @CachePut annotation updates the cached value.
	@CachePut(value="productsCache")
	public Product updateProductById(Product product, String productName) {
		product.setName(productName);
		prepo.save(product);

		return product;
	}

	/**
	 * Method to delete product on the basis of product id.
	 * @param productId
	 */
	// @CacheEvict annotation removes one or all entries from cached storage.
	// <code>allEntries=true</code> attribute allows developers to purge all entries from the cache.
	@CacheEvict(value="productsCache", key="#p0")
	public void deleteProductById(int productId) {
		prepo.deleteById(productId);
	}
}
3.4.5 Controller class
Add the following code to the controller class designed to handle the incoming requests. The class is annotated with the @RestController annotation where every method returns a domain object as a json response instead of a view.
Productcontroller.java
package com.ducat.springboot.ehcache.controller;

import java.util.Optional;

import org.springframework.beans.factory.annotation.Autowired;
import org.springframework.http.HttpStatus;
import org.springframework.http.ResponseEntity;
import org.springframework.web.bind.annotation.DeleteMapping;
import org.springframework.web.bind.annotation.GetMapping;
import org.springframework.web.bind.annotation.PathVariable;
import org.springframework.web.bind.annotation.PutMapping;
import org.springframework.web.bind.annotation.RequestMapping;
import org.springframework.web.bind.annotation.ResponseBody;
import org.springframework.web.bind.annotation.RestController;

import com.ducat.springboot.ehcache.model.Product;
import com.ducat.springboot.ehcache.service.ProductService;

@RestController
@RequestMapping(value="/api/product")
public class Productcontroller {
	@Autowired
	private ProductService pserv;

	/**
	 * Method to fetch product details on the basis of product id.
	 * @param productId
	 * @return
	 */
	@GetMapping(value="/{product-id}")
	@ResponseBody
	public ResponseEntity<Product> getProductById(@PathVariable("product-id") int productId) {
		Optional<Product> product = pserv.getProductById(productId);
		if(!product.isPresent())
			return new ResponseEntity<Product>(HttpStatus.NOT_FOUND);

		return new ResponseEntity<Product>(product.get(), HttpStatus.OK);
	}

	/**
	 * Method to update product on the basis of product id.
	 * @param productId
	 * @param productName
	 * @return
	 */
	@PutMapping(value="/{product-id}/{product-name}")
	public ResponseEntity<Product> updateTicketById(@PathVariable("product-id") int productId, @PathVariable("product-name") String productName) {
		Optional<Product> product = pserv.getProductById(productId);
		if(!product.isPresent())
			return new ResponseEntity<Product>(HttpStatus.NOT_FOUND);

		return new ResponseEntity<Product>(pserv.updateProductById(product.get(), productName), HttpStatus.OK);
	}

	/**
	 * Method to delete product on the basis of product id.
	 * @param productId
	 */
	@DeleteMapping(value="/{product-id}")
	public ResponseEntity<Product> deleteProductById(@PathVariable("product-id") int productId) {
		Optional<Product> product = pserv.getProductById(productId);
		if(!product.isPresent())
			return new ResponseEntity<Product>(HttpStatus.NOT_FOUND);

		pserv.deleteProductById(productId);
		return new ResponseEntity<Product>(HttpStatus.ACCEPTED);
	}
}
4. Run the Application
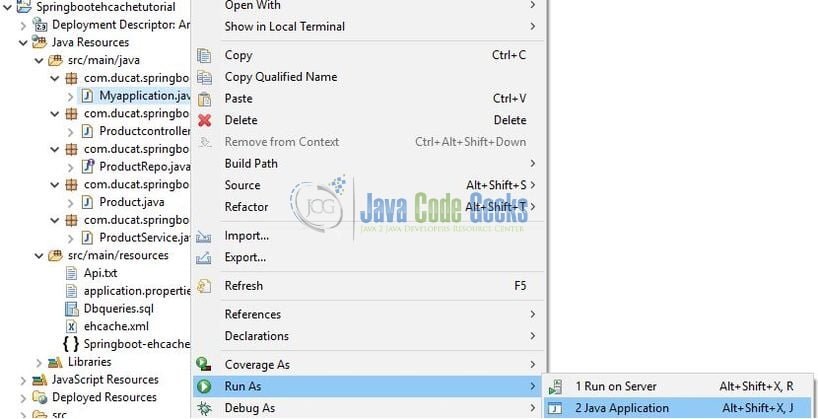
As we are ready with all the changes, let us compile the spring boot project and run the application as a java project. Right click on the Myapplication.java class, Run As -> Java Application.
Developers can debug the example and see what happens after every step. Enjoy!
5. Project Demo
Open the postman tool and hit the following urls to display the data in the json format.
1 2 3 4 5 6 7 8 9 | ----------------------------------------------------------------------------------:: GET PRODUCT BY ID ::----------------------------------------------------------------------------------:: DELETE PRODUCT BY ID ::----------------------------------------------------------------------------------:: UPDATE PRODUCT BY ID :: |
Here the first request will be served by the request handler method. This point no data is present with Ehcache. During the subsequent requests, the data will be retrieved from the cache itself. That is all for this tutorial and I hope the article served you whatever you were looking for. Happy Learning and do not forget to share!
6. Conclusion
In this section, developers learned how to create a Spring Boot application with MySQL and perform the basic operations to understand the caching functionality. Developers can download the sample application as an Eclipse project in the Downloads section.
7. Download the Eclipse Project
This was an example of implementing Cache with Spring Boot & Spring JPA.
You can download the full source code of this example here: Spring Boot Ehcache Example

Nice Example….
What is the key being used in @Cacheable annotation?
You should write MySql instead of MongoDB
How can we define strategy in ehcache?