1. Introduction
In this article we will explore the JPA @OneToMany and @ManyToOne associations in a SQL and NoSQL fashion. A @OneToMany association occurs when each record in one table corresponds to multiple records in a related table. If the records from the second table have an inverse association back to the first table, we say that we have a bidirectional @ManyToOne association. In this case, the mappedBy element must be used to specify the association field of the entity that is the owner of the association. Both, @OneToMany and @ManyToOne can be used in an embeddable class to specify an association to a collection of entities, or to specify an association from the embeddable class to an entity class. Alternatively, @OneToMany can be decorated with lazy loading, cascading or orphan removal.
For developing the applications presented in this article we used NetBeans IDE 8.1, Payara 4.1.1.154 (Full Java EE) application server (or you can use GlassFish application server instead of Payara), Apache Derby Server 10.11.1.2 (that comes bundled with Payara), and MongoDB 3.0.7. You will also need a JDK environment, 1.7 or 1.8.
2. Problem and use-case
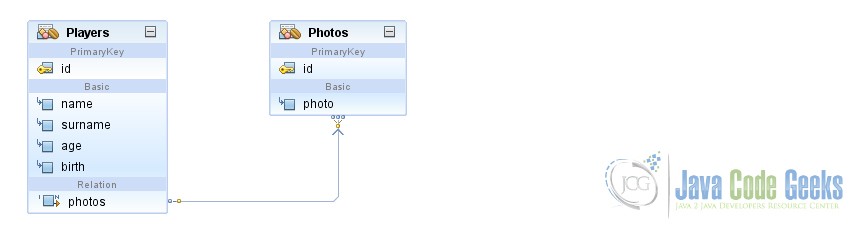
Let’s suppose we have the following two tables: Players and Photos. In this use-case, the Photos table contains one or multiple photo names, each photo is linked to one player. This kind of association is mapped by JPA using the @ManyToOne annotation. Alternatively, each player is linked to one or multiple photo names. This kind of association is mapped by JPA using the @OneToMany annotation. From this we can distinguish three use-cases:
- one-to-many unidirectional association
- many-to-one unidirectional association

- one-to-many bidirectional association
At a specific time, we might want to see all photos taken, along with the player name it belongs to. Let’s see how we can accomplish this!
3. @OneToMany and @ManyToOne in a SQL database
3.1 Introduction
In this section, we have developed an EAR application, called OneToMany_EclipseLink_and_ApacheDerby, which aims to illustrate the use-case presented in the previous section. The application contains two modules, an EJB module in which we will develop our EJB beans and entities and a WAR module needed to simply display our data in a web page. To create the application, we used NetBeans IDE 8.1 and Payara 4.1 as the application server. We also used Apache Derby, which comes bundled with Payara, as the database layer. You can change to use GlassFish application server instead of Payara.
- You can download the complete application from here.
Now, let’s focus on the relevant parts!
3.2 Creating the @OneToMany and @ManyToOne relationship
Inside the EJB module, in the eclipselink.apachederby.entity package, we have two entities. The first one is Players, which looks like below:
package eclipselink.apachederby.entity;

// Imports

@Entity
@Table(name = "atp_players")
public class Players implements Serializable {

    private static final long serialVersionUID = 1L;

    @Id
    @GeneratedValue(strategy = GenerationType.AUTO)
    private int id;

    @Column(name = "player_name")
    private String name;

    @Column(name = "player_surname")
    private String surname;

    @Column(name = "player_age")
    private int age;

    @Temporal(javax.persistence.TemporalType.DATE)
    @Column(name = "player_birth")
    private Date birth;

    @OneToMany(cascade = CascadeType.ALL, mappedBy = "player_photos", orphanRemoval = true)
    private Collection photos;

    // Getters and setters

}
We have highlighted the @OneToMany relationship which in simple words says that:
- the
mappedByattribute indicates thatPlayersentity in this side is the inverse of the relationship, and the owner resides in thePhotosentity - the field that owns the relationship is called
player_photos - all operations should be cascaded automatically to entity objects that are referenced by the
player_photosfield - if a player is removed from database, orphaned entities should be removed
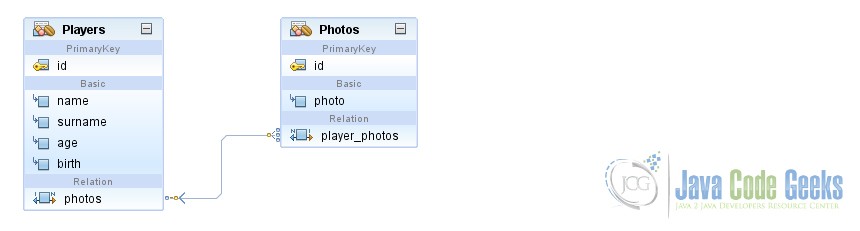
The second entity we see is called Photos and it looks like below:
package eclipselink.apachederby.entity;

// Imports

@Entity
@Table(name = "players_photos")
public class Photos implements Serializable {

    private static final long serialVersionUID = 1L;

    @Id
    @GeneratedValue(strategy = GenerationType.AUTO)
    private int id;

    private String photo;

    @ManyToOne
    @JoinColumn(name = "player_fk")
    private Players player_photos;

    // Getters and setters

}
We have highlighted the @ManyToOne relationship which in simple words says that:
- the
Photosentity is the owner entity of our bidirectional many-to-one relationship - the annotation
@JoinColumnindicates that this entity is the owner of our many-to-one relationship and the corresponding table has a column namedplayer_fkwith a foreign key to the referenced table
3.3 Configuring the database connection
Our next step is the persistence.xml file, which contains several configurations specific to Apache Derby that are highlighted below:
<?xml version="1.0" encoding="UTF-8"?>
<persistence version="2.0" xmlns="http://java.sun.com/xml/ns/persistence" xmlns:xsi="http://www.w3.org/2001/XMLSchema-instance" xsi:schemaLocation="http://java.sun.com/xml/ns/persistence http://java.sun.com/xml/ns/persistence/persistence_2_0.xsd">
 <persistence-unit name="EclipseLink_ManyToMany-ejbPU" transaction-type="JTA">
  <class>eclipselink.apachederby.entity.Players</class>
  <class>eclipselink.apachederby.entity.Tournaments</class>
  <exclude-unlisted-classes>false</exclude-unlisted-classes>
  <properties>
   <property name="javax.persistence.jdbc.driver" value="org.apache.derby.jdbc.EmbeddedDriver"/>
   <property name="javax.persistence.jdbc.url" value="jdbc:derby:memory:mapping_entities_db;create=true"/>
   <property name="javax.persistence.schema-generation.database.action" value="drop-and-create"/>
   <property name="javax.persistence.schema-generation.create-source" value="metadata"/>
   <property name="javax.persistence.schema-generation.drop-source" value="metadata"/>
  </properties>
 </persistence-unit>
</persistence>
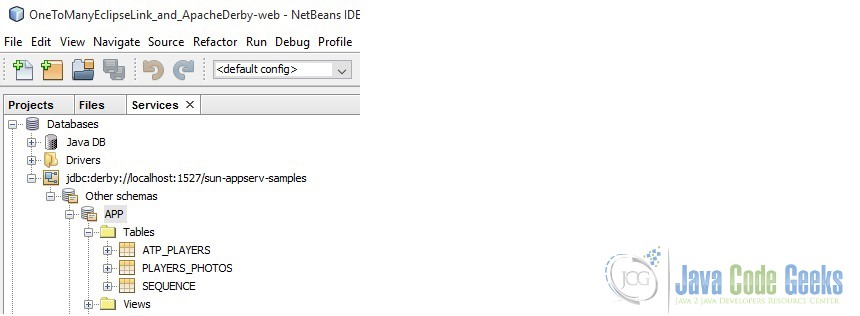
These configurations specifies that the necessary tables will be created on the default schema (named sun-appserv-samples) when running our application. You can explore them by navigating to the Services tab in NetBeans IDE and connecting to the sun-appserv-samples database:
3.4 Creating the web page
Now let’s have a quick look to the WAR module. We will use the JavaServer Faces technology for the presentation layer of our application. There is nothing fancy here, there are no managed beans, just a simple .xhtml page which looks like below:
<?xml version='1.0' encoding='UTF-8' ?>
<?xml version='1.0' encoding='UTF-8' ?>
<!DOCTYPE html PUBLIC "-//W3C//DTD XHTML 1.0 Transitional//EN" "http://www.w3.org/TR/xhtml1/DTD/xhtml1-transitional.dtd">
<html xmlns="http://www.w3.org/1999/xhtml"
      xmlns:h="http://java.sun.com/jsf/html">
    <h:head>
        <title>@OneToMany and @ManyToOne</title>
    </h:head>
    <h:body>
        <h1>@OneToMany and @ManyToOne</h1>
        <h:form>
            <h:commandButton action="#{bean.persistAction()}"
                             value="Insert Player" style="width:300px;"/>
        </h:form>
        <h:form>
            <h:commandButton action="#{bean.findAction()}"
                             value="List Players (first 1000)" style="width:300px;"/>
        </h:form>
        <h:form>
            <h:commandButton action="#{bean.removeAction()}"
                             value="Remove First Player (_id:1 - _id:1000)"
                             style="width:300px;"/>
        </h:form>
    </h:body>
</html>
Notice that CDI is used in order to reference #{bean} to the SampleBean session bean located in the eclipselink.apachederby.ejb package of our EJB module. When you press the “Insert player” button, it will call the persistAction() method and use a helper class (the Helper class inside the eclipselink.apachederby.helper package) in order to randomly generate some players and photo names and insert one player into the database. Similarly, the “List Players (first 1000)” button and “Remove First Player (_id:1 – _id:1000)” button will search for our list of players or remove the first it finds.
3.5 Testing the application
As mentioned above, pressing the “Insert player” button will insert a player into the database and then navigate to the same web page. If you check the IDE log, you should see a message like Info: PLAYER INSERTED ....
Now, press the “List Players (first 1000)” button to see what was inserted into our database. In our case, it showed:
Info:   PLAYERS INFORMATION ...
Info:   ************** PLAYER WITH ID: 1 *****************
Info:   PLAYER: Name:Nadal, Surname:Rafael, Age:26, Birth:6/3/86 12:00 AM
Info:   PHOTO: Name:nadal_1.png
Info:   PHOTO: Name:nadal_2.png
Info:   PHOTO: Name:nadal_3.png
Info:   PHOTO: Name:nadal_4.png
Info:   ****************************************************
Info:   NO MORE PLAYERS AVAILABLE ...
Info:   PHOTOS INFORMATION ...
Info:   ************** PHOTO WITH ID: 2 *****************
Info:   PHOTO: Photo :nadal_1.png, This photo belongs to :Nadal Rafael
Info:   ****************************************************
Info:   ************** PHOTO WITH ID: 3 *****************
Info:   PHOTO: Photo :nadal_2.png, This photo belongs to :Nadal Rafael
Info:   ****************************************************
Info:   ************** PHOTO WITH ID: 4 *****************
Info:   PHOTO: Photo :nadal_3.png, This photo belongs to :Nadal Rafael
Info:   ****************************************************
Info:   ************** PHOTO WITH ID: 5 *****************
Info:   PHOTO: Photo :nadal_4.png, This photo belongs to :Nadal Rafael
Info:   ****************************************************
Info:   NO MORE PHOTOS AVAILABLE ...
This is the player information currently hosted in the database with his related photos information. You should check the eclipselink.apachederby.ejb.SampleBean.findAction() method to see what’s happening behind the scene, but in simple words, we start from 1 and use a while loop to search the first 1000 players. To get a player collection of photos, we simply call the player.getPhotos() method.
Now, pressing the “Remove First Player (_id:1 – _id:1000)” button will remove the player and display the following message in the IDE log:
Info:   REMOVING FIRST PLAYER (_id:1 - _id:1000) ...
Info:   PLAYER SUCCESSFULLY REMOVED ...
To make sure that the player (and his related photos) were removed from the database, press the “List Players (first 1000)” again. This will output something like:
Info:   PLAYERS INFORMATION ...
Info:   NO MORE PLAYERS AVAILABLE ...
Info:   PHOTOS INFORMATION ...
Info:   NO MORE PHOTOS AVAILABLE ...
The complete application is called OneToMany_EclipseLink_and_ApacheDerby.
4. @OneToMany and @ManyToOne in a NoSQL database
4.1 Introduction
Similarly to the case presented in the previous section, in this section we have developed an EAR application, called OneToMany_HOGM_and_MongoDB, which aims to illustrate the JPA @OneToMany and @ManyToOne associations in a NoSQL database. In developing the application we have used Hibernate Object/Grid Mapper (OGM), which provides the JPA support for some of the common NoSQL databases, and MongoDB to serve for the NoSQL database.
You can download the complete application from here.
4.2 Hibernate OGM and JPA 2.1 annotations support
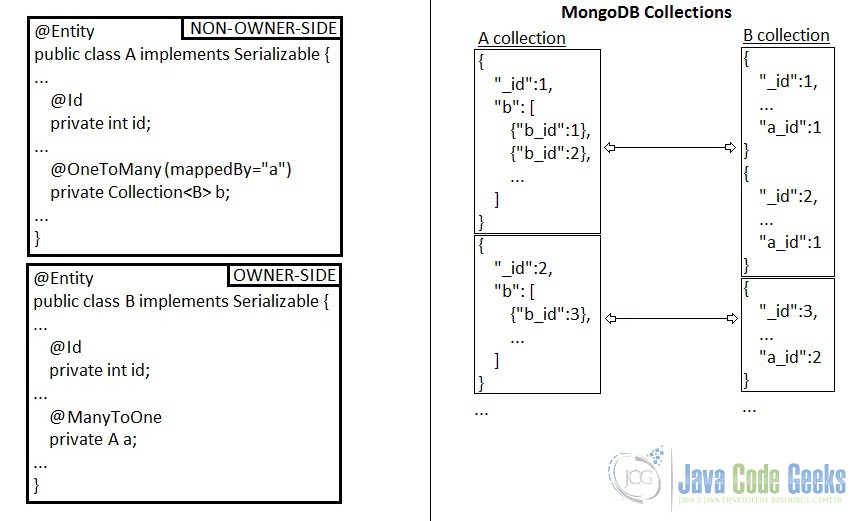
Hibernate OGM translates each entity in accordance with the official JPA specification, but adapted to MongoDB capabilities. Between the supported annotations we also have @OneToMany and @ManyToOne. Moreover, Hibernate OGM supports unidirectional and bidirectional associations. Hibernate OGM stores the association information in MongoDB using one of the following two strategies:
IN_ENTITY: store association information within the entity (we will use this one)ASSOCIATION_DOCUMENT: store association information in a dedicated document per association
For ASSOCIATION_DOCUMENT, you can define how to store association documents. Possible strategies are:
GLOBAL_COLLECTION(default): stores the association information in a unique MongoDB collection for all associationsCOLLECTION_PER_ASSOCIATION: stores the association in a dedicated MongoDB collection per association
Now, using the default strategy, IN_ENTITY, we can distinguish three use-cases:
- one-to-many unidirectional association
In this case, Hibernate OGM stores the navigation information for associations in the collection representing the owner side of the association, in fields that store the foreign keys in embedded collections.

- many-to-one unidirectional association
In this case, Hibernate OGM stores the navigation information in the collection representing the owner side of the association; each document will contain a field for storing the corresponding foreign key.

- one-to-many bidirectional association
In this case, the collection representing the entity that uses mappedBy (the non-owner side of the association) will contain fields that store the foreign keys in embedded collections and the collection representing the owner side of the association will contain, in each document, a field that stores the corresponding foreign key.
4.3 Configuring the database connection
Supposing that you already have installed and configured MongoDB on localhost (127.0.0.1:27017), our next step is the persistence.xml file, which contains several configurations specific to MongoDB that are highlighted below:
<?xml version="1.0" encoding="UTF-8"?>
<persistence version="2.0" xmlns="http://java.sun.com/xml/ns/persistence" xmlns:xsi="http://www.w3.org/2001/XMLSchema-instance" xsi:schemaLocation="http://java.sun.com/xml/ns/persistence http://java.sun.com/xml/ns/persistence/persistence_2_0.xsd">
    <persistence-unit name="HOGM_OneToMany-ejbPU" transaction-type="JTA">
        <provider>org.hibernate.ogm.jpa.HibernateOgmPersistence</provider>
        <class>hogm.mongodb.entity.Players</class>
        <class>hogm.mongodb.entity.Tournaments</class>
        <properties>
            <property name="hibernate.classloading.use_current_tccl_as_parent" value="false"/>
            <property name="hibernate.transaction.jta.platform" value="org.hibernate.service.jta.platform.internal.SunOneJtaPlatform"/>
            <property name="hibernate.ogm.datastore.provider" value="mongodb"/>
            <property name="hibernate.ogm.datastore.document.association_storage" value="IN_ENTITY"/>
            <property name="hibernate.ogm.datastore.database" value="mapping_entities_db"/>
            <property name="hibernate.ogm.datastore.create_database" value="true"/>
            <property name="hibernate.ogm.mongodb.host" value="127.0.0.1"/>
            <property name="hibernate.ogm.mongodb.port" value="27017"/>
        </properties>
    </persistence-unit>
</persistence>
Rest of our application remains the same as in the case presented for SQL, except from the data generated and inserted into the database.
4.4 Testing the application
After you start the MongoDB database server you can run the application and start testing. Now we can just repeat the steps we did for the SQL case. Press the “Insert player” button and then the “List Players (first 1000)” button to see what was inserted into our database. In our case, the IDE log showed:
Info:   PLAYER INSERTED ...
Info:   PLAYERS INFORMATION ...
Info:   ************** PLAYER WITH ID: 1 *****************
Info:   PLAYER: Name:Djokovic, Surname:Novak, Age:25, Birth:5/22/87 12:00 AM
Info:   PHOTO: Name:novak_3.png
Info:   PHOTO: Name:novak_1.png
Info:   PHOTO: Name:novak_2.png
Info:   ****************************************************
Info:   NO MORE PLAYERS AVAILABLE ...
Info:   PHOTOS INFORMATION ...
Info:   ************** PHOTO WITH ID: 2 *****************
Info:   PHOTO: Photo :novak_1.png, This photo belongs to :Djokovic Novak
Info:   ****************************************************
Info:   ************** PHOTO WITH ID: 3 *****************
Info:   PHOTO: Photo :novak_2.png, This photo belongs to :Djokovic Novak
Info:   ****************************************************
Info:   ************** PHOTO WITH ID: 4 *****************
Info:   PHOTO: Photo :novak_3.png, This photo belongs to :Djokovic Novak
Info:   ****************************************************
Info:   NO MORE PHOTOS AVAILABLE ...
To remove a player (and his related photos), press the “Remove First Player (_id:1 – _id:1000)”. Now, press the “List Players (first 1000)” again. These two actions are illustrated into the IDE log as follows:
Info:   REMOVING FIRST PLAYER (_id:1 - _id:1000) ...
Info:   PLAYER SUCCESSFULLY REMOVED ...
Info:   PLAYERS INFORMATION ...
Info:   NO MORE PLAYERS AVAILABLE ...
Info:   PHOTOS INFORMATION ...
Info:   NO MORE PHOTOS AVAILABLE ...
The complete application is called OneToMany_HOGM_and_MongoDB.
5. Conclusion
In this article we have explore the JPA @OneToMany and @ManyToOne associations in a SQL and NoSQL fashion. For testing the associations, we have developed two EAR applications, one using Apache Derby as the database layer, the other using MongoDB.
