Welcome, in this tutorial, we will see how to configure multiple data sources in a single boot application.
Here we will use a single source of truth (meaning a datatype of a single type but fetch the data from two different databases).
1. Introduction
Before going further in this tutorial, we will look at the common terminology such as introduction to Spring Boot and Lombok.
1.1 Spring Boot
- Spring boot is a module that provides rapid application development feature to the spring framework including auto-configuration, standalone-code, and production-ready code
- It creates applications that are packaged as jar and are directly started using embedded servlet container (such as Tomcat, Jetty or, Undertow). Thus, no need to deploy the war files
- It simplifies the maven configuration by providing the starter template and helps to resolve the dependency conflicts. It automatically identifies the required dependencies and imports them into the application
- It helps in removing the boilerplate code, extra annotations, and xml configurations
- It provides powerful batch processing and manages the rest endpoints
- It provides an efficient jpa-starter library to effectively connect the application with the relational databases
- It offers a Microservice architecture and cloud configuration that manages all the application related configuration properties in a centralized manner
1.2 Lombok
- Lombok is nothing but a small library which reduces the amount of boilerplate Java code from the project
- Automatically generates the getters and setters for the object by using the Lombok annotations
- Hooks in via the Annotation processor API
- Raw source code is passed to Lombok for code generation before the Java Compiler continues. Thus, produces properly compiled Java code in conjunction with the Java Compiler
- Under the
target/classesfolder you can view the compiled class files - Can be used with Maven, Gradle IDE, etc.
1.2.1 Lombok features
| Feature | Details |
|---|---|
val | Local variables are declared as final |
var | Mutable local variables |
@Slf4J | Creates an SLF4J logger |
@Cleanup | Will call close() on the resource in the finally block |
@Getter | Creates getter methods for all properties |
@Setter | Creates setter for all non-final properties |
@EqualsAndHashCode |
|
@ToString |
|
@NoArgsConstructor |
|
@RequiredArgsContructor |
|
@AllArgsConstructor |
|
@Data |
|
@Builder |
|
@Value |
|
Let us go ahead with the tutorial implementation but before going any further I’m assuming that you’re aware of the Spring boot basics.
2. How to Configure Multiple Data Sources in a Spring Boot Application
2.1 Tools Used for Spring boot application and Project Structure
We are using Eclipse Kepler SR2, JDK 8, and Maven. In case you’re confused about where you should create the corresponding files or folder, let us review the project structure of the spring boot application.
Let us start building the application!
3. Creating a Spring Boot application
Below are the steps involved in developing the application.
3.1 Maven Dependency
Here, we specify the dependency for the Spring Boot (Web, JPA, and Configuration processor), H2 database, Lombok, and Java faker. Maven will automatically resolve the other dependencies. The updated file will have the following code.
pom.xml
01 02 03 04 05 06 07 08 09 10 11 12 13 14 15 16 17 18 19 20 21 22 23 24 25 26 27 28 29 30 31 32 33 34 35 36 37 38 39 40 41 42 43 44 45 46 47 48 49 50 51 52 53 54 55 56 57 58 59 60 61 62 63 64 65 66 67 68 69 70 71 | <?xml version="1.0" encoding="UTF-8"?> xsi:schemaLocation="http://maven.apache.org/POM/4.0.0 https://maven.apache.org/xsd/maven-4.0.0.xsd"> <modelVersion>4.0.0</modelVersion> <groupId>com.springboot.multiple.datasources</groupId> <artifactId>SpringbootMultipleDatasources</artifactId> <version>0.0.1-SNAPSHOT</version> <parent> <groupId>org.springframework.boot</groupId> <artifactId>spring-boot-starter-parent</artifactId> <version>2.4.0</version> <relativePath /> <!-- lookup parent from repository --> </parent> <properties> <java.version>1.8</java.version> </properties> <dependencies> <dependency> <groupId>org.springframework.boot</groupId> <artifactId>spring-boot-starter-web</artifactId> </dependency> <dependency> <groupId>org.springframework.boot</groupId> <artifactId>spring-boot-starter-data-jpa</artifactId> </dependency> <!-- required for the proper working of @ConfigurationProperties --> <dependency> <groupId>org.springframework.boot</groupId> <artifactId>spring-boot-configuration-processor</artifactId> </dependency> <dependency> <groupId>org.springframework.boot</groupId> <artifactId>spring-boot-starter-test</artifactId> <scope>test</scope> </dependency> <!-- embedded database (h2) dependency. --> <dependency> <groupId>com.h2database</groupId> <artifactId>h2</artifactId> <scope>runtime</scope> </dependency> <!-- lombok dependency. --> <dependency> <groupId>org.projectlombok</groupId> <artifactId>lombok</artifactId> <optional>true</optional> </dependency> <!-- faker dependency to generate some random data. --> <dependency> <groupId>com.github.javafaker</groupId> <artifactId>javafaker</artifactId> <version>1.0.2</version> </dependency> </dependencies> <build> <!-- to make the application as fat jar so that spring boot libraries are included --> <plugins> <plugin> <groupId>org.springframework.boot</groupId> <artifactId>spring-boot-maven-plugin</artifactId> </plugin> </plugins> </build></project> |
3.2 Application Properties
Create a new properties file at the location: SpringbootMultipleDatasources/src/main/resources/ and add the following code to it. Here we will define the two data sources for a single h2 database along with database and application properties.
application.properties
01 02 03 04 05 06 07 08 09 10 11 12 13 14 15 16 17 18 19 20 | ## application propertiesserver.port=9091server.servlet.context-path=/jcgspring.application.name=springboot-multiple-datasources## h2 database settings## database1 name - beerdbspring.db1.datasource.username=saspring.db1.datasource.password=spring.db1.datasource.jdbc-url=jdbc:h2:mem:beerdbspring.db1.datasource.driver-class-name=org.h2.Driver## database2 name - customerdbspring.db2.datasource.username=saspring.db2.datasource.password=spring.db2.datasource.jdbc-url=jdbc:h2:mem:customerdbspring.db2.datasource.driver-class-name=org.h2.Driverspring.jpa.show-sql=true## url for h2 console - http://localhost:9091/jcg/h2-consolespring.h2.console.enabled=truespring.h2.console.path=/h2-console |
3.3 Java Classes
Let us write all the java class(es) involved in this application. Remember will only configure the important classes here to build a concrete understanding for this tutorial.
3.3.1 Implementation/Main class
Add the following code to the main class to bootstrap the application from the main method. Always remember, the entry point of the spring boot application is the class containing @SpringBootApplication annotation and the static main method.
Runner.java
01 02 03 04 05 06 07 08 09 10 11 12 13 14 15 16 17 | package com.springboot.multiple.datasources;import lombok.extern.slf4j.Slf4j;import org.springframework.boot.SpringApplication;import org.springframework.boot.autoconfigure.SpringBootApplication;// causes Lombok to generate a logger field.@Slf4j// serves two purposes i.e. configuration and bootstrapping.@SpringBootApplicationpublic class Runner { public static void main(String[] args) { SpringApplication.run(Runner.class, args); log.info("Application started successfully."); }} |
3.3.2 Beer database Configuration Class
Add the following code to the beer configuration class where we will configure the properties so that the spring boot application could connect to the beer database on the startup and perform the table schema creation using the Beer.java model class. This class will define the Spring bean for the data source, Entity Manager Factory, and Transaction Manager.
- At the top of this configuration class, we will add the
@EnableJpaRepositoriesannotation with thebasePackagesattribute. In this property, we will define the package that contains the JPA repository class for this particular data source - The
dataSource()method which is annotated with the@ConfigurationPropertiesannotation. The annotation has aprefixproperty which tells the spring that the properties for this data source are prefixed with the given value and should be used for creating the data source instance. The properties are read from theapplication.propertiesfile - The
db1EntityMgrFactory()method is responsible for creating theLocalContainerEntityManagerFactoryBeaninstance for the data source - The
db1TransactionMgr()method is responsible for creating thePlatformTransactionManagerinstance for this data source to handle the transaction management
Also, the use of @Primary annotation in this class tells Spring to treat the bean instances defined in this class as the primary beans.
BeerConfig.java
01 02 03 04 05 06 07 08 09 10 11 12 13 14 15 16 17 18 19 20 21 22 23 24 25 26 27 28 29 30 31 32 33 34 35 36 37 38 39 40 41 42 43 44 45 46 47 48 49 50 51 52 53 54 55 56 57 58 59 60 61 62 63 64 | package com.springboot.multiple.datasources.config;import org.springframework.beans.factory.annotation.Qualifier;import org.springframework.boot.context.properties.ConfigurationProperties;import org.springframework.boot.jdbc.DataSourceBuilder;import org.springframework.boot.orm.jpa.EntityManagerFactoryBuilder;import org.springframework.context.annotation.Bean;import org.springframework.context.annotation.Configuration;import org.springframework.context.annotation.Primary;import org.springframework.data.jpa.repository.config.EnableJpaRepositories;import org.springframework.orm.jpa.JpaTransactionManager;import org.springframework.orm.jpa.LocalContainerEntityManagerFactoryBean;import org.springframework.transaction.PlatformTransactionManager;import org.springframework.transaction.annotation.EnableTransactionManagement;import javax.persistence.EntityManagerFactory;import javax.sql.DataSource;import java.util.HashMap;import java.util.Map;@Configuration@EnableJpaRepositories( entityManagerFactoryRef = "db1EntityMgrFactory", transactionManagerRef = "db1TransactionMgr", basePackages = { "com.springboot.multiple.datasources.beer.repo" })@EnableTransactionManagementpublic class BeerConfig { @Bean(name = "datasource1") @ConfigurationProperties(prefix = "spring.db1.datasource") @Primary // setting up the data source for the beer database. public DataSource dataSource() { return DataSourceBuilder.create().build(); } @Bean(name = "db1EntityMgrFactory") @Primary public LocalContainerEntityManagerFactoryBean db1EntityMgrFactory( final EntityManagerFactoryBuilder builder, @Qualifier("datasource1") final DataSource dataSource) { // dynamically setting up the hibernate properties for each of the datasource. final Map<String, String> properties = new HashMap<>(); properties.put("hibernate.hbm2ddl.auto", "create-drop"); // in springboot2 the dialect can be automatically detected. // we are setting up here just to avoid any incident. properties.put("hibernate.dialect", "org.hibernate.dialect.H2Dialect"); return builder .dataSource(dataSource) .properties(properties) .packages("com.springboot.multiple.datasources.model") .persistenceUnit("beer") .build(); } @Bean(name = "db1TransactionMgr") @Primary public PlatformTransactionManager db1TransactionMgr( @Qualifier("db1EntityMgrFactory") final EntityManagerFactory entityManagerFactory) { return new JpaTransactionManager(entityManagerFactory); }} |
3.3.3 Customer database Configuration Class
Add the following code, to the customer configuration class where we will configure the properties so that the spring boot application could connect to the beer database on the startup and perform the table schema creation using the Customer.java model class. This class will define the Spring bean for the data source, Entity Manager Factory, and Transaction Manager.
- At the top of this configuration class, we will add the
@EnableJpaRepositoriesannotation with thebasePackagesattribute. In this property, we will define the package that contains the JPA repository class for this particular data source - The
dataSource()method which is annotated with the@ConfigurationPropertiesannotation. The annotation has aprefixproperty which tells the spring that the properties for this data source are prefixed with the given value and should be used for creating the data source instance. The properties are read from theapplication.propertiesfile - The
db2EntityMgrFactory()method is responsible for creating theLocalContainerEntityManagerFactoryBeaninstance for the data source - The
db2TransactionMgr()method is responsible for creating thePlatformTransactionManagerinstance for this data source to handle the transaction management
CustomerConfiguration.java
01 02 03 04 05 06 07 08 09 10 11 12 13 14 15 16 17 18 19 20 21 22 23 24 25 26 27 28 29 30 31 32 33 34 35 36 37 38 39 40 41 42 43 44 45 46 47 48 49 50 51 52 53 54 55 56 57 58 59 60 | package com.springboot.multiple.datasources.config;import org.springframework.beans.factory.annotation.Qualifier;import org.springframework.boot.context.properties.ConfigurationProperties;import org.springframework.boot.jdbc.DataSourceBuilder;import org.springframework.boot.orm.jpa.EntityManagerFactoryBuilder;import org.springframework.context.annotation.Bean;import org.springframework.context.annotation.Configuration;import org.springframework.data.jpa.repository.config.EnableJpaRepositories;import org.springframework.orm.jpa.JpaTransactionManager;import org.springframework.orm.jpa.LocalContainerEntityManagerFactoryBean;import org.springframework.transaction.PlatformTransactionManager;import org.springframework.transaction.annotation.EnableTransactionManagement;import javax.persistence.EntityManagerFactory;import javax.sql.DataSource;import java.util.HashMap;import java.util.Map;@Configuration@EnableJpaRepositories( entityManagerFactoryRef = "db2EntityMgrFactory", transactionManagerRef = "db2TransactionMgr", basePackages = { "com.springboot.multiple.datasources.customer.repo" })@EnableTransactionManagementpublic class CustomerConfig { @Bean(name = "datasource2") @ConfigurationProperties(prefix = "spring.db2.datasource") // setting up the data source for the customer database. public DataSource dataSource() { return DataSourceBuilder.create().build(); } @Bean(name = "db2EntityMgrFactory") public LocalContainerEntityManagerFactoryBean db2EntityMgrFactory( final EntityManagerFactoryBuilder builder, @Qualifier("datasource2") final DataSource dataSource) { // dynamically setting up the hibernate properties for each of the datasource. final Map<String, String> properties = new HashMap<>(); properties.put("hibernate.hbm2ddl.auto", "create-drop"); // in springboot2 the dialect can be automatically detected. // we are setting up here just to avoid any incident. properties.put("hibernate.dialect", "org.hibernate.dialect.H2Dialect"); return builder .dataSource(dataSource) .properties(properties) .packages("com.springboot.multiple.datasources.model") .persistenceUnit("customer") .build(); } @Bean(name = "db2TransactionMgr") public PlatformTransactionManager db2EntityMgrFactory( @Qualifier("db2EntityMgrFactory") final EntityManagerFactory entityManagerFactory) { return new JpaTransactionManager(entityManagerFactory); }} |
3.3.4 Beer Model Class
Add the following code to the beer model class which will be used to create a table schema on the application startup. The table schema for this model class will be created in the beerdb.
Beer.java
01 02 03 04 05 06 07 08 09 10 11 12 13 14 15 16 17 18 19 20 21 22 23 24 25 26 27 28 29 30 31 32 33 | package com.springboot.multiple.datasources.model;import lombok.AllArgsConstructor;import lombok.Builder;import lombok.Data;import lombok.NoArgsConstructor;import org.springframework.stereotype.Component;import javax.persistence.*;@Entity@Table(name = "beer")// causes Lombok to generate toString(), equals(), hashCode(), getter() & setter(), and Required arguments constructor in one go.@Data// causes Lombok to implement the Builder design pattern for the Pojo class.// usage can be seen in DefaultBeersLoader.java -> createNewBeer() method.@Builder// causes Lombok to generate a constructor with no parameters.@NoArgsConstructor// causes Lombok to generate a constructor with 1 parameter for each field in your class.@AllArgsConstructor@Componentpublic class Beer { @Id @GeneratedValue(strategy = GenerationType.AUTO) int id; @Column(name = "beer_name", nullable = false) String name; @Column(name = "beer_style", nullable = false) String style; String malt;} |
3.3.5 Customer Model Class
Add the following code to the customer model class which will be used to create a table schema on the application startup. The table schema for this model class will be created in the customerdb.
Customer.java
01 02 03 04 05 06 07 08 09 10 11 12 13 14 15 16 17 18 19 20 21 22 23 24 25 26 27 28 29 30 31 32 33 34 35 36 | package com.springboot.multiple.datasources.model;import lombok.AllArgsConstructor;import lombok.Builder;import lombok.Data;import lombok.NoArgsConstructor;import org.springframework.stereotype.Component;import javax.persistence.*;@Entity@Table(name = "customer")// causes Lombok to generate toString(), equals(), hashCode(), getter() & setter(), and Required arguments constructor in one go.@Data// causes Lombok to implement the Builder design pattern for the Pojo class.// usage can be seen in DefaultCustomersLoader.java -> createNewCustomer() method.@Builder// causes Lombok to generate a constructor with no parameters.@NoArgsConstructor// causes Lombok to generate a constructor with 1 parameter for each field in your class.@AllArgsConstructor@Componentpublic class Customer { @Id @GeneratedValue(strategy = GenerationType.AUTO) int id; @Column(name = "full_name", nullable = false) String fullName; @Column(name = "age", nullable = false) int age; @Column(name = "gender", nullable = false) String gender; @Column(name = "phone_number", unique = true) String phoneNumber;} |
3.3.6 Common Controller Class
Add the following code to the controller class where we have defined the HTTP GET methods to fetch the data from the two different databases (i.e. beerdb and customerdb). The method will call the service methods which in turn will interact with the DAO interface methods to fetch the data from the data source. Here the DAO interface is a simple interface that extends the JPA interface to perform the database operations.
CommonCtrl.java
01 02 03 04 05 06 07 08 09 10 11 12 13 14 15 16 17 18 19 20 21 22 23 24 25 26 27 28 29 30 31 32 33 34 35 36 37 38 39 40 41 42 43 44 | package com.springboot.multiple.datasources.controller;import com.springboot.multiple.datasources.model.Beer;import com.springboot.multiple.datasources.model.Customer;import com.springboot.multiple.datasources.service.BeerService;import com.springboot.multiple.datasources.service.CustomerService;import lombok.extern.slf4j.Slf4j;import org.springframework.beans.factory.annotation.Autowired;import org.springframework.http.HttpStatus;import org.springframework.http.ResponseEntity;import org.springframework.web.bind.annotation.GetMapping;import org.springframework.web.bind.annotation.RequestMapping;import org.springframework.web.bind.annotation.RestController;import java.util.List;@RestController@RequestMapping(value = "/api")@Slf4jpublic class CommonCtrl { @Autowired private BeerService service; @Autowired private CustomerService service2; // URL - http://localhost:9091/jcg/api/beers @GetMapping(value = "/beers") public ResponseEntity<List<Beer>> findAllBeers() { log.info("Fetch all beers info from the database."); // will fetch the beers data from the 'beer' table present in the 'beerdb' final List<Beer> beers = service.finalAll(); return new ResponseEntity<>(beers, HttpStatus.OK); } @GetMapping(value = "/customers") public ResponseEntity<List<Customer>> findAllCustomer() { log.info("Fetch all customers info from the database."); // will fetch the customers data from the 'customer' table present in the 'customerdb' final List<Customer> customers = service2.findAll(); return new ResponseEntity<>(customers, HttpStatus.OK); }} |
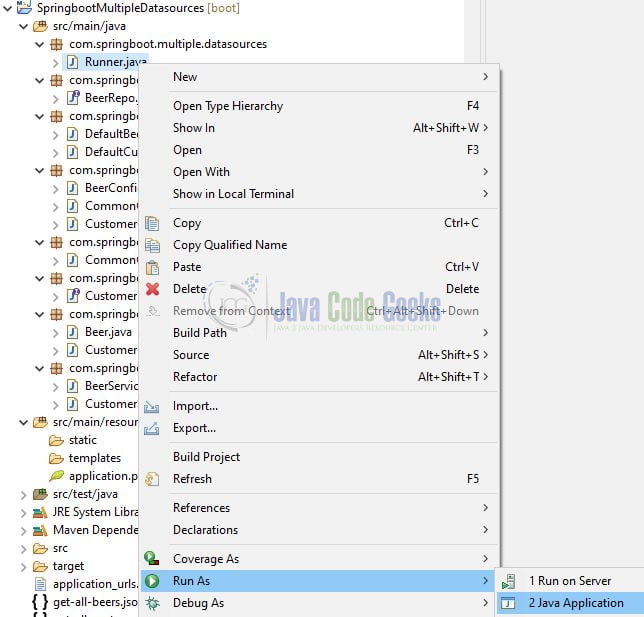
4. Run the Application
To execute the application, right-click on the Runner.java class, Run As -> Java Application.
5. Project Demo
Open the Postman tool and hit the following URL to list the actuator endpoints exposed over HTTP.
1 2 3 4 5 6 7 | // get all beers// http get// get all customers// http get |
On successfully calling these API’s the response will be returned from the different databases (i.e. the beer’s information will be returned from the beerdb and the customer’s information will be returned from the customerdb). That is all for this tutorial and I hope the article served you whatever you were looking for. Happy Learning and do not forget to share!
6. Summary
In this section, you learned,
- Spring boot and Lombok introduction
- Steps to implement the multiple data sources in a single spring boot application
You can download the sample application as an Eclipse project in the Downloads section.
7. Download the Eclipse Project
This was an example of actuators in the spring boot application.
You can download the full source code of this example here: How to Configure Multiple Data Sources in a Spring Boot Application

Do we need to specify ea h entity name as persistent unit.
Hi, is it possible to get queries from an external file with this configuration, because configuring mutliple datasources and getting queries from jpa-named-queries is no not possible