Hello. In this tutorial, we will create a simple hello world Spring Boot application in Kotlin.
1. Introduction
Kotlin is a statically typed language. It offers multiple features which makes a preferred choice among the open-source developers:
- It is open-source and is distributed under the Apache License v2.0
- Offers its compiler known as the Kompiler
- It is interoperable with Java and Android
- It is concise and expressive thus making it easy to learn
- It is tool-friendly and is easily playable with IntelliJ
- It offers to remove null references from code and being statically typed helps to catch errors at run-time
2. Getting Started with Kotlin and Spring Boot
Let us dive into some practice stuff and I am hoping that you are aware of the spring boot basics.
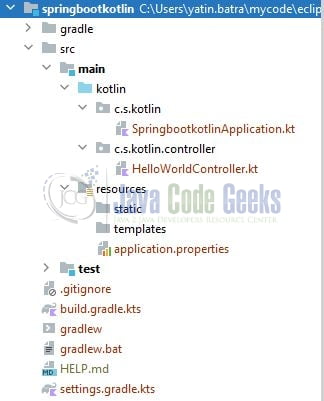
2.1 Tools Used for Spring boot application and Project Structure
We are using IntelliJ, JDK 8, and Maven. In case you’re confused about where you should create the corresponding files or folder, let us review the project structure of the spring boot application.
Let us start building the application!
3. Creating a Spring Boot application
To create the base for this application I will be skipping the traditional approach of creating the project and will move toward the Spring Initializr that offers the quickest way to set up the project. To create this tutorial I will be exploring Gradle as the project and Kotlin as the programming language.
3.1 Importing the project
Once the project setup is done via the Spring Initializr import it in the IntelliJ. Kotlin is developed by Jetbrains hence the project will be set up automatically and will start to download the libraries specified in the Gradle file named – build.gradle.kts. For this tutorial, I will use the spring-boot-starter-web dependency for creating a hello world application.
3.2 Setting the properties
Create a properties file in the resources folder and add the following content to it. The file will contain information about the port number on which the application should run.
application.properties
server.port=6001
3.3 Creating the implementation classes
To understand the Kotlin implementation we will start with the main class followed by the other classes required for this project.
3.3.1 Creating a controller class
Creating a controller responsible to handle the incoming requests from the client. The controller will have 2 endpoints.
HelloWorldController.kt
package com.springboot.kotlin.controller

import org.slf4j.LoggerFactory
import org.springframework.http.ResponseEntity
import org.springframework.web.bind.annotation.PathVariable
import org.springframework.web.bind.annotation.RequestMapping
import org.springframework.web.bind.annotation.RequestMethod
import org.springframework.web.bind.annotation.RestController
import java.util.*

@RestController
@RequestMapping("/api")
class HelloWorldController {

    private val log = LoggerFactory.getLogger(this.javaClass.name);

    // http://localhost:6001/api/index
    @RequestMapping(value = ["/index"], method = [RequestMethod.GET])
    fun getHelloWorld(): ResponseEntity<String> =
        ResponseEntity.ok("Welcome to spring boot and kotlin!")

    // http://localhost:6001/api/welcome/daniel
    @RequestMapping(value = ["/welcome/{name}"], method = [RequestMethod.GET])
    fun getUser(@PathVariable("name") name: String): ResponseEntity<HelloResponse> =
        ResponseEntity.ok(HelloResponse(UUID.randomUUID(), message = "Hello $name"))
}

data class HelloResponse(
    val id: UUID,
    val message: String
)
3.3.2 Creating an implementation class
Creating an implementation class responsible to start the application.
SpringbootkotlinApplication.kt
package com.springboot.kotlin

import org.springframework.boot.autoconfigure.SpringBootApplication
import org.springframework.boot.runApplication

@SpringBootApplication
class SpringbootkotlinApplication

fun main(args: Array) {
    runApplication(*args)
}
4. Run the main class
To run the application, right-click on the SpringbootkotlinApplication.kt class, Run As -> Spring Boot App. If everything goes well the application will be started successfully.
5. Project Demo
Once the application is started successfully we can use the controller endpoints to play around. To test we will use the postman tool. However, you’re free to use any tool of your choice for interacting with the application endpoints.
Application endpoints
-- get application status –
-- method – http get
http://localhost:6001/api/index

-- get a welcome message for the user —
-- method – http get
http://localhost:6001/api/welcome/your_username
That is all for this tutorial and I hope the article served you whatever you were looking for. Happy Learning and do not forget to share!
6. Summary
In this tutorial, we made a quick glimpse of Kotlin programming and create a simple hello world application in the spring framework. You can download the sample application as an Eclipse project in the Downloads section.
7. Download the Project
This was an example of Kotlin programming in a spring application.
You can download the full source code of this example here: Getting Started with Kotlin and Spring Boot
