Testing is a critical aspect of building robust and reliable Spring Boot applications, especially when it comes to RESTful APIs. In this article, we’ll walk through a step-by-step guide on testing Spring Boot REST endpoints using TestRestTemplate and Testcontainers with a Spring JPA example. The example will include setting up Testcontainers with a PostgreSQL container, creating a sample Spring JPA entity and repository, and testing the REST endpoints.
1. Introduction to Testcontainers
1.1 What is TestContainers?
TestContainers is an open-source Java library that simplifies the process of testing applications that use containerization technologies such as Docker. it provides a convenient way to manage the lifecycle of containers throughout test scenarios. Developers benefit from the ability to define and configure containers directly in their test code, making it easier to conduct tests on applications that interact with databases, message queues, and various components encapsulated within containers.
1.1.1 Key Features of Testcontainers
- Container Orchestration: TestContainers makes it easy to organize containers for testing. Developers can specify containers directly in their test code, making sure all the needed infrastructure is set up for thorough testing.
- Support for Docker: TestContainers mainly works with Docker containers, which is perfect for projects using Docker to organize containers. This guarantees that the testing environment matches the production environment for consistency.
- Broad Container Selection: TestContainers can handle many types of well-known containers, such as databases like PostgreSQL, MySQL, and MongoDB, and message brokers like Kafka and RabbitMQ. This variety allows developers to set up realistic testing situations with ease.
- Lifecycle Management: TestContainers takes care of containers from start to finish during testing. It kicks off containers before tests start and shuts them down after tests finish, ensuring a tidy and separate testing space for each situation.
- Declarative Configuration: Developers can set up containers by providing a clear configuration, stating the image, ports, environment variables, and other needed settings directly in the test code. This simplifies the understanding and upkeep of the testing setup.
1.2 Introduction to TestRestTemplate
TestRestTemplate is a class provided by the Spring Framework for testing RESTful services in Spring applications. It is part of the Spring Test module and is designed to simplify the testing of RESTful HTTP interactions in integration tests.
1.2.1 Key Features of TestRestTemplate
Here are some key points about TestRestTemplate:
- Purpose:
TestRestTemplateallows us to make HTTP requests to our RESTful endpoints in a testing environment. It provides a convenient and expressive way to interact with our application’s controllers during integration tests. - Integration with Spring Boot:
TestRestTemplateis particularly handy when working with Spring Boot applications. It is automatically configured when we use the@SpringBootTestannotation in our tests, allowing seamless integration with our application context. - Features: It provides methods to perform GET, POST, PUT, and DELETE requests, as well as methods to exchange information with your RESTful endpoints. It automatically handles the conversion of request and response bodies to and from Java objects using the configured
HttpMessageConverter‘s. - Easy Handling of Response Entities: The
exchangemethods inTestRestTemplatereturnResponseEntityobjects, allowing us to easily inspect the status code, headers, and response body of the HTTP response.
2. Set up a Spring Boot Project and Add Dependencies
Let’s start by creating a simple Spring Boot project. You can use the Spring Initializer (https://start.spring.io/) or your preferred IDE to generate a new project with the following dependencies:
- Spring Boot Starter Web
- Spring Boot Starter Test
- Spring Data JPA
- Testcontainers
- PostgreSQL Driver
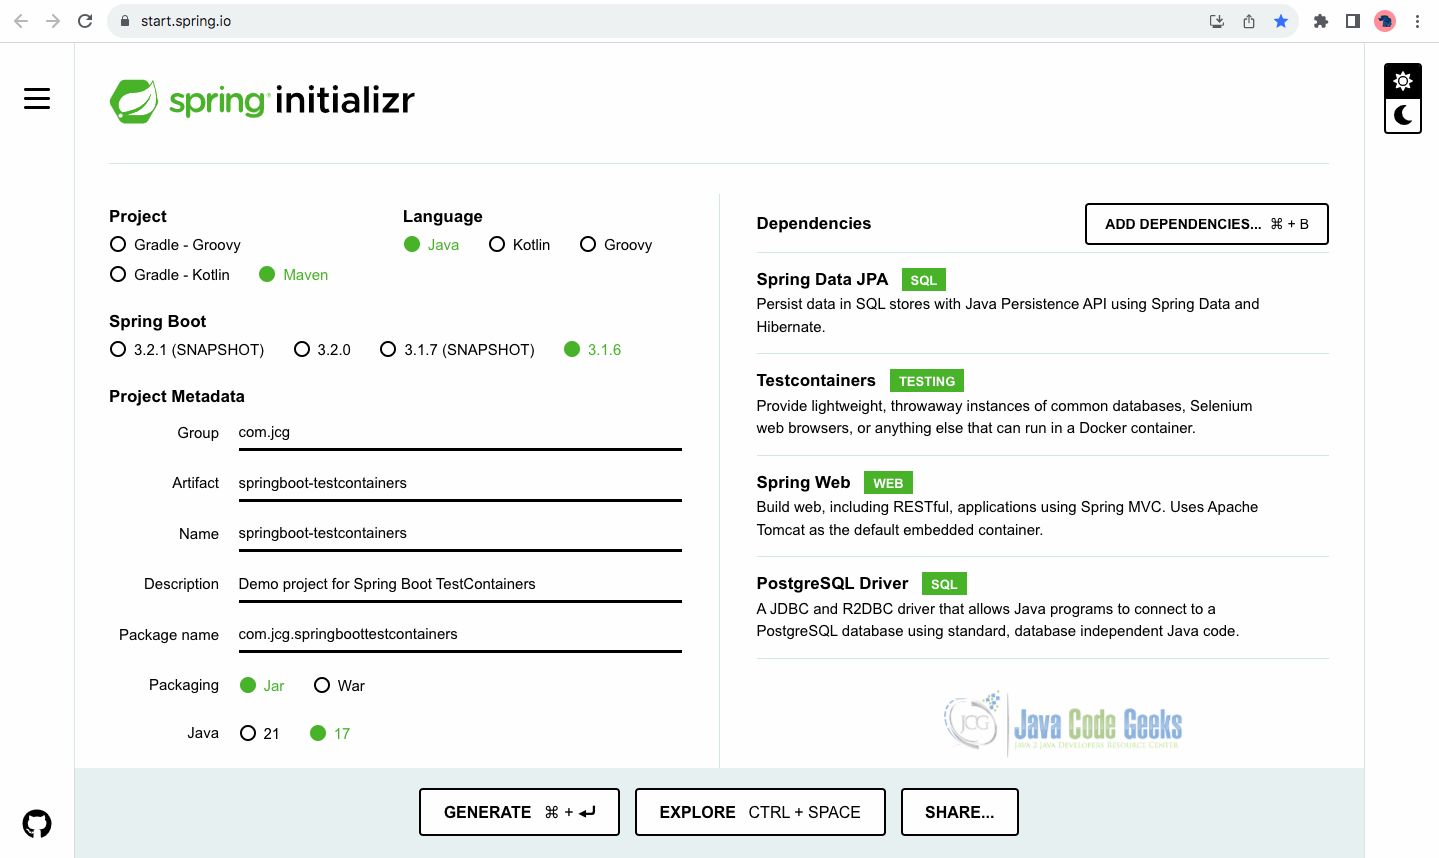
After adding the necessary dependencies to the project, the contents of the pom.xml file should resemble the following:
<?xml version="1.0" encoding="UTF-8"?>
<project xmlns="http://maven.apache.org/POM/4.0.0" xmlns:xsi="http://www.w3.org/2001/XMLSchema-instance"
         xsi:schemaLocation="http://maven.apache.org/POM/4.0.0 https://maven.apache.org/xsd/maven-4.0.0.xsd">
    <modelVersion>4.0.0</modelVersion>
    <parent>
        <groupId>org.springframework.boot</groupId>
        <artifactId>spring-boot-starter-parent</artifactId>
        <version>3.1.6</version>
        <relativePath/> <!-- lookup parent from repository -->
    </parent>
    <groupId>com.jcg</groupId>
    <artifactId>springboot-testcontainers</artifactId>
    <version>0.0.1-SNAPSHOT</version>
    <name>springboot-testcontainers</name>
    <description>Demo project for Spring Boot TestContainers</description>
    <properties>
        <java.version>17</java.version>
    </properties>
    <dependencies>
        <dependency>
            <groupId>org.springframework.boot</groupId>
            <artifactId>spring-boot-starter-data-jpa</artifactId>
        </dependency>
        <dependency>
            <groupId>org.springframework.boot</groupId>
            <artifactId>spring-boot-starter-web</artifactId>
        </dependency>

        <dependency>
            <groupId>org.postgresql</groupId>
            <artifactId>postgresql</artifactId>
            <scope>runtime</scope>
        </dependency>
        <dependency>
            <groupId>org.springframework.boot</groupId>
            <artifactId>spring-boot-starter-test</artifactId>
            <scope>test</scope>
        </dependency>
        <dependency>
            <groupId>org.springframework.boot</groupId>
            <artifactId>spring-boot-testcontainers</artifactId>
            <scope>test</scope>
        </dependency>

        <dependency>
            <groupId>org.testcontainers</groupId>
            <artifactId>testcontainers</artifactId>
            <scope>test</scope>
        </dependency>

       <!-- Testcontainer and Container to start and stop container -->
        <dependency>
            <groupId>org.testcontainers</groupId>
            <artifactId>junit-jupiter</artifactId>
            <scope>test</scope>
        </dependency>
        <dependency>
            <groupId>org.testcontainers</groupId>
            <artifactId>postgresql</artifactId>
            <scope>test</scope>
        </dependency>
    </dependencies>

    <build>
        <plugins>
            <plugin>
                <groupId>org.springframework.boot</groupId>
                <artifactId>spring-boot-maven-plugin</artifactId>
                <configuration>
                    <image>
                        <builder>paketobuildpacks/builder-jammy-base:latest</builder>
                    </image>
                </configuration>
            </plugin>
        </plugins>
    </build>

</project>
3. Creating a Sample Entity and Repository
Let’s create a simple entity class along with a repository to handle a hypothetical entity named Product.
3.1 Entity Class
Create a JPA entity named Product in a Java class named Product.java.
@Entity
@Table(name = "products")
public class Product {

    //private static final long serialVersionUID = 1L;
    @Id
    @GeneratedValue(strategy = GenerationType.IDENTITY)
    private Long id;

    @Column(nullable = false)
    private String name;

    public Product() {
    }

    public Product(Long id, String name) {
        this.id = id;
        this.name = name;
    }

    public Long getId() {
        return id;
    }

    public void setId(Long id) {
        this.id = id;
    }

    public String getName() {
        return name;
    }

    public void setName(String name) {
        this.name = name;
    }

    @Override
    public String toString() {
        return "Product{" + "id=" + id + ", name=" + name + '}';
    }

}
3.2 Repository
Next, create an interface ProductRepository that extends the JpaRepository interface, which is part of the Spring Data JPA framework.
public interface ProductRepository extends JpaRepository{

    Optional findByName(String name);
}
In the code above, the ProductRepository interface extends the functionality provided by JpaRepository and introduces a query method to find a Product by name, returning an Optional to handle the potential absence of the result. The JpaRepository interface is a part of the Spring Data JPA framework that makes it easy to perform CRUD (Create, Read, Update, Delete) operations on entities.
4. Configure Spring Boot for Database Initialization on Startup
Spring Boot provides a convenient way to initialize databases on application startup, ensuring that our application’s database is in the desired state before serving requests. One way to achieve this is by using the spring.sql.init.mode property along with appropriate SQL scripts.
4.1 Setting up the Initialization Scripts
Before configuring the spring.sql.init.mode property in our application, we need to create initialization scripts. These scripts contain the SQL statements required to set up our database. Spring Boot will execute these scripts during the application startup process.
Create a file named data.sql with the following content:
CREATE TABLE IF NOT EXISTS products (
    id bigserial NOT NULL,
    name VARCHAR(255) NOT NULL,
    primary key (id)
);
Ensure that the data.sql file is placed in the src/main/resources directory of the Spring Boot project.
4.2 Understanding spring.sql.init.mode
The spring.sql.init.mode property is a key part of Spring Boot’s database initialization process. It allows us to specify the mode in which initialization scripts should run. There are three modes available:
always: This mode ensures that initialization scripts are always run on startup, regardless of whether the database is empty or not.embedded: Initialization scripts are only executed when an embedded database is detected.never: Initialization scripts are never executed automatically. This is the default mode.
4.3 Configuring spring.sql.init.mode
Now that we have our initialization script, we can configure the spring.sql.init.mode property in our application.properties file like this:
# Enable database initialization on startup
spring.sql.init.mode=always
In this example, we set the spring.sql.init.mode property to always, indicating that the initialization scripts should be executed every time the application starts.
5. Create Spring Web RESTful API Endpoints
In this article, we will create a controller to establish a REST API endpoint for retrieving all product records from the database. We will also create additional endpoints to save a new product record as well as get a product by their id‘s. Here are Spring REST endpoints designed for the Product entity.
@RestController
@RequestMapping("api/products")
public class ProductController {

  @Autowired
  private ProductRepository productRepository;

  @GetMapping
  public List getAll() {
      return productRepository.findAll();
  }

  @PostMapping
  public Product create(@RequestBody Product product) {
      return productRepository.save(product);
  }

  @GetMapping("/{id}")
  public Product getById(@PathVariable Long id) {
      return productRepository.findById(id).orElse(null);
  }
}
The above code block defines a Spring RestController named ProductController. It is responsible for handling RESTful endpoints related to our Product entity. The controller utilizes the ProductRepository for database interactions. The provided endpoints include:
- GET
/api/products: Retrieves a list of all products from the database using thefindAllmethod ofProductRepository. - POST
/api/products: Creates a new product by saving the data received in the request body using thesavemethod ofProductRepository. - GET
/api/products/{id}: Retrieves a specific product by its ID from the database using thefindByIdmethod ofProductRepository. If the product with the given ID is not found, it returnsnull.
6. Create Tests for the API Endpoints
Let’s create an integration test class that uses Testcontainers to spin up a PostgreSQL container and use TestRestTemplate to test the REST endpoints. TestRestTemplate is part of the spring-boot-starter-test dependency and to use it in our project we have added it to our pom.xml file:
        <dependency>
            <groupId>org.springframework.boot</groupId>
            <artifactId>spring-boot-starter-test</artifactId>
            <scope>test</scope>
        </dependency>
Create a test class named ProductControllerTest. In this test class, we will employ the TestRestTemplate tool to conduct testing of the Spring REST endpoints in ProductController and asserting the expected behavior.
@SpringBootTest(webEnvironment = SpringBootTest.WebEnvironment.RANDOM_PORT)
@Testcontainers
public class ProductControllerTest {

    @LocalServerPort
    private Integer port;

    @Autowired
    private TestRestTemplate restTemplate;

    @Autowired
    private ProductRepository productRepository;

    @Container
    @ServiceConnection
    static PostgreSQLContainer postgres = new PostgreSQLContainer(
            "postgres:15-alpine"
    );

    @Test
    public void testProductEndPoints() {

        // Create new product
        Product product = new Product();
        product.setName("Real World Java EE Patterns");

        ResponseEntity createResponse =
                restTemplate.postForEntity("/api/products", product, Product.class);
        assertEquals(HttpStatus.OK, createResponse.getStatusCode());
        Product savedProduct = createResponse.getBody();
        productRepository.save(savedProduct);

        // Retrieve All products
        ResponseEntity getAllResponse =
                restTemplate.getForEntity("/api/products", Product[].class);
        assertEquals(HttpStatus.OK, getAllResponse.getStatusCode());

        Product[] getAllProducts = getAllResponse.getBody();
        assert getAllProducts != null;
        assertEquals(1, getAllProducts.length);

    }

}
Let’s break down the key elements of this code:
@SpringBootTest(webEnvironment = SpringBootTest.WebEnvironment.RANDOM_PORT): This annotation is used to instruct Spring Boot to start the entire Spring application context for testing, with a randomly assigned port for the embedded web server.@Testcontainers: This annotation is used to enable the use of Testcontainers. In this case, it’s being used to start a PostgreSQL container for the tests. The use of@Testcontainersand@Containerwill auto-start and stop the container.@LocalServerPort: This annotation injects the random port on which the Spring Boot application started using as specified bywebEnvironment = SpringBootTest.WebEnvironment.RANDOM_PORT).- We use the
@Autowiredannotation to injectTestRestTemplateandProductRepositorybeans for use in the test. @ContainerandPostgreSQLContainer<?> postgres: These annotation is used to define a Docker container for PostgreSQL. Thepostgrescontainer is a static member, meaning it will be shared across all test methods.@ServiceConnection: This annotation is a new feature added in Spring Boot 3.1 that makes integration testing with Testcontainers easier. This@ServiceConnectionannotation allows the application to automatically establish a connection to thepostgresservice running in the container.- The
testProductEndPointsmethod is a test method that performs the following steps:- Creates a new
Productinstance. - Uses the injected
TestRestTemplateto send a POST request to the/api/productsendpoint to create a new product. The response is expected to have a status code ofHttpStatus.OK. - Retrieves the created product from the response and saves it using the injected
ProductRepository. - Sends a GET request to the
/api/productsendpoint to retrieve all products. The response is expected to have a status code ofHttpStatus.OK - Validates that the response contains exactly one product.
- Creates a new
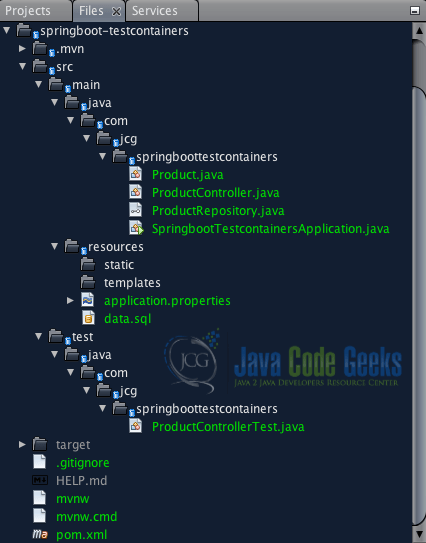
7. Project Structure
Below is the final project structure of the application used in this article. The project structure is a standard Java Maven project.
8. Run the Tests
When we run the test class, Testcontainers will automatically start the PostgreSQL container before executing the tests. To run the tests, navigate to the root directory of the project on a Terminal and enter the following command:
./mvnw test
When we run the above command, we should notice the initiation of a PostgreSQL Docker container, and the expectation is that all tests will succeed as indicated in the test results shown below.
[INFO] Tests run: 1, Failures: 0, Errors: 0, Skipped: 0, Time elapsed: 72.13 s - in com.jcg.springboottestcontainers.ProductControllerTest
[INFO]
[INFO] Results:
[INFO]
[INFO] Tests run: 1, Failures: 0, Errors: 0, Skipped: 0
[INFO]
[INFO] ------------------------------------------------------------------------
[INFO] BUILD SUCCESS
[INFO] ------------------------------------------------------------------------
[INFO] Total time:  01:27 min
[INFO] Finished at: 2023-12-04T14:46:42+01:00
[INFO] ------------------------------------------------------------------------
9. Conclusion
In this article, we delved into an example of using Spring Boot with Testcontainers. Testcontainers simplify the setup and execution of integration tests by providing a convenient way to manage external dependencies using Docker containers. Testing Spring Boot REST endpoints with TestRestTemplate and Testcontainers is a powerful combination that allows us to create comprehensive integration tests.
By following the example in this article, we can ensure that our Spring JPA repositories and REST controllers work seamlessly together, providing confidence in the reliability of our Spring Boot applications. This example focused on PostgreSQL, but Testcontainers supports various other containers, including MySQL, Redis, and more.
By incorporating Testcontainers into our Spring Boot projects, we can ensure that our integration tests are consistent and reflect real-world scenarios. In conclusion, Testcontainers proves to be a valuable tool that improves how reliably and effectively we conduct integration testing in Spring Boot applications.
10. Download the Source Code
This was an example of using Spring Boot Testcontainers
You can download the full source code of this example here: spring boot testcontainers example
