In this example, we will show how to use jetty for session clustering purposes. During this, we will configure multiple jetty instances,a load balancer, and jetty session clustering. Jetty is an open source web server developed by Eclipse Foundation. You can read more about how to deploy a simple servlet on jetty here.
Jetty can be used for high availability and scalability purposes. In such a scenario, jetty offers an ability for session clustering by persisting sessions to a shared database. Each jetty instance caches sessions locally for which it has received requests. To achieve this configuration of persistence, we will need a load balancer such as Apache Httpd Web Server and two instances of jetty on same machine. In real life scenarios, we will be doing session clustering across different servers/machines, but for this tutorial purpose, we will be perform session clustering on multiple instances on same machine.
1. Environment
In this example, we will be using following environment
- Windows 7 SP 1
- Eclipse Kepler 4.3
- Jetty version 9.2.15 v20160210
- Java version 7
- Apache Httpd Web Server 2.4
- Java Servlet Library – servlet-api-3.1
- Java JDBC Driver – mysql-5.0.4.jar
- MySQL Database – 5.0.86-community-nt
2. Terminalogy
We will using some frequent terms and notations in this example. I will go over them one by one, this will also give an idea why session replication can be used.
Sticky Session– is when load balancer remembers where the request came from and which particular server responded to it. Same server will respond to all the requests from the same client.Load balancer– is a server used to distribute load amount servers of a cluster. There are different mechanisms can be used to distribute this load. By default, it will try to distribute the load evenly.byrequestsis a way to distribute the requests among the various workers to ensure that each gets their configured share of the number of requests. We will usebytrafficwhich is based on the idea that how much share of traffic one particular worker wants to handle.
Why do we use session clustering and persistence mechanism? – In high traffic web applications, a single server can not handle the load. Such web applications are built using technologies which provide scalability and high availability . To achieve the goals scalability and high availability , we use session clustering mechanism. A clustered environment solves the problem of high traffic and failure of servers by using load balancing across multiple servers and session persistence.
3. Example outline
In this example, we will show how to configure two jetty instances. We will use a Apache Httpd 2.4 server as a load balancer in front of the jetty cluster we will set up. We will be using software based load balancing technique. We will discuss how to configure database and how to configure jetty for session clustering for our web application. At last, we will show session persistence using our sample web application.
4. Configure Jetty Instances
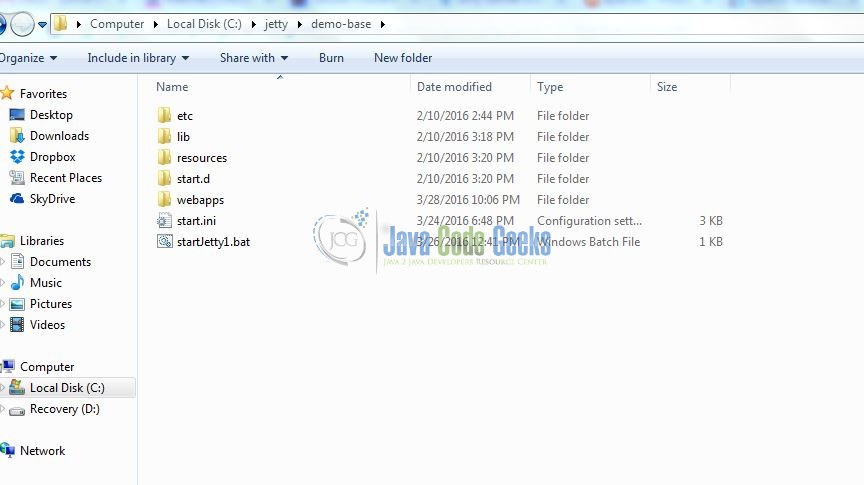
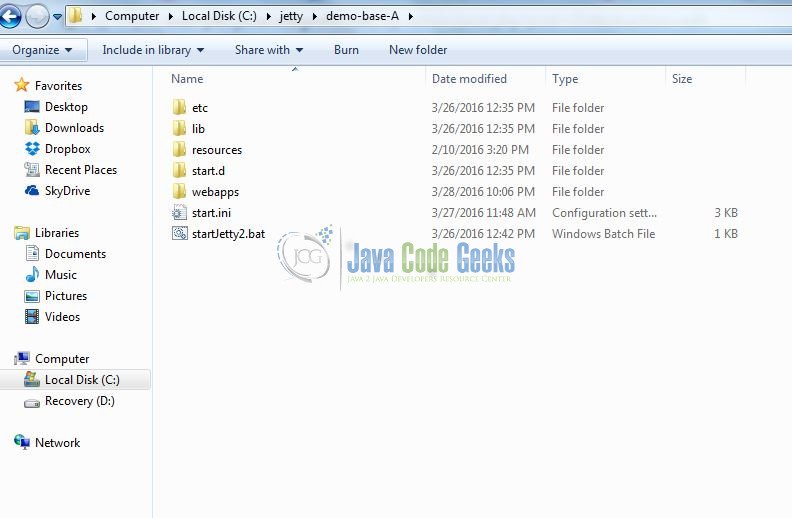
In real life examples, you can run jetty on two different physical machines and set up a cluster that way. But for our demo purposes, we will be using same physical machine, but still be running two jetty instances. We are using jetty version 9.2.15 and in this version, jetty uses $jetty.home and $jetty.base directories. It is generally advised that one should run jetty from $jetty.base directory. When jetty instance is started, it uses mostly $jetty.base directory content to load the files. We will copy $jetty.base directory and create one more $jetty.base directory as shown below.
Now before we can run our two instances of jetty, we have to make sure to change the port settings in our second instance. Go to $jetty.base/start.d/ directory and open http.ini and https.ini files and change port values of your choice. For this example, jetty instance 1 is running on http port 8080 and https port 8443 while jetty instance 2 is running on http port 8180 and https port 8543. Make sure the ports you are using are not used elsewhere otherwise you will run into port conflict issue. We will write two batch script files and copy them in respective $jetty.base directory.
 File name - runJetty1.bat
 set JETTY_BASE = C:/jetty/demo-base
 cd %JETTY_BASE%
 java -jar ../start.jar

 File name - runJetty2.bat
 set JETTY_BASE = C:/jetty/demo-base-A
 cd %JETTY_BASE%
 java -jar ../start.jar
Now open two command prompt windows and change directories to $jetty.base for instance one and $jetty.base for instance two respectively. And run the batch script files we wrote above.
5. Configure Load Balancer
We will be using Apache Httpd Web Server as a load balancer. For load balancing capabilities, we will be adding mod_proxy_balancer module to the server. There are other modules available from Apache like mod_jk or mod_proxy_http , but mod_proxy_balancer is the recommended balancer for jetty. We will need to enable few other modules in httpd.conf file which will be located in $apache.home/conf directory. You can download Apache Httpd Web server from here. Other modules we will need for load balancer to work lbmethod_byrequests_module modules/mod_lbmethod_byrequests.so , lbmethod_bytraffic_module modules/mod_lbmethod_bytraffic.so and slotmem_shm_module modules/mod_slotmem_shm.so . By default, Apache web server will be listening to port 80, we can change to any value we want, but for demo purpose, we will keep it to 80. Also add Servername in httpd.conf . Load balancer configuration from httpd.conf looks like below:
      <IfModule mod_proxy_balancer.c>
             <Location "/balancer-manager">
                   SetHandler balancer-manager
                   Order deny,allow
                   Deny from all
                   # Allow from local subnet only
                   Allow from all
             </Location>

             <Proxy balancer://mybalancer>
                   BalancerMember http://localhost:8080 route=route1
                   BalancerMember http://localhost:8180 route=route2
                   ProxySet lbmethod=bytraffic
             </Proxy>

          ProxyPass /balance balancer://mybalancer stickysession=JSESSIONID
      </IfModule>
So once this configuration is done, we can start Apache load balancer by configuring it as a windows service. This can be done by using following command on command prompt
$Apache.home/bin>httpd.exe -k install
Once we start the Apache mod_proxy_balancer service, we can launch a browser and can access the page at http://localhost/balance , this will be routed to one of the instances of jetty. You can test this by writing a simple html page and putting that in $jetty.base/webapps/ directory.
6. Configure Database
6.1 Install database
We will be using mysql database for this demo. You can download mysql here. Once we have installed mysql, create a database sessions . You can configure your database with username and password, for this demo, I have configured my database without username and password.
6.2 Configure Database Driver
We will need a mysql JDBC driver to connect to mysql database through our java code. You can download that driver jar file here. Before we do configuration for session clustering for jetty, make sure to copy mysql JDBC driver jar file to $jetty.base/lib/ext directory.
6.3 Configure Jetty for Session Clustering
Jetty manages sessions through two parts session id manager and session manager. As per definition from jetty’s website, session id manager ensures that session ids are unique across all webapps hosted on a jetty instance, and thus there can be only one session id manager per jetty instance, on the other hand, session manager handles the session lifecycle on behalf of application.
6.3.1 Configure jdbc-session-module
To enable jetty session persistence, first we will enable jdbc session module by using -add-to-start argument to start.jar. Add following changes to $jetty.base/start.ini
## Unique identifier for this node in the cluster
  jetty.jdbcSession.workerName=node1

## The interval in seconds between sweeps of the scavenger
# jetty.jdbcSession.scavenge=600

## Uncomment either the datasource name or driverClass and connectionURL
 jetty.jdbcSession.driverClass=com.mysql.jdbc.Driver
 jetty.jdbcSession.connectionURL=jdbc:mysql://127.0.0.1:3306/sessions
jetty.jdbcSession.workerName value will be node2 for another instance. Change that value in start.ini located in another $jetty.base . Make sure you choose the right port to connect to database. You should be able to figure that out during installation of mysql.
6.3.2 Configuring the JDBCSessionIdManager
Once you install jdbc-session module for jetty, there will be a file jetty-jdbc-sessions.xml in $jetty.home/etc/ directory. Add the following changes in that file as shown below:
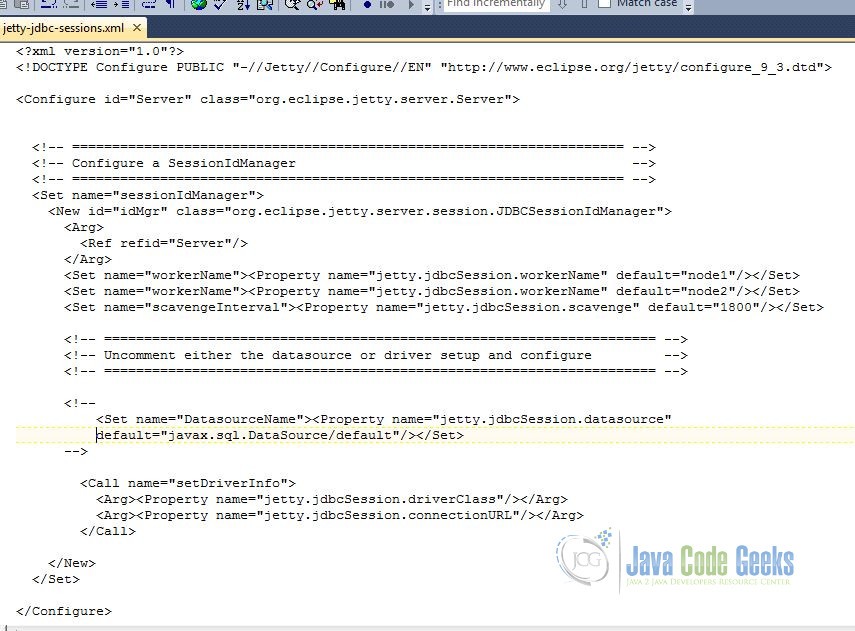
Once you have configured this and if you start jetty, you will notice that jetty will connect to database sessions and create database tables with default names jettysessionids and jettysessions
6.3.3 Configuring the JDBCSessionManager
We configure JDBCSessionManager per web context. We can create this file when we are configuring or when we create our web application. Also name the file same as name of the application. In our case, we will name our application as JettySessionClusterSample, we will name this file as JettySessionClusterSample.xml. This file will look like below:
<?xml version="1.0"  encoding="ISO-8859-1"?>
<!DOCTYPE Configure PUBLIC "-//Jetty//Configure//EN" "http://www.eclipse.org/jetty/configure_9_0.dtd">
<Configure class="org.eclipse.jetty.webapp.WebAppContext">
<Set name="contextPath">/JettySessionClusterSample</Set>
<Set name="war"><Property name="jetty.webapps" default="."/>/JettySessionClusterSample.war</Set>
<Ref id="Server">
<Call id="idMgr" name="getSessionIdManager"/>
</Ref>
<Set name="sessionHandler">
<New class="org.eclipse.jetty.server.session.SessionHandler">
<Arg>
<New id="jdbcmgr" class="org.eclipse.jetty.server.session.JDBCSessionManager">
<Set name="sessionIdManager">
<Ref id="idMgr"/>
</Set>
</New>
</Arg>
</New>
</Set>
</Configure>
Make sure you copy this file in $jetty.base/webapps/ directory of both instances of jetty.

7. Web Application Deployment
We are ready to write a simple web application and see session clustering in action. Create a new dynamic web project in eclipse JettySessionClusterSample . Add new servlet class SessionServlet in package com.javacodegeeksexample . We will add code in doPost method to find out what session we are using.
package com.javacodegeeksexample;

import java.io.IOException;
import java.text.SimpleDateFormat;
import java.util.Date;

import javax.servlet.ServletException;
import javax.servlet.annotation.WebServlet;
import javax.servlet.http.Cookie;
import javax.servlet.http.HttpServlet;
import javax.servlet.http.HttpServletRequest;
import javax.servlet.http.HttpServletResponse;
import javax.servlet.http.HttpSession;

/**
 * Servlet implementation class SessionServlet
 */
@WebServlet("/SessionServlet")
public class SessionServlet extends HttpServlet {
    private static final long serialVersionUID = 1L;

    /**
     * Default constructor.
     */
    public SessionServlet() {
        // TODO Auto-generated constructor stub
    }

    /**
    * @see HttpServlet#doGet(HttpServletRequest request, HttpServletResponse response)
    */
    protected void doGet(HttpServletRequest request, HttpServletResponse response) throws ServletException, IOException {
		// TODO Auto-generated method stub
		//String sessionId = request.getSession().getId();

	}

     /**
      * @see HttpServlet#doPost(HttpServletRequest request, HttpServletResponse response)
      */
     protected void doPost(HttpServletRequest request, HttpServletResponse response) throws ServletException, IOException {
	 // TODO Auto-generated method stub
	 response.getWriter().println("In POST - We will post the session id here - ");
	 HttpSession session = request.getSession();
	 if(request.getParameter("JSESSIONID") != null)
	 {
		Cookie userCookie = new Cookie("JSESSIONID",request.getParameter("JSESSIONID"));
		response.addCookie(userCookie);
	 }
	 else
	 {
		String sessionId = session.getId();
		Cookie userCookie = new Cookie("JSESSIONID",sessionId);
		response.addCookie(userCookie);

	 }
	 String currDate = new SimpleDateFormat("dd-MM-yyyy HH:mm:ss:SSS").format(new Date());
	 response.getWriter().println(" Current Date = " + currDate + " session id = " + session.getId());
     }
}
We will write a simple web page with a form in it. POST action of that form will submit the form to call doPost from our servlet.
SessionExamplePage.html
<!DOCTYPE html>
<html>
<head>
<meta charset="ISO-8859-1">
<title>First HTML PAGE </title>
</head>
<body>
<p>Let's Test doPost.</p>
<form method="POST" action="SessionServlet"/>
<input name="field" type="text" />
<input type="submit" value="Submit" />
</form>
</body>
</html>
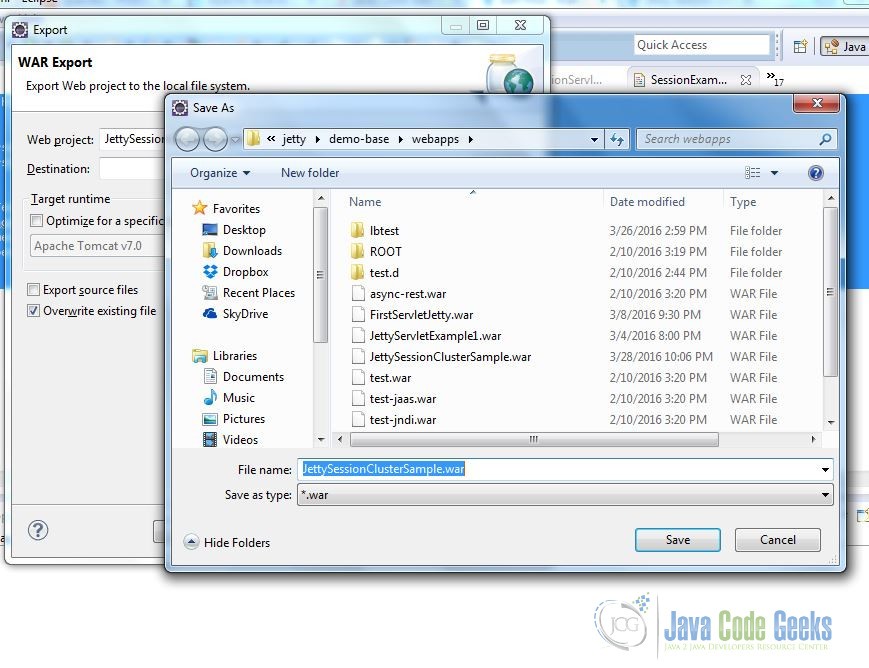
Export eclipse project as war file into $jetty.base/webapps/ directory of both instances of jetty as shown below
8. Verification
We will verify our cluster with session persistence by showing session id on the client that was connected to jetty instance in that moment with current time stamp. First stop load balancer from windows services. Stop both instances of jetty running. Now start Apache load balancer, then start both jetty instances. We will use Google Chrome and Firefox browsers to test our session persistence.
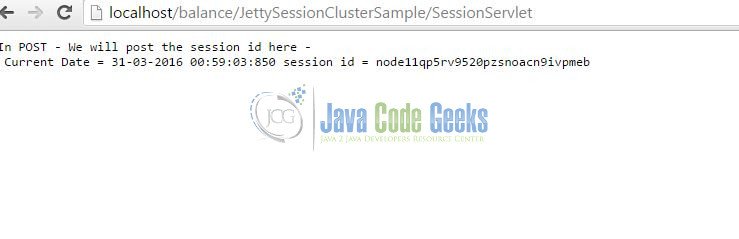
First screenshot below, shows the request sent from Chrome browser and server created the session on NODE1
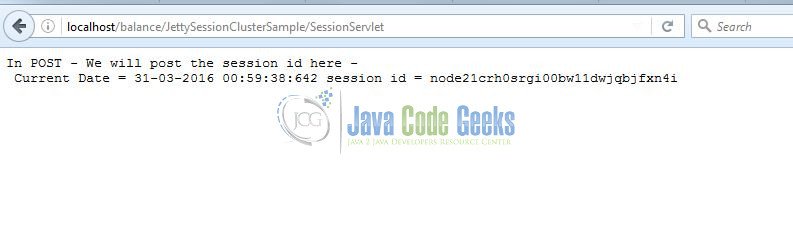
Second screenshot below, shows the request sent from Firefox browser and server created the session on NODE2:
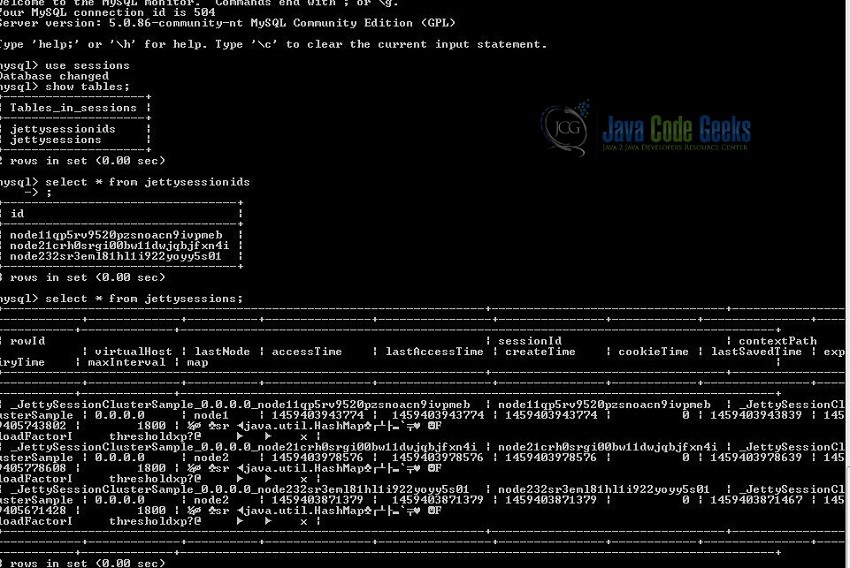
Now every subsequent request from these browsers will have the same session id till the session is scavenged. Following screenshot shows the session data stored in database during this process through JDBCSessionManager
9. Conclusion
Session Clustering is used in currently most high traffic web applications. The feature offers an easy way to scale your application. Also session clustering offers a way to handle failing server instances, in process, it provides way for high availability of the application. Following articles will help understand more about Session Clustering with respect to Jetty and other web servers.
10. Download the Source Code
This was an example about Jetty Session Clustering.
You can download the full source code and configuration files for this example here: JettySessionClusterSample
